Stamp size embroidery: Difference between revisions
m (→Links) |
|||
| (15 intermediate revisions by the same user not shown) | |||
| Line 3: | Line 3: | ||
|is_part_of_module=Computerized embroidery | |is_part_of_module=Computerized embroidery | ||
|do_not_show_sub_page=No | |do_not_show_sub_page=No | ||
|status= | |status=draft | ||
|see_also=Embroidery software, | |see_also=Embroidery software, | ||
Embroidery glossary, | Embroidery glossary, | ||
| Line 16: | Line 16: | ||
|cat_syllabus=Computerized embroidery | |cat_syllabus=Computerized embroidery | ||
}} | }} | ||
== Introduction == | == Introduction == | ||
Stamp sized embroidery to define small scale embroidery that roughly fits into a postage stamp area, i.e between 3 x 2. | Stamp sized embroidery to define small-scale embroidery that roughly fits into a postage stamp area, i.e., between 3 x 2.5 cm and a bit larger. | ||
=== embroidered Postage stamps === | === embroidered Postage stamps === | ||
[[image:swiss-st-gallen-embroidery-stamp-1.jpg|thumb|100px|First embroidered stamp]] | [[image:swiss-st-gallen-embroidery-stamp-1.jpg|thumb|100px|First embroidered stamp]] | ||
Several countries now offer embroidered stamps. The first on was created [https://www.swissinfo.ch/eng/swiss-post-introduces-first-embroidered-stamp/1533518 by the Swiss Post in 2000]. It was designed by Peter Hostettler, a textile designer from the Bischoff Textiles company in St Gallen. Austria | Several countries now offer embroidered stamps. The first on was created [https://www.swissinfo.ch/eng/swiss-post-introduces-first-embroidered-stamp/1533518 by the Swiss Post in 2000]. It was designed by Peter Hostettler, a textile designer from the Bischoff Textiles company in St Gallen. Austria published a series of flower-based designs. | ||
=== "Stamps" in machine embroidery === | === "Stamps" in machine embroidery === | ||
| Line 33: | Line 31: | ||
== Stamp Size == | == Stamp Size == | ||
Stamps come in various sizes, | Stamps come in various sizes, there is no standard size. | ||
=== Typical postage stamp sizes === | === Typical postage stamp sizes === | ||
Cheap, standard series are usually smaller than more expensive "special" editions. A typical size is 2x3cm. Several countries allow designing custom stamps. These are typically larger, e.g. 42x35cm in Austria. | Cheap, standard series are usually smaller than more expensive "special" editions. A typical size is 2x3cm. Several countries allow designing custom stamps. These are typically larger, e.g., 42x35cm in Austria. | ||
Germany: | Germany: | ||
| Line 46: | Line 44: | ||
* 42 x 35 mm (Customizable) | * 42 x 35 mm (Customizable) | ||
Stamp dimension is also defined by the | Stamp dimension is also defined by the number of teeth, typically 10 to 14 / 2 cm. According to [https://en.wikipedia.org/wiki/Postage_stamp_separation Postage stamp separation, Wikipedia], {{quotation|The standard for describing perforation is the number of holes (or the "teeth" or perfs of an individual stamp) in a 2-centimeter span. The finest gauge ever used is 18 on stamps of the Malay States in the early 1950s, and the coarsest is 2, seen on the 1891 stamps of Bhopal. Modern stamp perforations tend to range from 11 to 14. }} | ||
=== A10 | === A10 Proposal for Embroidery Projects === | ||
We decided to adopt A10 format (portrait or landscape) in order to laser cut series of patches. The [https://en.wikipedia.org/wiki/Paper_size#International_paper_sizes international A series] (Wikipedia) is defined in the [https://en.wikipedia.org/wiki/ISO_216 ISO 216] standard. According to Wikipedia, ISO paper sizes are all based on a single aspect ratio of the square root of 2, or approximately 1:1.41421, i.e. | We decided to adopt A10 format (portrait or landscape) in order to laser cut series of patches. The [https://en.wikipedia.org/wiki/Paper_size#International_paper_sizes international A series] (Wikipedia) is defined in the [https://en.wikipedia.org/wiki/ISO_216 ISO 216] standard. According to Wikipedia, ISO paper sizes are all based on a single aspect ratio of the square root of 2, or approximately 1:1.41421, i.e. | ||
| Line 55: | Line 53: | ||
This ratio has the unique property that when cut or folded in half widthways, the halves also have the same aspect ratio. Each ISO paper size is one half of the area of the next larger size in the same series. ([https://en.wikipedia.org/wiki/ISO_216 Wikipedia]). In addition to being practical (as noted by philosophers in the 18th century), the ratio is also quite pleasant to look at. | This ratio has the unique property that when cut or folded in half widthways, the halves also have the same aspect ratio. Each ISO paper size is one half of the area of the next larger size in the same series. ([https://en.wikipedia.org/wiki/ISO_216 Wikipedia]). In addition to being practical (as noted by philosophers in the 18th century), the ratio is also quite pleasant to look at. | ||
A10 is defined in landscape as 26×37 mm or 1.0 × 1.5 inches, but can be used in portrait mode of course. | A10 is defined in landscape mode as 26×37 mm or 1.0 × 1.5 inches, but can be used in portrait mode, of course. | ||
<div style="width:74mm;height:52mm;background-color:white;border: 1px solid black;> | <div style="width:74mm;height:52mm;background-color:white;border: 1px solid black;> | ||
| Line 65: | Line 63: | ||
:'''A 10 = 26×37 mm''' | :'''A 10 = 26×37 mm''' | ||
== Anatomy of a stamp sized embroidery == | == Anatomy of a stamp-sized embroidery == | ||
Small size requires some adaptation: | Small size requires some adaptation: | ||
* Since | * Since handmade designs do have an interesting look, machine embroidery could use 12 and 30 threads, mostly working with line-based patterns. | ||
* Detailed designs could be created with fine W.t. 60 thread and needles (size 60) | * Detailed designs could be created with fine W.t. 60 thread and needles (size 60) | ||
| Line 75: | Line 73: | ||
=== InkStitch Propaganda === | === InkStitch Propaganda === | ||
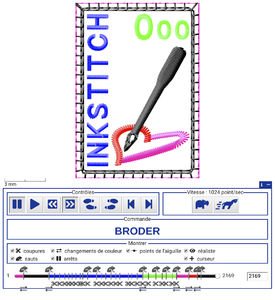
Since this | Since this type of project can be easily made with [[InkStitch]], the free embroidery program, we provide an example that features InkStitch itself. The goal was to create a stamp-sized (A10) embroidery that includes a interesting border, some lettering and some "drawings". | ||
Items and parameters for Version 2: | |||
* The positioning line is made for normal or 60 thread. | * The positioning line is made for normal or 60 thread. | ||
* | * We used a standard small satin border. Ugly in the picture, because we did not pre-cut the patch tissue. | ||
* The lettering is done with a 60 Polyester thread from Gunold and a 60 universal needle from Schmetz. Density is 6 lines/mm, i.e. 0. | * The lettering is done with a 60-Polyester thread from Gunold and a 60 universal needle from Schmetz. Density is about 6 lines/mm, i.e., 0.32 mm peak-to-peak distance in InkStitch. | ||
* The heart | * The heart was done with normal Polyester 40. | ||
* The needle | * The needle was also done with ordinary Polyester 60 thread. | ||
<gallery mode="packed" showfilename="true" heights="200px"> | <gallery mode="packed" showfilename="true" heights="200px"> | ||
| Line 89: | Line 87: | ||
</gallery> | </gallery> | ||
The result showed a somewhat weak lettering, so we added some density in the next version. The next version also test real silk and replaced the border by something that looks more stamp-like | |||
Items and parameters for Version 3: | |||
* The positioning line is made for normal or 60 thread. | * The positioning line is made for normal or 60 thread. | ||
* To simulate a rough edge, we | * To simulate a rough edge, we parameterized it with an "E" Stich using a thick thread (Decora 12 is easiest). Distance between peaks is 1.8mm | ||
* The lettering is done with a 60 Polyester thread from Gunold and a 60 universal needle from Schmetz. Density is | * The lettering is done with a 60-Polyester thread from Gunold and a 60 universal needle from Schmetz. Density is 7 (V3) lines/mm, i.e., 0.28 mm peak-to-peak distance in InkStitch | ||
* The heart is done with Kanagawa silk thread #50 (similar to Rayon 40). | * The heart is done with Kanagawa silk thread #50 (similar to Rayon 40). | ||
* The needle is done with ordinary Polyester 40 thread, but the color was a bad choice. | * The needle is done with ordinary Polyester 40 thread, but the color was a bad choice. | ||
| Line 101: | Line 101: | ||
</gallery> | </gallery> | ||
The result is fairly close to what we intended, but there was a problem in the lettering, maybe we could reduce tension a bit or reorganize spaces between letters. Choice of needle color was clearly wrong, it should have been darker. | |||
Items and parameters for Version 3: | |||
* Remade the needle. Its tip is now done with manual stitches | |||
* The borders are rung-less, i.e. both rails have an equal number of points. This allows for precision positioning. | |||
* E-stitch of the border now has a 2mm peak to peak distance. | |||
<gallery mode="packed" showfilename="true" heights="200px"> | |||
file: inkstitch-stamp-5.svg|Model version #5 ready for embroidery (click twice to download the SVG) | |||
file: inkstitch-stamp-5.png|Simulation version #5 | |||
file: inkstitch-stamp-5.jpg|Result version #5 | |||
</gallery> | |||
Lettering is still a bit of problem. Probably the font should be redesigned for very small letters and 60 w.t. thread. | |||
=== LOVE === | |||
The following patch uses a classical border (easier to do). | |||
Design: | |||
* Positioning line dimensions are 25.7 x 36.7, i.e. slightly smaller than the patch | |||
* Satin borders were defined without rungs since they inhibit precision positioning. Contour underlay with 0.3 border distance. Dimensions = 26.1 X 37.1 mm, i.e. very slightly bigger than the patch. | |||
* Density for the mouth is 0.3 peak-to-peak = 0.15 = 6.6 lines/mm, therefore quite dense. | |||
* Default density of 0.4 for the Font, but I manually simplified it, also a contour underlay with 0.3 distance from the border | |||
<gallery mode="packed" heights="300px" showfilename="true"> | |||
file: love-stamp4.svg|Postage stamp with LOVE (4th version, [[media:love-stamp4.svg|download]]) | |||
file: love-stamps.jpg|Postage stamps with LOVE (4th version is to the right) | |||
</gallery> | |||
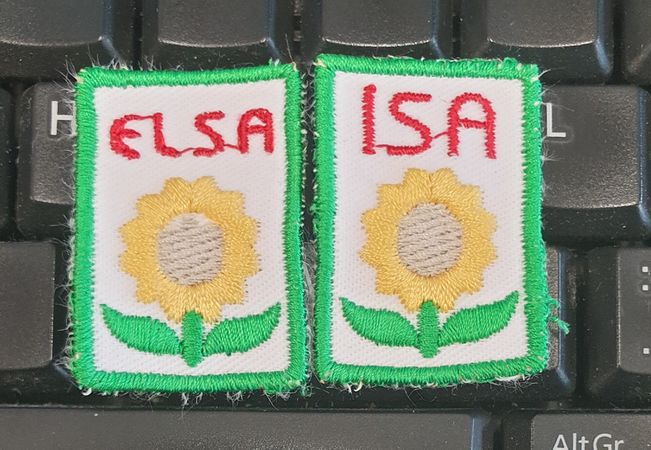
=== Sunflower === | |||
The Sunflower is stitched in different ways, e.g. with a Decora 12 thread (about 4mm diameter) and 2.5mm distance between points. | |||
<gallery mode="packed" heights="300px" showfilename="true"> | |||
file: inkstitch-sunflower-2.svg|Postage stamp Sunflower, [[media:inkstitch-sunflower-2.svg|download]]). Not yet tested ! | |||
file: sunflowers-stamps-silk.jpg | Version made with Kanagawa silk 40. | |||
</gallery> | |||
=== Tatoo like stamp === | |||
This examples is done entirely with 12 w.t. threads. | |||
Since InkStitch doesn't have any simple line font, we used a font to hearshy font transformation. This extensions can be found in the excellent [https://gitea.fablabchemnitz.de/FabLab_Chemnitz/mightyscape-1.X FabLab Cheminitz mightlyscape bundle] | |||
== Links == | == Links == | ||
=== Examples of stamp sized embroidery === | === Examples of stamp-sized embroidery === | ||
* [http://ginaferrari.blogspot.com/2013/09/stitched-miniatures.html?m=1 Stitched Miniatures] A nice series of free machines embroideries by Gina Ferrari. Made with a sewing machine I believe. (2013, consulted March 2021). Size is less than 2x2<nowiki>''</nowiki>, i.e. 5 x 5 cm. | * [http://ginaferrari.blogspot.com/2013/09/stitched-miniatures.html?m=1 Stitched Miniatures] A nice series of free machines embroideries by Gina Ferrari. Made with a sewing machine I believe. (2013, consulted March 2021). Size is less than 2x2<nowiki>''</nowiki>, i.e. 5 x 5 cm. | ||
Latest revision as of 16:47, 26 August 2021
Introduction
Stamp sized embroidery to define small-scale embroidery that roughly fits into a postage stamp area, i.e., between 3 x 2.5 cm and a bit larger.
embroidered Postage stamps

Several countries now offer embroidered stamps. The first on was created by the Swiss Post in 2000. It was designed by Peter Hostettler, a textile designer from the Bischoff Textiles company in St Gallen. Austria published a series of flower-based designs.
"Stamps" in machine embroidery
The word "stamp" is sometimes used to design patterns used in embossed tatami fills, e.g. here
Stamp Size
Stamps come in various sizes, there is no standard size.
Typical postage stamp sizes
Cheap, standard series are usually smaller than more expensive "special" editions. A typical size is 2x3cm. Several countries allow designing custom stamps. These are typically larger, e.g., 42x35cm in Austria.
Germany:
- 21 x 30 mm, 44 x 26 mm, 27 x 33 mm, 35 x 35 mm, 55 x 33 mm
- 42 x 28 mm Custom stamp
Austria:
- 42 x 35 mm (Customizable)
Stamp dimension is also defined by the number of teeth, typically 10 to 14 / 2 cm. According to Postage stamp separation, Wikipedia, “The standard for describing perforation is the number of holes (or the "teeth" or perfs of an individual stamp) in a 2-centimeter span. The finest gauge ever used is 18 on stamps of the Malay States in the early 1950s, and the coarsest is 2, seen on the 1891 stamps of Bhopal. Modern stamp perforations tend to range from 11 to 14.”
A10 Proposal for Embroidery Projects
We decided to adopt A10 format (portrait or landscape) in order to laser cut series of patches. The international A series (Wikipedia) is defined in the ISO 216 standard. According to Wikipedia, ISO paper sizes are all based on a single aspect ratio of the square root of 2, or approximately 1:1.41421, i.e.

This ratio has the unique property that when cut or folded in half widthways, the halves also have the same aspect ratio. Each ISO paper size is one half of the area of the next larger size in the same series. (Wikipedia). In addition to being practical (as noted by philosophers in the 18th century), the ratio is also quite pleasant to look at.
A10 is defined in landscape mode as 26×37 mm or 1.0 × 1.5 inches, but can be used in portrait mode, of course.
- A 10 = 26×37 mm
Anatomy of a stamp-sized embroidery
Small size requires some adaptation:
- Since handmade designs do have an interesting look, machine embroidery could use 12 and 30 threads, mostly working with line-based patterns.
- Detailed designs could be created with fine W.t. 60 thread and needles (size 60)
Examples
InkStitch Propaganda
Since this type of project can be easily made with InkStitch, the free embroidery program, we provide an example that features InkStitch itself. The goal was to create a stamp-sized (A10) embroidery that includes a interesting border, some lettering and some "drawings".
Items and parameters for Version 2:
- The positioning line is made for normal or 60 thread.
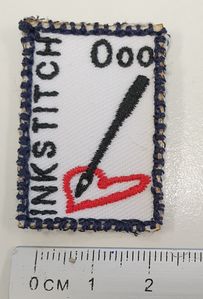
- We used a standard small satin border. Ugly in the picture, because we did not pre-cut the patch tissue.
- The lettering is done with a 60-Polyester thread from Gunold and a 60 universal needle from Schmetz. Density is about 6 lines/mm, i.e., 0.32 mm peak-to-peak distance in InkStitch.
- The heart was done with normal Polyester 40.
- The needle was also done with ordinary Polyester 60 thread.
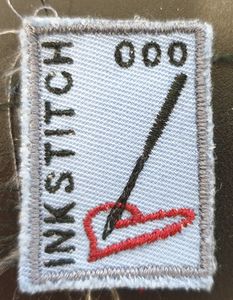
Inkstitch-stamp-2.jpg Result version #2 (stitched on approximately cut tissue)
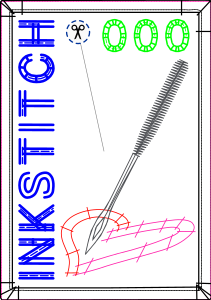
Inkstitch-stamp-2.svg Model version #2 ready for embroidery (click twice to download the SVG)


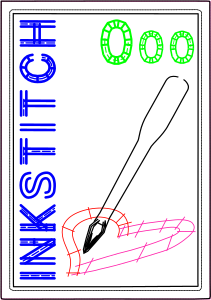
The result showed a somewhat weak lettering, so we added some density in the next version. The next version also test real silk and replaced the border by something that looks more stamp-like
Items and parameters for Version 3:
- The positioning line is made for normal or 60 thread.
- To simulate a rough edge, we parameterized it with an "E" Stich using a thick thread (Decora 12 is easiest). Distance between peaks is 1.8mm
- The lettering is done with a 60-Polyester thread from Gunold and a 60 universal needle from Schmetz. Density is 7 (V3) lines/mm, i.e., 0.28 mm peak-to-peak distance in InkStitch
- The heart is done with Kanagawa silk thread #50 (similar to Rayon 40).
- The needle is done with ordinary Polyester 40 thread, but the color was a bad choice.

Inkstitch-stamp-3.svg Model version #3 ready for embroidery (click twice to download the SVG)
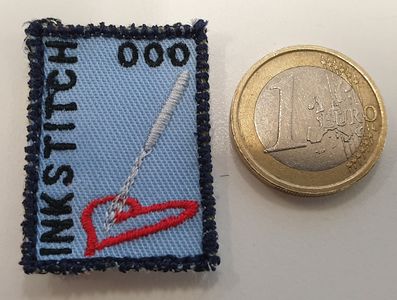
Inkstitch-stamp-3.jpg Result version #3


The result is fairly close to what we intended, but there was a problem in the lettering, maybe we could reduce tension a bit or reorganize spaces between letters. Choice of needle color was clearly wrong, it should have been darker.
Items and parameters for Version 3:
- Remade the needle. Its tip is now done with manual stitches
- The borders are rung-less, i.e. both rails have an equal number of points. This allows for precision positioning.
- E-stitch of the border now has a 2mm peak to peak distance.
Inkstitch-stamp-5.svg Model version #5 ready for embroidery (click twice to download the SVG)
Inkstitch-stamp-5.png Simulation version #5
Inkstitch-stamp-5.jpg Result version #5


Lettering is still a bit of problem. Probably the font should be redesigned for very small letters and 60 w.t. thread.
LOVE
The following patch uses a classical border (easier to do).
Design:
- Positioning line dimensions are 25.7 x 36.7, i.e. slightly smaller than the patch
- Satin borders were defined without rungs since they inhibit precision positioning. Contour underlay with 0.3 border distance. Dimensions = 26.1 X 37.1 mm, i.e. very slightly bigger than the patch.
- Density for the mouth is 0.3 peak-to-peak = 0.15 = 6.6 lines/mm, therefore quite dense.
- Default density of 0.4 for the Font, but I manually simplified it, also a contour underlay with 0.3 distance from the border

Love-stamp4.svg Postage stamp with LOVE (4th version, download)
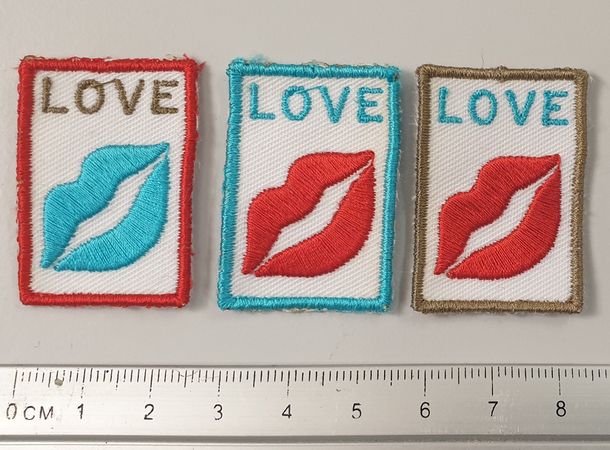
Love-stamps.jpg Postage stamps with LOVE (4th version is to the right)


Sunflower
The Sunflower is stitched in different ways, e.g. with a Decora 12 thread (about 4mm diameter) and 2.5mm distance between points.
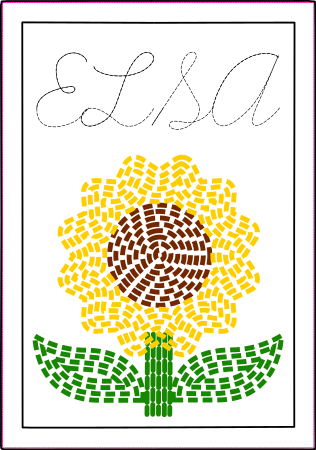
Inkstitch-sunflower-2.svg Postage stamp Sunflower, download). Not yet tested !
Sunflowers-stamps-silk.jpg Version made with Kanagawa silk 40.


Tatoo like stamp
This examples is done entirely with 12 w.t. threads.
Since InkStitch doesn't have any simple line font, we used a font to hearshy font transformation. This extensions can be found in the excellent FabLab Cheminitz mightlyscape bundle
Links
Examples of stamp-sized embroidery
- Stitched Miniatures A nice series of free machines embroideries by Gina Ferrari. Made with a sewing machine I believe. (2013, consulted March 2021). Size is less than 2x2'', i.e. 5 x 5 cm.
- Textile brooches made by Colette Copeland (consulted March 2021)
- Embroidered Valentine Heart Love Stamp. Feltie, Iron-On, Sew-On Patch. Custom Size Available. (Amazon)
- Some vendors sell replications of stamps, e.g. Sweden Stamp Embroidery Design
Examples of embroidered postage stamps
- The St. Gallen Embroidery, A Revolutionary Swiss Stamp, blog post by Victor Manta.
- Austrian Petit Point stamp
- Austrain Gentian stamp
- Lichtenstein stamp with recycled PES yarn
- Vatican 90 years embroidery
Examples of embroidered stamps
The word "stamp" does not only design postage stamps (printed) but also inked stamps, and these also can be embroidered ....
- NORTH POLE MAIL STAMPS Machine Embroidery Design. Examples offered by an online embroidery shop.