Tatami embroidery fill patterns
Introduction
Tatami fill patterns are a major type of stitch types (the others are lines, satin stitches and programmed stitches).
Each software manufacturer its own way of defining these. Generally speaking, semi-professional software includes a few dozen fill patterns. These can not be edited. However, there exist some ways to modify a pattern, i.e. to make it smoother/rougher, to add irregularity or emboss/stamp a pattern on top. Stitch Era is to our knowledge the only semi-professional program that does allow pattern editing.
Professional software may or may not have a larger choice of fill patters and allows creating new patterns, or modifying existing patterns.
Typology of tatami fill patterns
Tatami fill patterns define an area where the threads are stitched in lines (in parallel to each other). The position of stitch points in a set of lines allow creating different types of patterns.
Most software seems to distinguish between two types of patterns plus extra effects.
- A definition of one line, plus how it is repeated ("math patterns in Embroidery Office). A variant is the offset definition for a pair of lines (tatami offsets A and B in Embroidery Studio).
- Definition of several lines that have different offsets ("manual patterns" in Embroidery office). A variant are partition lines with 8 fixed slots in Embroidery Studio.
These fill pattern types can have either a regular or irregular look, depending on offsets that are used.
Main extra effects are:
- Embossed "textures" on top of the other two.
- Irregularity on top (hand stitch effect)
Below are some more examples of various fill patterns found in Embroidery office, some are embossed.
-
 "Math" patterns (repetitions of one line) in Embroidery office
 -
 Manual patterns (defined by several lines, on top) and combined patterns (bottom) in Embroidery Office
 -
 Manual patterns sideways
 -
 Several types of EO patterns


Simple line additive offset patterns
The most simple way of defining a pattern is the following
- Define a number of lines that define a pattern. Each "line" will contain just one stitch point between position 0% and 100%
- Define an offset percentage for the next line, e.g. 25%
- Define whether the line can be repeated
- The offset will be continuously applied. If the offset percentages add up to 100% we will get a vertical alignement.
A variant of this mechanism can be found in Embroidery Studio. It allows defining two offsets: one for the line
Notice that the first and the last pattern in a row is different, i.e. it must adapt to the border and the fact that stitching will turn 180 degrees. But let us leave this problems to software developers. In the principle, a designer should not have to define what happens at start and end of lines.
One could have defined Hatch fill patterns #1 and #16 with that logic. But Hatch 3 patterns have been defined with an A Offset = 0 and B Offset = 0.25 (see below)
- Simple Tatatmi patterns from Hatch 3
-
 Hatch 3 tatami fill pattern #1 (default, 4 repeated lines with 25% offset)
 -
 Hatch 3 tatami fill pattern #1 (default)
 -
 Hatch 3 tatami fill pattern #16 (4 x 2 repeated lines with 25% offset or A=0 and B=25%)
 -
 Hatch 3 tatami fill pattern #16 (zoom)
 -
 Hatch 3 tatami fill pattern #16


Complex line offset patterns
Both Embroidery Office and Embroidery Studio allow the user to define offset for points in one direction (Offset pa) and the reverse direction (Offset pB ?). Embroidery office also allows defining stitch offset (what happens to the next stitch on the line?) and line offset. We do not understand what these parameters actually do and there is no documentation for that. If you play with all sliders you will get nice irregular patterns :)
Patterns defined with a number of lines that start with and offset
We found this functionality both in DG 15 and Embroidery office and the basic principle is simple.
A pattern is defined by
- a number of lines
- each of these lines has an starting offset defined
For example, the basic Hatch #1 fill pattern could have been defined in the following way:
- Length = 4mm
- Lines = 4
- Line 1 offset = 0%
- Line 2 offset = 25%
- Line 3 offset = 50%
- Line 4 offset = 75%
The following screenshot show both stitch points and a simulation of this design.

More examples are shown in the section on EO Manual patterns below
Embroidery Office, in addition allows a stitch offset, a line offset and a tilt and we do not exactly understand what they do. These three extra features allow creating highly complex regular or irregular patterns.
DG 15 (Tajima)
DG 15 distinguishes between standard (regular) fill pattern, complex patterns, carved fill patterns
DG 15 standard patterns
According to chapter 11 of the DG 15 User's guide [1], a user can modify or create patterns using the standard patterns dialog. Standard patterns are defined by lines that have the same distance between stitches but are offset. The following can be defined
- Length of stitches (points), i.e. total length of a repeatable pattern line, e.g. 40
- Number of offsets (i.e. lines that will be stitched before the pattern repeats, typically 4 for simple design and over 10 for complex designs)
- For each offset, a percentage between 0 and 100 that defines the offset can be defined. Alternatively the patterns are displayed with lines and beads representing stitches. The lines with beads then can be moved up and down.

Carved fills are created with complex fill segments on top of which carved fill patterns are applied (chapter 11, page 221). Carved fill patterns can also be used with true type fonts.
Chroma "luxe"
The "pro" edition of the Chroma software uses a very similar, but simpler model. The user can:
- Define a number of lines (with an "add" button)
- Enter for each line a number that adds an offset.
Unfortunately our trial version did expire. See this (too short) Pattern Creator (Luxe YouTube Video which does not explain much.
Wilcom Embroidery Studio
Wilcom's flaship Embroidery Studio 2026 (formerly Embroidery Studio 4.x) product allows customization of tatami fills that go beyond typical end-user features such as stitch length and density. According to the online manuals[2] (PDF, p.471), section on patternd fills, there are several tools for creating patterns:
- Apply tatami A/B offset fractions
- Use partition lines and optional angles
- Use Program Split or Flexi Split to create decorative fills from predefined patterns or from scratch
- Use the Carving Stamp feature to define patterns using a ‘carving stamp’ as a template. Use it also to create your own split lines when you want to add detail to filled objects.
Creating textures with tatami A/B offsets
Embroidery Studio 2026 and prior versions allow defining a tatami pattern with two offsets that start from the same side, but 2 types of rows can be defined: A for forward rows and B for backward rows. This simple mechanism allows defining a fairly large range of patterns, e.g. most patterns available in Hatch 3 are made with this mechanism.
Combination of these two settings allow defining for example:
- Even smooth stitching: Both fields are set to 0.25
- Strong horizontal lines: Both fields are set to either 0 or 1
- Light horizontal lines: Both fields are set to 0.5
- To achieve diagonal lines: Set both fields to any other value than 0, 0.5 or 1. If the sum of A+B is < 0.8 the slope will tend go down, if A+B > .80 the slope will tend go up.
Additional effects such irregularity ou curving can be applied. Length is also an important factor.
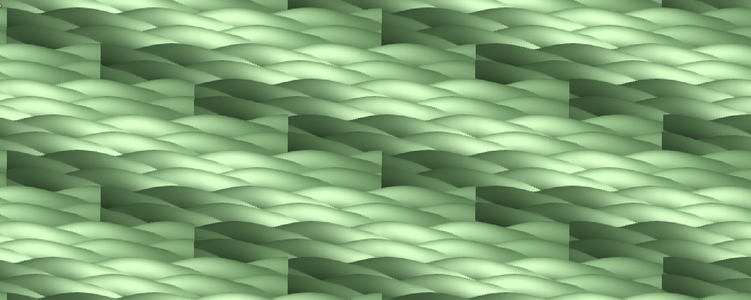
The following picture shows a few combinations of : stitch length, A fraction (in percentage), B fraction, and randomness (in percentage). For example the first square has a stitch length of 4mm, A offset=0.21 and B Offset=0.15. Item one in the third row is the default Hatch pattern with offsets=0.25. Rectangles of the last column ads randomness, most to the standard 25% offset pattern.

Partition line patterns
Partition line patterns are one of the two mechanisms to define standard non-embossed tatamis. A pattern is defined for up to 8 lines and an offset for each of these lines. They select, for each tatami line, a start phase on a fixed stitch-length lattice.
- For each line of the pattern, the stitch length is divided into 8 discrete phase slots (or knots, indexed 0–7).
- Each tatami line snaps its start to one of these slots.
- The partition pattern defines which slot each successive line uses. On can define up to 8 lines.
- When the end of the sequence is reached, it repeats. So, the offset are not additive like the A/B offsets introduced above.
Given a stitch length L:
- Slot size = L / 8
- Slots are fixed positions along the stitch direction (always the same direction, e.g. left to right)
- Tatami rows can only start on these positions
Example for stitch lengths of 3.2 and 4.0 mm:
| Slot | Position (mm, 3.2) | Position (mm, 4.0) | Position (% of stitch length) |
|---|---|---|---|
| 0 | 0.0 | 0.0 | 0% |
| 1 | 0.4 | 0.5 | 12.5% |
| 2 | 0.8 | 1.0 | 25% |
| 3 | 1.2 | 1.5 | 37.5% |
| 4 | 1.6 | 2.0 | 50% |
| 5 | 2.0 | 2.5 | 62.5% |
| 6 | 2.4 | 3.0 | 75% |
| 7 | 2.8 | 3.5 | 87.5% |
Below are a few examples that define typical patterns with partition line angle set to 90 (default)
| Drift patterns (monotonic phase progression) |
Block patterns (explicit phase holding) |
Zigzag / waveform patterns (phase ramp up and down) |
|---|---|---|
| 0123 | 00004444 (Hatch 3 pattern #32) | 01233210 (Hatch 3 pattern #27) |
| 01234567 | 00112233 | 23477432 (Hatch 3 pattern #55) |
Partition line angles
The partition line angle defines the orientation of the phase lattice relative to the tatami rows.
- The default is 90°, i.e. no angle : the lattice perpendicular to rows (the default, most revealing configuration since you one can see offsets to the left.)
- Small angles (≈7–15°) : lattice sheared, phase columns smeared
Changing the angle does not change the phase logic. It only changes how phase artifacts are projected spatially.
Lattice rotation does not fix quantization, but it redistributes quantization error spatially so that:
- Vertical rails are broken
- Errors appear as texture rather than bands
This is analogous to rotating a halftone screen in printing. These are pure partition-line constructs.
If a partition pattern uses only a small number of phase slots, tatami rows repeatedly reuse the same stitch-start columns. At 90°, this produces vertical banding.
Example:
- Pattern 0044
- Uses only slots 0 and 4
- Result: two vertical stitch corridors with no alternation
Periodicity matters
Even when two patterns generate the same infinite sequence, their declared cycle length affects visual repetition.
Example:
- 0246 → period of 4 lines
- 02460246 → period of 8 lines
Longer periods reduce visual resonance and appear smoother, even if the values repeat.
Relation to Offset A/B
Partition lines quantize offsets to multiples of 1/8 of the stitch length. An offset can be represented exactly only if offset × 8 = integer.
Examples:
- 0.125 → 1/8 → slot 1 ✓
- 0.25 → 2/8 → slot 2 ✓
- 0.375 → 3/8 → slot 3 ✓
- 0.5 → 4/8 → slot 4 ✓
- 0.33 → 2.66 ✗
- 0.15 → 1.2 ✗
Non-representable offsets require dithering and inevitably introduce visible structure.
Partition lines can reproduce offset patterns well when:
- Offsets are exact multiples of 1/8
- The offset behavior reduces to a line-wise or line-pair-wise phase sequence
Examples:
- A = 0.25, B = 0.25 → 02460246
- A = 0.5, B = 0 (row pairs) → 00440044
- A = 0.25, B = 0.5 → 02604624
Partition lines cannot reproduce offsets faithfully when:
- Any offset is not divisible by 1/8 (e.g. 0.15, 0.33)
- A ≠ B and directional behavior is essential
Example:
- A = 0.5, B = 0.15
Only visual approximation is possible, typically using:
- Shorter stitch lengths
- Longer phase sequences
- Lattice rotation (angle ≈7–11°)
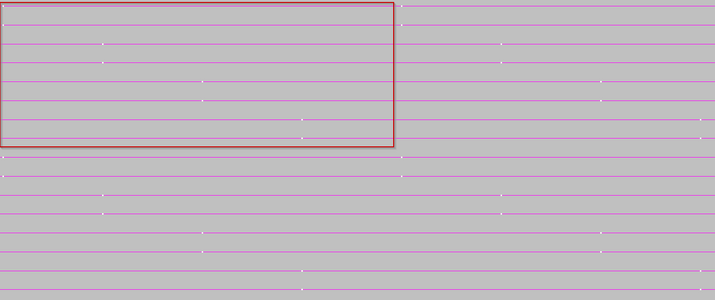
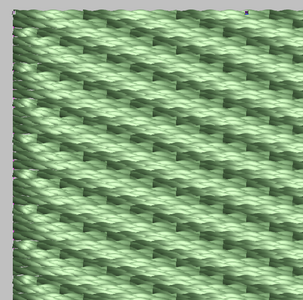
The image below shows some Offset A/B patterns in the left two columns and partition line patterns in the two right columns. As one can see, some offset patterns can be expressed as partition line patterns, some can be expressed approximately and some cannot (e.g. the two at the bottom that have zigzag or checker patterns).

A/B mechanism vs partition lines
| Offset A/B | Partition Lines |
|---|---|
| Continuous (not snapped to an 8-slot lattice) | Discrete (8-slot lattice) |
| Direction-dependent (forward vs backward stitch passes), applied per row pair | Applied strictly per tatami line |
| Preserves stitch pairing | No stitch-pair awareness |
| Typical visual result | Typical visual result |
| Smooth, even fills; subtle diagonals; progressive texture | Structured textures; blocks, checker patterns, zigzags; visible rhythm |
| Use Offset A/B when: | Use Partition Lines when: |
| Smoothness is required | Explicit structure or blocks are desired |
| Offsets are not multiples of 1/8 | Offsets are lattice-aligned |
| Directional behavior is important | The goal is texture rather than evenness |
Backstitches
- The backstitch definition will alter a partition line pattern. It will not do that for offset patterns. It controls how the engine connects the end of one tatami row to the start of the next row. Partition lines choose where a row starts, but backstitching determines how the row is reached. Think of it like this:
- Partition line = which door you must enter
- Backstitch = the corridor you take to reach the door
- Use the standard backstitch to get predictable results. The engine finishes the row, inserts a short reversing stitch (mostly along the stitch direction), then jumps to the next row start. Partition lines will look crisp.
- Diagonal backstitch breaks a pattern
- Borderline may have some kind of "rounding" effect (softened edges)
Summary
Partition line patterns are a phase-quantized, non-directional lattice mechanism. Partition lines are better understood as a phase selection mechanism, not a continuous offset. Once this is understood, all observed behaviors — banding, blocks, zigzags, and limitations — follow logically and somewhat predictably.
For a Tatami fill, the engine knows:
- stitch direction vector S (e.g. left to right)
- row direction vector R (e.g. down)
- stitch length L. The stitch length can greatly affect some patterns.
- row spacing d
- partition line pattern (up to 8 lines with 1/8th fractions that can be defined)
- backstitch definition
Creating embossed textures with program splits
According to the online manual, "Program Split is a decorative fill stitch where needle penetrations form a tiled pattern. Select a predefined pattern or create your own."
Using program splits has a similar logic as embossed fill patterns of Hatch 3, but there are more options described in the section "program split settings". Simple use goes as follows:
- One can add a "program split" on top of a tatami fill, as well as other fill types.
- Width and height can be set
- Angle can be set
- This can be combined with a curved fill effect.
More advanced options allow selecting the stitch type used (satin or tatami), to rotate angles, or to create an entire new arrangement of elements.
Creating patterns with flexi splits
The manual defines flexi split as "a decorative effect where one or more lines of a program split pattern are used in the object fill. It is both a patterned and curved fill".
Creating patterns with carving stamps
This feature is available in Hatch 3 and described below.
Wilcom Hatch 3
Hatch 3 includes a subset of the functionality of E4.5 and its add-ons. It does not include proper pattern editing. However, a number of "modifiers" allow adding variety to fill patterns. Hatch 3 patterns can be examined with Embroidery Studio. One can see that most patterns are defined as A/B offset patterns, some with randomness. Only 17 patterns are defined with partition lines.

Possible modifications in Hatch:
- Carving stamps allow to create embossed tatami fills (in french: Estampille de motif)
- Hand Stitch option allows adding irregularity to any fill.
- Stitch length allows smoothing
Carving stamps
According to Hatch Embroidery 3 Online Help [3] the Carving Stamp feature allows defining a pattern of needle penetrations using a ‘carving stamp’ as a template.
- A carving stamp can be any vector or embroidery shape.
- Carving stamps can also be defined with so-called custom splits, see E4.5 (above) for a more sophisticated version
- It is possible to use a digitized shape or an imported vector graphics from the sequence or else create a temporary stamp. Stamps can be saved to a library.
- Stamps can be edited (e.g. scaled, rotated, transformed, moved) in Reshape mode

You can create stamps from imported vector graphics as shown in the next screenshot. We imported an SVG pacman file into CorelDraw and then switched to Embroidery. Next we could select its three elements and create a stamp with a new category of carving patterns.

Embossed fill patterns
Built-in embossed fill patterns may be parameterized in many ways. The tool will not allow modifying "standard" tatami fills nor creating new ones (but see "carving stamps" above).
To use an embossed fill patterns:
- Select a normal tatami fill first. We suggest to start with a simple one, e.g. #1
- In the effects tab, select an emboss pattern under "elastic embossed fill" at the bottom of the page.
- Parameterize if needed.

The screenshot above shows three variants of the Ziggy2 parameters. Most changes you can make create some kind of random ugly pattern (like the one top). Therefore it is important to understand what these parameters can do, e.g. read the Embossed fill settings section of the official manual.
- Firstly, we suggest selecting "multiple rows". This will repeat the pattern in several rows (as normally indended). If you choose the scaling option, patterns will shrink on start and end of direction line (e.g. top and bottom).
- Width and height will adjust the size of the pattern. You then can adjust indentation, i.e. the start position. So, an indent equal to width will not change.
- However, if you change height and/or width, then you also should adapt spacing. The most simple operation is to make the pattern fit. E.g. if you set height to 8, most often row spacing should also be 8 and if you set width to 4 then column spacing should be 4. But you can change any value you like ....

Embroidery Office 23
Embroidery office (EO), as well as the semi-professional Stitch Era product line, distinguishes between four types of tatami fills. According to the manual [4] the amount of patterns does not depend on the software line (Stitch Era vs Embroidery Office) and the respective software levels. However, we found more patterns in our version than advertised.
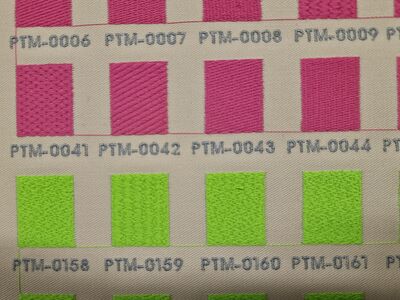
The following picture that you can enlarge shows some types and examples of fill patterns that are available among the hundreds that you can find in Embroidery Office or Stitch Era

Tatami fill patters of Embroidery Office (EO)
- Manual Patterns (~140 variants in EO, level D80) = defined by several lines with a different offset for each.
- Math (uniform) Patterns (~ 210 variants for D80) = defined by a line that is repeated with various offsets and a tilt
- Creative (graphic) Patterns ( ~151 variants) = defined with a kind of pixel editor.
- Combined Patterns (~120 in EO, level D80) = another pattern with a mask on top
- Masks (to be used with the others)
Fills can be created in EO software levels D60 (or better) and Stitch Era (SE Artist) levels. Alternatively for lower levels, the pattern builder module can be purchased.
The editors are available through (Menu Embroidery -> System libraries -> Embroidery Components -> Patterns).
EO Manual patterns
Manual patterns in Embroidery Office 23 are defined by the following elements:
- Number of lines that define the pattern (4 by default)
- Length of the stitches (4mm by default)
- An offset for each line of the pattern
- A stitch offset (0 by default)
- A line offset (0 by default)
- A pattern tilt (0 by default)
Let us look a slightly "rough" pattern fill that we defined ourselves
- It has 8 lines (the maximum possible)
- Stitch length is 4mm
- Line starts and ends go "forth and back"
- We did not add any additional stitch and line offsets that would create a totally irregular design.

Let us look at fairly irregular system pattern with some sort of rough "patches". This effect is achieved by changing stitch and line offset. Unfortunately the documentation does not explain what these exactly do.

The screenshot below shows the same pattern, but with stitch offset and line offset removed. As a result, the pattern becomes a regular one.

There is no export or import facility, but we believe that files can be copied manually between machines that have the same software installed (to be verified)
- from C:\ProgramData\Sierra\Design\Resources
- e.g. "C:\ProgramData\Sierra\Design\Resources\PTH-DKS-001.manpat"
EO Math patterns
Math patterns follow a similar logic as manual patterns, except that their definition is based on one line. EO (level D80) contains 211 variants.
The following parameters can be set:
- Stitch length (by default 4mm)
- Repetitions of the same lines (by default 1)
- Offset pA is the offset of the stitch to the right in percentage. E.g. a pA = 25 will create 4 offsets: line 1 = none, line 2 = 125%, line 3= 150%, line 4 = 175%. Line 5 (>100%) starts at line 1 horizontal position.
- Offset pB is the offset of the stich from right to left
- Invert will invert the position of the line with respect to the origin (?)
- Stitch offset (by default = 0) will allow irregular patterns
- Line offset (by default = 0) will allow irregular patterns
- Tilt of pattern

Let us look at four more examples:
A standard smooth tatami (PTM-0001, first pattern in the list) has the following properties:
- 3.2mm stitch length
- Offset pA = 25
- Default values for the rest.
An irregular pattern, e.g. PTM-0164 has the following parameters:
- Length = 3.6
- Repeat 0 (same as 1)
- Offset pA = 54
- Offset pB = 62
- Invert = 50
- Stitch offset = 51
- Line offset = 0
- Tilt = 0
By repeating lines like PTM 0179 one can achieve a "brick-like" effect
- length = 5.2
- Repeat = 10
- Offset pA = 50
PTM 0014 defines a wave pattern like this:
- length = 3.6
- repeat = 1
- Offset pA = 5
- Offset pB = 15
- Invert = 20

EO Creative patterns
The creative editor allows you to draw a foreground with a pixel editor that will be highlighted. Alternatively or in combination, one can import an image with *.bmp type, a format defined pixel by pixel. We suggest to keep it small, e.g. do not 1cm x 1cm. That's 100 x 100 pixels to manipulate. We use the following steps
- Get an icon with lines from the Noun project in SVG format
- Open in InkScape, resize the picture to 100mm max, then adjust the document size to the image, unless you really want margins for one or another reason.
- Export as PNG, in the right solution, e.g. 100x100px
- Import to GIMP
- Export as BMP
- Create a new Creative pattern in EO
- Adjust size to the size of the BMP (or a bit bigger), then import. So we repeat: in order to use a bitmap fully as pattern, firstly determine the precise size of the file, then define the height of the creative pattern canevas with the same dimension. You can keep the width or make it a bit larger.
- You can shift the pattern (0 to 100%).

It seems to us that you have to be careful to fill the canvas from top to bottom at least in one place in order to ensure that there are at least some dots (stitches) in the lines.
A first attempt was made some time ago and it was bad. Large surfaces do not seem to translate well !
Below is a second attempt for Pacman-like pattern, we will use "lines" as opposed to fills.
(to document some ....)

We do not yet understand how to create patterns that look good. Some more exploration and testing is required ....
Ink/Stitch
InkStitch for the moment includes:
- Carving patterns (as in Hatch 3 or Embird)
- Change stitch length and repetition of tatami fills

The simulation shows a rather satisfying result

References and links
- ↑ Pulse (2014), Using Tajima DG15 by Pulse. Retrieved from https://help.hsi.us/hc/en-us/articles/231740607-DG15-User-s-Guide-and-Release-Notes
- ↑ Wilcom (EmbroideryStudio e4 | Online Help), retrieved January 2026 from https://docs.wilcom.com/embroiderystudio/27/en/index.htm#t=OnlineHelp%2FDecorative%2Fpatterns%2Fpatterns-2.htm&rhsearch=tatami&rhsyns=%20 and June 2023 from https://legacy.wilcom.com/Help/e4/es/en/index.htm#t=MainHelp%2FPART_Help%2FPART_Help.htm
- ↑ Wilcom (2023), Hatch Embroidery 3 Online Help. Retrieved June 2023 from https://hatch.embroideryhelp.net/v3/en/index.htm
- ↑ Sierra (2023). Embroidery office manual, online, https://www.sierra-software.com/Downloads/Manuals/EO23/index.html