Doblo factory: Difference between revisions
m (→Download) |
|||
| (154 intermediate revisions by the same user not shown) | |||
| Line 1: | Line 1: | ||
{{ | {{Incomplete}} | ||
<!-- <pageby nominor="false" comments="false"/> --> | |||
== Introduction == | |||
'''Doblo Factory''' is the name of a set of [[OpenScad beginners tutorial|OpenScad]] modules to generate Lego and Duplo-compatible structures and bricks. An [[Doblo factory version 1|inititial]] version was written by Daniel K. Schneider in 2010. Daniel Taub created a nicely refactored version in 2012. This new version documented here also included several interesting additions made by D. Taub, such as various connectors. Doblo factory allows creating various pieces that are somewhat compatible with Lego® and Duplo® blocks. However, the pieces and structures one can generate are '''neither Lego® nor Duplo®''' bricks or composites. They look different and also have some different structural properties. | |||
'''Important update:''' As of september 2015, the V2.x version of this library is '''functional''' and compatible with current OpenSCAD implementations. '''Height parameters''' are different because it turned out that we needed to divide a full block by 6 (as opposed to 4). Also, there are additional parameters, in particular the scale parameter that allows having both Lego and Duplo sizes in one model. | |||
A new major update will be released around christmas 2021. It will include a [[lego-compatible marble run|marble run]]. | |||
== | === Purpose and applications === | ||
'''Doblo | '''Doblo factory''' includes both modules for generating "standard" bricks and modules for creating larger structures. Since OpenScad allows to "union" bricks, it is fairly easy to stack up bricks made from parametric OpenScad modules in order to create larger "playmobile-like" structures. | ||
Doblo factory modules use a grid-based positioning system. The library can be used by non-programmers to create complex Lego-like structures just by making function calls with the right position and size parameters. However, users are expected to be familiar with using a formal language (e.g. HTML or SPSS or a simple scripting language). So far, we created the following modules. | |||
* [[Modular castle kit - Lego compatible]] | |||
* | * [[Lego-compatible thesis project board]] | ||
* [[Lego-compatible icon kit]] | |||
* [[Lego-compatible marble run]] | |||
=== Download === | |||
Either | |||
* http://tecfa.unige.ch/guides/3dprinting/doblo-factory/ | |||
** Version 2.1 (or maybe better) is required for use with Castle kit 2.0 which is also included in the archive. | |||
** Version 2.3 (or better) is required for marble run kit (late 2018 or early 2019). | |||
** '''Version 3'''. Will be available before Xmas 2021. | |||
or | |||
* https://github.com/dmtaub/DobloFactory (owned by Daniel Taub, '''no longer maintained as of dec. 2018''') | |||
Check my [https://www.thingiverse.com/danielkschneider/designs thingiverse] page. It should include most designs using this library. | |||
== Concepts == | == Concepts == | ||
=== | ==== About Lego and Duplo dimensions ==== | ||
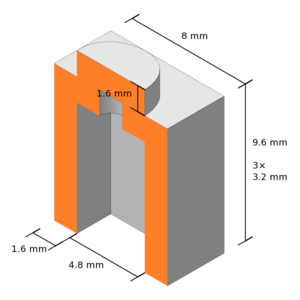
According to the german-speaking [http://www.1000steine.de/1000steine/forum2/mix_entry.php?id=191442 1000steine.de forum] , retrieved 13:12, 15 April 2010 (UTC), the approximate dimensions of a Lego brick are the following. Duplo bricks are double in each dimension (i.e. 8 times the volume) and Quatro are double of Duplo. However, there are important differences between Quatro, Duplo and Lego bricks. In the code, we deal with this by using conditionals when defining parameters. | |||
[[image:approximate-lego-dimensions.png|thumb|300px|none|Approximate Lego dimensions according to Paddie]] | |||
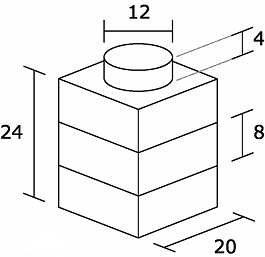
Another theory from the same forum thread claims that Lego have been designed in terms of special Lego units, i.e 1/64 inches. | |||
[[image:approximate-lego-dimensions-lego-units.jpg|frame|none|Approximate Lego dimensions according to Chris]] | |||
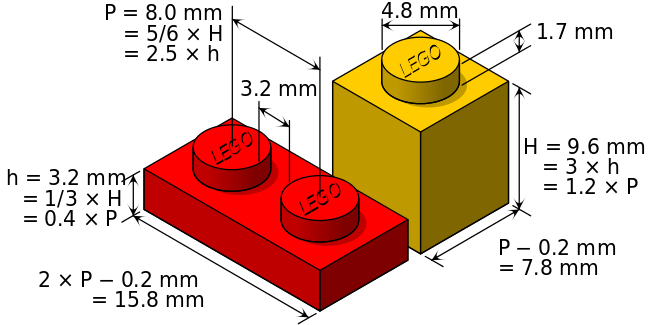
Wikipedia also includes a diagram with dimensions | |||
'''Height of a standard brick''' is defined as '''6 units. '''E.g. a height of 5 for a Lego brick would mean 5/ | [[image:lego-dimensions.svg|650px|thumb|none|"Lego dimensions" by Cmglee - Own work. Licensed under CC BY-SA 3.0 via Commons]] | ||
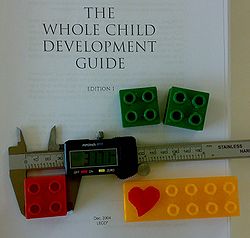
[[image:digital-calliper-duplos.jpg|thumb|250px|right|Digital Calliper]] | |||
Finally, I suggest to buy a digital caliper (about 17 Euros) and measure both original bricks and your own bricks. | |||
; Typical Duplo vs. Lego heights | |||
(1) Most Duplo pieces are either "normal" (19.2mm) or half height (9.6mm) | |||
* In our unit system: FULL or HALF, that is 6 or 3 units. In terms of mm's this translates to 6*3.2mm and 3*3.2mm | |||
(2) Most Lego pieces are either "normal" (9.6mm) or third height (3.2mm). | |||
* In our unit system: FULL or THIRD, that is 6 or 2 units. In terms of physical size, this would translate to 6*1.6mm = 9.6mm and 2*1.6mm = 3.2mm | |||
; Length/Width | |||
A 1x1 piece is 16mm for duplo-compatibles and 8mm for Lego compatibles. However, we suggest "shaving off" 0.2 to 0.4mm from the outer walls for better printed results (see the SHAVE parameter). | |||
Any 3D printer should be able to print DUPLO and Lego compatibles. You need to be able to print with 0.25mm layers (or better). | |||
=== Basic '''Units of the Doblo system''' === | |||
Doblo factory uses a simple unit and position system that allows thinking in high-level units, as opposed to fractions of millimeters. Lego measures are quite complex and sometimes controversial as you could see from reading information on various fan sites. | |||
Doblo factory has been tested quite extensively with Duplo and Lego sizes. You even can combine the two systems to create a single brick. Mini (nano size) and Cadro size has not been really tested. While the outside sizes of various systems are always 2 times smaller or bigger, this is not the case for walls, nibbles, cylinders, etc. | |||
==== Lugo, Doblo, Cadro, Mini ==== | |||
* '''Cadro''' are the biggest units and compatible with LEGO Quatro (TM). Compatible Cadro may need support for printing (but we do without). | |||
* '''Doblo''' bricks are compatible with LEGO Duplo (TM). Duplo are half as wide, long and high as Quatro, i.e. en 8th of the volume | |||
* '''Lugo''' bricks are compatible with LEGO (TM). Lego are half as wide, long and high as Duplo, i.e. en 8th of the volume or a 64th of a Cadro | |||
* '''Mini''' are an 8th of Legos (TM), i.e. the same size as Nanoblocks, but Lego compatible | |||
==== Height units of bricks that are compatible with the LEGO system ==== | |||
'''Height of a standard brick''' is defined as '''6 units.''' E.g., a height of 5 for a Lego brick would mean 5/6th of a standard brick. Common heights are also defined by''' the parameters FULL, HALF and THIRD.''' | |||
* FULL = 6 units | * FULL = 6 units | ||
* HALF = 3 units | * HALF = 3 units | ||
* THIRD = 2 units | * THIRD = 2 units | ||
The unit size in mm depends on the brick system | The unit size in mm depends on the brick system | ||
* Cadro (Quatro compatible) = 6.4mm | * Cadro (Quatro compatible) = '''6.4mm''' | ||
* Doblo (Duplo compatible) = 3.2mm | * Doblo (Duplo compatible) = '''3.2mm'''. Doblos can be devided in '''halfs'''. | ||
* Lugo (Lego compatible) = 1.6mm | * Lugo (Lego compatible) = '''1.6mm'''. Lugos can be divided in '''thirds'''. | ||
* Mini ( | * Mini (Nanoblock size, but not compatible) = 0.8mm | ||
For example, a standard Lego brick has a height of 6 units * 1.6mm = 9.6mm | |||
[[image:quatro-duplo-lego-comparison.jpg|thumb|none|600px|Quatro™, Duplo™, Lego™, side by side]] | |||
{| class="wikitable" | |||
|+ | |||
Heights of various blocks | |||
! | |||
!Cadro | |||
!Doblo | |||
!Lugo | |||
!Mini | |||
|- | |||
!compatibility | |||
!Quatro'''™''' | |||
!Duplo'''™''' | |||
!Lego'''™''' | |||
!Nanoblock'''™''' | |||
|- | |||
|FULL | |||
|38.4mm | |||
|19.2mm | |||
|9.6mm | |||
|? | |||
|- | |||
|HALF | |||
| 19.2 | |||
|9.6 | |||
| - | |||
| | |||
|- | |||
|THIRD | |||
| - | |||
| - | |||
|3.2 | |||
| | |||
|- | |||
|FORTH | |||
|9.6 | |||
| - | |||
| - | |||
| | |||
|- | |||
|Unit (1/6 == 2/12) | |||
used in some applications | |||
|(6.4) | |||
|3.2 | |||
|1.6 | |||
| | |||
|} | |||
For example, a standard Lego brick has a height of 6 units * 1.6mm = 9.6mm. A standard Duplo brick has a height of 6 * 3.2 = 19.2mm. A half duplo brick has a height of 9.6mm. A third Lego brick a height of 3.2mm. The following picture shows left to right (x axis) the FULL, HALF, THIRD and FORTH height of the various brick types. B | |||
[[File:doblo-height-conventions.png|600px|thumbnail|none|Doblo factory height conventions. Back to front: Doblo, Lego, Mini. Left to right: FULL, HALF, THIRD ([[media:doblo-height-comparison.stl|visualize]]) ]] | |||
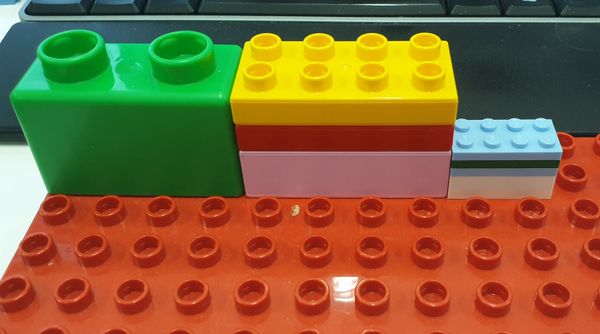
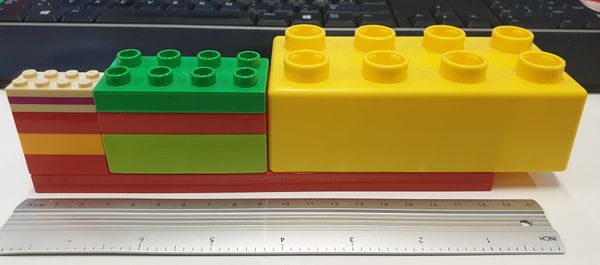
Remember that in principle, Doblo and Cadro don't have thirds and Lugo do not have halfs. Back to front (y axis) shows the brick types: Cadro, Doblo, Lego, Mini. Doblo can be stacked on Cadro, Lego on Doblo, and Mini on Lego (unless you decide to print with LATTICE TYPE = 3. In the latter case, To stack a smaller piece on a larger one, you must use a LEGO compatible in between, for example, a Lugo on top of a Lego on top of a Duplo. | |||
[[File: | [[File:Quatro-duplo-lego-comparison-2.jpg|600px|thumbnail|none|1 Quatro full height = 2 Duplo full or 4 Duplo Half = 4 Lego Full or 12 Lego Third]] | ||
[[Media:2x2xFULL_duplo_lego.stl|frame|none|STL model Standard 2x2xFULL Duplo and Lego compatible Doblo and Lugo blocks]] (click to visualize) | |||
==== Width and length units ==== | ==== Width and length units ==== | ||
Units for columns, rows, with and length are standardized with respect to the smallest Lugo/Doblo size, i.e. a brick that has on nibble on top. | |||
* DOBLO compatible with DUPLO base width/length = 16mm, e.g. the smallest 1x1 brick = 16mm * 16mm | |||
* LUGO, compatible with LEGO base width = 8mm, e.g. the smallest 1x1 brick = 8mm * 8 mm | |||
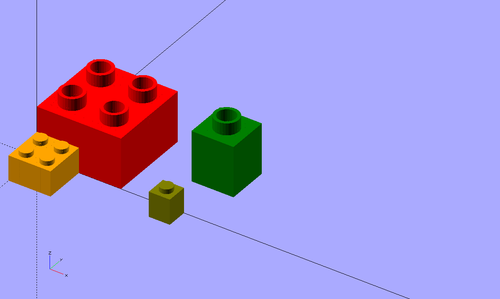
The following picture shows in the back row a 2x2 Duplo (red), a 1x1 Duplo (green), and in the front row a 2x2 Lego (orange) and an olive 1x1 Lego. The 1x1 bricks represent a unit. Positioning uses units with respect to the brick type. | |||
For example, as we shall explain again in more detail, a standard small Lego brick is defined as "2x2xFULL" = 2x2x6 = 16mm x 16mm x 9.6mm | [[File:Doblo-width-length.png|thumb|none|500px|Unit sizes in mm for width, length, row (y) and col (x) are not the same, e.g. 8mm for Lego and 16mm for Duplo]] | ||
For example, as we shall explain again in more detail, a standard small ''squared'' Lego brick is defined as "2x2xFULL" = 2x2x6 = 16mm x 16mm x 9.6mm | |||
==== Rotation ==== | ==== Rotation ==== | ||
| Line 80: | Line 174: | ||
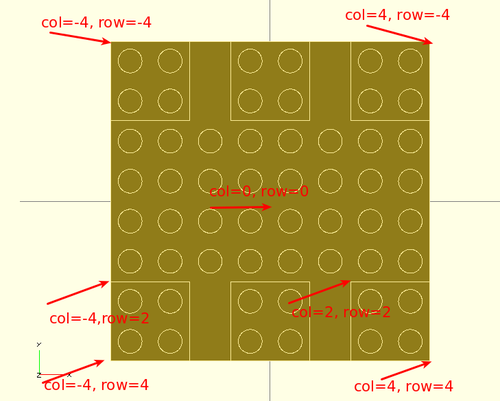
[[image:doblo-pos-width-length.png|thumb|500px|none|Coordinate system and brick x/y size units]] | [[image:doblo-pos-width-length.png|thumb|500px|none|Coordinate system and brick x/y size units]] | ||
You are free to use rational numbers for "in-between positioning", e.g. when assembling more complex structures. | |||
''' Parameter names used in the source code''' | ''' Parameter names used in the source code''' | ||
| Line 94: | Line 190: | ||
* nibbles_on_off: true = nibbles on top, false = no nibbles | * nibbles_on_off: true = nibbles on top, false = no nibbles | ||
'''Parameters to identify the Duplo/Lego scale''' | '''Parameters to identify the Duplo/Lego scale''' | ||
Each function that defines a brick has a scale parameter that you can use to render it in either Doblo, Lugo or mini size. | Each function that defines a brick in the doblo system has a <code>scale</code> parameter that you can use to render it in either Cadro, Doblo, Lugo or mini size. | ||
* DOBLO = 1; // Duplo size | * CADRO == 2; // Quatro size | ||
* LUGO = 0.5; // Lego size | * DOBLO == 1; // Duplo size | ||
* MINI = 0.25; // Nano size | * LUGO == 0.5; // Lego size | ||
* MINI == 0.25; // Nano size | |||
Alternatively, you could set the SCALE parameter in the beginning of your file, e.g. SCALE = 0.5 but passing parameters is preferable since it allows for better tracing. | |||
This section introduced some basic terminology and measures for Lego'''®''' pieces. Here is the executive summary. | |||
* Lugo refers to Lego'''™'''-compatibles, Doblo'''™''' refers to Duplo-compatibles, Cadro to Quatro'''™''' compatibles. Compatibility of printed doblo blocks depends on the quality of parameter settings, slicing settings, your 3D printer plus the use or not of the lattice option. | |||
* There is a positioning grid and it uses the smallest part width as unit, i.e. the size of a 1x1 Lego or Duplo unit. | |||
* Height of a typical brick was divided in 6 units. FULL=6, HALF=3 and THIRD=2. | |||
== Calibration of parameters (FIX this with a good table )== | |||
==== Doblo factory parameters ==== | ==== Doblo factory parameters ==== | ||
| Line 139: | Line 217: | ||
Parameters were by default set for a Felix V2 printer, i.e. typical mid-range PLA printer. Printing with "normal" slicers profiles should work fairly well, although you may add an extra shell to the first layer and and extra full layer for the bridges (roofs). | Parameters were by default set for a Felix V2 printer, i.e. typical mid-range PLA printer. Printing with "normal" slicers profiles should work fairly well, although you may add an extra shell to the first layer and and extra full layer for the bridges (roofs). | ||
* Layer thickness (mm): Between 0.2 and 0.25 for | * Layer thickness (mm): Between 0.2 and 0.25 for Lego compatibles. Between 0.2 and 0.7 for Doblos and Cadros. | ||
* Fit with real | * Fit with real Lego and Duplo can be rather tight (as least with our printer/slicer combination). After printing - while still warm - you can press the brick onto a real brick to make some adjustment. You also could heat a brick with heat gun, e.g. to 60 - 90 degrees before doing so. However, printing calibration bricks until you get it right is the better option. | ||
* Adjust wall with, insets and nibble outer radius, if needed. | * Adjust wall with, insets and nibble outer radius, if needed. | ||
Parameters | Parameters can and sometimes must be set '''wrong''' in order to compensate for the characteristics of the printer and the print parameters. '''If you do precision printing''', e.g. with a 0.1 mm layer you may go closer to the real DUPLO/Lego values. | ||
All units are mm. | All units are mm. | ||
| Line 153: | Line 231: | ||
: DUPLO compatible bricks: use SCALE = 1 | : DUPLO compatible bricks: use SCALE = 1 | ||
: Lego compatible bricks: Use SCALE = 0.5 | : Lego compatible bricks: Use SCALE = 0.5 | ||
: The table below defines some important parameters. Notice that we use functions, allowing us to compute other sizes than the non-standard ones, e.g. minis that are just half olf Lego size. | |||
{| class="wikitable" | |||
|+Most important doblo parameters and parameter functions (Cadro are approximate so far) | |||
!name | |||
!description | |||
!Definition | |||
!lugo size | |||
!doblo size | |||
!cadro size | |||
|- | |||
|<code>SCALE</code> | |||
| | |||
| | |||
|LUGO==0.5 | |||
|DOBLO==1 | |||
|CADRO==2 | |||
|- | |||
|<code>LEGO_SCALE (SCALE)</code> | |||
| | |||
|<code>2*SCALE</code> | |||
|0.5 | |||
|1 | |||
|2 | |||
|- | |||
|<code>PART_WIDTH (SCALE)</code> | |||
| | |||
|<code>16.0*SCALE</code> | |||
|8mm | |||
|16mm | |||
|32mm | |||
|- | |||
|<code>PART_HEIGHT (SCALE)</code> | |||
| | |||
|<code>3.2 * LEGO_SCALE (SCALE)</code> | |||
|1.6mm | |||
|3.2mm | |||
|6.4mm | |||
|- | |||
| | |||
| | |||
| | |||
| | |||
| | |||
| | |||
|- | |||
|<code>NO (SCALE)</code> | |||
|Top nibble offset from border | |||
|<code>PART_WIDTH (SCALE) / 2.0</code> | |||
|4mm | |||
|8mm | |||
|16mm | |||
|- | |||
|<code>NBO (SCALE)</code> | |||
|Bottom offset from border (if 2 lines of nibbles on top, there is one bottom nibble line) | |||
|<code>PART_WIDTH (SCALE)</code> | |||
|8mm | |||
|16mm | |||
|32mm | |||
|- | |||
|<code>NH (SCALE)</code> | |||
|Top nibble height is not linear. | |||
|<code>(SCALE < 0.6) ? 1.9 * LEGO_SCALE(SCALE) : (SCALE == 1) ? 4.55 : 7;</code> | |||
|1.9 | |||
|4.55 | |||
|7 | |||
|- | |||
|<code>NB_RADIUS(SCALE)</code> | |||
|Top nibble (outer) radius, not linear. | |||
|<code>(SCALE < 0.6) ? (4.9 / 2 * LEGO_SCALE(SCALE)) : (9.6/2.0 * SCALE)</code> | |||
|4.9/2=2.45 | |||
|9.6/2.0=4.8 | |||
|18/2=9 | |||
|- | |||
|<code>NB_RADIUS_INSIDE (SCALE)</code> | |||
|Top nibble inner radius, not linear | |||
|<code>(SCALE < 0.6) ? 4.9/2*LEGO_SCALE(SCALE) : 10.8/2*SCALE;</code> | |||
|none | |||
|6.44/2 | |||
|13.48/2 | |||
|- | |||
|<code>NB_THICKNESS (SCALE)</code> | |||
|In principle, outer - inner radius | |||
|<code>NB_RADIUS (SCALE) - NB_RADIUS_INSIDE SCALE)</code> | |||
| | |||
| | |||
| | |||
|- | |||
| | |||
| | |||
| | |||
| | |||
| | |||
| | |||
|- | |||
| <code>NB_BOTTOM_RADIUS (SCALE)</code> | |||
|Bottom nibble radius | |||
|<code>(SCALE < 0.6) ? 6.2/2*LEGO_SCALE(SCALE) : 13.4/2*DOBLO</code> | |||
|6.2/2=3.1 | |||
|13.4/2=6.7 | |||
|same as duplo | |||
|- | |||
|<code>NB_BOTTOM_RADIUS_INSIDE (SCALE)</code> | |||
|Bottom nibble inside radius | |||
|<code>(SCALE < 0.6) ? 4.9/2*LEGO_SCALE(SCALE) : 10.8/2*DOBLO;</code> | |||
|4.9/2 = 2.45 | |||
|10.8/2 = 5.4 | |||
|same as duplo | |||
|- | |||
|<code>DOBLOWALL(SCALE)</code> | |||
|thickness of walls | |||
|<code>(SCALE < 0.6) ? 1.4 * LEGO_SCALE(SCALE): 1.55 *SCALE;</code> | |||
|1.2 | |||
|1.55 | |||
|maybe a bit smaller than duplo (to do) | |||
|- | |||
|LATTICE_TYPE | |||
|Type of lattice | |||
|1 == normal, 2== additional, 3== all the way down for better stability but no compatibility between lugo, doblo, cadro. | |||
| | |||
| | |||
| | |||
|- | |||
|INSET_WIDTH(SCALE) | |||
|Inset width (underneath) | |||
|<code>(SCALE < 0.6) ? 0.4 *LEGO_SCALE(SCALE) : (SCALE==1) ? 1.50 : 1.50</code> | |||
| | |||
| | |||
| | |||
|- | |||
|INSET_LENGTH(SCALE) | |||
|Inset length | |||
|<code>(SCALE < 0.6) ? 3*DOBLOWALL(SCALE) : (SCALE==1) ? 4*DOBLOWALL(SCALE) : 6*DOBLOWALL(SCALE);</code> | |||
|3.6 | |||
| | |||
|much longer than Lego or Duplo (to do) | |||
|- | |||
|LATTICE_WIDTH | |||
|Lego (TM) do not need these | |||
|1.50 * SCALE | |||
|.75 | |||
|1.5 | |||
|3 | |||
|} | |||
Below we show the settings part of the <code>doblo-params.scad</code> file in Doblo Factory, version 2.1 | Below we show the settings part of the <code>doblo-params.scad</code> file in Doblo Factory, version 2.1 | ||
<source lang="javascript"> | <source lang="javascript"> | ||
| Line 245: | Line 465: | ||
=== Getting started === | === Getting started === | ||
Getting started - e.g. producing a canonical 4x2 Lego brick - is simple | Getting started - e.g. producing a canonical 4x2 Lego brick - is simple | ||
* Create a Scad file that includes the doblo-factory library and a parameter file | * Create a Scad file that includes the doblo-factory library and a parameter file | ||
* Call the doblo | * Call the doblo module with some parameters. | ||
'''Creation of simple Lego brick using a list of parameters''' | |||
<source lang="JavaScript"> | |||
SCALE =0.5; | |||
LATTICE_TYPE = 1; | |||
include <doblo-factory.scad>; | include <doblo-factory.scad>; | ||
include <lib/doblo-params- | include <lib/doblo-params.scad>; | ||
// column line z-pos width length height nibbles diamonds, size | |||
doblo (0, 0, 0, 4, 2, FULL, true, false, LUGO); | |||
</source> | |||
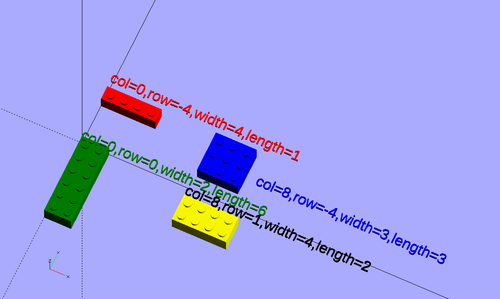
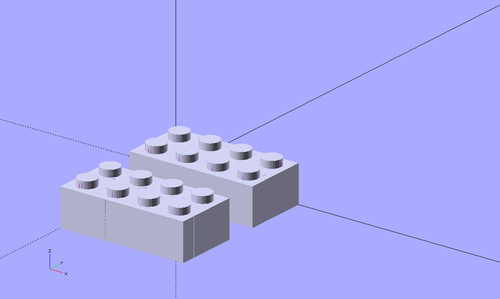
This will create a brick that looks like this and that is positioned at x,y,z origin. As you can see in the code, we added a line with comments so that we could remember what each parameter represents. | |||
Alternatively - and we recomment this - you can use a more verbose syntax that uses parameter names in the module call. '''Warning''': you cannot use both positions and verbose syntax in one module call (except for the last element). | |||
The following code will produce two identical Lego compatible bricks. We use both '''short''' and '''long notation (named parameters)'''. | |||
<source lang="JavaScript"> | |||
SCALE =0.5; | |||
LATTICE_TYPE = 1; | |||
include <doblo-factory.scad>; | |||
include <lib/doblo-params.scad>; | |||
//doblo (0, 0, 0, 2, 2, FULL, true, false, DOBLO); | |||
//doblo (0, 0, 0, 2, 2, FULL, true, false, LUGO); | |||
// col row up width length height | |||
doblo (0, 0, 0, 4, 2, FULL, true, false, LUGO); | |||
doblo (col=0, row=4, up=0, | |||
width=4, length=2, height=FULL, | |||
nibbles_on_off=true, diamonds_on_off=false, | |||
scale=LUGO); | |||
</source> | |||
[[File:doblo-module1.png|thumb|none|500px|Creating simple Lego bricks with the doblo module. Two ways to call a module]] | |||
'''Using the library and the parameter file, file locations''' | |||
Most example code should work (copy/paste the code). However, you have to make sure that the file paths are right. | |||
E.g. if your scad file sits in the top-level directory, use | |||
include <doblo-factory.scad>; | |||
include <lib/doblo-params.scad>; | |||
If it stits in a subdirectory, use | |||
include <../doblo-factory.scad>; | |||
include <../lib/doblo-params.scad>; | |||
etc. | |||
=== A simple example === | |||
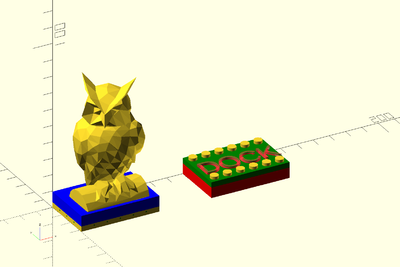
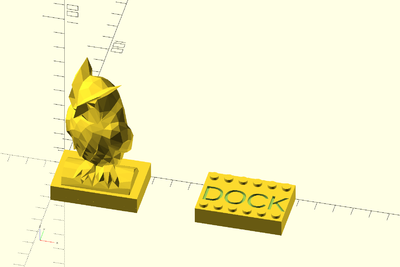
This example should sit in the root directory with filename = ''basic-example.scad''. | |||
<source lang="javascript"> | <source lang="javascript"> | ||
/* | |||
Doblo library usage example. For more information, please read: | |||
https://edutechwiki.unige.ch/en/Doblo_factory#Using_openscad_doblo_modules | |||
This is an example on how to use this library. It will create two simple objects. | |||
- A: A lego brick with a block on top followed by an imported STL | |||
- B: A lego brick with some nibbles and some 3D text on top | |||
V1. Daniel.Schneider@unige.ch, April 2018 | |||
The owl was taken from https://www.thingiverse.com/thing:647060. I was made by Sailor96. | |||
Low Poly Owl by Sailor96 is licensed under the Creative Commons - Attribution - Share Alike license. | |||
(http://creativecommons.org/licenses/by-sa/3.0/) | |||
*/ | |||
// Include the library plus default parameters | |||
include <doblo-factory.scad>; | |||
include <lib/doblo-params.scad>; | |||
/* Object A has three parts: | |||
- a brick of size 6x4, 1/3rd height, no nibbles on top | |||
- a block on top 2/3 height | |||
- an imported owl on top (from the stls directory) | |||
*/ | |||
// ------ Create a 6x4 brick in position 0,0 | |||
doblo (col=0, | |||
row=0, | |||
up=0, | |||
width=6, | |||
length=4, | |||
height=THIRD, | |||
nibbles_on_off=false); | |||
// put a block on top | |||
color("blue") block (col=0, row=0, up=THIRD, width=6, length=4, height=4); | |||
// Add the owl | |||
merge_stl (file="stls/Owl_LowPoly.stl", col=2, row=1.2, up=4, stl_z_offset_mm=0, shrink=2); | |||
// ------- Create a brick in position 10,0 | |||
color ("red") doblo (col=10, | |||
row=0, | |||
up=0, | |||
width=6, | |||
length=4, | |||
height=2*THIRD, | |||
nibbles_on_off=false); | |||
difference () { | |||
// put a block on top | |||
color("green") block (col=10, row=0, up=2*THIRD, width=6, length=4, height=THIRD); | |||
// ---- subtract some text | |||
# color ("black") write (text="DOCK", col=10.1, row=1.5, up=5, size=12, height=3); | |||
} | |||
// --- add some nibbles | |||
nibbles (col=10, row=0, up=FULL, width=6, length=1); | |||
nibbles (col=10, row=3, up=FULL, width=6, length=1); | |||
</source> | </source> | ||
[[ | {| | ||
|[[File:Doblo-factory-v2-simple-example.png|400px|thumb|none|screen copy]] | |||
|[[File:Doblo-factory-v2-simple-example2.png|400px|thumb|none|screen copy]] | |||
|} | |||
=== Overview of doblo modules === | |||
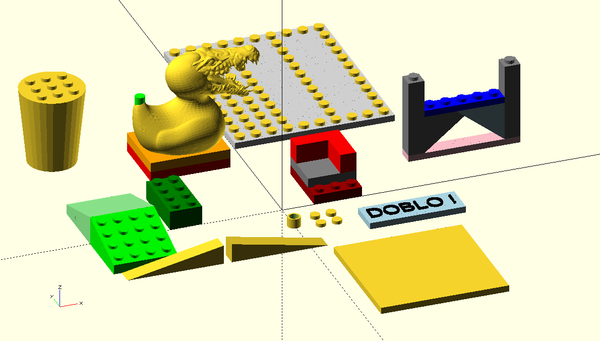
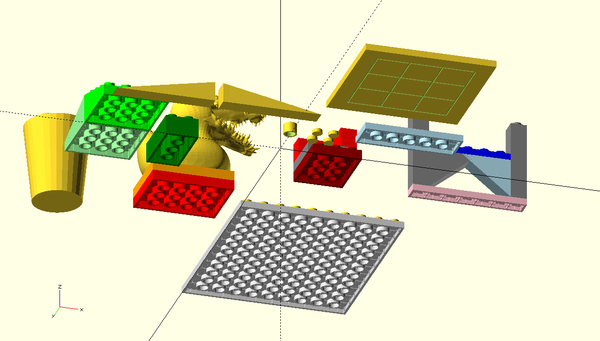
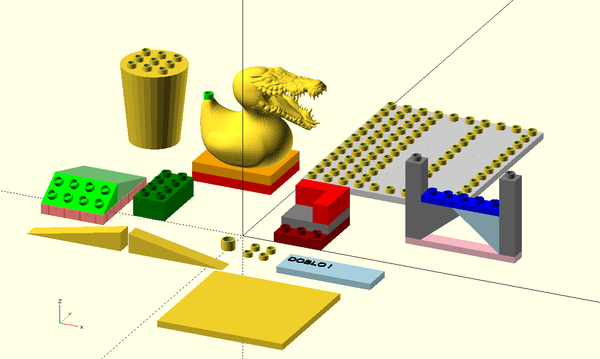
==== doblo brick | The following picture of Doblo Factory V2 shows most types of bricks that you could generate (and combine). | ||
[[image:doblo-factory-v2-exhibit1.png|thumb|600px|none|Doblo factory V2 OpenScad lego-compatible module bricks - top]] | |||
[[image:doblo-factory-v2-exhibit2.png|thumb|600px|none|Doblo factory V2 OpenScad lego-compatible module bricks - bottom]] | |||
[[image:doblo-factory-v2-exhibit-duplo1.png|thumb|600px|none|Doblo factory V2 OpenScad Duplo-compatible module bricks - top]] | |||
# Doblo brick: An x/y/z size of Lego/Duplo compatible brick. With or without nibbles on top | |||
# Base plate: Like block, but a different bottom for easier printing | |||
# Merge STL files | |||
# Block: Like duplos, but a flat bottom. Allows to assemble playmobile-like structures | |||
# Nibbles: To stick on top of plates, blocks, animals | |||
# Support triangles. To build housing and other structures | |||
# Ramp: to build housing and other structures | |||
# Cylinder. An alternative to block when building structures | |||
# [ New elements !! ] | |||
== List of doblo modules == | |||
Below, we shall attempt to document each type of brick. The documentation is not complete yet, look at the source code please - [[User:Daniel K. Schneider|Daniel K. Schneider]] ([[User talk:Daniel K. Schneider|talk]]) 17:25, 28 September 2015 (CEST) | |||
=== doblo brick === | |||
Creates a typical duplo-compatible brick. Typical use is to create a Doblo base on which you then can add other structures. You also can pile up (union) these bricks, but that may lead to a waste of processing time and plastic. Doblo bricks are just like Duplo bricks, however you can make the nibbles on top optional. | Creates a typical duplo-compatible brick. Typical use is to create a Doblo base on which you then can add other structures. You also can pile up (union) these bricks, but that may lead to a waste of processing time and plastic. Doblo bricks are just like Duplo bricks, however you can make the nibbles on top optional. | ||
; Syntax | ; Short Syntax | ||
: doblo (col, row, up, width,length,height,nibbles_on_off) | <source lang="JavaScript"> | ||
doblo (col, row, up, width, length, height, nibbles_on_off, holes_on_off, system) | |||
col = number, the x position of the brick | |||
row = number, the y position of the brick | |||
width = number, the size in x axis. 2 refers to brick size of 2 | |||
length = number (y axis). 4 referes to brick size of 4 | |||
height = either a number for the sixth of a standard brick height or THIRD, HALF, FULL | |||
nibbles_on_off = wether you want nibbles or not, i.e. true or false | |||
system = either LUGO or DOBLO | |||
</source> | |||
; Named parameters syntax with default parameter values | |||
<source lang="JavaScript"> | |||
doblo (col=0, | |||
row=4, | |||
up=0, | |||
width=4, | |||
length=2, | |||
height=FULL, | |||
nibbles_on_off=true, | |||
diamonds_on_off=false, | |||
scale=LUGO. | |||
orientation=0; | |||
lattice_type=LATTICE_TYPE | |||
); | |||
</source> | |||
Orientation is not useful in a normal context, because changing height, with, col, row does the same, but it can be useful in composite object. lattice_type allows overriding a global constant. By default it should be set to 1. | |||
'''Example''' | |||
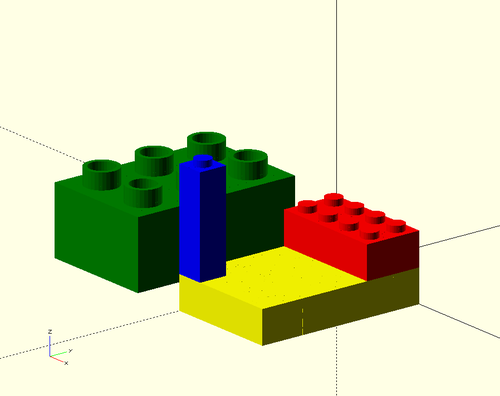
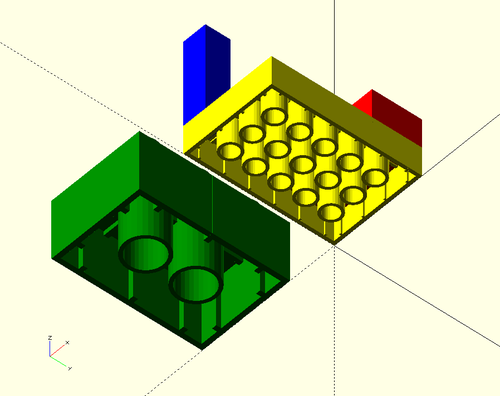
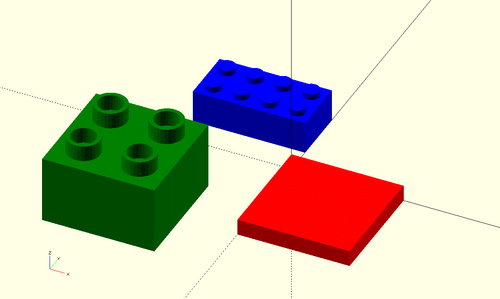
The following picture shows four bricks: | |||
* Yellow: A larger yellow Lego-compatible brick (4x6x6 or 4x6xFULL size) without nibbles | |||
* Red: A standard 2x2xFULL sized Lego-compatible brick | |||
* Blue: A 1x1x18 = 1x1x 3*FULL Lego-compatible brick | |||
* Green: A 2x3xFULL Duplo-compatible block | |||
[[File:doblo-bricks1.png|thumbnail|500px|none|A set of doblo bricks (top front view)]] | |||
The code (including an extra "color("....") statements goes like this: | |||
<source lang="JavaScript"> | |||
include <doblo-factory.scad>; | |||
include <lib/doblo-params.scad>; | |||
color ("yellow") doblo (col=0, row=0, up=0, | |||
width=4, length=6, height=FULL, | |||
nibbles_on_off=false, | |||
diamonds_on_off=false, | |||
scale=LUGO); | |||
color ("red") doblo (col=0, row=0, up=FULL, | |||
width=4, length=2, height=FULL, | |||
nibbles_on_off=true, | |||
diamonds_on_off=false, | |||
scale=LUGO); | |||
color ("blue") doblo (col=0, row=5, up=FULL, | |||
width=1, length=1, height=3*FULL, | |||
nibbles_on_off=true, | |||
diamonds_on_off=false, | |||
scale=LUGO); | |||
color ("green") doblo (col=-3, row=0, up=0, | |||
width=2, length=3, height=FULL, | |||
nibbles_on_off=true, | |||
diamonds_on_off=false, | |||
scale=DOBLO); | |||
</source> | |||
[[File:doblo-bricks2.png|thumbnail|500px|none|A set of doblo bricks (bottom front view)]] | |||
=== Base plate === | |||
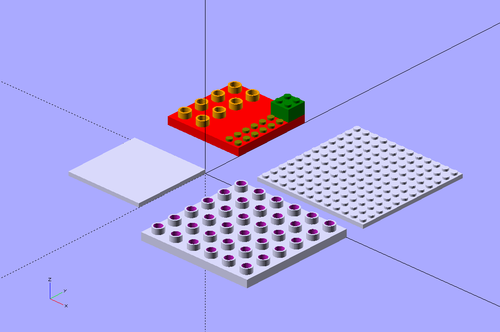
This is an easy to print non-stackable base plate. In order to prevent warping on the print bed, it has smaller squares underneath if you print them in exactly the same heights as below (there is a bug as of sept. 2015). Up should be always 0. You also can "glue" other elements on top in order to create play-mobile like structures. In that case you also should nibbles in certain areas as shown in the following example: | |||
;Short Syntax | |||
: <code>base_plate (col, row, up, width, length, height, nibbles_on_off, scale) </code> | |||
; Long Syntax | |||
: <code>module base_plate (col=0, row=0, up=0, width=8,length=8,height=THIRD,nibbles_on_off, scale=LUGO) </code> | |||
; | '''Example that shows how to add a few nibbles on top:''' | ||
<source lang="JavaScript"> | |||
include <doblo-factory.scad>; | |||
base_plate (4, -14, 0, 12,12,2,true, LUGO); | |||
base_plate (2, 0, 0, 6, 6, 2,true, DOBLO); | |||
base_plate(col=-8); | |||
==== | // A stack of doblos/lugos just for the fun of it. | ||
// Note how DOBLOs and LUGOs have a different coordinate system | |||
color ("red") base_plate (-4, -6, 0, 4, 4, 2, false, DOBLO); | |||
color ("orange") nibbles (col=-4, row=-6, up=2, width=2, length=4, scale=DOBLO); | |||
color ("green") doblo (-2, -12, 4, 2, 2, 6, true, false, LUGO); | |||
color ("olive") nibbles (col=-2, row=-10, up=4, width=2, length=6, scale=LUGO); | |||
</source> | |||
As this example shows, it could be useful to add a bit of color in front of some bricks. This way you can identify them. | |||
Below is the picture: | |||
[[file:doblo-base-plates.png|thumb|none|500px|4 differenty base plates]] | |||
: | |||
=== Merge STL files=== | |||
Positions an stl file, you may have to find out by trial and error what z offset to use. Tip: embed the STL into a doblo or a block. | Positions an stl file, you may have to find out by trial and error what z offset to use. Tip: embed the STL into a doblo or a block. | ||
;Syntax | ;Syntax | ||
: merge_stl (file, col, row, stl_z_offset_mm) | : <code>merge_stl (file, col, row, up, stl_z_offset_mm, shrink, scale)</code> | ||
Notice: For height, you only need the up parameter, e.g. <code>up=3.2</code>, but if you prefer to think in mm's use <code>stl_z_offset_mm</code> | |||
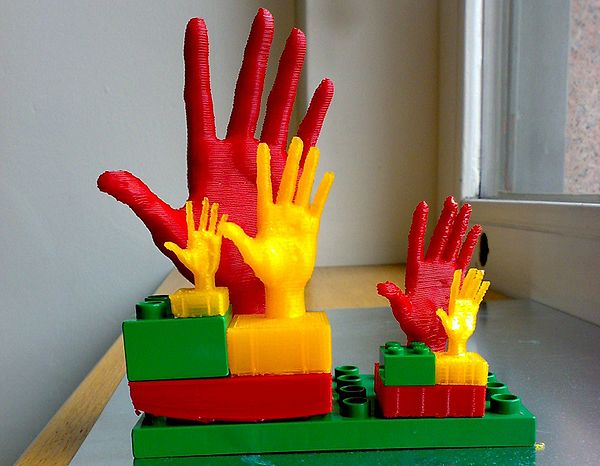
[[image:3-duplo-hands_display_medium.jpg|thumb|400px|none|Code available at [http://www.thingiverse.com/thing:2608 thingiverse] ]] | [[image:3-duplo-hands_display_medium.jpg|thumb|400px|none|Code available at [http://www.thingiverse.com/thing:2608 thingiverse] ]] | ||
==== Block | '''Example''': | ||
merge_stl ("../stls/duckator-reduced.stl", col=-3.4, row=-9, up=FULL); | |||
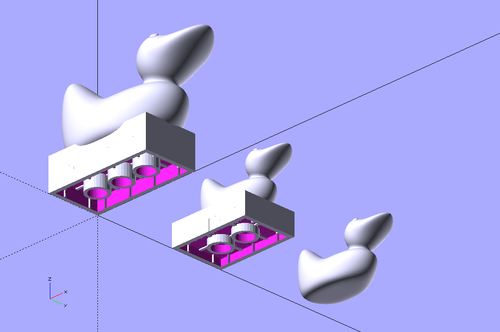
If you plan to create blocks with some animal on top, also consider using the little stl-merge-display extension like this: | |||
<source lang="javascript"> | |||
include <doblo-factory.scad>; | |||
include <lib/doblo-params.scad>; | |||
include <ext/stl-merge-display.scad>; | |||
// One in front | |||
merge_brick(stl_file="stls/duck.stl"); | |||
// A second one in the back | |||
translate([0,40,0]) | |||
merge_brick (doblo_width=3, doblo_length=2, doblo_height=2, doblo_nibbles=false, | |||
stl_file="stls/duck.stl", stl_lift=-1, stl_shrink=1.66, | |||
STL_col=1, STL_row=0, | |||
block_height=2, block_width=3, block_length=2); | |||
// A simple merge without brick and block using the doblo-factory module | |||
translate([0,80,0]) scale (0.5) merge_stl ("stls/duck.stl", shrink=0.8); | |||
</source> | |||
[[image:doblo-stl-merge-example.png|thumb|500px|none|A duck merged on a Lugo brick]] | |||
=== Block === | |||
Creates a building block for larger structures with x,y,z positioning. A block does not have nibbles underneath and may or may not have nibbles on top. Also could be used to print a base plate. | Creates a building block for larger structures with x,y,z positioning. A block does not have nibbles underneath and may or may not have nibbles on top. Also could be used to print a base plate. | ||
; Syntax | ; Syntax | ||
: block (col, row, up, width,length,height,nibbles_on_off) | :<code>block (col, row, up, width,length,height,nibbles_on_off, scale)</code> | ||
:<code>block (col=0, row=0, up=0, width=2,length=4,height=FULL,nibbles_on_off=false, scale=LUGO) </code> | |||
'''Example: Simple stairway''' | |||
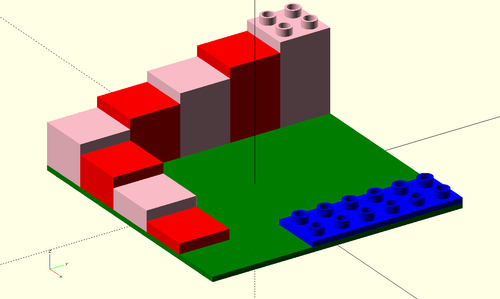
Blocks are essential for building larger structures. The following examples shows how we could create a simple stairway by stacking a series of blocks next to each other. | |||
<source lang="javascript"> | |||
include <doblo-factory.scad>; | |||
include <lib/doblo-params.scad>; | |||
module stairs_world_light () | |||
{ | |||
// (col, row, up, width,length,height,nibbles_on_off) | |||
color ("green") doblo (-5, -5, 0, 10, 10, 1, false, scale=DOBLO); | |||
// staircase | |||
// (col, row, up, width,length,height,nibbles_on_off, SCALE) | |||
color ("red") block (1, 3, 1, 2, 2, 2, false, DOBLO); | |||
color ("pink") block (-1, 3, 1, 2, 2, 4, false, DOBLO); | |||
color ("red") block (-3, 3, 1, 2, 2, 6, false, DOBLO); | |||
color ("pink") block (-5, 3, 1, 2, 2, 8, false, DOBLO); | |||
color ("red") block (-5, 1, 1, 2, 2, 10, false, DOBLO); | |||
color ("pink") block (-5, -1, 1, 2, 2, 12, false, DOBLO); | |||
color ("red") block (-5, -3, 1, 2, 2, 14, false, DOBLO); | |||
color ("pink") block (-5, -5, 1, 2, 2, 16, true, DOBLO); | |||
color ("blue") block (3, -5, 1, 2, 6, 1, true, scale=DOBLO); | |||
} | |||
// call the module, else it won't draw | |||
stairs_world_light(); | |||
</source> | |||
[[File:doblo-stairway1.png|thumbnail|500px|none|Simple stairway made with blocks]] | |||
'''Example: Stairway''' | |||
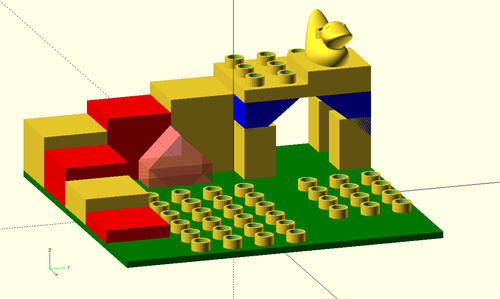
The following example shows inclusion of some other brick types that we shall explain below, e.g. nibbles. Also admire the duck embedded as a monument to all this... | |||
This example also demonstrates how to use standard openscad functionality to "dig" a tunnel, seen to the left. In the source code below the # sign will allow to visualize the object (in pink) that was subtracted and that won't be seen in the computed scene. | |||
The passageway to the right has been built with some support brick (see below) that should be replaced some day with something that is more graceful but still printable. | |||
<source lang="javascript"> | |||
include <doblo-factory.scad>; | |||
include <lib/doblo-params.scad>; | |||
stairs_world (); | |||
module stairs_world () | |||
{ | |||
// (col, row, up, width, length) | |||
nibbles (-1, -1, 1, 6, 4 , scale=DOBLO); | |||
nibbles (-1, -5, 1, 4, 3 , scale=DOBLO); | |||
difference () { | |||
union () { | |||
// Base plate, for faster printing replace by block | |||
// (col, row, up, width,length,height,nibbles_on_off, diamonds) | |||
color ("green") base_plate (-5, -5, 0, 10, 10, 1, false, false, scale=DOBLO); | |||
// staircase | |||
// (col, row, up, width,length,height,nibbles_on_off) | |||
color("red") block (1, 3, 1, 2, 2, 2, false, scale=DOBLO); | |||
block (-1, 3, 1, 2, 2, 4, false, scale=DOBLO); | |||
color("red") block (-3, 3, 1, 2, 2, 6, false, scale=DOBLO); | |||
block (-5, 3, 1, 2, 2, 8, false, scale=DOBLO); | |||
color("red") block (-5, 1, 1, 2, 2, 10, false, scale=DOBLO); | |||
block (-5, -1, 1, 2, 2, 12, false, scale=DOBLO); | |||
} | |||
# house_lr (-6.01, 0.01, 1.01, 4.01, 2.01, 3.01, DOBLO); | |||
} | |||
// platform and support | |||
// (col,row,up,height,angle, width) | |||
color ("blue") support (-5, -5, 6, 7, 270, 1, scale=DOBLO) ; | |||
block (-5, -5, 1, 1, 1, 8, false, scale=DOBLO); | |||
color ("blue") support (-3, -5, 6, 7, 270, 1, scale=DOBLO) ; | |||
block (-3, -5, 1, 1, 1, 8, false, scale=DOBLO); | |||
color ("blue") support (-5, -2, 6, 7, 90, 1, scale=DOBLO) ; | |||
block (-5, -2, 1, 1, 1, 8, false, scale=DOBLO); | |||
color ("blue") support (-3, -2, 6, 7, 90, 1, scale=DOBLO) ; | |||
block (-3, -2, 1, 1, 1, 8, false, scale=DOBLO); | |||
block (-5, -5, 13, 3, 4, 2, true, scale=DOBLO); | |||
// support block + duck | |||
block (-4, -5, 15, 2, 2, 2, false, scale=DOBLO); | |||
merge_stl ("stls/duck.stl", -4, -5, 15, 3, scale=DOBLO); | |||
nibbles (-3.9, -4.5, 19.7, 1, 1, scale=DOBLO); | |||
nibbles (-3.9, -4.5, 19, 1, 1, scale=DOBLO); | |||
} | |||
</source> | |||
To insert nibbles on some spots of a nibble-less block or an imported STL. For use in larger structures. | |||
[[File:doblo-stairway2.png|thumbnail|500px|none|Simple stairway made with blocks]] | |||
===Nibbles=== | |||
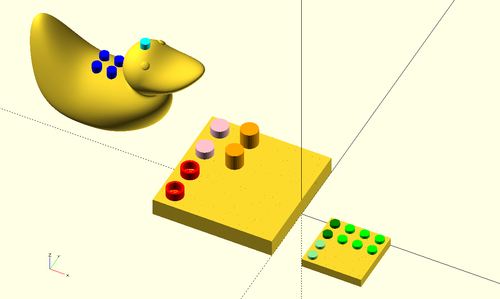
To insert nibbles on some spots of a nibble-less block or an imported STL. For use in larger structures or to create custom bricks. Nibbles also can be stuck on top of imported STL files (use rational numbers for the x,z,z aks col,row,up positions to do so, as seen for the duck in the example below. | |||
; Syntax | ; Syntax | ||
: nibbles (col, row, up, width, length) | : <code>nibbles (col, row, up, width, length, scale, extra, filled, hscale) </code> | ||
: <code> nibbles (col=0, row=0, up=FULL, width=1, length=1, scale=LUGO, extra =false, filled=false, hscale=1)</code> | |||
'''Example''' | |||
[[image:doblo-nibbles.png|thumb|none|500px|Various doblo nibbles]] | |||
<source lang="JavaScript"> | |||
include <doblo-factory.scad>; | |||
include <lib/doblo-params.scad>; | |||
doblo (col=-4, row=-2, up=0, | |||
width=4, length=4, height=HALF, | |||
nibbles_on_off=false, | |||
diamonds_on_off=false, | |||
scale=DOBLO); | |||
color ("red") nibbles (col=-4, row=0, up=HALF, width=1, length=2, | |||
scale=DOBLO, extra =false, filled=false, hscale=1); | |||
color ("pink") nibbles (col=-4, row=-2, up=HALF, width=1, length=2, | |||
scale=DOBLO, extra =false, filled=true, hscale=1); | |||
color ("orange") nibbles (col=-3, row=-2, up=HALF, width=1, length=2, | |||
scale=DOBLO, extra =false, filled=true, hscale=3); | |||
doblo (col=2, row=0, up=0, | |||
width=4, length=4, height=HALF, | |||
nibbles_on_off=false, | |||
diamonds_on_off=false, | |||
scale=LUGO); | |||
color ("green") nibbles (col=2, row=0, up=HALF, width=1, length=2, | |||
scale=LUGO, extra =false, filled=false, hscale=1); | |||
color ("lightgreen") nibbles (col=2, row=2, up=HALF, width=1, length=2, | |||
scale=LUGO, extra =false, filled=true, hscale=1); | |||
color ("lime") nibbles (col=3, row=0, up=HALF, width=3, length=2, | |||
scale=LUGO, extra =false, filled=true, hscale=1); | |||
merge_stl (file="stls/duck.stl", col=-15, row=-4, up=0, stl_z_offset_mm=0, shrink=0.5, scale=LUGO); | |||
color ("blue") nibbles (col=-15.5, row=-4, up=17, width=2, length=2, | |||
scale=LUGO, extra =false, filled=true, hscale=3); | |||
==== | color ("cyan") nibbles (col=-12.5, row=-3.5, up=31, width=1, length=1, | ||
scale=LUGO, extra =false, filled=true, hscale=3); | |||
</source> | |||
To insert underneath an imported STL. Not very usefull | * See also the example above for the block element | ||
=== Bottom nibbles === | |||
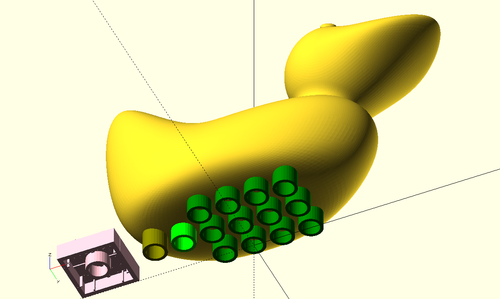
To insert underneath an imported STL. Not very usefull, unless you can print with an easily removable support material or if you can turn the object upside down (put these nibbles on top) or if you turn it upside down and then use a support structure generated from your slicer. I'd rather stick a doblo block to the feet of an imported object. | |||
; Syntax | ; Syntax | ||
: | : <code>nibbles_bottom (col, row, up, width, length, height, scale)</code> | ||
'''Important''': For positioning think of a bottom nibble as the center of a "virtual Lego brick". E.g. in the example below, both the lime and the olive nibble sit on the same "row" as the pink Lugo brick. | |||
'''Example''' | |||
[[Image:doblo-nibbles-bottom.png|thumb|none|500px|Bottom nibbles ]] | |||
<source lang="Javascript"> | |||
include <doblo-factory.scad>; | |||
include <lib/doblo-params.scad>; | |||
merge_stl (file="stls/duck.stl", col=0, row=0, up=HALF, stl_z_offset_mm=0, shrink=0.5, scale=LUGO); | |||
// calibration brick | |||
color ("pink") doblo (col=-6, row=0, up=0, width=2, length=2, height=HALF, scale=LUGO); | |||
color ("green") nibbles_bottom (col=-2, row=-1, up=0, width=5, length=4, height=FULL, scale=LUGO); | |||
color ("lime") nibbles_bottom (col=-3, row=0, up=0, width=1, length=1, height=FULL, scale=LUGO); | |||
color ("olive") nibbles_bottom (col=-4, row=0, up=0, width=2, length=2, h | |||
</source> | |||
=== Alternative to bottom nibbles === | |||
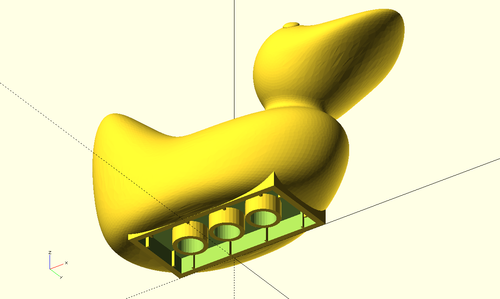
As we mentioned above, you could just "sit" and STL object on top of a doblo brick. However, if you want the nibbles underneath to be less appareant, you can play with the following kind of alternative. | |||
The following alternative requires a tiny bit of OpenSCAD programming and does create printable objects. | |||
# Use a block to dig a rectangular hole into the imported STL object | |||
# Stick a doblo block without nibbles into this hole. | |||
'''Example''' | |||
[[image: doblo-stl-brick-union.png|thumb|none|500px|Imported STL with an embedded doblo brick (requires a difference operation with a block of the same size).]] | |||
<source lang="javascript"> | |||
include <doblo-factory.scad>; | |||
include <lib/doblo-params.scad>; | |||
difference () { | |||
merge_stl (file="stls/duck.stl", col=0, row=0, up=0, stl_z_offset_mm=0.5, shrink=0.7, scale=LUGO); | |||
block (col=-1.3, row=0, up=-1, width=3, length=2, height=HALF, nibbles_on_off=false, scale=LUGO); | |||
} | |||
doblo (col=-1.3, row=0, up=0, width=3, length=2, height=HALF, nibbles_on_off=false, scale=LUGO); | |||
</source> | |||
=== Doblo angle and block angle === | |||
'''Doblo angle'<nowiki/>'''s allow creating blocks with an angle with or without nibbles. '''Block angle''''s are made for stacking. Btw. the doblo angle is just the union of a doblo block with a block angle. | |||
These are bit '''experimental''' and measures may not exactly be right. In particular, angle blocks z-position can be below 0. Therefore on position these on top of something else. Doblo angle blocks, on the other hand should work OK. There is no rotation feature. Finally, you will have to use OpenSCAD rotation, e.g. <code>translate([2*PART_WIDTH(LUGO),0,0]) rotate(90)doblo_angle();</code>, plus a translation to put it back in the right position. | |||
Short Syntax for <code>doblo_angle</code> | |||
: <code> module doblo_angle_block (col,row,up,width,length,height,a_height,nibbles_on_off,scale)</code> | |||
Long Syntax with default values shown: | |||
<source lang="JavaScript"> | |||
doblo_angle (col=0,row=0, | |||
up=0, | |||
width=2,length=4, | |||
height=FULL, | |||
a_height=FULL, | |||
nibbles_on_off=true, | |||
scale=LUGO) | |||
</source> | |||
With respect to doblo's there is an additional parameter: <code>a_height</code>. I.e. <code>doblo angle</code> have a base height '''plus''' the height of the angle block that will sit on top. | |||
Short Syntax for <code>block_angle</code> | |||
: <code>module block_angle (col, row, up, width,length,height,nibbles_on_off, scale) </code> | |||
'''Warning: z positioning is slightly wrong''', i.e. a bit below z=0. Use these only for single printing or as building blocks for larger structures. | |||
'''Example''' | |||
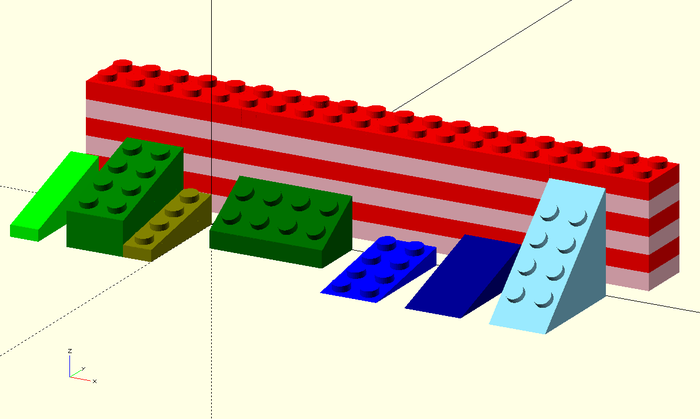
The following picture shows for doblo angle blocks (the green ones) and three block angle pieces (the blue ones). The wall in the background is for calibration. | |||
[[image:angle-blocks.png|thumb|none|700px|Various doblo and block angle pieces]] | |||
<source lang="Javascript"> | |||
include <doblo-factory.scad>; | |||
include <lib/doblo-params.scad>; | |||
==== Support triangles | // calibration block | ||
Support triangles are used in larger structures to support a roof. | |||
color ("pink") block (-5,-3, 0, 20,2,HALF,false,LUGO); | |||
color ("red") block (-5,-3, HALF, 20,2,HALF,false,LUGO); | |||
color ("pink") block (-5,-3, FULL, 20,2,HALF,false,LUGO); | |||
color ("red") block (-5,-3, 3*HALF, 20,2,HALF,false,LUGO); | |||
color ("pink") block (-5,-3, 2*FULL, 20,2,HALF,false,LUGO); | |||
color ("red") doblo (-5,-3, 2*FULL+HALF, 20,2,HALF,true,false,LUGO); | |||
// from left to right | |||
color ("lime") doblo_angle (col=-5, row=0, up=0, | |||
width=1, length=4, | |||
height=THIRD, a_height=FULL, | |||
nibbles_on_off=false, | |||
scale=LUGO); | |||
color ("green") doblo_angle (col=-3); | |||
color ("olive") doblo_angle (col=-1, row=0, up=0, | |||
width=1, length=4, | |||
height=THIRD, a_height=HALF, | |||
nibbles_on_off=true, | |||
scale=LUGO); | |||
color ("darkgreen") doblo_angle (col=1, row=0, up=0, | |||
width=4, length=2, | |||
height=HALF, a_height=FULL, | |||
nibbles_on_off=true, | |||
scale=LUGO); | |||
color ("blue") block_angle (col=6, row=0, up=0, | |||
width=2,length=4,height=HALF, a_height=FULL, | |||
nibbles_on_off=true, scale=LUGO); | |||
color ("darkblue") block_angle (col=9, row=0, up=0, | |||
width=2,length=4,height=FULL, | |||
nibbles_on_off=false, scale=LUGO); | |||
color ("skyblue") block_angle (col=12, row=0, up=0, | |||
width=2,length=4,height=3*FULL, | |||
nibbles_on_off=true, scale=LUGO); | |||
</source> | |||
=== Support triangles === | |||
Support triangles are used in larger structures to support a roof. These bricks are really ugly and some day should be replaced by some more graceful arcs ... | |||
* Thickness = 1 doblo width, e.g. = PART_WIDTH. | * Thickness = 1 doblo width, e.g. = PART_WIDTH. | ||
| Line 327: | Line 1,062: | ||
;Syntax | ;Syntax | ||
: support (col,row,up,height,rotation_angle,thickness) | : <code>support (col,row,up,height,rotation_angle,thickness,scale)</code> | ||
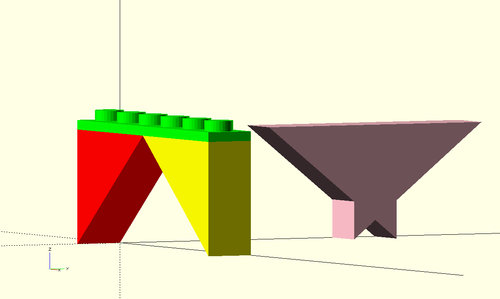
'''Example''' | |||
[[image: doblo-support.png|thumb|frame|none|500px|Support structure block]] | |||
<source lang="javascript"> | |||
include <doblo-factory.scad>; | |||
include <lib/doblo-params.scad>; | |||
// (col=0,row=0,up=0,height=FULL,angle=0,thickness=1, scale) | |||
color ("pink") support (col=0, row=-6, up=0, height=2*FULL, angle=270, thickness=1, scale=LUGO) ; | |||
color ("pink") support (col=0, row=-6, up=0, height=2*FULL, angle=90, thickness=1, scale=LUGO) ; | |||
color ("red") support (0, 0, 0, 2*FULL, 0, 1, LUGO) ; | |||
color ("yellow") support (5, 0, 0, 2*FULL, 180, 1, LUGO) ; | |||
color ("lime") block (0, 0, 2*FULL, 6, 1, 1, true, LUGO); | |||
</source> | |||
=== ramp === | |||
''ramp'' is the opposite of the support triangle, but with a flatter angle. Can be used to anchor a high and slim block or also to build a real ramp. | |||
* Height/length proportion is 4.8/16 (i.e. typical Lego proportions) | * Height/length proportion is 4.8/16 (i.e. typical Lego proportions) | ||
If you wish to use a more flexible solution, you could start from block_angles, but you'd have to rotate these manually. The ramp doesn't have nibbles, the angle blocks do ... | |||
Syntax: | Syntax: | ||
: ramp (col,row,up,height,rotation_angle) | : <code>ramp (col,row,up,height,rotation_angle, width,scale)</code> | ||
: Rotation must be one of 0, 90 180 or 270. | |||
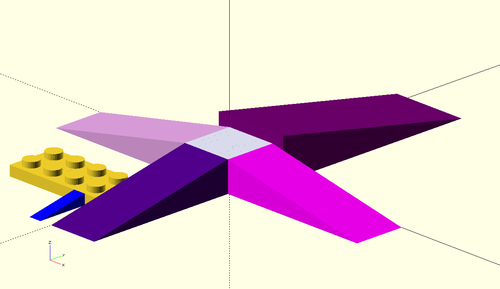
'''Example''' | |||
[[image: doblo-ramps.png|thumb|none|500px|Various doblo ramps.]] | |||
==== Cylinder | <source lang="javascript"> | ||
include <doblo-factory.scad>; | |||
include <lib/doblo-params.scad>; | |||
color ("lavender") doblo (col=-0, row=0, height=FULL, width=2, nibbles_on_off=false); | |||
// ramp (col, row, up, height, angle,width,scale) | |||
color ("fuchsia") ramp (2, 0, 0, FULL, 0, 2, LUGO); | |||
color ("plum") ramp (0, 0, 0, FULL, 180, 2, LUGO); | |||
color ("purple") ramp (-0.5, 0, 0, 8, 90, 3, LUGO); | |||
color ("indigo") ramp (0, 2, 0, FULL, 270, 2, LUGO); | |||
doblo (col=-4, row=4,height=THIRD); | |||
color ("blue") ramp (col=-1, row=6, up=0, height=THIRD, angle=270, width=0.5, scale=LUGO); | |||
</source> | |||
=== Cylinder === | |||
''cylinder'' is like a block, but round. | ''cylinder'' is like a block, but round. | ||
| Line 344: | Line 1,119: | ||
Syntax: | Syntax: | ||
:cyl_block (col, row, up, bottom_r, top_r, height, nibbles_on_off) | :cyl_block (col, row, up, bottom_r, top_r, height, nibbles_on_off,scale) | ||
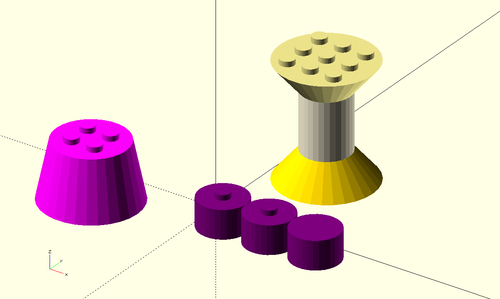
'''Example''' | |||
[[image:doblo-cylinder.png|thumb|none|500px|A collection of funky doblo cylinders]] | |||
<source lang="javascript"> | |||
include <doblo-factory.scad>; | |||
include <lib/doblo-params.scad>; | |||
color ("purple") cyl_block (); | |||
color ("purple") cyl_block (col=2); | |||
color ("purple") cyl_block (col=4, nibbles_on_off=false); | |||
color ("fuchsia") cyl_block (col=-6, bottom_r=4, top_r=3, height=2*FULL); | |||
// An ugly antique pilar | |||
color ("gold") cyl_block (row=-6, col=0, up=0, | |||
bottom_r=4, top_r=2, height=FULL, nibbles_on_off=false); | |||
color ("cornsilk") cyl_block (row=-5, col=1, up=FULL, | |||
bottom_r=2, top_r=2, height=2*FULL, nibbles_on_off=false); | |||
color ("khaki") cyl_block (row=-5, col=1, up=3*FULL, | |||
bottom_r=2, top_r=4, height=FULL, nibb | |||
</source> | |||
Bug: Generates 4 nibbles for a r=0.5 cylinder. Workaround: Add a single one manually using the nibbles module. | |||
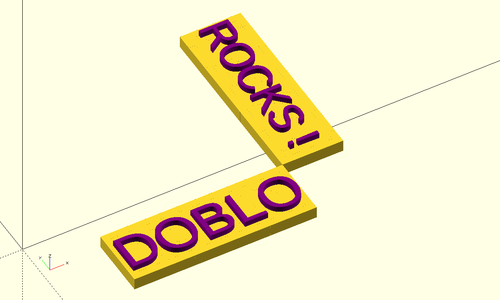
=== Writing text === | |||
For writing text on top of blocks, we can use the OpenSCAD text function. | |||
<source lang="JavaScript"> | |||
include <../doblo-factory.scad>; | |||
include <../lib/doblo-params.scad>; | |||
// text on a 6x2 doblo | |||
doblo (col=2,row=1,up=0,length=2,width=6,height=THIRD,nibbles_on_off=false); | |||
color ("purple") write (text="DOBLO", col=2, row=1.5, up=THIRD, | |||
size=10, height=1.5); | |||
doblo (col=8,row=-5,up=0,length=6,width=2,height=THIRD,nibbles_on_off=false); | |||
color ("purple") write (text="ROCKS !", col=8.5, row=-4.9, up=THIRD, rot=270, | |||
size=8, height=1.5,valign="baseline"); | |||
</source> | |||
[[image:doblo-write.png|thumb|none|500px|Writing on two doblo bricks using a little write module (see below)]] | |||
Since this module might be missing from doblo-factory.scad, here is the definition of the module (just copy/paste it in your file, e.g. next to the example above). | |||
<source lang="JavaScript"> | |||
// Text module | |||
module write (text="hello", col=0, row=0, up=0, rot=0, height=1, size=8, valign="top", halign="left", font="Liberation Sans,style=bold", scale=LUGO) { | |||
x_0 = col * PART_WIDTH(scale); | |||
y_0 = - (row * PART_WIDTH(scale)); | |||
z_0 = up * PART_HEIGHT(scale); | |||
translate ([x_0, y_0, z_0]) { | |||
rotate (rot) { | |||
linear_extrude (height=height) { | |||
text (text, font = font, size=size, valign=valign, halign=halign); | |||
} | |||
} | |||
} | |||
} | |||
</source> | |||
== Extensions == | |||
Some bricks are available through the extension library. Some modules are not fully tested or not fully implemented... | |||
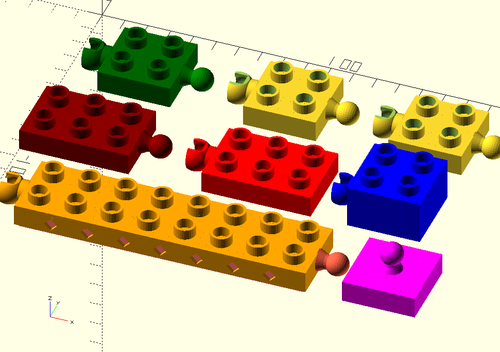
=== Ball and socket doblos === | |||
Ball and socket doblos are defined in the connectors extension library. They allow creating objects that can hook together. These joints are based on ball joint in SCAD by Erik de Bruijn, modified by juniortan | |||
http://www.thingiverse.com/thing:2631, derived originally from Erik's parametric ball joint: http://www.thingiverse.com/thing:1968. | |||
'''Syntax''' | |||
: ball_doblo (row, col, up, width, height, nibbles_on_off, diamonds_on_off, size) | |||
Arguments are the same as for doblo, except that parameter names are different. | |||
: ball_doblo(xoff, yoff, zoff,width,length,height=3,nibbles=true,diamonds=false,size=DOBLO) | |||
: module socket_doblo(xoff, yoff, zoff,width,length,height=3,nibbles=true,diamonds=false,size=DOBLO){ | |||
Example: | |||
<source lang="JavaScript"> | |||
include <doblo-factory.scad>; | |||
include <lib/doblo-params.scad>; | |||
include <ext/connectors.scad>; | |||
//ball_doblo (0, 1, 0, 2, 2,size=LUGO); | |||
//socket_doblo (4, 1, 0, 2, 2,size=LUGO); | |||
color ("red") socket_doblo (xoff=5, yoff=4, zoff=0, width=3, length=2, height=HALF, nibbles=true, diamonds=false, size=DOBLO); | |||
color ("darkred") ball_doblo (0, 4, 0, 3, 2,size=DOBLO); | |||
color ("tomato") ball_doblo (1, 7, 0, 8, 2,diamonds=true,size=DOBLO); | |||
color ("orange") socket_doblo (1, 7, 0, 8, 2,diamonds=true,size=DOBLO); | |||
color ("green") ball_doblo (1, 1, 0, 2, 2,size=DOBLO); | |||
color ("darkgreen") socket_doblo (1, 1, 0, 2, 2,size=DOBLO); | |||
ball_doblo (5, 1, 0, 2, 2,size=DOBLO); | |||
socket_doblo (5, 1, 0, 2, 2,size=DOBLO); | |||
ball_doblo (9, 1, 0, 2, 2,size=DOBLO); | |||
socket_doblo (9, 1, 0, 2, 2,size=DOBLO); | |||
color ("blue") socket_doblo (9, 4, 0, 2, 2,6,size=DOBLO); | |||
color ("fuchsia") top_ball_doblo (10, 7, 0, 2, 2,diamonds=false,size=DOBLO); | |||
</source> | |||
[[File:doblo-sockets-balls.png|thumb|500px|none|Sockets and ball joints]] | |||
=== Hinges === | |||
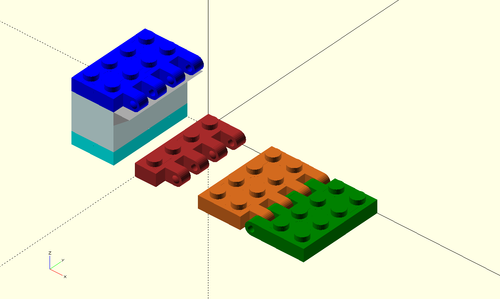
Hinges allor to create covers, doors etc. You either can print these as is or assemble within other objects. You may have to use OpenScad transformations of positioning. Note that these require a good high resolution printer for Lego-compatible blocks (Lugos). Doblos should be easier to print ... | |||
'''horizontal hinges''' | |||
Thes rotate up/down along the y-axis | |||
Syntax: | |||
: hinge_y(xoff, yoff, zoff,length,width,height=3,nibbles=true,size=DOBLO, $fs=0.01,type=0) | |||
: module hinge_z_hole(offx=0,offy=0,offz=0,width=1,length=2,height=6,nibbles=true,size=DOBLO,tolerance = 1){ | |||
'''Hinge_y example''' | |||
[[image:doblo-hinge_y.png|thumb|none|500px|Four doblo hinges. Rotations (i.e. the green one) must be done with OpenSCAD transforms]] | |||
<source lang="javascript"> | |||
include <doblo-factory.scad>; | |||
include <lib/doblo-params.scad>; | |||
include <ext/connectors.scad>; | |||
// minimum dimension for hinge side is 2 | |||
color ("brown") hinge_y (0, 0, 0, 1, 4, 3, true, LUGO); | |||
color ("chocolate") hinge_y (3, 0, 0, 2, 4, 3, true, LUGO); | |||
// create a hinge on top of a stackable block | |||
color ("cyan") doblo (-3, 0, 0, 2, 4, HALF, false, false, LUGO); | |||
color ("lightcyan") block (-3, 0, HALF, 2, 4, HALF+FULL, false, LUGO); | |||
color ("grey") support (col=-1, row=0, up=FULL+HALF, height=HALF, angle=0, thickness=4, scale=LUGO); | |||
color ("blue") hinge_y (-3, 0, 2*FULL, 2, 4, HALF, true, LUGO); | |||
// rotate, then translate a hinge with OpenSCAD functions | |||
unit = PART_WIDTH(LUGO); | |||
translate ([8*unit, -4*unit, 0]) { | |||
rotate (180) { | |||
color ("green") hinge_y (xoff=0, yoff= 0, zoff= 0, length=2, width=4, height=3, nibbles=true, size=LUGO); | |||
} | |||
} | |||
</source> | |||
=== Text === | |||
The text module is deprecated, since OpenSCAD now does have a text module. | |||
'''Glyph''' | |||
Is a letter, a number or a special character. This module is based on [http://www.thingiverse.com/thing:2054 OpenSCAD Bitmap Fonts Module] | Is a letter, a number or a special character. This module is based on [http://www.thingiverse.com/thing:2054 OpenSCAD Bitmap Fonts Module] | ||
| Line 353: | Line 1,287: | ||
: glyph (col, row, up, height_mm, char) | : glyph (col, row, up, height_mm, char) | ||
'''Text''' | |||
Is a text with glyph characters (see above). | Is a text with glyph characters (see above). | ||
| Line 367: | Line 1,300: | ||
: text (1, 6, 2, 4, ["T","H","i","N","G","Y"], 6); | : text (1, 6, 2, 4, ["T","H","i","N","G","Y"], 6); | ||
== | == Examples == | ||
=== Simple bricks with x/y positions and color parameters === | |||
The following example demonstrates (again) how to create simple Lego and Duplo compatible bricks | |||
It also shows how to create custom modules that would simplify creation of frequently bricks. Each module takes position, and a color | |||
and then produces a standard Lego-compatible bricks, a flat half-height lego-compatible bricks for mashups, and a standard 2x2 Duplo-compatible brick. | |||
[[image:doblo-bricks3.png|thumb|none|500px|Three bricks created with custom modules]] | |||
/ | <source lang="JavaScript"> | ||
include <doblo-factory.scad>; | |||
include <lib/doblo-params.scad>; | |||
// | // Each brick is defined in a module that takes x/y position and color as parameter | ||
module lego_brick_for_mashups (x,y,fill) { | |||
color (fill) | |||
doblo (col=x, row=y, up=0, | |||
width=4, length=4, height=HALF, | |||
nibbles_on_off=false, diamonds_on_off=false, | |||
scale=LUGO); | |||
} | |||
module lego_compat_standard_brick (x,y,fill) { | |||
color (fill) | |||
doblo (x,y, 0, 4, 2, FULL, true, false, LUGO); | |||
} | |||
module duplo_compat_2x2xHALF_brick (x,y,fill) { | |||
color (fill) { | |||
doblo (x,y, 0, 2, 2, FULL, true, false, DOBLO); | |||
} | |||
} | |||
// display each module, position and color each | |||
// makes it easier to use (less typing if you just want flat standard bricks) | |||
=== | lego_brick_for_mashups (x=0, y=0, fill="red"); | ||
lego_compat_standard_brick (-4,-3,"blue"); | |||
duplo_compat_2x2xHALF_brick (-3,1, "green"); | |||
</source> | |||
Exercise: | |||
* Revert the y position | |||
* Add width and length parameters | |||
=== Doblo structure - A stronghold === | === Doblo structure - A stronghold === | ||
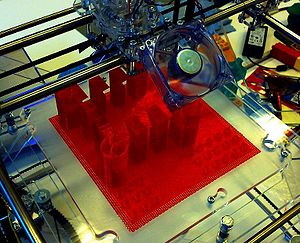
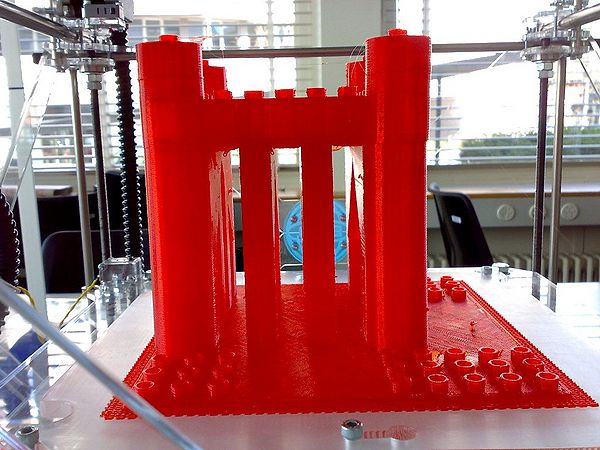
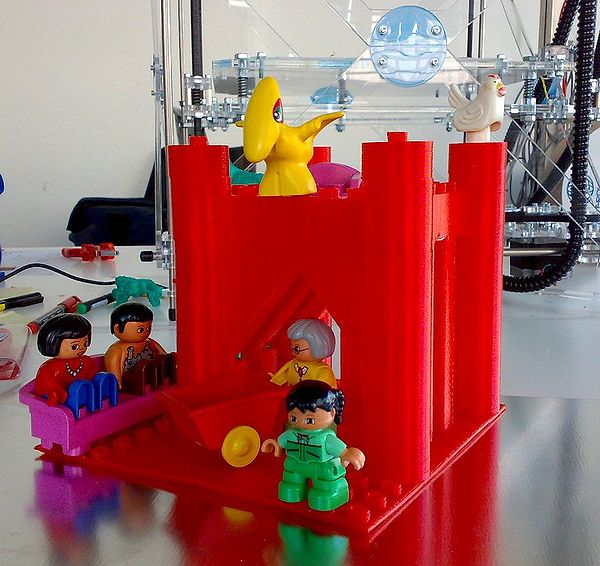
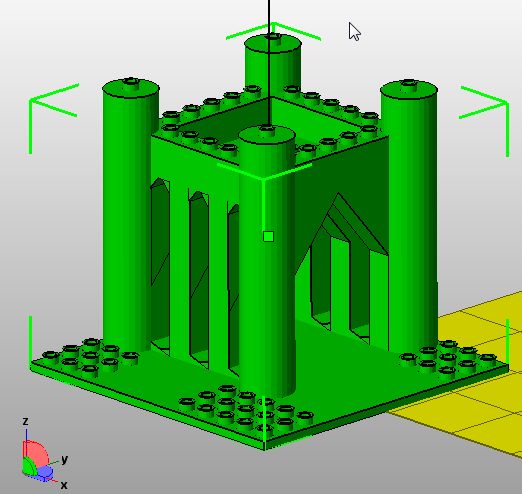
The following structure was my first creation and it did have some design flaws. But it did print. | The following structure was my first creation and it did have some design flaws. But it did print back in 2010 on a RapMan printer. It took about 3 days.... | ||
[[image:stronghold-in-progress1-small.jpg|thumb|300px|none|Strong-hold in progress]] | [[image:stronghold-in-progress1-small.jpg|thumb|300px|none|Strong-hold in progress]] | ||
| Line 462: | Line 1,373: | ||
<source lang="javascript"> | <source lang="javascript"> | ||
// ------------------- A stronghold | |||
include <doblo-factory.scad>; | |||
include <lib/doblo-params.scad>; | |||
// SCALE=LUGO; | |||
SCALE=DOBLO; | |||
stronghold(); | |||
module stronghold () | |||
{ | |||
union() | |||
{ | |||
doblo (col=-6, row=-6, up=0, width=12, length=12, height=THIRD, nibbles_on_off=false, diamonds=false, scale=SCALE); | |||
nibbles (col=3, row=-6, up=THIRD, width=3, length=3, scale=SCALE, extra=false, filled=false, hscale=1); | |||
nibbles (col=1, row=3, up=THIRD, width=5, length=3, scale=SCALE, extra=false, filled=false, hscale=1); | |||
nibbles (col=-6, row=3, up=THIRD, width=3, length=3, scale=SCALE, extra=false, filled=false, hscale=1); | |||
//back | |||
ramp (0, -5, 1, 2, 0, scale=SCALE); | |||
block (col=-5, row=-5, up=THIRD, width=1, length=1, height=6*FULL, nibbles_on_off=false, scale=SCALE); | |||
color ("grey") ramp (-4, -5, 1, 2, 0, scale=SCALE); | |||
color ("black") ramp (-2.5, -5, 1, 2, 180, scale=SCALE); | |||
block (col=-3, row=-5, up=THIRD, width=1, length=1, height=6*FULL, nibbles_on_off=false, scale=SCALE); | |||
ramp (-2, -5, 1, 2, 0, scale=SCALE); | |||
ramp (-0.5, -5, 1, 2, 180, scale=SCALE); | |||
block (col=-1, row=-5, up=THIRD, width=1, length=1, height=6*FULL, nibbles_on_off=false, scale=SCALE); | |||
ramp (1.5, -5, 1, 2, 180, scale=SCALE); | |||
block (col=1, row=-5, up=THIRD, width=1, length=1, height=6*FULL, nibbles_on_off=false, scale=SCALE); | |||
// left | |||
block (col=-5, row=-3, up=THIRD, width=1, length=1, height=6*FULL, nibbles_on_off=false, scale=SCALE); | |||
block (col=-5, row=-1, up=THIRD, width=1, length=1, height=6*FULL, nibbles_on_off=false, scale=SCALE); | |||
// front | |||
ramp (-4, 1, 1, 2, 0, scale=SCALE); | |||
block (col=-5, row=1, up=THIRD, width=1, length=1, height=6*FULL, nibbles_on_off=false, scale=SCALE); | |||
ramp (-2, 1, 1, 2, 0, scale=SCALE); | |||
ramp (-2.5, 1, 1, 2, 180, scale=SCALE); | |||
block (col=-3, row=1, up=THIRD, width=1, length=1, height=6*FULL, nibbles_on_off=false, scale=SCALE); | |||
ramp (-0, 1, 1, 2, 0, scale=SCALE); | |||
ramp (-0.5, 1, 1, 2, 180, scale=SCALE); | |||
block (col=-1, row=1, up=THIRD, width=1, length=1, height=6*FULL, nibbles_on_off=false, scale=SCALE); | |||
ramp (1.5, 1, 1, 2, 180, scale=SCALE); | |||
block (col=1, row=1, up=THIRD, width=1, length=1, height=6*FULL, nibbles_on_off=false, scale=SCALE); | |||
// right | |||
// big arc | |||
color("blue") support (col=-5, row=-5, up=3*FULL, height=3*FULL, angle=270, thickness=1, scale=SCALE) ; | |||
color ("red") support (col=-4.1, row=-5, up=6*FULL-THIRD, height=2.2, angle=0, thickness=7, scale=SCALE); | |||
support (col=-3.9, row=-5, up=6*FULL-THIRD, height=2.2, angle=180, thickness=7, scale=SCALE); | |||
support (col=-3, row=-5, up=3*FULL, height=3*FULL, angle=270, thickness=1, scale=SCALE) ; | |||
color ("red") support (col=-2.1, row=-5, up=6*FULL-THIRD, height=2.2, angle=0, thickness=7, scale=SCALE); | |||
support (col=-1.9, row=-5, up=6*FULL-THIRD, height=2.2, angle=180, thickness=7, scale=SCALE); | |||
support (col=-1, row=-5, up=3*FULL, height=3*FULL, angle=270, thickness=1, scale=SCALE) ; | |||
support (col=-0.1, row=-5, up=6*FULL-THIRD, height=2.2, angle=0, thickness=7, scale=SCALE); | |||
support (col=0.1, row=-5, up=6*FULL-THIRD, height=2.2, angle=180, thickness=7, scale=SCALE); | |||
support (col=1, row=-5, up=3*FULL, height=3*FULL, angle=270, thickness=1, scale=SCALE) ; | |||
support (col=-5, row=1, up=3*FULL, height=3*FULL, angle=90, thickness=1, scale=SCALE) ; | |||
support (col=-3, row=1, up=3*FULL, height=3*FULL, angle=90, thickness=1, scale=SCALE) ; | |||
support (col=-1, row=1, up=3*FULL, height=3*FULL, angle=90, thickness=1, scale=SCALE) ; | |||
support (col=1, row=1, up=3*FULL, height=3*FULL, angle=90, thickness=1, scale=SCALE) ; | |||
// Roof | |||
block (col=-5, row=-5, up=6*FULL, width=7, length=7, height=1, nibbles_on_off=false, scale=SCALE); | |||
nibbles (col=-3, row=-3, up=6*FULL+1, width=3, length=3, scale=SCALE, extra=false, filled=false, hscale=1); | |||
color ("green") block (col=-5, row=-5, up=6*FULL, width=7, length=1, height=FULL, nibbles_on_off=false, scale=SCALE); | |||
nibbles (col=-4, row=-5, up=7*FULL, width=5, length=1, scale=SCALE, extra=false, filled=false, hscale=1); | |||
color ("green") block (col=-5, row=1, up=6*FULL, width=7, length=1, height=FULL, nibbles_on_off=false, scale=SCALE); | |||
nibbles (col=-5, row=-4, up=7*FULL, width=1, length=5, scale=SCALE, extra=false, filled=false, hscale=1); | |||
color ("green") block (col=-5, row=-4, up=6*FULL, width=1, length=5, height=FULL, nibbles_on_off=false, scale=SCALE); | |||
nibbles (col=-4, row=1, up=7*FULL, width=5, length=1, scale=SCALE, extra=false, filled=false, hscale=1); | |||
color ("green") block (col=1, row=-4, up=6*FULL, width=1, length=5, height=FULL, nibbles_on_off=false, scale=SCALE); | |||
nibbles (col=1, row=-4, up=7*FULL, width=1, length=5, scale=SCALE, extra=false, filled=false, hscale=1); | |||
cyl_block (col=-6,row= -6,up=THIRD,bottom_r= 2,top_r= 2,height= 8*FULL,nibbles_on_off= true, scale=SCALE) ; | |||
cyl_block (col=1,row= -6,up=THIRD,bottom_r= 2,top_r= 2,height= 8*FULL,nibbles_on_off= true, scale=SCALE) ; | |||
cyl_block (col=-6,row= 1,up=THIRD,bottom_r= 2,top_r= 2,height= 8*FULL,nibbles_on_off= true, scale=SCALE) ; | |||
cyl_block (col=1,row= 1,up=THIRD,bottom_r= 2,top_r= 2,height= 8*FULL,nibbles_on_off= true, scale=SCALE) ; | |||
} | |||
} | } | ||
</source> | </source> | ||
To use this "as is", just | To use this "as is", just set the scale in the beginning of the file. | ||
=== Some mashups === | === Some mashups === | ||
'''Some history''' | |||
In the following picture you can see two kinds of mashups made in 2010 with a Rapman printer and a rather coarse 0.4mm layer resolution. | In the following picture you can see two kinds of mashups made in 2010 with a Rapman printer and a rather coarse 0.4mm layer resolution. | ||
| Line 569: | Line 1,478: | ||
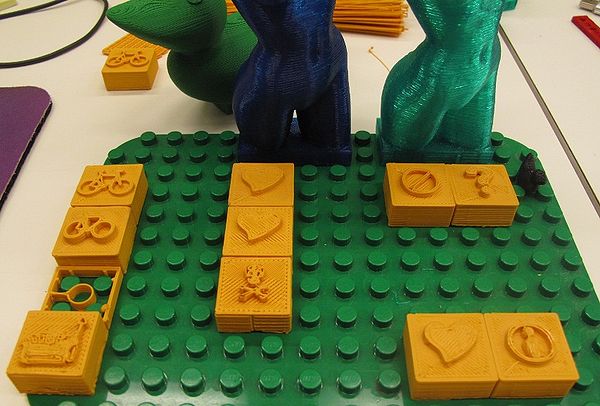
[[image:duplo-compatible-symbol-bricks-small.jpg|thumb|600px|none|Some Doblo bricks (Duplo compatible). Various Skeinforge settings, some bad]] | [[image:duplo-compatible-symbol-bricks-small.jpg|thumb|600px|none|Some Doblo bricks (Duplo compatible). Various Skeinforge settings, some bad]] | ||
'''Lego-compatibles icon blocks''' | |||
Thanks to icon libraries like [https://thenounproject.com/ the noun project], there are thousands of interesting sets that allow creating lego-compatible blocks to used in games, simulations or just for decoration. | |||
[[image: doblo_people_lugos.png|thumb|none|500px|Women icon on compatible bricks (see [[openScad beginners tutorial#Import_and_extrude_2D_graphics_from_SVG|our openscad tutorial]] that explains how to import SVG files)]] | |||
A similar object, printed with t-glase (a bit too much extrusion) looks like this: | |||
[[image:t-glase-lego.jpg|thumb|none|300px|Women icon on compatible brick printer with t-glase on the [[Felix Pro 1 3D printer]] ]] | |||
T-glase is a plastic that is fairly easy to print, however it requires slow speed and certain amount of filament coming out. | |||
The following wouldn't print well (some wall are too small) but it illustrates use of more complex SVG graphics. | |||
<source lang="javascript"> | |||
include <../doblo-factory.scad>; | |||
include <../lib/doblo-params.scad>; | |||
cowgirl_lugos(); | |||
unit = NBO(LUGO); | |||
module cowgirl_lugos () { | |||
difference () { | |||
union () { | |||
color ("lightgrey") doblo (col=0, row=-4, up=0, | |||
width=4, length=4, height=HALF, | |||
nibbles_on_off=false, | |||
diamonds_on_off=false, | |||
scale=LUGO); | |||
color ("lightgrey") block (col=0, row=-4, up=HALF, | |||
width=4, length=4, height=HALF, | |||
nibbles_on_off=false, | |||
diamonds_on_off=false, | |||
scale=LUGO); | |||
} | |||
translate ([5,1,FULL+THIRD]) { | |||
color ("pink") linear_extrude(height = 5, center = true, convexity = 10) | |||
// cowgirl by Simon Child from the Noun Project | |||
import (file = "noun_cowgirl_31624_cleaned.dxf"); | |||
} | |||
} | |||
translate ([6*unit,0,0]) { | |||
color ("lightgrey") doblo (col=0, row=-4, up=0, | |||
width=4, length=4, height=HALF, | |||
nibbles_on_off=false, | |||
diamonds_on_off=false, | |||
scale=LUGO); | |||
color ("lightgrey") block (col=0, row=-4, up=HALF, | |||
width=4, length=4, height=HALF, | |||
nibbles_on_off=false, | |||
diamonds_on_off=false, | |||
scale=LUGO); | |||
translate ([5,1,FULL+HALF]) { | |||
color ("pink") linear_extrude(height = 5, center = true, convexity = 10) | |||
// cowgirl by Simon Child from the Noun Project | |||
import (file = "noun_cowgirl_31624_cleaned.dxf"); | |||
} | |||
} | |||
} | |||
</source> | |||
[[image: cowgirl-lugos.png|thumb|none|500px|Cowgirl Lego-compatible bricks (see [[openScad beginners tutorial#Import_and_extrude_2D_graphics_from_SVG|our openscad tutorial]] that explains how to import SVG files)]] | |||
== Printing == | == Printing == | ||
=== | Printing Lego and Duplo compatible blocks is never easy. There are several challenges: | ||
'''Correct dimensions and wall thickness in particular''' | |||
* Real wall thickness (and in particular of the crucial nibbles underneath) depend very much on your slicer settings. Several parameters could influence real wall thickness: layer height, layer width, wall re-inforcement, speed, temperature, the kind/brand of plastic, filling, etc. The only way to get this right is to print a few bricks and then play with both slicer and OpenScad settings. Create a new parameter file for each plastic/slicer setting. Make a copy of <code>DobloFactory/lib/doblo-params.scad</code>. If you use the Cura slicer, make sure to install a very recent version and fix the default fat wall setting of 1mm. Personally, I got the best results with the (old) skeinforge slicer and the commercial Simplify3D, but any slicer will work under the condition that it allows defining slim walls. | |||
* Since PLA behaves a bit like wood, i.e. thin walls break easily, we suggest to print at least three walls. Make the nibbles underneath rather too fat as opposed to too slim. While the piece is still somewhat warm but not warm from the oven, press it gently on a real Lego plate. This way it will both fit and be a bit more solid than the thin "Lego"-like walls. | |||
* For ABS (not recommended), tinker with OpenScad/slicer settings until you get it right. | |||
'''First layer''' | |||
As with any other difficult print, make sure to get the first layer right. I rather recommend calibrating the printer (nozzle is 1 sheet of paper away from the platform) then making the base layer extra fat. If the first layer is not precise, the nibbles will look all wrong. If you print too closely to the platform (PLA looks almost transparent and very wide) then you will have trouble pressing the brick down to make it fit. But too close is better than too far. If your print bed is too uneven and removable, then either make the first layer much fatter or use glue and wash the piece off with hot water... | |||
'''Roof''' | |||
The roof will be ugly underneath and there is nothing you can do about it, except going back to a 3mm / 4mm layer height printer. You can make it less ugly, by slowing down and extruding a bit more. The top should be ok, but may need a bit more plastic flow than usual. | |||
'''Resolution''' | |||
For larger pieces, using 2.5mm layers layers and 0.35mm width (or similar) gives pretty good results, except if you plan to have small 2D 1/2 extruded drawings on top of a block. In the latter case make sure to have little or no retraction, plus high fill. Otherwise, the result will be ugly. In addition, the plastic may "dry up". | |||
For smaller Lego compatible pieces we recommend 2mm layers. Of course, you also can print with lower resolution (e.g. 0.1 mm) but the resulting standard blocks do not necessarily look better and they take ages to print. | |||
A large duplo-compatible piece, e.g. a castle tower from the [[modular castle kit - Lego compatible]] takes more than a day to print with 2.5mm layers (e.g. 28h30 for a typical heavy 8x8 tower). So if you plan to give a gift of several of these consider printing with 3 or even 4mm resolution, but that requires changing the hot end. The same Lego-compatible structure takes about 6 times less, i.e. 5h30. Printing it with 2mm resolution adds 1h30, e.g. 7 hours. | |||
'''Retraction''' | |||
I suggest using little retraction. It is better to have stringing than problems with plastic flow when printing the nibbles underneath the bricks ... Try and see. | |||
'''Calibration''' | |||
Try small objects first, e.g. a 3x3x3 doblo brick with PLA or PETG or a 2x2x3 block with ABS. ABS warps, therefore either use diamonds in the walls or strong glue ! | |||
'''Plastics''' | |||
We printed most pieces with various sorts of PLA or PETG. ABS, T-glase, Laybrick, TPE also worked. In order to get the bottom right, you really have to slow down when printing with composites like laybrick, T-glase and various TPEs. | |||
=== Post processing === | |||
If fit is too tight, heat the underneath with a heat gun (about 80 degs for PLA) then press the piece onto a real Lego or Duplo plate. You also can try an oven or a hair dryer. The latter only reaches about 55 to 60 degs, but this is better than pressing down cold plastic. | |||
If fit is too loose, you cannot do anything about it. Change your slicer settings or re-generate the models with different settings. | |||
=== Can your printer do it ? === | |||
We designed a simple suite of benchmarking pieces that you can use to test drive both DUPLO-compatible and LEGO-compatible sized blocks. Note however, that different kinds of structures may need different calibration. Print time is also a big factor. | |||
If you know how to use OpenScad, it's better to generate the STLs again, since I had to cheat a bit with the width parameters in order to compensate the way the printer works. The ABS prints in the picture below did use the old version of [http://www.thingiverse.com/thing:2106 doblo factory]. | |||
The *.zip file includes all files (except the picture) | |||
Evaluation criteria: | |||
* 1a) Fit with real Duplos, i.e. respect dimensions of real Duplo and Lego bricks | |||
* 1b) First good good 5 layers of the brick. That's important for both esthetics and also vertical fit. That includes no warping ! | |||
* 1c) Roof of the brick on top, must be flat and smooth | |||
* 1d) Roof of the brick underneath, no hanging filament | |||
* 2a) Overhang of the thumb | |||
* 2b) Smoothness of the palm and the back (difficult, of course faster prints will use bigger filament) | |||
* 2c) Smoothness of the fingers, nails (difficult) | |||
* 2d) Correct position of fingers | |||
* 3a) Amount of post-processing needed | |||
* 3b) Solidity (with respect to polymers used and size) | |||
* 4) I don't know exactly how - but all this should be put into relation with print time | |||
[[image:doblo-lugo-benchmark.jpg|thumb|600px|none|Doblo-lugo benchmark V.1 - made in 2010 - Green pieces are DUPLOs/LEGOs(TM)]] | |||
=== Printing pauses and recovery from print abortion === | |||
A larger structure like the stronghold takes over 24 hours to print. If you use PLA, it's ok to interrupt while you sleep or do other stuff. Unless you got some very special control software, your computer must stay on. With most software it is ok to move the printhead for extruding some plastic before continuing. It should move back to where it was. | |||
However, if you encounter a card read error or a filament problem after 20 hours of printing, frustration can be '''high''' ! In the [[g-code]] article, we described how we managed to recover. It's not so easy, but certainly less painful than to restart. | |||
=== Tips for first-generation RapMan / RepRap Mendel printers === | |||
The following skeinforge printing settings for the [[RapMan]] were made in 2010. You may consult the [[Skeinforge for RapMan]] to understand these. | |||
* Layer Thickness (mm) : 0.4 | * Layer Thickness (mm) : 0.4 | ||
* Perimeter Width over Thickness (ratio), i.e. how wide the filament should be compared to it´s height: 1.8 | * Perimeter Width over Thickness (ratio), i.e. how wide the filament should be compared to it´s height: 1.8 | ||
| Line 597: | Line 1,644: | ||
; ABS | ; ABS | ||
* We only made smaller objects so far, e.g. simple doblo bricks and mashups. You can see some of these in the [[Meshlab for RapMan tutorial]] and [[Netfabb Studio tutorial]]. | * We only made smaller objects so far, e.g. simple doblo bricks and mashups. You can see some of these in the [[Meshlab for RapMan tutorial]] and [[Netfabb Studio tutorial]]. | ||
* One of the major difficulties is to create a raft that really sticks both to the print bed and the object. See the [[Skeinforge_for_RapMan#duplo_bricks_for_color_ABS|duplo bricks for color ABS ]] section in our Skeinforge entry. | * One of the major difficulties is to create a raft that really sticks both to the print bed and the object. See the [[Skeinforge_for_RapMan#duplo_bricks_for_color_ABS|duplo bricks for color ABS]] section in our Skeinforge entry. | ||
Since skeinforge does not really produce what I want, I'd suggest to produce sort of a normal "fat" raft code, then edit the [[g-code]] file and double up M108 and Fxxx values. Make it twice as fast, else it takes hours to get just the raft printed .... | Since skeinforge does not really produce what I want, I'd suggest to produce sort of a normal "fat" raft code, then edit the [[g-code]] file and double up M108 and Fxxx values. Make it twice as fast, else it takes hours to get just the raft printed .... | ||
| Line 616: | Line 1,663: | ||
* Feed Rate = 16 | * Feed Rate = 16 | ||
=== | === Tips for 2mm printers === | ||
Printers of the 2012 to 2014 generation can easily do Lego compatibles, but the floor underneath will probably be uglier than with older more coarse-grained printers. A 4x4 full height piece should take between 15 minutes and an hour depending on quality and resolution settings. For each different setting you may have to change OpenSCAD parameters (sorry). '''We suggest starting with "normal" settings''' that your slicer software provides for your printer. You then maybe should remove some retraction, '''slow down printing of the first layer''' (10-15mm/s) max., print 3-4 layers for floors and reinforce the walls a bit. | |||
High quality prints are not necessarily better. As you can see in the pictures below, a fast "normal" 2.5mm/3.8mm print will just use straight lines for creating nibbles and other small stuff. A high resolution solution will create fills and these then bang into the walls and make them look less good .... | |||
[[File:2.5mm-layers-normal-walls.png|none|600px|thumbnail|2.5mm layers and normal 3.8mm walls (Felixprinter 2.0, Repetierhost control software, Skeinforge slicer]] | |||
[[File:2mm-layers-thin-walls.png|none|600px|thumbnail|2.0 mm layers and thin 0.25mm walls (Felixprinter 2.0, Repetierhost control software, Skeinforge slicer. Both nibbles and walls are "filled" with a zigzag pattern. Print time: more than an hour]] | |||
* 4) | '''Pick the right slicer''' | ||
* Some slicers have trouble printing LEGO since they attempt to strengthen thin walls. For example, it was (sometimes in the past) fairly difficult to convince Slic3R to respect basic Lego wall and nibble definitions. Using Cura for Duplo compatibles is much simpler, since one can define wall thickness but it had the same problem with Lego. Even as of 2018, the slicer delivered with RepetierHost does not allow to print lego-comptible walls that have less than 4 prints walls (2x2). | |||
* Skeinforge is much more respectful, but it was difficult to use and longer maintained. Sfact was an easier version, but is no longer maintained either. | |||
* Interaction between nozzle size and flow also seems to have different effects, but that could be explained by initial configuration settings that are not equivalent. | |||
As of dec. 2018 I cannot make any recommendations. I first will need to find some time to test different slicers. For now I am using either Cura or Simplify3D. | |||
'''Recommendations for printing larger objects:''' | |||
Printing objects of our castle or marble run kit requires many hours. 24 hour prints are not untypical. Therefore, you should consider speed over flat walls .... | |||
* layer height = 0.25mm | |||
* first layer speed = 10mm/s | |||
* other layers = 100 mm/s (yes, ten times faster !) | |||
* first layer height = some extra (e.g. 0.38 for 0.25), but not too much since otherwise the block will not fit and you will have to shave of plastic with a knife. My personal alternative is to put the print bed a bit closer to the nozzle than recommended, but this requires a really flat and well calibrated bed. | |||
* Temperature: Middle (e.g. for PLA that prints between 190 and 220, take 200) | |||
* no support (never ever) | |||
- For Lego-compatibles, you can add skirts (to the outside only !) or use glue if your print bed is uneven or not suitable for printing flat structures. | |||
== Educational use == | == Educational use == | ||
| Line 679: | Line 1,713: | ||
; Teacher and educational technologists training | ; Teacher and educational technologists training | ||
Since fall 2010, we used this library in classes in our [http://tecfa.unige.ch/maltt master in educational technology] | |||
Example (in french) of a wakeup activity: [http://edutechwiki.unige.ch/fr/STIC:STIC_IV_(2015)/Objets_village_de_savants Objets village de savants]. Students had to create printable Lego mashups to populate a "village" of wise researchers... | |||
; A few notes on childhood learning | ; A few notes on childhood learning | ||
| Line 706: | Line 1,742: | ||
* "End-user 3D programming" environment (e.g. students could add other primitives) | * "End-user 3D programming" environment (e.g. students could add other primitives) | ||
=== Prototyping === | |||
One could imagine printing bricks that, assembled together with Lego bricks, allow to create rapid prototype models, e.g. as described in Muller et al. (2014) [http://www.stefaniemueller.org//wp-content/themes/f8-lite/images/faBrickation/chi-2014-mueller-faBrickation.pdf faBrickation: Fast 3D Printing of Functional Objects by Integrating Construction Kit Building Blocks. | |||
== Bugs, to do == | == Bugs, to do == | ||
| Line 718: | Line 1,758: | ||
* replace support modules by triangle_forward, triangle_right, etc. | * replace support modules by triangle_forward, triangle_right, etc. | ||
* Parametrize '''all''' numbers | * Parametrize '''all''' numbers | ||
; Adjustments | ; Adjustments | ||
* | * Develop a design formula for bricks that are printable with a typical FDM printer. Slicers in so-called "draft" or "fast" mode do not respect precise dimensions. Typically Lego are a bit too wide and walls are too fat. | ||
== Links == | == Legal issues == | ||
Copyright for simple Lego Blocks has expired, but it does have a Trademark. That means our bricks, even if they were were perfect (they are not!), are only '''compatible bricks'''. | |||
Read [https://en.wikipedia.org/wiki/Lego_clone Lego clone] (Wikipedia). We quote {{quotation|At least two of the largest clone manufacturers have been challenged in court by Lego. The lawsuits have been mostly unsuccessful, for courts have generally found the functional design of the basic brick to be a matter of patent rather than trademark law, and all relevant Lego patents have expired.}} (retrieved, October 2019). | |||
== Links and credits == | |||
'''Credits for the OpenScad code''' | '''Credits for the OpenScad code''' | ||
* [http://www.thingiverse.com/thing:1778 parametric lego duplo], prior work by by [http://www.thingiverse.com/Domonoky Domonoky]. | * [http://www.thingiverse.com/thing:1778 parametric lego duplo], prior work by by [http://www.thingiverse.com/Domonoky Domonoky]. | ||
* Some extension modules in the ext directory reuse other code and is documented in the source | |||
'''STL files''' | |||
* A duck by suzujoji: https://www.thingiverse.com/thing:1205 | |||
* The Jewelry hand by Makerbot: http://www.thingiverse.com/thing:1288 | |||
; OpenScad | ; OpenScad | ||
* [[OpenScad beginners tutorial]] (stub) | * [[OpenScad beginners tutorial]] (stub) | ||
* [http://openscad.org/ OpenSCAD - The Programmers Solid 3D CAD Modeller] (download) | * [http://openscad.org/ OpenSCAD - The Programmers Solid 3D CAD Modeller] (download) | ||
* | * http://en.wikibooks.org/wiki/OpenSCAD_User_Manual | ||
; End-user programming / microworlds | ; End-user programming / microworlds | ||
| Line 745: | Line 1,795: | ||
* [http://legolearning.net legolearning.net] | * [http://legolearning.net legolearning.net] | ||
* [http://makezine.com/tag/lego/ Lego]-related articles at MakeZine | * [http://makezine.com/tag/lego/ Lego]-related articles at MakeZine | ||
* [https://www.cailliau.org/Alphabetical/L/Lego/Dimensions/General%20Considerations/ Lego] pages from Robert Cailliau, e.g. [https://www.cailliau.org/Lego/Dimensions/zMeasurements-en.xhtml Lego Dimensions] | |||
; What's the relationship between playing with Lego and creation of Google ? | ; What's the relationship between playing with Lego and creation of Google ? | ||
| Line 761: | Line 1,812: | ||
* LEGO Group (2004), ''The whole child development guide'', LEGO Group, [http://cache.lego.com/upload/contentTemplating/ParentsChildDevelopment/otherfiles/1033/download840A296790B3E0127078DAEAB734A88C.pdf PDF dowload]. Also can be found through [http://learninginstitute.lego.com/en-gb/Research/ Lego Learning Institute] Research Page. | * LEGO Group (2004), ''The whole child development guide'', LEGO Group, [http://cache.lego.com/upload/contentTemplating/ParentsChildDevelopment/otherfiles/1033/download840A296790B3E0127078DAEAB734A88C.pdf PDF dowload]. Also can be found through [http://learninginstitute.lego.com/en-gb/Research/ Lego Learning Institute] Research Page. | ||
* Stefanie Mueller, Sangha Im, Serafima Gurevich, Alexander Teibrich, Lisa Pfisterer, François Guimbretière, and Patrick Baudisch, WirePrint: Fast 3D Printed Previews. Proceedings of UIST '14. http://stefaniemueller.org/ [http://www.stefaniemueller.org//wp-content/themes/f8-lite/images/faBrickation/chi-2014-mueller-faBrickation.pdf PDF] | |||
* Winnicott, D.W. (1989) Playing and Reality. London, New York: Routledge. | * Winnicott, D.W. (1989) Playing and Reality. London, New York: Routledge. | ||
[[Category: | [[Category:LEGO]] | ||
[[ | [[category:3D printing]] | ||
[[Category: microworlds]] | [[Category: microworlds]] | ||
Latest revision as of 20:01, 21 October 2021
Introduction
Doblo Factory is the name of a set of OpenScad modules to generate Lego and Duplo-compatible structures and bricks. An inititial version was written by Daniel K. Schneider in 2010. Daniel Taub created a nicely refactored version in 2012. This new version documented here also included several interesting additions made by D. Taub, such as various connectors. Doblo factory allows creating various pieces that are somewhat compatible with Lego® and Duplo® blocks. However, the pieces and structures one can generate are neither Lego® nor Duplo® bricks or composites. They look different and also have some different structural properties.
Important update: As of september 2015, the V2.x version of this library is functional and compatible with current OpenSCAD implementations. Height parameters are different because it turned out that we needed to divide a full block by 6 (as opposed to 4). Also, there are additional parameters, in particular the scale parameter that allows having both Lego and Duplo sizes in one model.
A new major update will be released around christmas 2021. It will include a marble run.
Purpose and applications
Doblo factory includes both modules for generating "standard" bricks and modules for creating larger structures. Since OpenScad allows to "union" bricks, it is fairly easy to stack up bricks made from parametric OpenScad modules in order to create larger "playmobile-like" structures.
Doblo factory modules use a grid-based positioning system. The library can be used by non-programmers to create complex Lego-like structures just by making function calls with the right position and size parameters. However, users are expected to be familiar with using a formal language (e.g. HTML or SPSS or a simple scripting language). So far, we created the following modules.
- Modular castle kit - Lego compatible
- Lego-compatible thesis project board
- Lego-compatible icon kit
- Lego-compatible marble run
Download
Either
- http://tecfa.unige.ch/guides/3dprinting/doblo-factory/
- Version 2.1 (or maybe better) is required for use with Castle kit 2.0 which is also included in the archive.
- Version 2.3 (or better) is required for marble run kit (late 2018 or early 2019).
- Version 3. Will be available before Xmas 2021.
or
- https://github.com/dmtaub/DobloFactory (owned by Daniel Taub, no longer maintained as of dec. 2018)
Check my thingiverse page. It should include most designs using this library.
Concepts
About Lego and Duplo dimensions
According to the german-speaking 1000steine.de forum , retrieved 13:12, 15 April 2010 (UTC), the approximate dimensions of a Lego brick are the following. Duplo bricks are double in each dimension (i.e. 8 times the volume) and Quatro are double of Duplo. However, there are important differences between Quatro, Duplo and Lego bricks. In the code, we deal with this by using conditionals when defining parameters.
Another theory from the same forum thread claims that Lego have been designed in terms of special Lego units, i.e 1/64 inches.
Wikipedia also includes a diagram with dimensions
Finally, I suggest to buy a digital caliper (about 17 Euros) and measure both original bricks and your own bricks.
- Typical Duplo vs. Lego heights
(1) Most Duplo pieces are either "normal" (19.2mm) or half height (9.6mm)
- In our unit system: FULL or HALF, that is 6 or 3 units. In terms of mm's this translates to 6*3.2mm and 3*3.2mm
(2) Most Lego pieces are either "normal" (9.6mm) or third height (3.2mm).
- In our unit system: FULL or THIRD, that is 6 or 2 units. In terms of physical size, this would translate to 6*1.6mm = 9.6mm and 2*1.6mm = 3.2mm
- Length/Width
A 1x1 piece is 16mm for duplo-compatibles and 8mm for Lego compatibles. However, we suggest "shaving off" 0.2 to 0.4mm from the outer walls for better printed results (see the SHAVE parameter).
Any 3D printer should be able to print DUPLO and Lego compatibles. You need to be able to print with 0.25mm layers (or better).
Basic Units of the Doblo system
Doblo factory uses a simple unit and position system that allows thinking in high-level units, as opposed to fractions of millimeters. Lego measures are quite complex and sometimes controversial as you could see from reading information on various fan sites.
Doblo factory has been tested quite extensively with Duplo and Lego sizes. You even can combine the two systems to create a single brick. Mini (nano size) and Cadro size has not been really tested. While the outside sizes of various systems are always 2 times smaller or bigger, this is not the case for walls, nibbles, cylinders, etc.
Lugo, Doblo, Cadro, Mini
- Cadro are the biggest units and compatible with LEGO Quatro (TM). Compatible Cadro may need support for printing (but we do without).
- Doblo bricks are compatible with LEGO Duplo (TM). Duplo are half as wide, long and high as Quatro, i.e. en 8th of the volume
- Lugo bricks are compatible with LEGO (TM). Lego are half as wide, long and high as Duplo, i.e. en 8th of the volume or a 64th of a Cadro
- Mini are an 8th of Legos (TM), i.e. the same size as Nanoblocks, but Lego compatible
Height units of bricks that are compatible with the LEGO system
Height of a standard brick is defined as 6 units. E.g., a height of 5 for a Lego brick would mean 5/6th of a standard brick. Common heights are also defined by the parameters FULL, HALF and THIRD.
- FULL = 6 units
- HALF = 3 units
- THIRD = 2 units
The unit size in mm depends on the brick system
- Cadro (Quatro compatible) = 6.4mm
- Doblo (Duplo compatible) = 3.2mm. Doblos can be devided in halfs.
- Lugo (Lego compatible) = 1.6mm. Lugos can be divided in thirds.
- Mini (Nanoblock size, but not compatible) = 0.8mm
| Cadro | Doblo | Lugo | Mini | |
|---|---|---|---|---|
| compatibility | Quatro™ | Duplo™ | Lego™ | Nanoblock™ |
| FULL | 38.4mm | 19.2mm | 9.6mm | ? |
| HALF | 19.2 | 9.6 | - | |
| THIRD | - | - | 3.2 | |
| FORTH | 9.6 | - | - | |
| Unit (1/6 == 2/12)
used in some applications |
(6.4) | 3.2 | 1.6 |
For example, a standard Lego brick has a height of 6 units * 1.6mm = 9.6mm. A standard Duplo brick has a height of 6 * 3.2 = 19.2mm. A half duplo brick has a height of 9.6mm. A third Lego brick a height of 3.2mm. The following picture shows left to right (x axis) the FULL, HALF, THIRD and FORTH height of the various brick types. B
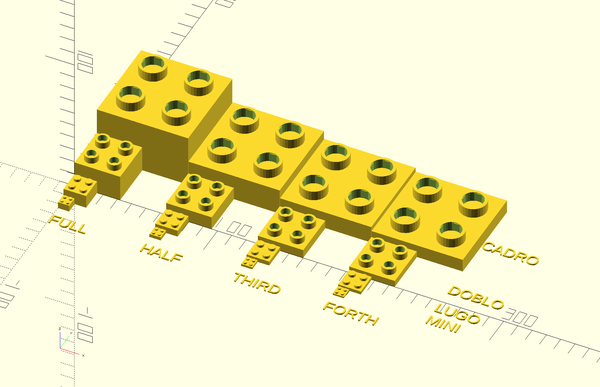
Remember that in principle, Doblo and Cadro don't have thirds and Lugo do not have halfs. Back to front (y axis) shows the brick types: Cadro, Doblo, Lego, Mini. Doblo can be stacked on Cadro, Lego on Doblo, and Mini on Lego (unless you decide to print with LATTICE TYPE = 3. In the latter case, To stack a smaller piece on a larger one, you must use a LEGO compatible in between, for example, a Lugo on top of a Lego on top of a Duplo.
frame|none|STL model Standard 2x2xFULL Duplo and Lego compatible Doblo and Lugo blocks (click to visualize)
Width and length units
Units for columns, rows, with and length are standardized with respect to the smallest Lugo/Doblo size, i.e. a brick that has on nibble on top.
- DOBLO compatible with DUPLO base width/length = 16mm, e.g. the smallest 1x1 brick = 16mm * 16mm
- LUGO, compatible with LEGO base width = 8mm, e.g. the smallest 1x1 brick = 8mm * 8 mm
The following picture shows in the back row a 2x2 Duplo (red), a 1x1 Duplo (green), and in the front row a 2x2 Lego (orange) and an olive 1x1 Lego. The 1x1 bricks represent a unit. Positioning uses units with respect to the brick type.
For example, as we shall explain again in more detail, a standard small squared Lego brick is defined as "2x2xFULL" = 2x2x6 = 16mm x 16mm x 9.6mm
Rotation
Some bricks can be rotated through rotation parameters. You only should try 0, 90, 180, 270, else the result is unpredictable
The positioning framework
Doblo uses a grid like a chessboard. Origin is in the middle like in most 3D representation languages.
- Column = left to right (x axis)
- Row = forward to backward (y axis). This can be considered a good decision if you look at your model from top. Else it isn't. I wasn't sure about this, but now it's done. So remember: y is reversed with respect to OpenScad.
- up = upwards (z axis)
Blocks have the x/y origin in the origin in the upper left.
Let us illustrate this with an example picture:
You are free to use rational numbers for "in-between positioning", e.g. when assembling more complex structures.
Parameter names used in the source code
- col: the x axis (left-to-right)
- row: the y axis (forward to backward)
- up: the z axis (down to up), Z origin is the bottom of a block. I.e. a block of up=1 would sit on a block of height=1.
- width: length on the x-axis. Except for the doblo block whose origin is in the middle, origin is upper left
- length: length on the y-axis, Except for the doblo block whose origin is in the middle, origin is upper left
- nibbles_on_off: true = nibbles on top, false = no nibbles
Parameters to identify the Duplo/Lego scale
Each function that defines a brick in the doblo system has a scale parameter that you can use to render it in either Cadro, Doblo, Lugo or mini size.
- CADRO == 2; // Quatro size
- DOBLO == 1; // Duplo size
- LUGO == 0.5; // Lego size
- MINI == 0.25; // Nano size
Alternatively, you could set the SCALE parameter in the beginning of your file, e.g. SCALE = 0.5 but passing parameters is preferable since it allows for better tracing.
This section introduced some basic terminology and measures for Lego® pieces. Here is the executive summary.
- Lugo refers to Lego™-compatibles, Doblo™ refers to Duplo-compatibles, Cadro to Quatro™ compatibles. Compatibility of printed doblo blocks depends on the quality of parameter settings, slicing settings, your 3D printer plus the use or not of the lattice option.
- There is a positioning grid and it uses the smallest part width as unit, i.e. the size of a 1x1 Lego or Duplo unit.
- Height of a typical brick was divided in 6 units. FULL=6, HALF=3 and THIRD=2.
Calibration of parameters (FIX this with a good table )
Doblo factory parameters
To create somewhat DUPLO and Lego-compatible bricks, one does not necessarily use real dimensions. For example, filament-based 3D printers will not produce accurate nibbles. Therefore, if you provide correct data, your blocks won't be compatible. You will have to adjust for your printer and your print settings by editing the parameters in the *.scad file.
Doblo factory is fully parametrized and you certainly will have to adjust the nibble-related parameters with respect to your type of 3D printer, polymers used, and your print setting like print speed, extrusion speed, layer width, and Perimeter Width over Thickness ratio. See for example the Skeinforge for RapMan article for an explanation of these concepts.
Depending on your printer and your layer/thickness printing parameters you may need to change parameters for nibbles and walls.
Parameters were by default set for a Felix V2 printer, i.e. typical mid-range PLA printer. Printing with "normal" slicers profiles should work fairly well, although you may add an extra shell to the first layer and and extra full layer for the bridges (roofs).
- Layer thickness (mm): Between 0.2 and 0.25 for Lego compatibles. Between 0.2 and 0.7 for Doblos and Cadros.
- Fit with real Lego and Duplo can be rather tight (as least with our printer/slicer combination). After printing - while still warm - you can press the brick onto a real brick to make some adjustment. You also could heat a brick with heat gun, e.g. to 60 - 90 degrees before doing so. However, printing calibration bricks until you get it right is the better option.
- Adjust wall with, insets and nibble outer radius, if needed.
Parameters can and sometimes must be set wrong in order to compensate for the characteristics of the printer and the print parameters. If you do precision printing, e.g. with a 0.1 mm layer you may go closer to the real DUPLO/Lego values.
All units are mm.
Dimensions:
- A typical small 2x2 nibbles on top DUPLO compatible brick with one nibble underneath is approximately 32mm x 32mm x 19.2mm (plus a nibble height of 4.5mm)
- LEGO-compatible bricks are half that size in all three dimensions. However walls and nibbles are not proportionally smaller !. This is why we use conditionals in the parameter section. we assume that any size smaller than 0.6 should adopt the Lego proportions.
- DUPLO compatible bricks: use SCALE = 1
- Lego compatible bricks: Use SCALE = 0.5
- The table below defines some important parameters. Notice that we use functions, allowing us to compute other sizes than the non-standard ones, e.g. minis that are just half olf Lego size.
| name | description | Definition | lugo size | doblo size | cadro size |
|---|---|---|---|---|---|
SCALE
|
LUGO==0.5 | DOBLO==1 | CADRO==2 | ||
LEGO_SCALE (SCALE)
|
2*SCALE
|
0.5 | 1 | 2 | |
PART_WIDTH (SCALE)
|
16.0*SCALE
|
8mm | 16mm | 32mm | |
PART_HEIGHT (SCALE)
|
3.2 * LEGO_SCALE (SCALE)
|
1.6mm | 3.2mm | 6.4mm | |
NO (SCALE)
|
Top nibble offset from border | PART_WIDTH (SCALE) / 2.0
|
4mm | 8mm | 16mm |
NBO (SCALE)
|
Bottom offset from border (if 2 lines of nibbles on top, there is one bottom nibble line) | PART_WIDTH (SCALE)
|
8mm | 16mm | 32mm |
NH (SCALE)
|
Top nibble height is not linear. | (SCALE < 0.6) ? 1.9 * LEGO_SCALE(SCALE) : (SCALE == 1) ? 4.55 : 7;
|
1.9 | 4.55 | 7 |
NB_RADIUS(SCALE)
|
Top nibble (outer) radius, not linear. | (SCALE < 0.6) ? (4.9 / 2 * LEGO_SCALE(SCALE)) : (9.6/2.0 * SCALE)
|
4.9/2=2.45 | 9.6/2.0=4.8 | 18/2=9 |
NB_RADIUS_INSIDE (SCALE)
|
Top nibble inner radius, not linear | (SCALE < 0.6) ? 4.9/2*LEGO_SCALE(SCALE) : 10.8/2*SCALE;
|
none | 6.44/2 | 13.48/2 |
NB_THICKNESS (SCALE)
|
In principle, outer - inner radius | NB_RADIUS (SCALE) - NB_RADIUS_INSIDE SCALE)
|
|||
NB_BOTTOM_RADIUS (SCALE)
|
Bottom nibble radius | (SCALE < 0.6) ? 6.2/2*LEGO_SCALE(SCALE) : 13.4/2*DOBLO
|
6.2/2=3.1 | 13.4/2=6.7 | same as duplo |
NB_BOTTOM_RADIUS_INSIDE (SCALE)
|
Bottom nibble inside radius | (SCALE < 0.6) ? 4.9/2*LEGO_SCALE(SCALE) : 10.8/2*DOBLO;
|
4.9/2 = 2.45 | 10.8/2 = 5.4 | same as duplo |
DOBLOWALL(SCALE)
|
thickness of walls | (SCALE < 0.6) ? 1.4 * LEGO_SCALE(SCALE): 1.55 *SCALE;
|
1.2 | 1.55 | maybe a bit smaller than duplo (to do) |
| LATTICE_TYPE | Type of lattice | 1 == normal, 2== additional, 3== all the way down for better stability but no compatibility between lugo, doblo, cadro. | |||
| INSET_WIDTH(SCALE) | Inset width (underneath) | (SCALE < 0.6) ? 0.4 *LEGO_SCALE(SCALE) : (SCALE==1) ? 1.50 : 1.50
|
|||
| INSET_LENGTH(SCALE) | Inset length | (SCALE < 0.6) ? 3*DOBLOWALL(SCALE) : (SCALE==1) ? 4*DOBLOWALL(SCALE) : 6*DOBLOWALL(SCALE);
|
3.6 | much longer than Lego or Duplo (to do) | |
| LATTICE_WIDTH | Lego (TM) do not need these | 1.50 * SCALE | .75 | 1.5 | 3 |
Below we show the settings part of the doblo-params.scad file in Doblo Factory, version 2.1
// Normal size (DUPLO)
// SCALE = 1;
// Lego size - see also the hacks in the code for fixing wall and nibble dimensions
// SCALE = 0.5 ;
// Mini Lego size
// SCALE = 0.25

CADRO = 2; // not yet tested
DOBLO = 1;
LUGO = 0.5;
MINI = 0.25;

HALF=3;
THIRD=2;
FULL=6;

// LEGO SCALE - don't change, allows to create nano legos, should be 1 if real Legos
function LEGO_SCALE(SCALE) = 2 * SCALE;

// Doblo block size
// Real DUPLO Block = 31.7 / 2 = 15.85 (with some variations)
function PART_WIDTH(SCALE)  = 16.0  * SCALE;

// Block height (a typical block is 4 * PART_HEIGHT)
// Real Duplo Block = 19.17 / 4 = 4.8, we also measured 19.09, 19.16
function PART_HEIGHT(SCALE)  = (SCALE < 0.6) ? ( 1.6 * LEGO_SCALE(SCALE) ) : ( 3.2 * SCALE );
// Diamonds - size of anti-warping holes - used optionally
DIAMOND = 4;

// Top nibble size definitions
// Must be adjusted with respect to layer resolution and other slicing considerations
function NO(SCALE)         = PART_WIDTH(SCALE) / 2.0;              //nibble offset
function NBO(SCALE)        = PART_WIDTH(SCALE);                   // nibble bottom offset
function NH(SCALE)         = (SCALE < 0.6) ? 1.75 * LEGO_SCALE(SCALE) : 4.55 * SCALE;  // LEGO vs. DUPLO
function NB_RADIUS(SCALE)  = (SCALE < 0.6) ? (4.9 / 2 * LEGO_SCALE(SCALE)) : (9.2 / 2.0 * SCALE);  // Lego vs. DUPLO

// Real DUPLO Block = 9.38
function NB_RADIUS_INSIDE(SCALE) = 6.8/2  * SCALE;
// 6.44 = Real DUPLO block

function NB_THICKNESS(SCALE)=NB_RADIUS(SCALE)-NB_RADIUS_INSIDE(SCALE);

// For square nibble supports in 1xM or Nx1 blocks
function ALONG_LEN(SCALE)  = (PART_WIDTH(SCALE)-NB_RADIUS(SCALE))/1.7; //tighter fit than 1.8
function CROSS_LEN(SCALE)  = (PART_WIDTH(SCALE)-NB_RADIUS(SCALE)/2);

// Bottom nibbles size definitions
// Must be adjusted with respect to layer resolution and other slicing considerations
function NB_BOTTOM_RADIUS(SCALE)        = (SCALE < 0.6) ? 6.5/2*LEGO_SCALE(SCALE) : 13.4/2*SCALE;
function NB_BOTTOM_RADIUS_THIN(SCALE)   = (SCALE < 0.6) ? 3.5/2*LEGO_SCALE(SCALE) : 7.2/2*SCALE;
// Real DUPLO = 13.48
function NB_BOTTOM_RADIUS_INSIDE(SCALE) = (SCALE < 0.6) ? 4.8/2*LEGO_SCALE(SCALE) : 10.8/2*SCALE;
// Real DUPLO = 10.73
// rapman 10.6
// Real Lego = 4.9

// walls - IMPORTANT: must be adjusted with respect to layer resolution and other slicing considerations
function DOBLOWALL(SCALE) = (SCALE < 0.6) ? 1.2 * LEGO_SCALE(SCALE): 1.55 *SCALE; // Lego vs. Duplo, Lego is not 2x smaller

function USE_INSET(SCALE) = (SCALE < 0.6) ? true : true;
function INSET_WIDTH(SCALE)    = (SCALE < 0.6) ? 0.4 *LEGO_SCALE(SCALE) : 1.50 * SCALE; //little inset walls to make it stick
function INSET_LENGTH(SCALE)  = (SCALE < 0.6) ? 3*DOBLOWALL(SCALE) : 4*DOBLOWALL(SCALE); // Legos have proportionally smaller insets

//lattice width and height (optional, see LATTICE_TYPE)
// A grid underneath the flat bridge, crossing through the nibbles underneath
function LATTICE_WIDTH(SCALE)   = 1.50 * SCALE;

// 0 means none, 1 means more spacing (same as nibbles underneath),
// 2 means denser
LATTICE_TYPE    = 1;

// Sizes of a standard 2x2 square brick, normal height
// Not used, but are practical in your custom modules
function DOBLOWIDTH(SCALE)  = PART_WIDTH(SCALE)  * 2.0  * SCALE;
function DOBLOHEIGHT(SCALE) = PART_HEIGHT(SCALE) * 6.0  * SCALE;
function LEGOHEIGHT(SCALE)  = PART_HEIGHT(SCALE) * 6.0  * SCALE;
Using openscad doblo modules
From a user point of view, Doble factory, is a set of functions (called modules in OpenSCAD) that will produce various Lego geometries.
You could use Doblo factory to generate various types of isolated bricks, but its main purpose is to assemble various smaller pieces into a bigger whole that then can printed.
Most doblo modules work in the same way, the use the same parameters in the same order if appropriate.
Getting started
Getting started - e.g. producing a canonical 4x2 Lego brick - is simple
- Create a Scad file that includes the doblo-factory library and a parameter file
- Call the doblo module with some parameters.
Creation of simple Lego brick using a list of parameters
SCALE =0.5;
LATTICE_TYPE = 1;
include <doblo-factory.scad>;
include <lib/doblo-params.scad>;
//       column line z-pos   width length   height nibbles diamonds, size
doblo   (0,     0,   0,      4,    2,       FULL,  true,   false,    LUGO);
This will create a brick that looks like this and that is positioned at x,y,z origin. As you can see in the code, we added a line with comments so that we could remember what each parameter represents.
Alternatively - and we recomment this - you can use a more verbose syntax that uses parameter names in the module call. Warning: you cannot use both positions and verbose syntax in one module call (except for the last element).
The following code will produce two identical Lego compatible bricks. We use both short and long notation (named parameters).
SCALE =0.5;
LATTICE_TYPE = 1;
include <doblo-factory.scad>;
include <lib/doblo-params.scad>;

//doblo   (0,   0,   0,   2,   2,    FULL,  true, false, DOBLO);
//doblo   (0,   0,   0,   2,   2,    FULL,  true, false, LUGO);

//      col row   up  width length height
doblo   (0,   0,   0,   4,   2,    FULL,  true, false, LUGO);

doblo   (col=0,  row=4, up=0,
	 width=4,  length=2, height=FULL,
	 nibbles_on_off=true, diamonds_on_off=false,
	 scale=LUGO);
Using the library and the parameter file, file locations
Most example code should work (copy/paste the code). However, you have to make sure that the file paths are right.
E.g. if your scad file sits in the top-level directory, use
include <doblo-factory.scad>;
include <lib/doblo-params.scad>;
If it stits in a subdirectory, use
include <../doblo-factory.scad>;
include <../lib/doblo-params.scad>;
etc.
A simple example
This example should sit in the root directory with filename = basic-example.scad.
/*
Doblo library usage example. For more information, please read:
https://edutechwiki.unige.ch/en/Doblo_factory#Using_openscad_doblo_modules

This is an example on how to use this library. It will create two simple objects.
- A: A lego brick with a block on top followed by an imported STL
- B: A lego brick with some nibbles and some 3D text on top

V1. Daniel.Schneider@unige.ch, April 2018

The owl was taken from https://www.thingiverse.com/thing:647060. I was made by Sailor96.
Low Poly Owl by Sailor96 is licensed under the Creative Commons - Attribution - Share Alike license.
(http://creativecommons.org/licenses/by-sa/3.0/)

*/

// Include the library plus default parameters
include <doblo-factory.scad>;
include <lib/doblo-params.scad>;

/* Object A has three parts:
- a brick of size 6x4, 1/3rd height, no nibbles on top
- a block on top 2/3 height
- an imported owl on top (from the stls directory)
*/

// ------ Create a 6x4 brick in position 0,0

doblo   (col=0,
         row=0,
         up=0,
	 width=6,
         length=4,
         height=THIRD,
	 nibbles_on_off=false);

// put a block on top
color("blue") block (col=0, row=0, up=THIRD,  width=6, length=4, height=4);

// Add the owl
merge_stl (file="stls/Owl_LowPoly.stl", col=2, row=1.2, up=4, stl_z_offset_mm=0, shrink=2);

// ------- Create a brick in position 10,0

color ("red") doblo   (col=10,
         row=0,
         up=0,
	 width=6,
         length=4,
         height=2*THIRD,
	 nibbles_on_off=false);

difference () {
    // put a block on top
    color("green") block (col=10, row=0, up=2*THIRD,  width=6, length=4, height=THIRD);
    // ---- subtract some text
    # color ("black") write (text="DOCK", col=10.1, row=1.5, up=5, size=12, height=3);
}
// --- add some nibbles
nibbles (col=10,  row=0, up=FULL, width=6, length=1);
nibbles (col=10,  row=3, up=FULL, width=6, length=1);
Overview of doblo modules
The following picture of Doblo Factory V2 shows most types of bricks that you could generate (and combine).
- Doblo brick: An x/y/z size of Lego/Duplo compatible brick. With or without nibbles on top
- Base plate: Like block, but a different bottom for easier printing
- Merge STL files
- Block: Like duplos, but a flat bottom. Allows to assemble playmobile-like structures
- Nibbles: To stick on top of plates, blocks, animals
- Support triangles. To build housing and other structures
- Ramp: to build housing and other structures
- Cylinder. An alternative to block when building structures
- [ New elements !! ]
List of doblo modules
Below, we shall attempt to document each type of brick. The documentation is not complete yet, look at the source code please - Daniel K. Schneider (talk) 17:25, 28 September 2015 (CEST)
doblo brick
Creates a typical duplo-compatible brick. Typical use is to create a Doblo base on which you then can add other structures. You also can pile up (union) these bricks, but that may lead to a waste of processing time and plastic. Doblo bricks are just like Duplo bricks, however you can make the nibbles on top optional.
- Short Syntax
doblo   (col, row,  up,  width, length, height, nibbles_on_off, holes_on_off, system)

col     = number, the x position of the brick
row     = number, the y position of the brick
width   = number, the size in x axis. 2 refers to brick size of 2
length  = number (y axis). 4 referes to brick size of 4
height  = either a number for the sixth of a standard brick height or THIRD, HALF, FULL
nibbles_on_off = wether you want nibbles or not, i.e. true or false
system  = either LUGO or DOBLO
- Named parameters syntax with default parameter values
doblo   (col=0,
         row=4,
         up=0,
	 width=4,
         length=2,
         height=FULL,
	 nibbles_on_off=true,
         diamonds_on_off=false,
	 scale=LUGO.
         orientation=0;
         lattice_type=LATTICE_TYPE
);
Orientation is not useful in a normal context, because changing height, with, col, row does the same, but it can be useful in composite object. lattice_type allows overriding a global constant. By default it should be set to 1.
Example
The following picture shows four bricks:
- Yellow: A larger yellow Lego-compatible brick (4x6x6 or 4x6xFULL size) without nibbles
- Red: A standard 2x2xFULL sized Lego-compatible brick
- Blue: A 1x1x18 = 1x1x 3*FULL Lego-compatible brick
- Green: A 2x3xFULL Duplo-compatible block
The code (including an extra "color("....") statements goes like this:
include <doblo-factory.scad>;
include <lib/doblo-params.scad>;

color ("yellow") doblo (col=0,  row=0, up=0,
		       width=4,  length=6, height=FULL,
		       nibbles_on_off=false,
		       diamonds_on_off=false,
		       scale=LUGO);

color ("red") doblo   (col=0,  row=0, up=FULL,
		       width=4,  length=2, height=FULL,
		       nibbles_on_off=true,
		       diamonds_on_off=false,
		       scale=LUGO);

color ("blue") doblo   (col=0,  row=5, up=FULL,
		       width=1,  length=1, height=3*FULL,
		       nibbles_on_off=true,
		       diamonds_on_off=false,
		       scale=LUGO);

color ("green") doblo  (col=-3,  row=0, up=0,
		       width=2,  length=3, height=FULL,
		       nibbles_on_off=true,
		       diamonds_on_off=false,
		       scale=DOBLO);
Base plate
This is an easy to print non-stackable base plate. In order to prevent warping on the print bed, it has smaller squares underneath if you print them in exactly the same heights as below (there is a bug as of sept. 2015). Up should be always 0. You also can "glue" other elements on top in order to create play-mobile like structures. In that case you also should nibbles in certain areas as shown in the following example:
- Short Syntax
base_plate (col, row, up, width, length, height, nibbles_on_off, scale)
- Long Syntax
module base_plate (col=0, row=0, up=0, width=8,length=8,height=THIRD,nibbles_on_off, scale=LUGO)
Example that shows how to add a few nibbles on top:
include <doblo-factory.scad>;

base_plate (4, -14, 0, 12,12,2,true, LUGO);
base_plate (2, 0, 0, 6, 6, 2,true, DOBLO);
base_plate(col=-8);

// A stack of doblos/lugos just for the fun of it.
// Note how DOBLOs and LUGOs have a different coordinate system
color ("red")    base_plate  (-4, -6,  0,   4,   4,  2,  false, DOBLO);
color ("orange") nibbles     (col=-4, row=-6,  up=2,  width=2, length=4, scale=DOBLO);

color ("green")  doblo       (-2, -12,  4,   2,   2,    6,  true, false, LUGO);
color ("olive")  nibbles     (col=-2, row=-10,  up=4,  width=2, length=6, scale=LUGO);
As this example shows, it could be useful to add a bit of color in front of some bricks. This way you can identify them. Below is the picture:
Merge STL files
Positions an stl file, you may have to find out by trial and error what z offset to use. Tip: embed the STL into a doblo or a block.
- Syntax
merge_stl (file, col, row, up, stl_z_offset_mm, shrink, scale)
Notice: For height, you only need the up parameter, e.g. up=3.2, but if you prefer to think in mm's use stl_z_offset_mm
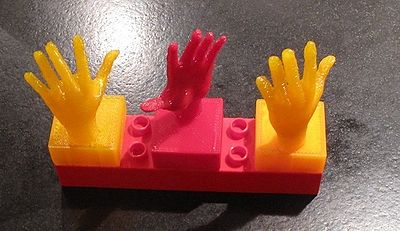
Example:
merge_stl ("../stls/duckator-reduced.stl", col=-3.4, row=-9, up=FULL);
If you plan to create blocks with some animal on top, also consider using the little stl-merge-display extension like this:
include <doblo-factory.scad>;
include <lib/doblo-params.scad>;
include <ext/stl-merge-display.scad>;

// One in front
merge_brick(stl_file="stls/duck.stl");

// A second one in the back
translate([0,40,0])
 merge_brick (doblo_width=3, doblo_length=2, doblo_height=2, doblo_nibbles=false,
	      stl_file="stls/duck.stl", stl_lift=-1, stl_shrink=1.66,
	      STL_col=1, STL_row=0,
	      block_height=2, block_width=3, block_length=2);

// A simple merge without brick and block using the doblo-factory module
translate([0,80,0]) scale (0.5) merge_stl ("stls/duck.stl", shrink=0.8);
Block
Creates a building block for larger structures with x,y,z positioning. A block does not have nibbles underneath and may or may not have nibbles on top. Also could be used to print a base plate.
- Syntax
block (col, row, up, width,length,height,nibbles_on_off, scale)block (col=0, row=0, up=0, width=2,length=4,height=FULL,nibbles_on_off=false, scale=LUGO)
Example: Simple stairway
Blocks are essential for building larger structures. The following examples shows how we could create a simple stairway by stacking a series of blocks next to each other.
include <doblo-factory.scad>;
include <lib/doblo-params.scad>;

module stairs_world_light ()
{
     //    (col, row, up, width,length,height,nibbles_on_off)
     color ("green") doblo (-5,  -5,   0,  10,   10,    1,     false, scale=DOBLO);

     //    staircase
     //                   (col, row, up, width,length,height,nibbles_on_off, SCALE)
     color ("red")  block (1,   3,   1,  2,    2,     2,     false, DOBLO);
     color ("pink") block (-1,  3,   1,  2,    2,     4,     false, DOBLO);
     color ("red")  block (-3,  3,   1,  2,    2,     6,     false, DOBLO);
     color ("pink") block (-5,  3,   1,  2,    2,     8,     false, DOBLO);
     color ("red")  block (-5,  1,   1,  2,    2,    10,     false, DOBLO);
     color ("pink") block (-5, -1,   1,  2,    2,    12,     false, DOBLO);
     color ("red")  block (-5, -3,   1,  2,    2,    14,     false, DOBLO);
     color ("pink") block (-5, -5,   1,  2,    2,    16,     true, DOBLO);

     color ("blue") block (3, -5, 1, 2, 6, 1, true, scale=DOBLO);
}
// call the module, else it won't draw
stairs_world_light();
Example: Stairway
The following example shows inclusion of some other brick types that we shall explain below, e.g. nibbles. Also admire the duck embedded as a monument to all this...
This example also demonstrates how to use standard openscad functionality to "dig" a tunnel, seen to the left. In the source code below the # sign will allow to visualize the object (in pink) that was subtracted and that won't be seen in the computed scene.
The passageway to the right has been built with some support brick (see below) that should be replaced some day with something that is more graceful but still printable.
include <doblo-factory.scad>;
include <lib/doblo-params.scad>;

stairs_world ();

module stairs_world ()
{
     //      (col, row, up, width, length)
     nibbles (-1,   -1,   1,   6,     4      , scale=DOBLO);
     nibbles (-1,   -5,   1,   4,     3      , scale=DOBLO);

     difference () {
	  union () {
	       //    Base plate, for faster printing replace by block
	       //    (col, row, up, width,length,height,nibbles_on_off, diamonds)
	       color ("green") base_plate (-5,  -5,   0,  10,   10,    1,     false, false, scale=DOBLO);
     	       //    staircase
	       //    (col, row, up, width,length,height,nibbles_on_off)
	       color("red") block (1,   3,   1,  2,    2,     2,     false, scale=DOBLO);
	       block (-1,  3,   1,  2,    2,     4,     false, scale=DOBLO);
	       color("red") block (-3,  3,   1,  2,    2,     6,     false, scale=DOBLO);
	       block (-5,  3,   1,  2,    2,     8,     false, scale=DOBLO);
	       color("red") block (-5,  1,   1,  2,    2,    10,     false, scale=DOBLO);
	       block (-5, -1,   1,  2,    2,    12,     false, scale=DOBLO);
	       }
	  # house_lr (-6.01, 0.01, 1.01, 4.01, 2.01, 3.01, DOBLO);
	  }
     //   platform and support
     //          (col,row,up,height,angle, width)
     color ("blue") support (-5, -5,  6,  7,   270, 1, scale=DOBLO) ;
     block   (-5, -5,  1,  1,    1,     8,   false, scale=DOBLO);

     color ("blue") support (-3, -5,  6,  7,   270, 1, scale=DOBLO) ;
     block   (-3, -5,  1,  1,    1,     8,   false, scale=DOBLO);

     color ("blue") support (-5, -2,  6,  7,   90, 1, scale=DOBLO) ;
     block   (-5, -2,  1,  1,    1,     8,   false, scale=DOBLO);

     color ("blue") support (-3, -2,  6,  7,   90, 1, scale=DOBLO) ;
     block   (-3, -2,  1,  1,    1,     8,   false, scale=DOBLO);

     block   (-5, -5,  13,  3,    4,     2,   true, scale=DOBLO);

     // support block + duck
     block   (-4, -5,  15,  2,    2,     2,     false, scale=DOBLO);
     merge_stl ("stls/duck.stl", -4, -5, 15, 3, scale=DOBLO);
     nibbles (-3.9, -4.5, 19.7, 1, 1, scale=DOBLO);
     nibbles (-3.9, -4.5, 19, 1, 1, scale=DOBLO);
}
Nibbles
To insert nibbles on some spots of a nibble-less block or an imported STL. For use in larger structures or to create custom bricks. Nibbles also can be stuck on top of imported STL files (use rational numbers for the x,z,z aks col,row,up positions to do so, as seen for the duck in the example below.
- Syntax
nibbles (col, row, up, width, length, scale, extra, filled, hscale)nibbles (col=0, row=0, up=FULL, width=1, length=1, scale=LUGO, extra =false, filled=false, hscale=1)
Example
include <doblo-factory.scad>;
include <lib/doblo-params.scad>;

doblo (col=-4, row=-2, up=0,
	width=4,  length=4, height=HALF,
	nibbles_on_off=false,
	diamonds_on_off=false,
	scale=DOBLO);

color ("red") nibbles (col=-4, row=0, up=HALF, width=1, length=2,
		       scale=DOBLO, extra =false, filled=false, hscale=1);
color ("pink") nibbles (col=-4, row=-2, up=HALF, width=1, length=2,
			scale=DOBLO, extra =false, filled=true, hscale=1);
color ("orange") nibbles (col=-3, row=-2, up=HALF, width=1, length=2,
			  scale=DOBLO, extra =false, filled=true, hscale=3);

doblo (col=2, row=0, up=0,
	width=4,  length=4, height=HALF,
	nibbles_on_off=false,
	diamonds_on_off=false,
	scale=LUGO);

color ("green") nibbles (col=2, row=0, up=HALF, width=1, length=2,
			 scale=LUGO, extra =false, filled=false, hscale=1);
color ("lightgreen") nibbles (col=2, row=2, up=HALF, width=1, length=2,
			      scale=LUGO, extra =false, filled=true, hscale=1);
color ("lime") nibbles (col=3, row=0, up=HALF, width=3, length=2,
			scale=LUGO, extra =false, filled=true, hscale=1);

merge_stl (file="stls/duck.stl", col=-15, row=-4, up=0, stl_z_offset_mm=0, shrink=0.5, scale=LUGO);

color ("blue") nibbles (col=-15.5, row=-4, up=17, width=2, length=2,
			scale=LUGO, extra =false, filled=true, hscale=3);

color ("cyan") nibbles (col=-12.5, row=-3.5, up=31, width=1, length=1,
			scale=LUGO, extra =false, filled=true, hscale=3);
- See also the example above for the block element
Bottom nibbles
To insert underneath an imported STL. Not very usefull, unless you can print with an easily removable support material or if you can turn the object upside down (put these nibbles on top) or if you turn it upside down and then use a support structure generated from your slicer. I'd rather stick a doblo block to the feet of an imported object.
- Syntax
nibbles_bottom (col, row, up, width, length, height, scale)
Important: For positioning think of a bottom nibble as the center of a "virtual Lego brick". E.g. in the example below, both the lime and the olive nibble sit on the same "row" as the pink Lugo brick.
Example
include <doblo-factory.scad>;
include <lib/doblo-params.scad>;

merge_stl (file="stls/duck.stl", col=0, row=0, up=HALF, stl_z_offset_mm=0, shrink=0.5, scale=LUGO);

// calibration brick
color ("pink") doblo (col=-6, row=0, up=0, width=2, length=2, height=HALF, scale=LUGO);

color ("green") nibbles_bottom (col=-2, row=-1, up=0, width=5, length=4, height=FULL, scale=LUGO);
color ("lime") nibbles_bottom (col=-3, row=0, up=0, width=1, length=1, height=FULL, scale=LUGO);
color ("olive") nibbles_bottom (col=-4, row=0, up=0, width=2, length=2, h
Alternative to bottom nibbles
As we mentioned above, you could just "sit" and STL object on top of a doblo brick. However, if you want the nibbles underneath to be less appareant, you can play with the following kind of alternative.
The following alternative requires a tiny bit of OpenSCAD programming and does create printable objects.
- Use a block to dig a rectangular hole into the imported STL object
- Stick a doblo block without nibbles into this hole.
Example
include <doblo-factory.scad>;
include <lib/doblo-params.scad>;

difference () {
     merge_stl (file="stls/duck.stl", col=0, row=0, up=0, stl_z_offset_mm=0.5, shrink=0.7, scale=LUGO);
     block (col=-1.3, row=0, up=-1, width=3, length=2, height=HALF, nibbles_on_off=false, scale=LUGO);
}

doblo (col=-1.3, row=0, up=0, width=3, length=2, height=HALF, nibbles_on_off=false, scale=LUGO);
Doblo angle and block angle
Doblo angle's allow creating blocks with an angle with or without nibbles. Block angle's are made for stacking. Btw. the doblo angle is just the union of a doblo block with a block angle.
These are bit experimental and measures may not exactly be right. In particular, angle blocks z-position can be below 0. Therefore on position these on top of something else. Doblo angle blocks, on the other hand should work OK. There is no rotation feature. Finally, you will have to use OpenSCAD rotation, e.g. translate([2*PART_WIDTH(LUGO),0,0]) rotate(90)doblo_angle();, plus a translation to put it back in the right position.
Short Syntax for doblo_angle
module doblo_angle_block (col,row,up,width,length,height,a_height,nibbles_on_off,scale)
Long Syntax with default values shown:
 doblo_angle (col=0,row=0,
	      up=0,
	      width=2,length=4,
	      height=FULL,
              a_height=FULL,
	      nibbles_on_off=true,
	      scale=LUGO)
With respect to doblo's there is an additional parameter: a_height. I.e. doblo angle have a base height plus the height of the angle block that will sit on top.
Short Syntax for block_angle
module block_angle (col, row, up, width,length,height,nibbles_on_off, scale)
Warning: z positioning is slightly wrong, i.e. a bit below z=0. Use these only for single printing or as building blocks for larger structures.
Example
The following picture shows for doblo angle blocks (the green ones) and three block angle pieces (the blue ones). The wall in the background is for calibration.
include <doblo-factory.scad>;
include <lib/doblo-params.scad>;

// calibration block

color ("pink")  block  (-5,-3, 0,      20,2,HALF,false,LUGO);
color ("red") block  (-5,-3, HALF,   20,2,HALF,false,LUGO);
color ("pink")  block  (-5,-3, FULL,   20,2,HALF,false,LUGO);
color ("red") block  (-5,-3, 3*HALF, 20,2,HALF,false,LUGO);
color ("pink")  block  (-5,-3, 2*FULL,   20,2,HALF,false,LUGO);
color ("red")  doblo  (-5,-3, 2*FULL+HALF,   20,2,HALF,true,false,LUGO);

// from left to right

color ("lime") doblo_angle (col=-5, row=0, up=0,
	     width=1, length=4,
	     height=THIRD, a_height=FULL,
	     nibbles_on_off=false,
	     scale=LUGO);

color ("green") doblo_angle (col=-3);

color ("olive") doblo_angle (col=-1, row=0, up=0,
	     width=1, length=4,
	     height=THIRD, a_height=HALF,
	     nibbles_on_off=true,
	     scale=LUGO);

color ("darkgreen") doblo_angle (col=1, row=0, up=0,
	     width=4, length=2,
	     height=HALF, a_height=FULL,
	     nibbles_on_off=true,
	     scale=LUGO);

color ("blue") block_angle (col=6, row=0, up=0,
			    width=2,length=4,height=HALF, a_height=FULL,
			    nibbles_on_off=true, scale=LUGO);

color ("darkblue") block_angle (col=9, row=0, up=0,
			    width=2,length=4,height=FULL,
			    nibbles_on_off=false, scale=LUGO);

color ("skyblue") block_angle (col=12, row=0, up=0,
			       width=2,length=4,height=3*FULL,
			       nibbles_on_off=true, scale=LUGO);
Support triangles
Support triangles are used in larger structures to support a roof. These bricks are really ugly and some day should be replaced by some more graceful arcs ...
- Thickness = 1 doblo width, e.g. = PART_WIDTH.
- Sometimes you may want rational numbers. E.g. 1.5
- Height/length proportion is 4.8/4 (i.e. typical Duplo proportions).
- Only use angle arg of 0,90,180,270 !!
WARNING: You may want to have these bricks overlap a bit, e.g. if 2 corners are just touching, the model will be not be "simple" and can't be exported as STL. In other words, make them a bit higher and position a bit off (embed into the block that you will put on the back and embed the back in a side block). See the stronghold example included.
- Syntax
support (col,row,up,height,rotation_angle,thickness,scale)
Example
include <doblo-factory.scad>;
include <lib/doblo-params.scad>;

// (col=0,row=0,up=0,height=FULL,angle=0,thickness=1, scale)

color ("pink") support    (col=0, row=-6, up=0, height=2*FULL, angle=270, thickness=1, scale=LUGO) ;
color ("pink") support    (col=0, row=-6, up=0, height=2*FULL, angle=90, thickness=1, scale=LUGO) ;

color ("red") support     (0,     0,     0,    2*FULL,        0,       1,           LUGO) ;
color ("yellow") support   (5,  0,   0,   2*FULL,   180, 1, LUGO) ;
color ("lime") block      (0,  0,   2*FULL,  6,    1,   1, true, LUGO);
ramp
ramp is the opposite of the support triangle, but with a flatter angle. Can be used to anchor a high and slim block or also to build a real ramp.
- Height/length proportion is 4.8/16 (i.e. typical Lego proportions)
If you wish to use a more flexible solution, you could start from block_angles, but you'd have to rotate these manually. The ramp doesn't have nibbles, the angle blocks do ...
Syntax:
ramp (col,row,up,height,rotation_angle, width,scale)- Rotation must be one of 0, 90 180 or 270.
Example
include <doblo-factory.scad>;
include <lib/doblo-params.scad>;

color ("lavender") doblo (col=-0, row=0, height=FULL, width=2, nibbles_on_off=false);
// ramp                (col, row, up, height, angle,width,scale)
color ("fuchsia") ramp  (2,  0,   0,  FULL,   0,    2, LUGO);
color ("plum")    ramp  (0,  0,   0,  FULL,   180,  2, LUGO);
color ("purple")  ramp  (-0.5,  0,   0,  8,      90,   3, LUGO);
color ("indigo")  ramp  (0,  2,   0,  FULL,   270,  2, LUGO);

doblo (col=-4, row=4,height=THIRD);
color ("blue")  ramp  (col=-1, row=6, up=0, height=THIRD, angle=270, width=0.5, scale=LUGO);
Cylinder
cylinder is like a block, but round.
- Can have nibbles on top.
Syntax:
- cyl_block (col, row, up, bottom_r, top_r, height, nibbles_on_off,scale)
Example
include <doblo-factory.scad>;
include <lib/doblo-params.scad>;

color ("purple") cyl_block ();
color ("purple") cyl_block (col=2);
color ("purple") cyl_block (col=4, nibbles_on_off=false);

color ("fuchsia") cyl_block (col=-6, bottom_r=4, top_r=3, height=2*FULL);

// An ugly antique pilar
color ("gold")    cyl_block (row=-6, col=0, up=0,
			     bottom_r=4, top_r=2, height=FULL, nibbles_on_off=false);
color ("cornsilk") cyl_block (row=-5, col=1, up=FULL,
			      bottom_r=2, top_r=2, height=2*FULL, nibbles_on_off=false);
color ("khaki")    cyl_block (row=-5, col=1, up=3*FULL,
			      bottom_r=2, top_r=4, height=FULL, nibb
Bug: Generates 4 nibbles for a r=0.5 cylinder. Workaround: Add a single one manually using the nibbles module.
Writing text
For writing text on top of blocks, we can use the OpenSCAD text function.
include <../doblo-factory.scad>;
include <../lib/doblo-params.scad>;

// text on a 6x2 doblo

doblo (col=2,row=1,up=0,length=2,width=6,height=THIRD,nibbles_on_off=false);
color ("purple") write (text="DOBLO", col=2, row=1.5, up=THIRD,
			size=10, height=1.5);

doblo (col=8,row=-5,up=0,length=6,width=2,height=THIRD,nibbles_on_off=false);
color ("purple") write (text="ROCKS !", col=8.5, row=-4.9, up=THIRD, rot=270,
			size=8, height=1.5,valign="baseline");
Since this module might be missing from doblo-factory.scad, here is the definition of the module (just copy/paste it in your file, e.g. next to the example above).
// Text module

module write (text="hello", col=0, row=0, up=0, rot=0, height=1, size=8, valign="top", halign="left", font="Liberation Sans,style=bold", scale=LUGO) {
     x_0 = col    * PART_WIDTH(scale);
     y_0 = - (row * PART_WIDTH(scale));
     z_0 = up     * PART_HEIGHT(scale);

     translate ([x_0, y_0, z_0]) {
	  rotate (rot) {
	       linear_extrude (height=height) {
		    text (text, font = font, size=size, valign=valign, halign=halign);
	       }
	  }
     }
}
Extensions
Some bricks are available through the extension library. Some modules are not fully tested or not fully implemented...
Ball and socket doblos
Ball and socket doblos are defined in the connectors extension library. They allow creating objects that can hook together. These joints are based on ball joint in SCAD by Erik de Bruijn, modified by juniortan http://www.thingiverse.com/thing:2631, derived originally from Erik's parametric ball joint: http://www.thingiverse.com/thing:1968.
Syntax
- ball_doblo (row, col, up, width, height, nibbles_on_off, diamonds_on_off, size)
Arguments are the same as for doblo, except that parameter names are different.
- ball_doblo(xoff, yoff, zoff,width,length,height=3,nibbles=true,diamonds=false,size=DOBLO)
- module socket_doblo(xoff, yoff, zoff,width,length,height=3,nibbles=true,diamonds=false,size=DOBLO){
Example:
include <doblo-factory.scad>;
include <lib/doblo-params.scad>;
include <ext/connectors.scad>;

//ball_doblo   (0,   1,   0,   2,   2,size=LUGO);
//socket_doblo   (4,   1,   0,   2,   2,size=LUGO);

color ("red") socket_doblo (xoff=5, yoff=4, zoff=0, width=3, length=2, height=HALF, nibbles=true, diamonds=false, size=DOBLO);

color ("darkred") ball_doblo   (0,   4,   0,   3,   2,size=DOBLO);

color ("tomato") ball_doblo   (1,   7,   0,   8,   2,diamonds=true,size=DOBLO);
color ("orange") socket_doblo   (1,   7,   0,   8,   2,diamonds=true,size=DOBLO);

color ("green") ball_doblo   (1,   1,   0,   2,   2,size=DOBLO);
color ("darkgreen") socket_doblo   (1,   1,   0,   2,   2,size=DOBLO);

ball_doblo   (5,   1,   0,   2,   2,size=DOBLO);
socket_doblo   (5,   1,   0,   2,   2,size=DOBLO);

ball_doblo   (9,   1,   0,   2,   2,size=DOBLO);
socket_doblo   (9,   1,   0,   2,   2,size=DOBLO);

color ("blue") socket_doblo   (9,   4,   0,   2,   2,6,size=DOBLO);

color ("fuchsia") top_ball_doblo   (10,   7,   0,   2,   2,diamonds=false,size=DOBLO);
Hinges
Hinges allor to create covers, doors etc. You either can print these as is or assemble within other objects. You may have to use OpenScad transformations of positioning. Note that these require a good high resolution printer for Lego-compatible blocks (Lugos). Doblos should be easier to print ...
horizontal hinges
Thes rotate up/down along the y-axis
Syntax:
- hinge_y(xoff, yoff, zoff,length,width,height=3,nibbles=true,size=DOBLO, $fs=0.01,type=0)
- module hinge_z_hole(offx=0,offy=0,offz=0,width=1,length=2,height=6,nibbles=true,size=DOBLO,tolerance = 1){
Hinge_y example
include <doblo-factory.scad>;
include <lib/doblo-params.scad>;
include <ext/connectors.scad>;

// minimum dimension for hinge side is 2

color ("brown")     hinge_y   (0,  0,  0,   1,  4, 3, true, LUGO);
color ("chocolate") hinge_y   (3,  0,  0,   2,  4, 3, true, LUGO);

// create a hinge on top of a stackable block
color ("cyan")       doblo     (-3,  0,  0,      2,  4, HALF, false, false, LUGO);
color ("lightcyan")  block     (-3,  0,  HALF,   2,  4, HALF+FULL, false, LUGO);
color ("grey")       support   (col=-1, row=0, up=FULL+HALF, height=HALF, angle=0, thickness=4, scale=LUGO);
color ("blue")       hinge_y   (-3,  0,  2*FULL,   2,  4, HALF, true, LUGO);

// rotate, then translate a hinge with OpenSCAD functions
unit = PART_WIDTH(LUGO);
translate ([8*unit, -4*unit, 0]) {
     rotate (180) {
	  color ("green") hinge_y (xoff=0, yoff= 0, zoff= 0, length=2, width=4, height=3, nibbles=true, size=LUGO);
     }
     }
Text
The text module is deprecated, since OpenSCAD now does have a text module.
Glyph
Is a letter, a number or a special character. This module is based on OpenSCAD Bitmap Fonts Module
Syntax:
- glyph (col, row, up, height_mm, char)
Text
Is a text with glyph characters (see above).
Syntax:
- text (col, row, up, height_mm, chars, count)
count is the number of letters chars is an array.
Example
- text (1, 6, 2, 4, ["T","H","i","N","G","Y"], 6);
Examples
Simple bricks with x/y positions and color parameters
The following example demonstrates (again) how to create simple Lego and Duplo compatible bricks
It also shows how to create custom modules that would simplify creation of frequently bricks. Each module takes position, and a color and then produces a standard Lego-compatible bricks, a flat half-height lego-compatible bricks for mashups, and a standard 2x2 Duplo-compatible brick.
include <doblo-factory.scad>;
include <lib/doblo-params.scad>;

// Each brick is defined in a module that takes x/y position and color as parameter

module lego_brick_for_mashups (x,y,fill) {
     color (fill)
     doblo   (col=x,  row=y, up=0,
	      width=4,  length=4, height=HALF,
	      nibbles_on_off=false, diamonds_on_off=false,
	      scale=LUGO);
}

module lego_compat_standard_brick  (x,y,fill) {
     color (fill)
     doblo (x,y, 0, 4, 2, FULL, true, false, LUGO);
}

module duplo_compat_2x2xHALF_brick  (x,y,fill) {
     color (fill) {
	  doblo (x,y, 0, 2, 2, FULL, true, false, DOBLO);
	  }
}

// display each module, position and color each
// makes it easier to use (less typing if you just want flat standard bricks)

lego_brick_for_mashups (x=0, y=0, fill="red");
lego_compat_standard_brick (-4,-3,"blue");
duplo_compat_2x2xHALF_brick (-3,1, "green");
Exercise:
- Revert the y position
- Add width and length parameters
Doblo structure - A stronghold
The following structure was my first creation and it did have some design flaws. But it did print back in 2010 on a RapMan printer. It took about 3 days....
But it did print:
See the happy Duplo persons !
- Module name
- stronghold ()
Below is a revised design which I didn't print yet. It's included in the doblo-factory-1.scad file.
The code is fairly complex, because we needed some support triangles. These should be replaced by pillars some day ...
// ------------------- A stronghold

include <doblo-factory.scad>;
include <lib/doblo-params.scad>;

// SCALE=LUGO;
SCALE=DOBLO;

stronghold();

module stronghold ()
{
     union()
     {
	  doblo (col=-6, row=-6, up=0, width=12, length=12, height=THIRD, nibbles_on_off=false, diamonds=false, scale=SCALE);
	  nibbles (col=3, row=-6, up=THIRD, width=3, length=3, scale=SCALE, extra=false, filled=false, hscale=1);
	  nibbles (col=1, row=3, up=THIRD, width=5, length=3, scale=SCALE, extra=false, filled=false, hscale=1);
	  nibbles (col=-6, row=3, up=THIRD, width=3, length=3, scale=SCALE, extra=false, filled=false, hscale=1);

	  //back
	  ramp  (0, -5, 1, 2, 0, scale=SCALE);
	  block (col=-5, row=-5, up=THIRD, width=1, length=1, height=6*FULL, nibbles_on_off=false, scale=SCALE);
	  color ("grey")  ramp  (-4, -5, 1, 2, 0, scale=SCALE);
	  color ("black") ramp  (-2.5, -5, 1, 2, 180, scale=SCALE);
	  block (col=-3, row=-5, up=THIRD, width=1, length=1, height=6*FULL, nibbles_on_off=false, scale=SCALE);
	  ramp  (-2, -5, 1, 2, 0, scale=SCALE);
	  ramp  (-0.5, -5, 1, 2, 180, scale=SCALE);
	  block (col=-1, row=-5, up=THIRD, width=1, length=1, height=6*FULL, nibbles_on_off=false, scale=SCALE);
	  ramp  (1.5, -5, 1, 2, 180, scale=SCALE);
	  block (col=1, row=-5, up=THIRD, width=1, length=1, height=6*FULL, nibbles_on_off=false, scale=SCALE);
	  // left
	  block (col=-5, row=-3, up=THIRD, width=1, length=1, height=6*FULL, nibbles_on_off=false, scale=SCALE);
	  block (col=-5, row=-1, up=THIRD, width=1, length=1, height=6*FULL, nibbles_on_off=false, scale=SCALE);
	  // front
	  ramp  (-4, 1, 1, 2, 0, scale=SCALE);
	  block (col=-5, row=1, up=THIRD, width=1, length=1, height=6*FULL, nibbles_on_off=false, scale=SCALE);

	  ramp  (-2, 1, 1, 2, 0, scale=SCALE);
	  ramp  (-2.5, 1, 1, 2, 180, scale=SCALE);
	  block (col=-3, row=1, up=THIRD, width=1, length=1, height=6*FULL, nibbles_on_off=false, scale=SCALE);

	  ramp  (-0, 1, 1, 2, 0, scale=SCALE);
	  ramp  (-0.5, 1, 1, 2, 180, scale=SCALE);
	  block (col=-1, row=1, up=THIRD, width=1, length=1, height=6*FULL, nibbles_on_off=false, scale=SCALE);

	  ramp  (1.5, 1, 1, 2, 180, scale=SCALE);
	  block (col=1, row=1, up=THIRD, width=1, length=1, height=6*FULL, nibbles_on_off=false, scale=SCALE);
	  // right
	  // big arc
	  color("blue") support (col=-5, row=-5, up=3*FULL, height=3*FULL, angle=270, thickness=1, scale=SCALE) ;
	  color ("red") support (col=-4.1, row=-5, up=6*FULL-THIRD, height=2.2, angle=0, thickness=7, scale=SCALE);
	  support (col=-3.9, row=-5, up=6*FULL-THIRD, height=2.2, angle=180, thickness=7, scale=SCALE);

	  support (col=-3, row=-5, up=3*FULL, height=3*FULL, angle=270, thickness=1, scale=SCALE) ;
	  color ("red")  support (col=-2.1, row=-5, up=6*FULL-THIRD, height=2.2, angle=0, thickness=7, scale=SCALE);
	  support (col=-1.9, row=-5, up=6*FULL-THIRD, height=2.2, angle=180, thickness=7, scale=SCALE);

	  support (col=-1, row=-5, up=3*FULL, height=3*FULL, angle=270, thickness=1, scale=SCALE) ;
	  support (col=-0.1, row=-5, up=6*FULL-THIRD, height=2.2, angle=0, thickness=7, scale=SCALE);
	  support (col=0.1, row=-5, up=6*FULL-THIRD, height=2.2, angle=180, thickness=7, scale=SCALE);

	  support (col=1, row=-5, up=3*FULL, height=3*FULL, angle=270, thickness=1, scale=SCALE) ;
	  support (col=-5, row=1, up=3*FULL, height=3*FULL, angle=90, thickness=1, scale=SCALE) ;

	  support (col=-3, row=1, up=3*FULL, height=3*FULL, angle=90, thickness=1, scale=SCALE) ;

	  support (col=-1, row=1, up=3*FULL, height=3*FULL, angle=90, thickness=1, scale=SCALE) ;

	  support (col=1, row=1, up=3*FULL, height=3*FULL, angle=90, thickness=1, scale=SCALE) ;

	  // Roof
	  block   (col=-5, row=-5, up=6*FULL, width=7, length=7, height=1, nibbles_on_off=false, scale=SCALE);
	  nibbles (col=-3, row=-3, up=6*FULL+1, width=3, length=3, scale=SCALE, extra=false, filled=false, hscale=1);

	  color ("green") block   (col=-5, row=-5, up=6*FULL, width=7, length=1, height=FULL, nibbles_on_off=false, scale=SCALE);
	  nibbles (col=-4, row=-5, up=7*FULL, width=5, length=1, scale=SCALE, extra=false, filled=false, hscale=1);

	  color ("green") 	  block   (col=-5, row=1, up=6*FULL, width=7, length=1, height=FULL, nibbles_on_off=false, scale=SCALE);
	  nibbles (col=-5, row=-4, up=7*FULL, width=1, length=5, scale=SCALE, extra=false, filled=false, hscale=1);

	  color ("green") 	  block   (col=-5, row=-4, up=6*FULL, width=1, length=5, height=FULL, nibbles_on_off=false, scale=SCALE);
	  nibbles (col=-4, row=1, up=7*FULL, width=5, length=1, scale=SCALE, extra=false, filled=false, hscale=1);

	  color ("green") 	  block   (col=1, row=-4, up=6*FULL, width=1, length=5, height=FULL, nibbles_on_off=false, scale=SCALE);
	  nibbles (col=1, row=-4, up=7*FULL, width=1, length=5, scale=SCALE, extra=false, filled=false, hscale=1);

	  cyl_block   (col=-6,row= -6,up=THIRD,bottom_r= 2,top_r= 2,height= 8*FULL,nibbles_on_off= true, scale=SCALE) ;
	  cyl_block   (col=1,row= -6,up=THIRD,bottom_r= 2,top_r= 2,height= 8*FULL,nibbles_on_off= true, scale=SCALE) ;
	  cyl_block   (col=-6,row= 1,up=THIRD,bottom_r= 2,top_r= 2,height= 8*FULL,nibbles_on_off= true, scale=SCALE) ;
	  cyl_block   (col=1,row= 1,up=THIRD,bottom_r= 2,top_r= 2,height= 8*FULL,nibbles_on_off= true, scale=SCALE) ;
     }
}
To use this "as is", just set the scale in the beginning of the file.
Some mashups
Some history
In the following picture you can see two kinds of mashups made in 2010 with a Rapman printer and a rather coarse 0.4mm layer resolution.
- Larger STL models put on top of bricks. I actually did these with Meshlab before I learnt how to use OpenScad.
- Doblo bricks with webdings on top. Produced with either OpenScad alone or with Netfabb Studio. The basic version of Netfabb does have a 3D text. The pro version can directly export a mashup. Users of Netfabb Studio basic should also use either OpenScad or Meshlab for merging.
Lego-compatibles icon blocks
Thanks to icon libraries like the noun project, there are thousands of interesting sets that allow creating lego-compatible blocks to used in games, simulations or just for decoration.

A similar object, printed with t-glase (a bit too much extrusion) looks like this:
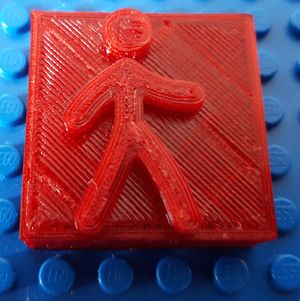
T-glase is a plastic that is fairly easy to print, however it requires slow speed and certain amount of filament coming out.
The following wouldn't print well (some wall are too small) but it illustrates use of more complex SVG graphics.
include <../doblo-factory.scad>;
include <../lib/doblo-params.scad>;

cowgirl_lugos();
unit = NBO(LUGO);

module cowgirl_lugos () {
     difference () {
	  union () {
	       color ("lightgrey") doblo (col=0,  row=-4, up=0,
					  width=4,  length=4, height=HALF,
					  nibbles_on_off=false,
					  diamonds_on_off=false,
					  scale=LUGO);
	       color ("lightgrey") block (col=0,  row=-4, up=HALF,
					  width=4,  length=4, height=HALF,
					  nibbles_on_off=false,
					  diamonds_on_off=false,
					  scale=LUGO);
	       }

	  translate ([5,1,FULL+THIRD]) {
	       color ("pink") linear_extrude(height = 5, center = true, convexity = 10)
		    // cowgirl by Simon Child from the Noun Project
	       import (file = "noun_cowgirl_31624_cleaned.dxf");
	  }
}

     translate ([6*unit,0,0]) {
	  color ("lightgrey") doblo (col=0,  row=-4, up=0,
				     width=4,  length=4, height=HALF,
				     nibbles_on_off=false,
				     diamonds_on_off=false,
				     scale=LUGO);
	  color ("lightgrey") block (col=0,  row=-4, up=HALF,
				     width=4,  length=4, height=HALF,
				     nibbles_on_off=false,
				     diamonds_on_off=false,
				     scale=LUGO);
	  translate ([5,1,FULL+HALF]) {
	       color ("pink") linear_extrude(height = 5, center = true, convexity = 10)
		    // cowgirl by Simon Child from the Noun Project
		    import (file = "noun_cowgirl_31624_cleaned.dxf");
	  }
     }

     }
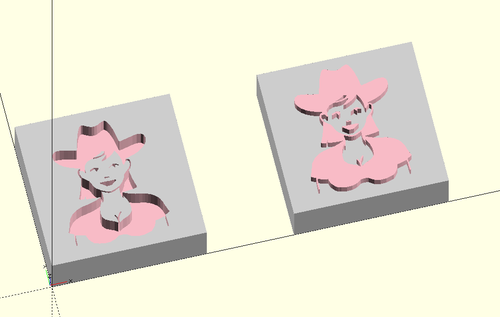
Printing
Printing Lego and Duplo compatible blocks is never easy. There are several challenges:
Correct dimensions and wall thickness in particular
- Real wall thickness (and in particular of the crucial nibbles underneath) depend very much on your slicer settings. Several parameters could influence real wall thickness: layer height, layer width, wall re-inforcement, speed, temperature, the kind/brand of plastic, filling, etc. The only way to get this right is to print a few bricks and then play with both slicer and OpenScad settings. Create a new parameter file for each plastic/slicer setting. Make a copy of
DobloFactory/lib/doblo-params.scad. If you use the Cura slicer, make sure to install a very recent version and fix the default fat wall setting of 1mm. Personally, I got the best results with the (old) skeinforge slicer and the commercial Simplify3D, but any slicer will work under the condition that it allows defining slim walls.
- Since PLA behaves a bit like wood, i.e. thin walls break easily, we suggest to print at least three walls. Make the nibbles underneath rather too fat as opposed to too slim. While the piece is still somewhat warm but not warm from the oven, press it gently on a real Lego plate. This way it will both fit and be a bit more solid than the thin "Lego"-like walls.
- For ABS (not recommended), tinker with OpenScad/slicer settings until you get it right.
First layer
As with any other difficult print, make sure to get the first layer right. I rather recommend calibrating the printer (nozzle is 1 sheet of paper away from the platform) then making the base layer extra fat. If the first layer is not precise, the nibbles will look all wrong. If you print too closely to the platform (PLA looks almost transparent and very wide) then you will have trouble pressing the brick down to make it fit. But too close is better than too far. If your print bed is too uneven and removable, then either make the first layer much fatter or use glue and wash the piece off with hot water...
Roof
The roof will be ugly underneath and there is nothing you can do about it, except going back to a 3mm / 4mm layer height printer. You can make it less ugly, by slowing down and extruding a bit more. The top should be ok, but may need a bit more plastic flow than usual.
Resolution
For larger pieces, using 2.5mm layers layers and 0.35mm width (or similar) gives pretty good results, except if you plan to have small 2D 1/2 extruded drawings on top of a block. In the latter case make sure to have little or no retraction, plus high fill. Otherwise, the result will be ugly. In addition, the plastic may "dry up".
For smaller Lego compatible pieces we recommend 2mm layers. Of course, you also can print with lower resolution (e.g. 0.1 mm) but the resulting standard blocks do not necessarily look better and they take ages to print.
A large duplo-compatible piece, e.g. a castle tower from the modular castle kit - Lego compatible takes more than a day to print with 2.5mm layers (e.g. 28h30 for a typical heavy 8x8 tower). So if you plan to give a gift of several of these consider printing with 3 or even 4mm resolution, but that requires changing the hot end. The same Lego-compatible structure takes about 6 times less, i.e. 5h30. Printing it with 2mm resolution adds 1h30, e.g. 7 hours.
Retraction
I suggest using little retraction. It is better to have stringing than problems with plastic flow when printing the nibbles underneath the bricks ... Try and see.
Calibration
Try small objects first, e.g. a 3x3x3 doblo brick with PLA or PETG or a 2x2x3 block with ABS. ABS warps, therefore either use diamonds in the walls or strong glue !
Plastics
We printed most pieces with various sorts of PLA or PETG. ABS, T-glase, Laybrick, TPE also worked. In order to get the bottom right, you really have to slow down when printing with composites like laybrick, T-glase and various TPEs.
Post processing
If fit is too tight, heat the underneath with a heat gun (about 80 degs for PLA) then press the piece onto a real Lego or Duplo plate. You also can try an oven or a hair dryer. The latter only reaches about 55 to 60 degs, but this is better than pressing down cold plastic.
If fit is too loose, you cannot do anything about it. Change your slicer settings or re-generate the models with different settings.
Can your printer do it ?
We designed a simple suite of benchmarking pieces that you can use to test drive both DUPLO-compatible and LEGO-compatible sized blocks. Note however, that different kinds of structures may need different calibration. Print time is also a big factor.
If you know how to use OpenScad, it's better to generate the STLs again, since I had to cheat a bit with the width parameters in order to compensate the way the printer works. The ABS prints in the picture below did use the old version of doblo factory.
The *.zip file includes all files (except the picture)
Evaluation criteria:
- 1a) Fit with real Duplos, i.e. respect dimensions of real Duplo and Lego bricks
- 1b) First good good 5 layers of the brick. That's important for both esthetics and also vertical fit. That includes no warping !
- 1c) Roof of the brick on top, must be flat and smooth
- 1d) Roof of the brick underneath, no hanging filament
- 2a) Overhang of the thumb
- 2b) Smoothness of the palm and the back (difficult, of course faster prints will use bigger filament)
- 2c) Smoothness of the fingers, nails (difficult)
- 2d) Correct position of fingers
- 3a) Amount of post-processing needed
- 3b) Solidity (with respect to polymers used and size)
- 4) I don't know exactly how - but all this should be put into relation with print time
Printing pauses and recovery from print abortion
A larger structure like the stronghold takes over 24 hours to print. If you use PLA, it's ok to interrupt while you sleep or do other stuff. Unless you got some very special control software, your computer must stay on. With most software it is ok to move the printhead for extruding some plastic before continuing. It should move back to where it was.
However, if you encounter a card read error or a filament problem after 20 hours of printing, frustration can be high ! In the g-code article, we described how we managed to recover. It's not so easy, but certainly less painful than to restart.
Tips for first-generation RapMan / RepRap Mendel printers
The following skeinforge printing settings for the RapMan were made in 2010. You may consult the Skeinforge for RapMan to understand these.
- Layer Thickness (mm) : 0.4
- Perimeter Width over Thickness (ratio), i.e. how wide the filament should be compared to it´s height: 1.8
- Fill
- Fill of 0.1 should be ok (I tested with 0.05)
- PLA
- Use PLA on large objects to prevent warping (Notice: I should create a version of the bricks with big holes in the side walls for ABS printing)
- Temperature: 210 (all) and Fan on
- Raft: One interface layer
- Flow rate: At least 380 for a layer thickness of 0.4 (for horizontal structures)
- Other
- Solid Surface Thickness for both ABS and PLA: 4
- ABS
- We only made smaller objects so far, e.g. simple doblo bricks and mashups. You can see some of these in the Meshlab for RapMan tutorial and Netfabb Studio tutorial.
- One of the major difficulties is to create a raft that really sticks both to the print bed and the object. See the duplo bricks for color ABS section in our Skeinforge entry.
Since skeinforge does not really produce what I want, I'd suggest to produce sort of a normal "fat" raft code, then edit the g-code file and double up M108 and Fxxx values. Make it twice as fast, else it takes hours to get just the raft printed ....
- Precision objects
- See the Hand on duplo-compatible block example discussed on Thingyverse. E.g. a good quality/print time setting for Skeinforge is:
- Layer Thickness = 0.35
- Clip Over Perimeter Width = 0.15
- Cool Type = Orbit
- Min Layer time = 1
- Extra shells on Base = 2
- Infill perimeter Overlap
- Infill solidity = 0.3
- Solid surface layers = 4
- Jitter = activated
- Temperature = 210 for ALL
- Flow Rate = 250
- Feed Rate = 16
Tips for 2mm printers
Printers of the 2012 to 2014 generation can easily do Lego compatibles, but the floor underneath will probably be uglier than with older more coarse-grained printers. A 4x4 full height piece should take between 15 minutes and an hour depending on quality and resolution settings. For each different setting you may have to change OpenSCAD parameters (sorry). We suggest starting with "normal" settings that your slicer software provides for your printer. You then maybe should remove some retraction, slow down printing of the first layer (10-15mm/s) max., print 3-4 layers for floors and reinforce the walls a bit.
High quality prints are not necessarily better. As you can see in the pictures below, a fast "normal" 2.5mm/3.8mm print will just use straight lines for creating nibbles and other small stuff. A high resolution solution will create fills and these then bang into the walls and make them look less good ....
Pick the right slicer
- Some slicers have trouble printing LEGO since they attempt to strengthen thin walls. For example, it was (sometimes in the past) fairly difficult to convince Slic3R to respect basic Lego wall and nibble definitions. Using Cura for Duplo compatibles is much simpler, since one can define wall thickness but it had the same problem with Lego. Even as of 2018, the slicer delivered with RepetierHost does not allow to print lego-comptible walls that have less than 4 prints walls (2x2).
- Skeinforge is much more respectful, but it was difficult to use and longer maintained. Sfact was an easier version, but is no longer maintained either.
- Interaction between nozzle size and flow also seems to have different effects, but that could be explained by initial configuration settings that are not equivalent.
As of dec. 2018 I cannot make any recommendations. I first will need to find some time to test different slicers. For now I am using either Cura or Simplify3D.
Recommendations for printing larger objects:
Printing objects of our castle or marble run kit requires many hours. 24 hour prints are not untypical. Therefore, you should consider speed over flat walls ....
- layer height = 0.25mm
- first layer speed = 10mm/s
- other layers = 100 mm/s (yes, ten times faster !)
- first layer height = some extra (e.g. 0.38 for 0.25), but not too much since otherwise the block will not fit and you will have to shave of plastic with a knife. My personal alternative is to put the print bed a bit closer to the nozzle than recommended, but this requires a really flat and well calibrated bed.
- Temperature: Middle (e.g. for PLA that prints between 190 and 220, take 200)
- no support (never ever)
- For Lego-compatibles, you can add skirts (to the outside only !) or use glue if your print bed is uneven or not suitable for printing flat structures.
Educational use
(will be completed later, probably as a separate piece - 14:33, 13 April 2010 (UTC) ....)
Design of constructivist play kits
One of our goals is create a kit that allows the creation of 3D duplo-compatible "play" boards for various purposes from Kindergarten to Master level.
“In the LEGO System, complex cause-and-effect relationships can be built from the ground up by the relatively simple act of combining individual elements” (Ackerman et al. 2009: 76). While ready-made playmobil-like boards to not necessarily favor creativity, building such boards does. LEGO (ibid:77) argues that the benefits of playing with LEGO Systems are: Curiosity (bricks encourage exploration naturally), courage (one can take risks and make mistakes), exploration and investigation (Lego has an easy start, but can reach high levels), experimentation (change and fiddle), imagination (infinite combinations), reason and discipoline (uses a fixed logical structure), sociability (can be shared) and reflection (builders can step back and evaluate).
The same paper (p. 81)also argues that the system will support systematic creativity:
- Preparation (problems that arrise curiosity)
- Incubation (ideas being generated and unlocked)
- Insight (thing falls in place and construction can begin)
- Evaluation (decide if the insight is worth pursuing and may lead to "hard fun")
- Elaboration (create the final form)
“The LEGO System is a system to think with. It encourages the process of making and reflecting, then making and reflecting again, in a thoughtful circuit of activity. In LEGO Serious Play participants are encouraged to build quickly and spontaneously, but then to take a step back and consider what they have made, and then review and change it as they see fit, with multiple iterations of individual and the collective activity. This build-then-reflect approach is really just one of the standard ways of using LEGO bricks which people naturally adopt.”
- Teacher and educational technologists training
Since fall 2010, we used this library in classes in our master in educational technology
Example (in french) of a wakeup activity: Objets village de savants. Students had to create printable Lego mashups to populate a "village" of wise researchers...
- A few notes on childhood learning
Ackerman, in an interview (retrieved 11:22, 13 April 2010 (UTC)) states that “LEGO provides a unique building system that encourages children to give form, or expression, to their wildest ideas in the most rigorous ways (hard fun)! Two things I enjoy most about LEGO: 1) the system offers endless possibilities. Yet, at the same time, not anything goes! The bricks have a mind [or logic] of their own, that the child learns to compose with to achieve their creations; 2) the system grows with the child, thus allowing the children to grow with it. As a constructivist at heart, I like play materials that let you in at different levels, and you can add complexity at will (low floor, high ceiling). Most children love to build things, and then bring them to life through play – or for real by adding special bricks, such as a motor, a light, or even a sensor.”
“Systems are crucial for creativity. Systems of science channel creativity towards asking specific questions, and solving or problems as in maths, chemistry and engineering. Systems of art channel creativity into many different and unique expressions, giving form to our imagination, feelings and identities, as in painting, music and sculpture. LEGO offers a unique—and widely recognized—system capable of channelling both, simultaneously. With LEGO you can bridge a stream, or transport an apple from A to B (scientific creativity) or build a fantasy creature, spaceship or landscape; or create metaphorical arrangements to evoke, project and represent feelings or identities (artistic creativity).” (Defining Systematic Creativity, retrieved 11:22, 13 April 2010 (UTC)).
Frans Orsted Andersen (2004) also argues that high PISA performances of the Danish Schools can be partly explained by the fact the learners more often encounter flow through "optimal learning environments". Scandinavian education is based on the three child i'es:
- initiative
- independence
- intrinsic motivation (which in turn is part-of flow). “Being able to base the learning processes on high levels of pupil
intrinsic motivation through a special teaching model enhancing flow experiences - indeed seems to be the key to understanding the successful optimal learning environments of the sampled Danish schools in this study.” ([Anderson, 2004: 14).
In addition to using such bricks and systems in normal schools and at home, DUPLOs and other construction kits seem to popular in special education (refs. needed).
- Adult learning
Another potential avenue for the doblo factory comes from so-called simulation and gaming. Some adult gaming environments only use physical support, others rely entirely on computer-support and, finally, others on mixed support.
Our aim is to procude visual, mostly 2D, iconic languages to support various kinds of project-oriented learning.
CAD/CAM, 3D and CS education
- Introduction to 3D graphics and design (learn about positions) and simple use of OpenSCAD
- "End-user 3D programming" environment (e.g. students could add other primitives)
Prototyping
One could imagine printing bricks that, assembled together with Lego bricks, allow to create rapid prototype models, e.g. as described in Muller et al. (2014) [http://www.stefaniemueller.org//wp-content/themes/f8-lite/images/faBrickation/chi-2014-mueller-faBrickation.pdf faBrickation: Fast 3D Printing of Functional Objects by Integrating Construction Kit Building Blocks.
Bugs, to do
- Bugs
- cyl_block nibbles can't handle top_r < 2 and rational numbers
- Needed
- a pillar with both supports for bottom and top (i.e. 2x4 directions)
- Improvements
- replace support modules by triangle_forward, triangle_right, etc.
- Parametrize all numbers
- Adjustments
- Develop a design formula for bricks that are printable with a typical FDM printer. Slicers in so-called "draft" or "fast" mode do not respect precise dimensions. Typically Lego are a bit too wide and walls are too fat.
Legal issues
Copyright for simple Lego Blocks has expired, but it does have a Trademark. That means our bricks, even if they were were perfect (they are not!), are only compatible bricks.
Read Lego clone (Wikipedia). We quote “At least two of the largest clone manufacturers have been challenged in court by Lego. The lawsuits have been mostly unsuccessful, for courts have generally found the functional design of the basic brick to be a matter of patent rather than trademark law, and all relevant Lego patents have expired.” (retrieved, October 2019).
Links and credits
Credits for the OpenScad code
- parametric lego duplo, prior work by by Domonoky.
- Some extension modules in the ext directory reuse other code and is documented in the source
STL files
- A duck by suzujoji: https://www.thingiverse.com/thing:1205
- The Jewelry hand by Makerbot: http://www.thingiverse.com/thing:1288
- OpenScad
- OpenScad beginners tutorial (stub)
- OpenSCAD - The Programmers Solid 3D CAD Modeller (download)
- http://en.wikibooks.org/wiki/OpenSCAD_User_Manual
- End-user programming / microworlds
- Lego
- In this wiki, Lego Dacta and LEGO Mindstorms (includes links to Lego-fan sites that describe the 1000s of parts., good for inspiration)
- Parents at Lego.com
- LEGO Learning Institute (home page)
- legolearning.net
- Lego-related articles at MakeZine
- Lego pages from Robert Cailliau, e.g. Lego Dimensions
- What's the relationship between playing with Lego and creation of Google ?
- Meet The Google Guys, Time magazine, Sunday, Feb. 12, 2006
Bibliography
- Ackermann Edith; David Gauntlett and Cecilia Weckstrom (2009). Defining Systematic Creativity, LEGO Learning Institute, Summary, PDF download
- Andersen, Frans Ørsted (2004), Optimal Learning Environments at Danish Primary Schools, LEGO Learning Institute Abstract/PDF download
- Claxton, Guy (1997). Hare Brain, Tortoise Mind, Fourth Estate, London.
- Claxton, Guy, What’s the Point of School, One World Publications, Oxford, 2008.
- LEGO Group (2004), The whole child development guide, LEGO Group, PDF dowload. Also can be found through Lego Learning Institute Research Page.
- Stefanie Mueller, Sangha Im, Serafima Gurevich, Alexander Teibrich, Lisa Pfisterer, François Guimbretière, and Patrick Baudisch, WirePrint: Fast 3D Printed Previews. Proceedings of UIST '14. http://stefaniemueller.org/ PDF
- Winnicott, D.W. (1989) Playing and Reality. London, New York: Routledge.
