Doblo factory version 1
News: This version is obsolete. Of course you still continue using it in old projects. Daniel Taub refactored the code and it is available from GitHub and documented in the
article - Daniel K. Schneider 19:37, 26 October 2012 (CEST)
Introduction
Doblo Factory is the name of a set of OpenScad modules we wrote to generate duplo-compatible structures and bricks.
Download: The OpenScad modules and example designs that are documented here are available available on Thingyverse. You will need two things:
- doblo-factory.x-y.scad - Take the latest version, e.g. doblo-factory-1-2.scad
- doblo-factory-examples.scad
These modules are based on:
- parametric lego duplo, prior work by by Domonoky.
- OpenSCAD Bitmap Fonts Module, prior work by Tony Buser.$
New (2013)
- A much improved version (that I will try to document some day) is here:
- https://github.com/dmtaub/DobloFactory (made by Daniel Taub)
Since OpenScad allows to "union" bricks, it is fairly easy to stack up bricks made from parametric OpenScad modules in order to create larger structures. Since the Doblo factory modules use grid-based positioning and size parameters, they are fairly easy to use for non-programmers. However, you are expected to be familiar with using a formal languages (e.g. HTML or SPSS or a simple scripting languages). See the example section for some module usage code.
See also: Lego Dacta, i.e. an article describing a Lego product line for education.
Usage
The positioning framework
Doblo uses a grid like a chessboard. Origin is in the middle like in most 3D representation languages.
- Column = left to right (x axis)
- Row = forward to backward (y axis). This can be considered a good decision if you look at your model from top. Else it isn't. I wasn't sure about this, but now it's done. So remember: y is reversed with respect to OpenScad.
- up = upwards (z axis)
All blocks, except the doblo block has the origin in the upper left. Since one only uses the doblo block once for the base plate, it has is x,y origin in the middle.
Parameter names used
- col: the x axis (left-to-right)
- row: the y axis (forward to backward)
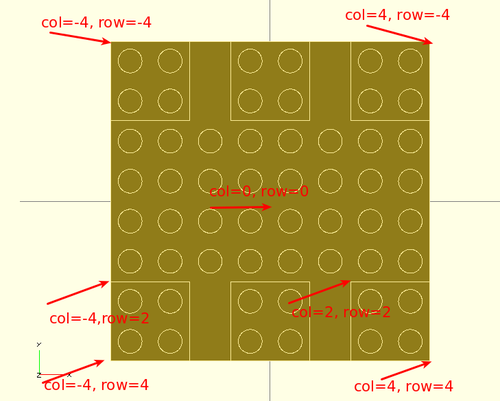
- up: the z axis (down to up), Z is the bottom of the block. I.e. a block of up=1 would sit on a block of height=1.
- width: length on the x-axis. Except for the doblo block whose origin is inthe middle, origin is upper left
- length: length on the y-axis, Except for the doblo block whose origin is in the middle, origin is upper left
- nibbles_on_off: true = nibbles on top, false = no nibbles
Units
- Units for columns, rows, with and length: 1 unit = 16mm
- Units for height: 1 unit = 4.8 mm
- Units for rotation angles around z-axis: Only 0, 90, 180, 270
Parameters and calibration
About Lego and Duplo dimensions
According to the german-speaking 1000steine.de forum , retrieved 13:12, 15 April 2010 (UTC), the approximate dimensions of a Lego brick are the following. Duplo bricks are double in each dimension (i.e. 8 times the volume). However, there are important differences between Duplo and Lego bricks. In the code, we deal with this by using conditionals when defining parameters.
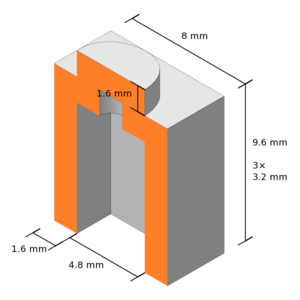
Another theory from the same forum thread claims that Legos have been designed in terms of special Lego units, i.e 1/64 inches.
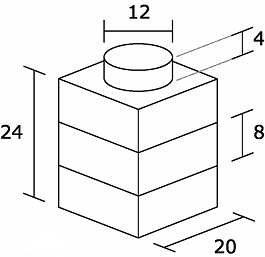
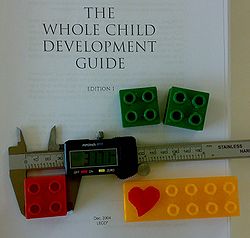
Finally, I suggest to buy a digital calliper (about 17 Euros) and measure both original bricks and your own bricks.
- Duplo vs. lego heights
(1) Most Duplo pieces are either "normal" (19.2mm) or half height (9.6mm)
- In our unit system, PART_HEIGHT = 4.8mm
(2) Most Lego pieces are either "normal" (9.6mm) or third height (3.2mm).
- In our unit system, PART_HEIGHT = 2.4mm, iff LEGO-DIV = true
(3) In order to be able to print Lego and Duplo structures in the same proportions
- By default we define: LEGO-DIV = false
- PART_HEIGHT = 2.4mm
In other words, if you set LEGO-DIV = true, then a DUPLO model would be proportionally higher when generated at half (LEGO) size. Sounds a bit complicated, but it's the solution I found. In principle, since heights are defined in term of our own units, no harm should come from using either one or even your own weird setting.
Doblo factory parameters
To create somewhat DUPLO and Lego-compatible bricks, one does not necessarily use real dimensions. For example, filament-based 3D printers will not produce accurate nibbles. Therefore, if you provide correct data, your blocks won't be compatible. You will have to adjust for your printer and your print settings by editing the parameters in the *.scad file.
Doblo factory is fully parametrized and you certainly will have to adjust the nibble-related parameters with respect to your type of 3D printer, polymers used, and your print setting like print speed, extrusion speed, layer width, and Perimeter Width over Thickness ratio. See for example the Skeinforge for RapMan article for an explanation of these concepts.
Depending on your printer and your layer/thickness printing parameters you may need to change parameters for nibbles and walls.
Parameters are by default set for V1 [Felix printer]. Printing with the "normal" SFACT/skeforge profile works fairly well, although you may add an extra shell to the first layer and and extra full layer for the bridges (roofs).
- Layer thickness (mm): Between 0.2 and 0.25 for DUPLOS and between 0.1 and 0.2 for Legos.
- Fit with real Duplos is rather loose. This way, if you print with imperfections or a larger layer, they will still fit. Feel free to slightly increase the wall with, insets and nibble outer radius'.
In earlier versions, parameters were by default set for a V3.1 RapMan with the following low to mid quality print parameters:
- Perimeter Width over Thickness (ratio) : 1.8
- Layer Thickness (mm) : 0.4
- Flow rate: 440 (44 RPM)
- Speed: 16
Parameters are wrong in order to compensate for the characteristics of the printer and the print parameters. If you do precision printing, e.g. with a 0.1 mm layer you may go closer to the real DUPLO/Lego values.
All units are mm.
But check the openscad file you use, I could have made changes.
Dimensions:
- A typical small 2x2 nibbles on top DUPLO compatible brick with one nibble underneath is approximately 32mm x 32mm x 19.2mm (plus a nibble height of 4.5mm)
- LEGO-compatible bricks are half that size in all three dimensions. However walls and nibbles are not proportionally smaller !. This is why I use conditionals in the parameter section. I assume that any size smaller than 0.6 should adopt the Lego proportions.
- DUPLO compatible bricks: use SCALE = 1
- Lego compatible bricks: Use SCALE = 0.5
Settings for doblo-factory-1-9.scad
// !!! IMPORTANT !!!!
//  You MUST set the SCALE AND LEGO_DIV variables in the file that imports this library and not here !!!

// Normal size (DUPLO)
// SCALE = 1;
// Lego size - see also the hacks in the code for fixing wall and nibble dimensions
// SCALE = 0.5 ;

// If you plan to print 1/3 height Lego pieces set to true
// LEGO_DIV = false;

// Doblo block size
// Real DUPLO Block = 31.7 / 2 = 15.85 (with some variations)
PART_WIDTH   = 16.0  * SCALE;

// Block height (a typical block is 4 * PART_HEIGHT)
// Real Duplo Block = 19.17 / 4 = 4.8
// we also measured 19.09, 19.16
PART_HEIGHT  = ((SCALE < 0.6) && LEGO_DIV) ? 3.2 : 4.8 * SCALE ;

// Diamonds - anti-warping holes - used optionally
DIAMOND = 4;

// Top nibble size definitions
NO              = PART_WIDTH / 2.0;              //nibble offset
NBO             = PART_WIDTH ;                   // nibble bottom offset
NH              = (SCALE < 0.6) ? 1.75 : 4.55 ;  // LEGO vs. DUPLO
NB_RADIUS       = (SCALE < 0.6) ? (4.9 / 2) : (9.2 / 2.0);    // radius Lego vs. DUPLO
// Real DUPLO Block = 9.38
NB_RADIUS_INSIDE = 6.8/2  * SCALE;
// 6.44 = Real DUPLO block

// Bottom nibbles size definitions

NB_BOTTOM_RADIUS        = (SCALE < 0.6) ? 6.5/2 : 13.2/2;
// Real DUPLO = 13.48
NB_BOTTOM_RADIUS_INSIDE = (SCALE < 0.6) ? 4.8/2 : 10.8/2;
// Real DUPLO = 10.73
// rapman 10.6
// Real Lego = 4.9

// walls - IMPORTANT: must be adjusted with respect to layer resolution
DOBLOWALL = (SCALE < 0.6) ? 1.2 : 1.55 ; // Lego vs. Duplo, Lego is not 2x smaller

INSET_WIDTH    = (SCALE < 0.6) ? 0.4  : 1.50 ; //little inset walls to make it stick
INSET_LENGTH  = (SCALE < 0.6) ? 3*DOBLOWALL : 4*DOBLOWALL; // Legos have proportionally smaller insets

//lattice width and height (optional, see LATTICE_TYPE)
// A grid underneath the flat bridge, crossing through the nibbles underneath
LATTICE_WIDTH   = 1.50 * SCALE;
// 0 means none, 1 means more spacing (same as nibbles underneath),
// 2 means denser
LATTICE_TYPE    = 1;

// Sizes of a standard 2x2 square brick, normal height
// Not used, but are practical in your custom modules
DOBLOWIDTH  = PART_WIDTH   * 2.0  * SCALE;
DOBLOHEIGHT  = PART_HEIGHT * 4.0  * SCALE;
Using openscad doblo modules
To create your own more complex custom shapes, there are several modules (functions). All of these use the same position system.
Typically, you could either edit the doblo-factory-examples.scad file or create your own file. e.g. to create a standard 2x2 duplo-compatible block with nibbles on top, create a new *.scad file and insert:
 include <doblo-factory-1-4.scad>;
 doblo (0,   0,   0,   2,   2,     4,    true);
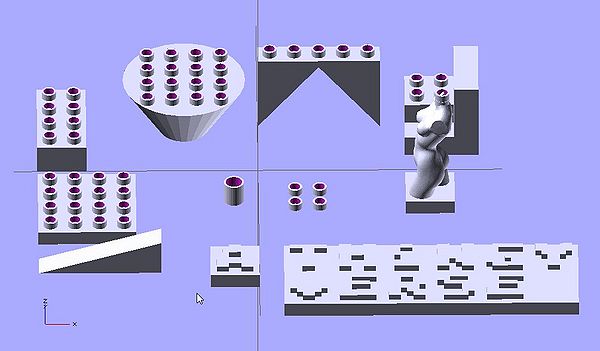

doblo brick
Creates a typical duplo-compatible brick. Typical use is to create a Doblo base on which you then can add other structures. You also can pile up (union) these bricks, but that may lead to a waste of processing time and plastic. Doblo bricks are just like Duplo bricks, however you can make the nibbles on top optional.
- Syntax
- doblo (col, row, up, width,length,height,nibbles_on_off)
doblo light
Same as above, but with a grid instead of nibbles undederneath. Faster to generate and to print (probably). I never use it ....
- Syntax
- doblo_light (col, row, up, width,length,height,nibbles_on_off)
Base plate
This is an easy to print non-stackable base plate. In order to prevent warping on the print bed it has smaller squares underneath. Up should be always 0.
- Syntax
- base_plate (col, row, up, width,length,height,nibbles_on_off)
Merge STL files
Positions an stl file, you may have to find out by trial and error what z offset to use. Tip: embed the STL into a doblo or a block.
- Syntax
- merge_stl (file, col, row, stl_z_offset_mm)
Block
Creates a building block for larger structures with x,y,z positioning. A block does not have nibbles underneath and may or may not have nibbles on top. Also could be used to print a base plate.
- Syntax
- block (col, row, up, width,length,height,nibbles_on_off)
Nibbles
To insert nibbles on some spots of a nibble-less block or an imported STL. For use in larger structures.
- Syntax
- nibbles (col, row, up, width, length)
Bottom nibbles
To insert underneath an imported STL. Not very usefull I think, I'd rather stick a doblo block to the feet of an imported object.
- Syntax
- bottom_nibbles (col, row, up, width, length, N_height)
Support triangles
Support triangles are used in larger structures to support a roof.
- Thickness = 1 doblo width, e.g. = PART_WIDTH.
- Sometimes you may want rational numbers. E.g. 1.5
- Height/length proportion is 4.8/4 (i.e. typical Duplo proportions).
- Only use angle arg of 0,90,180,270 !!
WARNING: You may want to have these bricks overlap a bit, e.g. if 2 corners are just touching, the model will be not be "simple" and can't be exported as STL. In other words, make them a bit higher and position a bit off (embed into the block that you will put on the back and embed the back in a side block). See the stronghold example included.
- Syntax
- support (col,row,up,height,rotation_angle,thickness)
ramp
ramp is the opposite of the support triangle, but with a flatter angle. Can be used to anchor a high and slim block or also to build a real ramp (then you might place 2-4 next to each other.
- Height/length proportion is 4.8/16 (i.e. typical Lego proportions)
Syntax:
- ramp (col,row,up,height,rotation_angle)
Notice: I'll have to add width to this one
Cylinder
cylinder is like a block, but round.
- Can have nibbles on top.
Syntax:
- cyl_block (col, row, up, bottom_r, top_r, height, nibbles_on_off)
Glyph
Is a letter, a number or a special character. This module is based on OpenSCAD Bitmap Fonts Module
Syntax:
- glyph (col, row, up, height_mm, char)
Text
Is a text with glyph characters (see above).
Syntax:
- text (col, row, up, height_mm, chars, count)
count is the number of letters chars is an array.
Example
- text (1, 6, 2, 4, ["T","H","i","N","G","Y"], 6);
Simple mashup blocks
This module can be found in the doblo-factory-examples.scad file ! It's not essential, but can be useful. Seee the Doblo-lugo benchmarks code for an example that does merging using a simpler method.
module merge_brick ()
- Syntax
- merge_brick ()
Allows to create a mashup brick with a duplo-compatible block at the bottom, a "presentation brick" in between and an imported .STL file on top. Not very powerful, but a quick way to create new kinds of Duplo persona for example.
Usage: Edit the first section of the merge_brick module and change the parameters below.
// BASE PLATE PARAMETERS

// 1 = standard doblo with (i.e. 16mm on the x axis)
    doblo_width = 2;

// 1 =  standard 4x4 doblo length (i.e. 16mm on the y axis)
    doblo_length= 2;

// 1 =   minimal doblo height (i.e. 4.8 mm on the z axis), 4 = typical brick
    doblo_height = 2;

// true or false - not needed if presentation block is same size
    doblo_nibbles = false;

// STL file PARAMETERS

// filename (a string), middle of object should be x,y ~ 0 !!
    stl_file = "duck.stl";

// units are mm - how much move the STL up/down with respect to the presentation block - TRY !
// if the STL sits on z=0 then about half height. Just try until it's ok ;)
    stl_lift = 0;

// Positioning - moves STL and support block right and forward/backward by columns and rows.
// pos in N doblo_width/2.  0 = left border of base plate
    STL_col = 0;
// pos in N doblo_length/2. 0 = upper border of base plate
    STL_row = 0;

// Size of the block underneath the STL
// height of the presentation block in terms of doblo_height, can be 0
    block_height = 3;
// width of presentation block in N doblo_width, e.g. 2 means 2 nibbles
    block_width = 2;
// length of presentation block in N doblo_ width, e.g. 2 means 2 nibbles
    block_length = 2;
Examples
A simple brick
A simple 4x4 brick without nibbles (for mashups) and a typical 2x2 brick with nibbles commented out
// define a module if you like
module doblo_brick ()
{
    //    (col, row, up, width,length,height,nibbles_on_off)
    doblo (0,   0,   0,   4,   4,     3,    false);
 // doblo (0,   0,   0,   2,   2,     4,    true);
}

// Call the module
doblo_brick ();
Doblo structure - A stronghold
The following structure was my first creation and it did have some design flaws. But it did print.
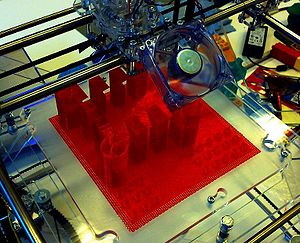
But it did print:
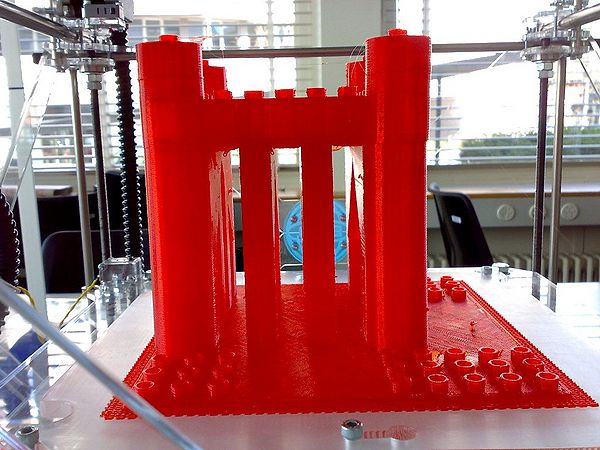
See the happy Duplo persons !
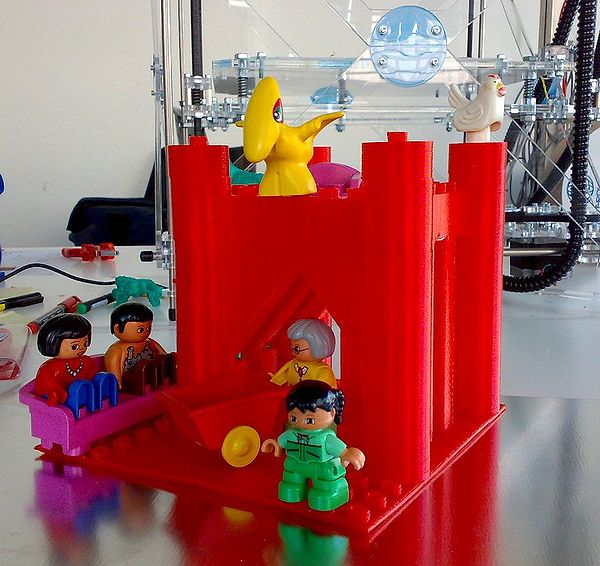
- Module name
- stronghold ()
Below is a revised design which I didn't print yet. It's included in the doblo-factory-1.scad file.
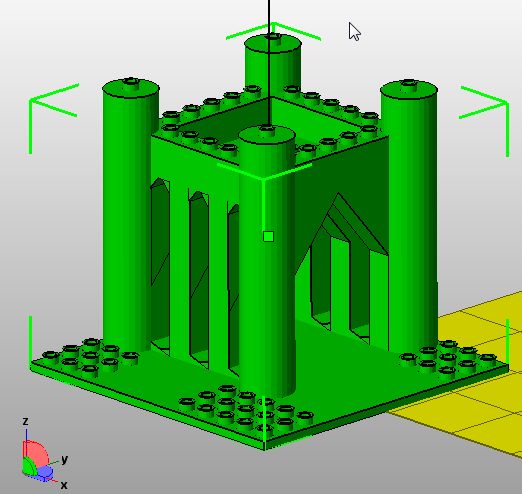
The code is fairly complex, because we needed some support triangles. These should be replaced by pillars some day ...
module stronghold ()
{
    union()
	{
	    //    Base plate, for faster printing replace by block
	    //    (col, row, up, width,length,height,nibbles_on_off)
	    // doblo (-5,  -5,   0,  10,   10,    1,     false);
	    doblo_light (-6,  -6,   0,  12,   12,    1,     false);

	    //      (col, row, up, width, length)
	    nibbles (3,   -6,   1,  3,     3      );
	    nibbles (1,   3,   1,  5,     3      );
	    nibbles (-6,  3,   1,  3,     3      );
            //    (col, row, up, width,length,height,nibbles_on_off) - blocks
            //    (col, row, up, height,degrees) - ramps
	    // back

	    ramp  (-5,  -5,   1,  2,   0);
	    block (-5,  -5,   1,  1,   1,    12,     false);

	    ramp  (-3,  -5,   1,  2,   0);
	    ramp  (-3,  -5,   1,  2,   180);
	    block (-3,  -5,   1,  1,   1,    12,     false);

	    ramp  (-1,  -5,   1,  2,   0);
	    ramp  (-1,  -5,   1,  2,   180);
	    block (-1,  -5,   1,  1,   1,    12,     false);

	    ramp  (1,  -5,   1,  2,   180);
	    block (1,  -5,   1,  1,   1,    12,     false);
	    // left
	    block (-5,  -3,   1,  1,   1,    22,     false);
	    block (-5,  -1,   1,  1,   1,    22,     false);
	    // front
	    ramp  (-5,  1,   1,  2,   0);
	    block (-5,  1,   1,  1,   1,    12,     false);

	    ramp  (-3,  1,   1,  2,   0);
	    ramp  (-3,  1,   1,  2,   180);
	    block (-3,  1,   1,  1,   1,    12,     false);

	    ramp  (-1,  1,   1,  2,   0);
	    ramp  (-1,  1,   1,  2,   180);
	    block (-1,  1,   1,  1,   1,    12,     false);

	    ramp  (1,  1,   1,  2,   180);
	    block (1,  1,   1,  1,   1,    12,     false);
	    // right
	    // block (0,  -4,   1,  1,   3,    8,     false);
	    // big arc
            //      (col, row, up, height,degrees)
	    support (-5, -5,   9,   14,   270, 1) ;
	    support (-4.1,  -5,  21,  2.2,  0, 7);
	    support (-3.9,  -5,  21,  2.2,   180, 7);

	    support (-3, -5,   9,   14,   270, 1) ;
	    support (-2.1,  -5,  21,  2.2,  0, 7);
	    support (-1.9,  -5,  21,  2.2,   180, 7);

	    support (-1, -5,   9,   14,   270, 1) ;
	    support (-0.1,  -5,  21,  2.2,  0, 7);
	    support (0.1,  -5,  21,  2.2,   180, 7);

	    support (1,  -5,   9,   14,   270, 1) ;

	    support (-5, 1,   9,   14,   90, 1) ;

	    support (-3, 1,   9,   14,   90, 1) ;

	    support (-1, 1,   9,   14,   90, 1) ;

	    support (1,  1,   9,   14,   90, 1) ;

	    // Roof
            //    (col, row, up, width,length,height,nibbles_on_off)
	    block   (-5,  -5,   23,  7,   7,    1,     false);
	    nibbles (-3,  -3,   24,  3,   3);

	    block (-5,  -5,   24,  7,   1,    4,     false);
	    nibbles (-4,  -5,   28,  5,   1);

	    block (-5,  1,   24,  7,   1,    4,     false);
	    nibbles (-5,  -4,   28,  1,   5);

	    block (-5,  -4,   24,  1,   5,    4,     false);
	    nibbles (-4,  1,   28,  5,   1);

	    block (1,  -4,   24,  1,   5,    4,     false);
	    nibbles (1,  -4,   28,  1,   5);
	    //          (col, row, up, bottom_r, top_r, height, nibbles_on_off)
	    cyl_block   (-6,   -6,  1,  2,       2,     32,   true) ;
	    cyl_block   (1,   -6,  1,  2,       2,     32,   true) ;
	    cyl_block   (-6,   1,  1,  2,       2,     32,   true) ;
	    cyl_block   (1,   1,  1,  2,       2,     32,   true) ;
	}
}
To use this "as is", just uncomment the following line in the doblo-factory-examples.scad file:
// stronghold ();
Some mashups
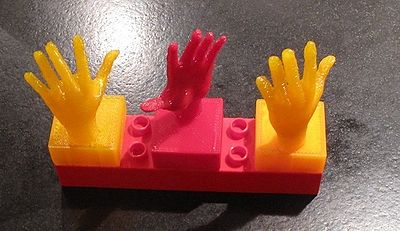
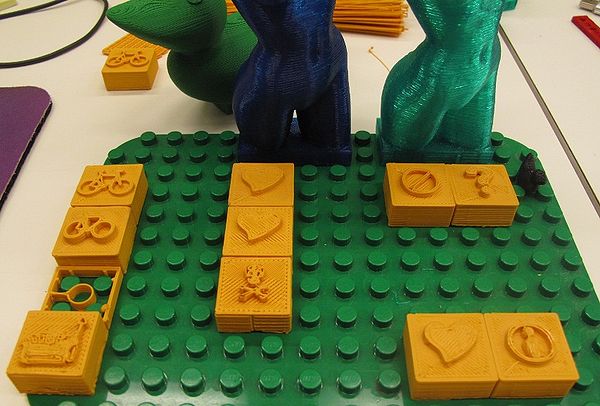
In the following picture you can see two kinds of mashups made in 2010 with a Rapman printer and a rather coarse 0.4mm layer resolution.
- Larger STL models put on top of bricks. I actually did these with Meshlab before I learnt how to use OpenScad.
- Doblo bricks with webdings on top. Produced with either OpenScad alone or with Netfabb Studio. The basic version of Netfabb does have a 3D text. The pro version can directly export a mashup. Users of Netfabb Studio basic should also use either OpenScad or Meshlab for merging.
Printing
RapMan / RepRap Mendel
We shall discuss some skeinforge printing settings for the RapMan below. You may consult the Skeinforge for RapMan to understand these. Also, Netfabb engine for RapMan will be able to print high quality DUPLOs in some near future. The current 4.5.1 Beta version cannot correctly print the overhangs of the Duplo tops yet - Daniel K. Schneider 20:14, 30 April 2010 (UTC).
- Try small objects first, e.g. a 3x3x3 doblo brick with PLA or a 2x2x3 block with ABS. ABS warps !
Calibration
We used the following setup for larger structures
- Layer Thickness (mm) : 0.4
- Perimeter Width over Thickness (ratio), i.e. how wide the filament should be compared to it´s height: 1.8
- Fill
- Fill of 0.1 should be ok (I tested with 0.05)
- PLA
- Use PLA on large objects to prevent warping (Notice: I should create a version of the bricks with big holes in the side walls for ABS printing)
- Temperature: 210 (all) and Fan on
- Raft: One interface layer
- Flow rate: At least 380 for a layer thickness of 0.4 (for horizontal structures)
- Other
- Solid Surface Thickness for both ABS and PLA: 4
- ABS
- We only made smaller objects so far, e.g. simple doblo bricks and mashups. You can see some of these in the Meshlab for RapMan tutorial and Netfabb Studio tutorial.
- One of the major difficulties is to create a raft that really sticks both to the print bed and the object. See the duplo bricks for color ABS section in our Skeinforge entry.
Since skeinforge does not really produce what I want, I'd suggest to produce sort of a normal "fat" raft code, then edit the g-code file and double up M108 and Fxxx values. Make it twice as fast, else it takes hours to get just the raft printed ....
- Precision objects
- See the Hand on duplo-compatible block example discussed on Thingyverse. E.g. a good quality/print time setting for Skeinforge is:
- Layer Thickness = 0.35
- Clip Over Perimeter Width = 0.15
- Cool Type = Orbit
- Min Layer time = 1
- Extra shells on Base = 2
- Infill perimeter Overlap
- Infill solidity = 0.3
- Solid surface layers = 4
- Jitter = activated
- Temperature = 210 for ALL
- Flow Rate = 250
- Feed Rate = 16
Felixprinter and fabbster
Start with default "normal" profiles, i.e. something between draft and high-quality printing.
Can your printer do it ?
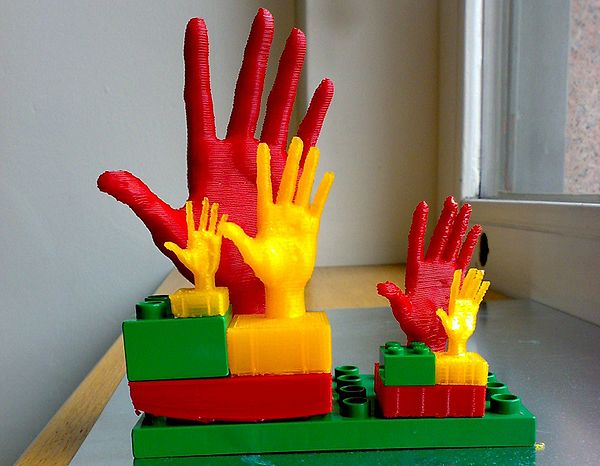
We designed a simple suite of benchmarking pieces that you can use to test drive both DUPLO-compatible and LEGO-compatible sized blocks. Start with the DUPLOs pieces. Note however, that different kinds of structures may need different calibration. Print time is also a big factor.
Download: http://www.thingiverse.com/thing:2714
Print the four pieces and see if they fit like in the picture. The green blocks are Duplos/Legos. Pieces must fit in each possible combination.
If you know how to use OpenScad, it's better to generate the STLs again, since I had to cheat a bit with the width parameters in order to compensate the way the printer works. See also http://www.thingiverse.com/thing:2106 for the blocks generator.
The *.zip file includes all files (except the picture)
Evaluation criteria:
- 1a) Fit with real Duplos, i.e. respect dimensions of real Duplo and Lego bricks
- 1b) First good good 5 layers of the brick. That's important for both esthetics and also vertical fit. That includes no warping !
- 1c) Roof of the brick on top, must be flat and smooth
- 1d) Roof of the brick underneath, no hanging filament
- 2a) Overhang of the thumb
- 2b) Smoothness of the palm and the back (difficult, of course faster prints will use bigger filament)
- 2c) Smoothness of the fingers, nails (difficult)
- 2d) Correct position of fingers
- 3a) Amount of post-processing needed
- 3b) Solidity (with respect to polymers used and size)
- 4) I don't know exactly how - but all this should be put into relation with print time
Printing pauses and recovery from print abortion
A larger structure like the stronghold takes over 24 hours to print. If you use PLA, it's ok to interrupt (hit the ESC key) while you sleep or do other stuff. I don't know about ABS.
However, if you encounter a card read error or a filament problem after 20 hours of printing, frustration can be high ! In the g-code article, we described how we managed to recover. It's not so easy, but certainly less painful than to restart.
Educational use
(will be completed later, probably as a separate piece - 14:33, 13 April 2010 (UTC) ....)
Design of constructivist play kits
One of our goals is create a kit that allows the creation of 3D duplo-compatible "play" boards for various purposes from Kindergarten to Master level.
“In the LEGO System, complex cause-and-effect relationships can be built from the ground up by the relatively simple act of combining individual elements” (Ackerman et al. 2009: 76). While ready-made playmobil-like boards to not necessarily favor creativity, building such boards does. LEGO (ibid:77) argues that the benefits of playing with LEGO Systems are: Curiosity (bricks encourage exploration naturally), courage (one can take risks and make mistakes), exploration and investigation (Lego has an easy start, but can reach high levels), experimentation (change and fiddle), imagination (infinite combinations), reason and discipoline (uses a fixed logical structure), sociability (can be shared) and reflection (builders can step back and evaluate).
The same paper (p. 81)also argues that the system will support systematic creativity:
- Preparation (problems that arrise curiosity)
- Incubation (ideas being generated and unlocked)
- Insight (thing falls in place and construction can begin)
- Evaluation (decide if the insight is worth pursuing and may lead to "hard fun")
- Elaboration (create the final form)
“The LEGO System is a system to think with. It encourages the process of making and reflecting, then making and reflecting again, in a thoughtful circuit of activity. In LEGO Serious Play participants are encouraged to build quickly and spontaneously, but then to take a step back and consider what they have made, and then review and change it as they see fit, with multiple iterations of individual and the collective activity. This build-then-reflect approach is really just one of the standard ways of using LEGO bricks which people naturally adopt.”
- Teacher and educational technologists training
In a fall 2010, class we will work with a small group of students to create both half-baked play platforms that leave enough space for thinking and new kinds of little blocks to support some classes of pedagogical scenarios. - 14:12, 13 April 2010 (UTC).
- A few notes on childhood learning
Ackerman, in an interview (retrieved 11:22, 13 April 2010 (UTC)) states that “LEGO provides a unique building system that encourages children to give form, or expression, to their wildest ideas in the most rigorous ways (hard fun)! Two things I enjoy most about LEGO: 1) the system offers endless possibilities. Yet, at the same time, not anything goes! The bricks have a mind [or logic] of their own, that the child learns to compose with to achieve their creations; 2) the system grows with the child, thus allowing the children to grow with it. As a constructivist at heart, I like play materials that let you in at different levels, and you can add complexity at will (low floor, high ceiling). Most children love to build things, and then bring them to life through play – or for real by adding special bricks, such as a motor, a light, or even a sensor.”
“Systems are crucial for creativity. Systems of science channel creativity towards asking specific questions, and solving or problems as in maths, chemistry and engineering. Systems of art channel creativity into many different and unique expressions, giving form to our imagination, feelings and identities, as in painting, music and sculpture. LEGO offers a unique—and widely recognized—system capable of channelling both, simultaneously. With LEGO you can bridge a stream, or transport an apple from A to B (scientific creativity) or build a fantasy creature, spaceship or landscape; or create metaphorical arrangements to evoke, project and represent feelings or identities (artistic creativity).” (Defining Systematic Creativity, retrieved 11:22, 13 April 2010 (UTC)).
Frans Orsted Andersen (2004) also argues that high PISA performances of the Danish Schools can be partly explained by the fact the learners more often encounter flow through "optimal learning environments". Scandinavian education is based on the three child i'es:
- initiative
- independence
- intrinsic motivation (which in turn is part-of flow). “Being able to base the learning processes on high levels of pupil
intrinsic motivation through a special teaching model enhancing flow experiences - indeed seems to be the key to understanding the successful optimal learning environments of the sampled Danish schools in this study.” ([Anderson, 2004: 14).
In addition to using such bricks and systems in normal schools and at home, DUPLOs and other construction kits seem to popular in special education (refs. needed).
- Adult learning
Another potential avenue for the doblo factory comes from so-called simulation and gaming. Some adult gaming environments only use physical support, others rely entirely on computer-support and, finally, others on mixed support.
Our aim is to procude visual, mostly 2D, iconic languages to support various kinds of project-oriented learning.
CAD/CAM, 3D and CS education
- Introduction to 3D graphics and design (learn about positions) and simple use of OpenSCAD
- "End-user 3D programming" environment (e.g. students could add other primitives)
Bugs, to do
- Bugs
- cyl_block nibbles can't handle top_r < 2 and rational numbers
- Needed
- a pillar with both supports for bottom and top (i.e. 2x4 directions)
- Improvements
- replace support modules by triangle_forward, triangle_right, etc.
- Parametrize all numbers
- Make it also Lego compatible
- Adjustments
- make the nibbles underneath a bit fatter maybe
- Figure out the best skeinforge settings for ABS and PLA
Links
Credits for the OpenScad code
- parametric lego duplo, prior work by by Domonoky.
- OpenScad
- OpenScad beginners tutorial (stub)
- OpenSCAD - The Programmers Solid 3D CAD Modeller (download)
- http://en.wikibooks.org/wiki/OpenSCAD_User_Manual
- End-user programming / microworlds
- Lego
- In this wiki, Lego Dacta and LEGO Mindstorms (includes links to Lego-fan sites that describe the 1000s of parts., good for inspiration)
- Parents at Lego.com
- LEGO Learning Institute (home page)
- legolearning.net
- Lego-related articles at MakeZine
- What's the relationship between playing with Lego and creation of Google ?
- Meet The Google Guys, Time magazine, Sunday, Feb. 12, 2006
Bibliography
- Ackermann Edith; David Gauntlett and Cecilia Weckstrom (2009). Defining Systematic Creativity, LEGO Learning Institute, Summary, PDF download
- Andersen, Frans Ørsted (2004), Optimal Learning Environments at Danish Primary Schools, LEGO Learning Institute Abstract/PDF download
- Claxton, Guy (1997). Hare Brain, Tortoise Mind, Fourth Estate, London.
- Claxton, Guy, What’s the Point of School, One World Publications, Oxford, 2008.
- LEGO Group (2004), The whole child development guide, LEGO Group, PDF dowload. Also can be found through Lego Learning Institute Research Page.
- Winnicott, D.W. (1989) Playing and Reality. London, New York: Routledge.