« Flash CS4 - Cinématique inversée » : différence entre les versions
| Ligne 50 : | Ligne 50 : | ||
Chargez l'application [http://tecfa.unige.ch/guides/flash/ex4/inverse-kinematics/symbol-vs-shape-armature.html symbol-vs-shape-armature.html] et tirez les bouts (ou d'autres parties des formes). Assurez-vous que vous avez Flash Player 10 installé autrement, cela ne fonctionnera pas. Notification : Les armatures ont été définies comme type ''Runtime'' qui permet à l'utilisateur manipuler la structure IK. | Chargez l'application [http://tecfa.unige.ch/guides/flash/ex4/inverse-kinematics/symbol-vs-shape-armature.html symbol-vs-shape-armature.html] et tirez les bouts (ou d'autres parties des formes). Assurez-vous que vous avez Flash Player 10 installé autrement, cela ne fonctionnera pas. Notification : Les armatures ont été définies comme type ''Runtime'' qui permet à l'utilisateur manipuler la structure IK. | ||
== | == Une armature simple utilisant des occurrences de symbole == | ||
=== Creation of a simple IK animation | === Créer une animation IK simple avec Creation of a simple IK animation tilisant des occurrences de symbole === | ||
Voir l'exemple [http://tecfa.unige.ch/guides/flash/ex4/inverse-kinematics/symbols-ik-armature-intro.html symbols-ik-armature-intro] d'abord. | |||
[[image:symbols-ik-intro.png|thumb|right|150px|A simple IK animation with symbol instances]] | [[image:symbols-ik-intro.png|thumb|right|150px|A simple IK animation with symbol instances]] | ||
; | ; Une exemple de boules connéctées | ||
; Step 1 - create the symbols | ; Step 1 - create the symbols | ||
* Create a new layer | * Create a new layer | ||
Version du 12 octobre 2009 à 21:07
Cet article est incomplet.
Il est jugé trop incomplet dans son développement ou dans l'expression des concepts et des idées. Son contenu est donc à considérer avec précaution.
Introduction
- Objectifs d'apprentissage
- Insérer des armatures dans les formes
- Lier les symboles aux armatures
- L'interpolation de mouvement avec les armatures
- Lier les contours des formes aux armatures
- Prérequis
- Flash CS4 - Créer des dessins avec les outils de dessin
- Flash CS4 - Arranger des dessins
- Flash CS4 - Animation image par image
- Flash CS4 - Interpolation de mouvement
- Flash CS4 - Morphing
- Matériaux
- Aucun, jouer simplement avec vos propres objets:)
Ce tutoriel est une traduction de la section Using inverse kinematics de la version anglaise de l'aide Adobe Flash CS4 disponible en ligne sous une license Attribution-Noncommercial-Share Alike et de la version anglaise de l'article Flash CS4 inverse kinematics tutorial en Edutechwiki.
A propos de la cinématique inversée
La cinématique inverse (inverse kinematics ou IK) est une méthode pour animer un objet ou un ensemble d'objets reliés utilisant une structure de segments articulés appelée une armature. Les segments ou "os" permettent le déplacement de symboles et de formes de manière complexe et naturels avec un minimum d'effort de conception. Par exemple, la cinématique inverse vous laisse créer les effets d'animation de personnages, telle que le mouvement naturel des bras, des jambes, et des expressions faciales beaucoup plus facilement.
L'outil bone ou os est un outil de la cinématique inverse (IK) qui permet de créer des armatures pour des formes ou des occurrences (instances) de symboles reliés. Ces armatures relient des objets ou des parties de formes dans un arbre hiérarchique. Lorsque les segments ou os à l'"extérieur" (ou enfant) sont déplacés ils déplacent les os à l'"intérieur" (ou parents). Prenant un avatar humain comme exemple, si on tire un doigt, la main se déplacera aussi et la main à son tour déplacera le bras inférieur, etc. Quand un os se déplace, les autres os reliés se déplacent par rapport à l'os qui a lancé le mouvement. Ainsi contrairement à l'animation cinématique directe, où chaque mouvement pour chaque composant doit être prévu, il ne faut que spécifier les positions de départ et d'arrêt des objets.
Vous pouvez ajouter des armatures aux occurrences de symboles individuels ou à l'intérieur d'une forme. Utilisant la cinématique inverse La cinématique inverse vous laisse créer le mouvement naturel beaucoup plus facilement.
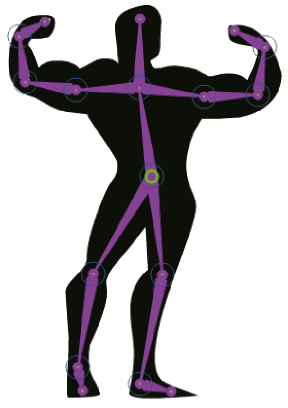
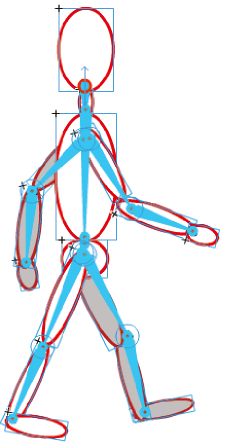
Une chaîne d'os s'appelle une armature. Les os dans une armature sont reliés entre eux dans une hiérarchie de parent-enfant. Une armature peut être linéaire ou embranchée. Des branches d'une armature qui commencent au même os s'appellent des siblings. Le point où un os se relie un autre s'appelle une articulation (joint).
On peut utiliser IK en Flash CS4 de deux manières. La première est d'articuler une série d'occurrences de symboles en ajoutant des os pour relier chaque occurrence à un autre. Les os permettent à la chaîne d'occurrences de symboles de bouger ensemble comme dans l'exemple ci-dessus.
La deuxième manière d'employer IK est d'ajouter une armature à l'intérieur d'une forme. La forme peut être créée en comme forme primitive (merge drawing mode) ou forme standard (object drawing mode). Les os permettent de déplacer eet animer des parties d'une forme sans la nécessité de dessiner différentes versions de la forme ou de créer un tween de forme. Par exemple, on peut ajouter des os à un dessin simple d'un serpent pour permettre au serpent de se déplacer de manière réaliste.
Lorsque vous ajoutez des os aux instances de symboles ou aux formes, Flash met l'instance ou la forme et leur armature correspondantes sur un nouveau calque dans le scénario (timeline). Ce calque s'appelle un calque de pose (pose layer')'. Chaque couche de pose peut contenir seulement une armature et ses occurrences ou formes associés.
Flash inclut deux outils pour travailler avec IK. Vous pouvez ajouter des os aux occurrences de symbole et aux formes avec l'outil os. Vous pouvez utiliser l'outil de grippage (Bind tool) pour modifier les rapports entre différents os et points de control des formes.
Démo simple
L'exemple suivant montre que la différence entre une structure d'IK (armature) faite avec des symboles vs une structure faite avec une forme.
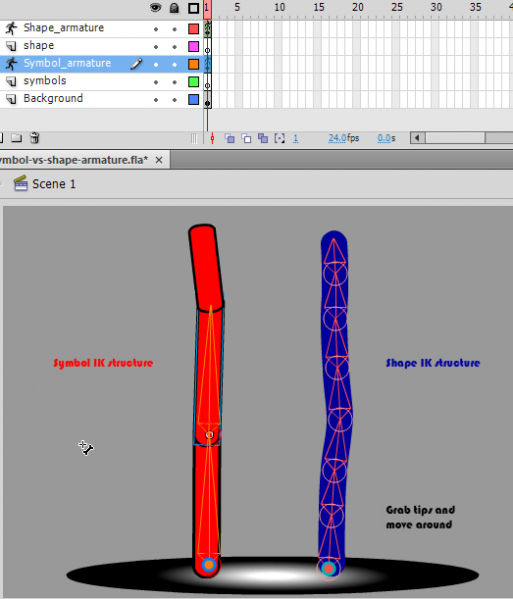
Chargez l'application symbol-vs-shape-armature.html et tirez les bouts (ou d'autres parties des formes). Assurez-vous que vous avez Flash Player 10 installé autrement, cela ne fonctionnera pas. Notification : Les armatures ont été définies comme type Runtime qui permet à l'utilisateur manipuler la structure IK.
Une armature simple utilisant des occurrences de symbole
Créer une animation IK simple avec Creation of a simple IK animation tilisant des occurrences de symbole
Voir l'exemple symbols-ik-armature-intro d'abord.
- Une exemple de boules connéctées
- Step 1 - create the symbols
- Create a new layer
- Create a movie clip symbol, draw a red ball and right-click convert to symbol. Select "Movie clip".
- Then adjust the instance on stage (e.g. fix its color and size or add a bevel filter)
- Then create copies of this instance. The fastest way is to hold down CTRL-ALT and drag.
- Repeat this with a rounded rectangle.
In your library you now should have two Movie clip symbols, e.g. Red ball and Red rectangle
- Step 2 - move the symbols into an initial position
- E.g. try to reproduce the example. Make sure that you have all the symbols you need on the stage. You won't be able to add additional symbols once you start defining the armature.
- Step 3 - create the chain
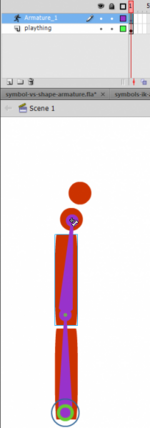
The chain should be going from parent to children, from children to great children etc. In our case, this means that we start with the rectangle that is attached to the floor.
- Select the bone tool and click on the first shape to designate it as the parent shape. The spot where you click first will be the one that attaches the armature to the scene. I our case we selected it close to the floor.
- Then, from from the end point of first point, i.e. the joint', drag the bone tool to the next shape and release the mouse where you want your bone to end. If you release the mouse outside of a symbol (shape) nothing will happen.
- Repeat this step until all of the symbols are linked. Always start from a joint. In our case, always the "outer" joint, since we want to create a chain.
You now will see that Flash now created an armature layer (called "Armature_1" and you can't edit your objects anymore. They have been copied to the armature layer and did become ikNodes. You may change the name of that layer if you like.
A note on terminology: Each bone will get a name like "ikBoneName1" (that you can change) and each connected symbol will get a name like "ikNode1" (that you also can change). So in a IK armature we got bones and nodes.
Now you can play a bit, e.g. drag the last child in the IK structure around and see if the joints are in the right place. If not, adjust (see below)
Adjustments
- Adjust center points
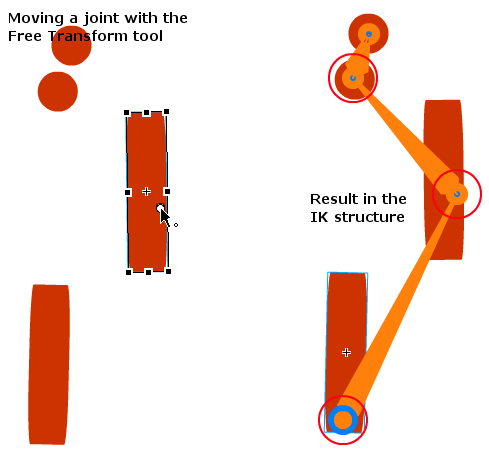
- If the start of a bone is in the wrong place, you can move the rotation point with the free transform tool. You also could turn the shape, move it or adjust its size, so that it would adjust to the new rotation and length of the bone, but that's a bit tricky. You will learn move about bone and node manipulation later, but for starters this it is enough to move bones up and down.
The picture below shows what happens if you move a shape and change its rotation point. The result is not entirely convincing (compare with the previous picture above) ...
Animation
Let's now create an IK animation. Before you start, make sure that the IK structure is what you want. It must be complete. You won't be able to change the structure itself later on. You only can change poses, do some transformations and other more advanced tuning. So here is the procedure.
- Hit F5 somewhere in the timeline
- Use the select tool
- Move all the joints wherever you want in any frame you like. Each time you do this, it will create a new keyframe with a pose. Keyframes are represented by little lozenges.
- You can copy/paste poses: Right-click directly in the timeline on a keyframe (i.e. an existing pose) and copy pose. Then right-click in a different frame and paste pose. Make sure to directly right-click (no click first), else it won't work.
What if you got it all wrong ?
- Select the armature layer by clicking on it. This selects the whole IK structure
- Kill the parent bone (in our example it its on the bottom)
- The select all symbols and copy them back to the initial layer ("plaything" in our case). You could use ctrl-shift-v to "copy in place".
- Then delete the armature layer and start again.
Adjustment of the time line
- Just drag the latest frame out or in. Make sure that you see a horizontal double arrow, i.e. don't click in the last frame. In the latter case you would just move the whole animation chain to the right.
- Result and source
- symbols-ik-armature-intro.html
- Source: symbols-ik-armature-intro.fla (Notice: Selection of elements behaves strangely, maybe because I changed features of the symbols or because of the bevel. Simply magnify to 400% if you want to play with it ...).
- Directory: http://tecfa.unige.ch/guides/flash/ex4/inverse-kinematics/
