Netfabb Studio tutorial: Difference between revisions
m (→Introduction) |
|||
| Line 48: | Line 48: | ||
=== Simple Mashup example - duplos for grown ups === | === Simple Mashup example - duplos for grown ups === | ||
See also: [[OpenScad beginners tutorial]] | See also: [[OpenScad beginners tutorial]] and [[Doblo factory]] | ||
==== Getting and aligning the parts === | |||
; Get a ready made duplo without caps: | ; Get a ready made duplo without caps: | ||
* Get a parametric DUPLO | * Get a parametric DUPLO from Thingiverse or generate one yourself: | ||
* A good piece is the [http://www.thingiverse.com/download: | ** [http://www.thingiverse.com/thing:2106 Doblo factory - OpenScad modules for building DUPLO structures and bricks]] | ||
* A good piece is the [http://www.thingiverse.com/download:44594 2x2x14mm flat.stl] | |||
; Open in Netfabb | ; Open in Netfabb | ||
| Line 69: | Line 72: | ||
[[image:netfabb-duplo-heart.jpg|thumb|800px|none|3D text DUPLO aligned in Netfabb]] | [[image:netfabb-duplo-heart.jpg|thumb|800px|none|3D text DUPLO aligned in Netfabb]] | ||
; | ; Note on finding/selecting webdings | ||
* Read [[Webdings and wingdings]] | * Read [[Webdings and wingdings]] | ||
* Basically, under Windows open the character table, then copy and paste. | * Basically, under Windows open the character table, then copy and paste. | ||
; | ==== Merging the parts ==== | ||
* Since you can't do this in the free version, you will have to export '''both''' parts | |||
; Export the two parts for merging | |||
* Since you can't do this in the free Netfabb version, you will have to export '''both''' parts | |||
* Menu->Part->Export Part; Select .STL (ascii) | * Menu->Part->Export Part; Select .STL (ascii) | ||
* Now save the whole thing as Netfabb project (Project->Save), in case you did something wrong. | * Now save the whole thing as Netfabb project (Project->Save), in case you did something wrong. | ||
; Merge with Meshlab | |||
Import both exported parts to Meshlab ([http://sourceforge.net/projects/meshlab/ download]) and merge layers. Meshlab is a really difficult program, but merging two layers is very easy (see the [[Meshlab for RapMan tutorial]] for some more details if you like). | |||
* Menu: File->Import Mesh (first part) | |||
* Menu: File->Import Mesh (second part, order doesn't matter) | |||
* Menu: Filters->Layer and Attribute Management->Flatten Layers | |||
Don't try to understand anything and just leave the suggested default boxes checked. | |||
* Menu: File->Export As (select STL) | |||
* Call the file something like duplo-symbol.stl | * Call the file something like duplo-symbol.stl | ||
; Clean up the .STL | ; Clean up the .STL | ||
This step may not be necessary, but it is better to make sure that mesh merge went ok. | |||
* Import the combined duplo-symbol.stl to netfabb | * Import the combined duplo-symbol.stl to netfabb | ||
* Then clean it up by pressing the "+" button. | * Then clean it up by pressing the "+" button. | ||
* Click on "automatic repair" | * Click on "automatic repair" | ||
* click on Apply repair | * click on Apply repair | ||
* Now export again as part: Menu->Part->Export Part. You can overwrite the duplo-symbol | * Now export again as part: Menu->Part->Export Part. You can overwrite the duplo-symbol.stl since it may be broken anyhow. | ||
==== Printing with the RapMan ==== | |||
* Now you can import the fixed .STL file to [[Skeinforge for RapMan|skeinforge]] | * Now you can import the fixed .STL file to [[Skeinforge for RapMan|skeinforge]] | ||
* Recommended settings for our Rapman v3.1 (have to check this a bit more): | * Recommended settings for our Rapman v3.1 (have to check this a bit more): | ||
| Line 114: | Line 127: | ||
'''Warning''': This setting squeezes down layers, so stay next to your printer. It may get stuck on something that would stick out. | '''Warning''': This setting squeezes down layers, so stay next to your printer. It may get stuck on something that would stick out. | ||
==== Printing with the fabbster ==== | |||
We suggest to use our "Uma" style: | |||
* Read [[Netfabb engine for fabbster build styles#UMA| Netfabb engine for fabbster build styles]] | |||
* Download from [http://tecfa.unige.ch/guides/3dprinting/fabbster/styles/uma http://tecfa.unige.ch/guides/3dprinting/fabbster/styles/uma] | |||
==== Printing with the Felix ==== | |||
* Default style should be ok, but can make the layers a bit fatter. | |||
=== Cleaning === | === Cleaning === | ||
Revision as of 18:39, 20 June 2012
Introduction
“netfabb Studio is a software tailored for additive fabrication, rapid prototyping and 3D printing. It includes the ability of viewing, editing, repairing and analyzing stl-files or slice-based files in various formats.”. The version called Netfabb Studio Basic (as of fall 2010) is free and it runs under Windows / Linux and MC. For Linux, you should have OpenGL support.
Netfabb Studio is a must have tool for 3D printing, e.g with the RapMan, the fabbster or the Felix
Other versions:
- netfabb Cloud Services, extends the functionality of the free netfabb Studio Basic.
- Netfabb Studio Professional is a recommended pro version. On important feature is merging STL files which makes life a lot easier if your printable object is made from several others (e.g. a duck sitting on a Lego brick).
- Netfabb engine for RapMan and Netfabb engine for RepRap are commercial inexpensive slicers for rapman that you could use instead of skeinforge. These products works as an add-ons of Netfabb Studio.
See also:
- Meshlab for RapMan tutorial (for layer merging)
- Skeinforge for RapMan for printing with a RapMan
Base functionalities
Views
In any 3D drawing programs you can change your view of an object. This can be achieved mainly through mouse gestures
- Rotation of the view (not of the object): Right-Mouse-down
- Zooming in: Mouse wheel or ctrl-right-mouse-down
- Panning: Middle mouse down.
In addition, you can set predefined Views of the scene either through icons on the tool bar or the View Menu. This is a very useful feature, if you want to quickly check whether the x-y-z positions are ok.
In order to "see" where the print will go in x-y-z space, I also suggest turning on the "platform view" with Menu: View->Show Platform. This does not represent the print platform, the x=0,y=0 corner of the by default "yellow" platform is on the lower left. In a RapMan printer the x=0, y=0 is in the middle of the print bed. In other words, we suggest putting your object near the lower left corner, or put more simple. The center of your object should be fairly close to x=0,y=0. Obviously the bottom (and not the center) of your object must be z=0.
Positioning, rotation and resizing
Parts are manipulated either through icons on the tool bar, the Parts menu or shortcuts
- Positioning and scaling
Positioning is really easy because one can quickly choose a view from one of seven views (e.g. top, bottom, left, right, front, back) and then either move the object or drag a corner of the (green) bounding box rectangle.
For precision work, e.g. align to z=0 one can use pop-ups in the Part menu or some shortcuts:
- Move: Ctrl-V
- Rotate: Ctrl-D
- Scale: CTRL-S
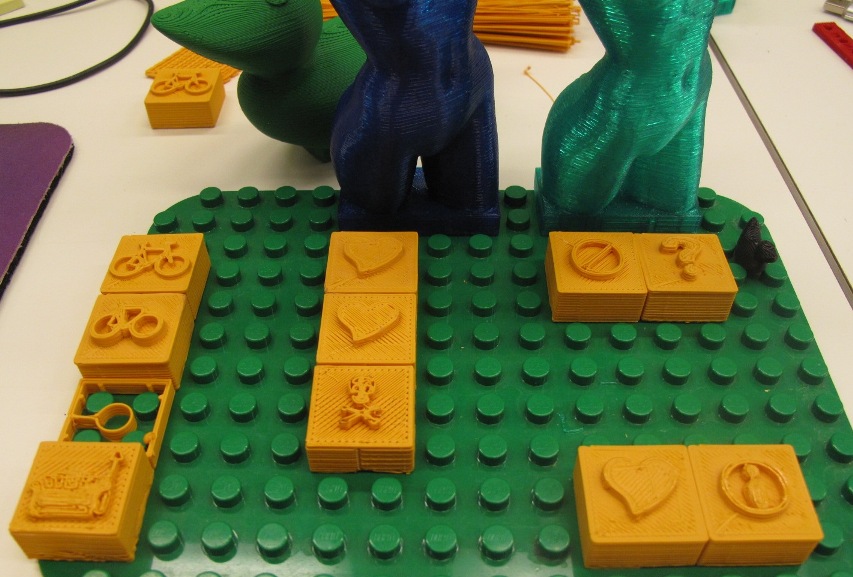
Simple Mashup example - duplos for grown ups
See also: OpenScad beginners tutorial and Doblo factory
= Getting and aligning the parts
- Get a ready made duplo without caps
- Get a parametric DUPLO from Thingiverse or generate one yourself:
- A good piece is the 2x2x14mm flat.stl
- Open in Netfabb
- Project -> New
- Project -> Open the .STL file
- Create 3D text
- Click on the "Create Primitives Icon" (second to the left)
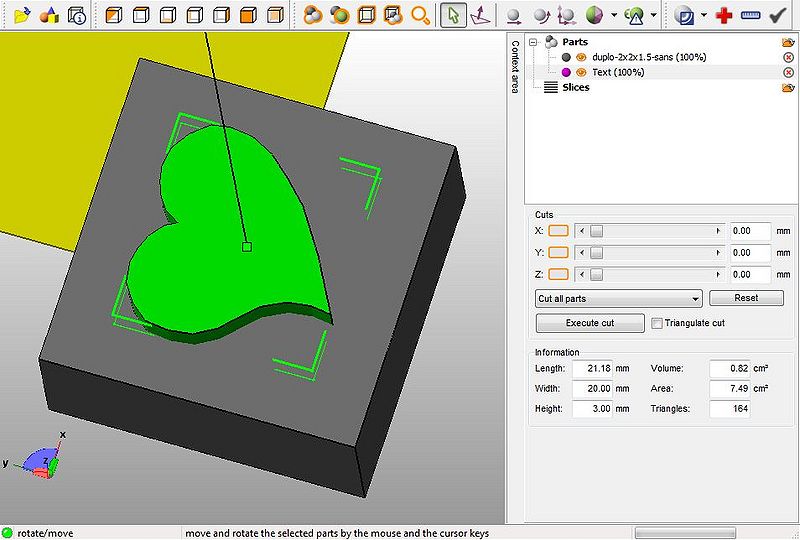
- Set Height to 20.mm and depth to 2.0 or 3.0 mm
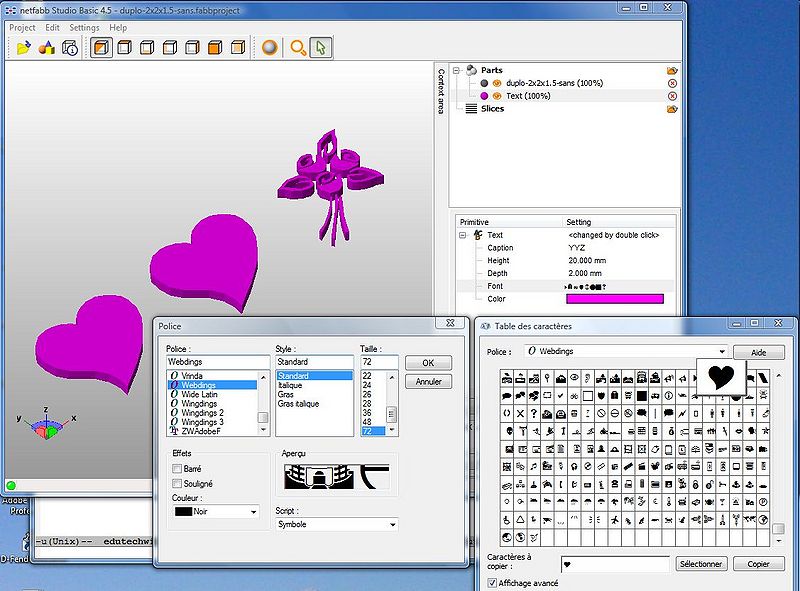
- Double click on Text and enter a letter, e.g. "Y" (read the next item about "webdings")
- Change the Font to Webdings (double click), select bold and select size = 72
- Click on Apply.
- Align
Use each of the seven views to align and make sure that the symbol will be on top.
- Note on finding/selecting webdings
- Read Webdings and wingdings
- Basically, under Windows open the character table, then copy and paste.
Merging the parts
- Export the two parts for merging
- Since you can't do this in the free Netfabb version, you will have to export both parts
- Menu->Part->Export Part; Select .STL (ascii)
- Now save the whole thing as Netfabb project (Project->Save), in case you did something wrong.
- Merge with Meshlab
Import both exported parts to Meshlab (download) and merge layers. Meshlab is a really difficult program, but merging two layers is very easy (see the Meshlab for RapMan tutorial for some more details if you like).
- Menu: File->Import Mesh (first part)
- Menu: File->Import Mesh (second part, order doesn't matter)
- Menu: Filters->Layer and Attribute Management->Flatten Layers
Don't try to understand anything and just leave the suggested default boxes checked.
- Menu: File->Export As (select STL)
- Call the file something like duplo-symbol.stl
- Clean up the .STL
This step may not be necessary, but it is better to make sure that mesh merge went ok.
- Import the combined duplo-symbol.stl to netfabb
- Then clean it up by pressing the "+" button.
- Click on "automatic repair"
- click on Apply repair
- Now export again as part: Menu->Part->Export Part. You can overwrite the duplo-symbol.stl since it may be broken anyhow.
Printing with the RapMan
- Now you can import the fixed .STL file to skeinforge
- Recommended settings for our Rapman v3.1 (have to check this a bit more):
- Carve -
Layer thickness                 = 0.4 (0.45 is sort of ok)
- Speed -
Feed rate (head spead)          =  16
Flow rate setting (RPM/10)      = 450 to 500 (this is a lot, but it's for the top)
Perimeter feed and flow rates   = 0.9 to 1.0 (0.9 will make it more precise)
- Temperature -
Base, Interface, support        = 238
All others                      = 247
- Fill -
Solid surface thickness         = 0.4
- Raft -
Base Layer thickness            = 2.5
Base Feed Rate Multiplier       = 0.90
Interface Layers                = 2
Nozzle lifts (all three)        = 0.35
- In addition I tried using cool (for orbiting) but I did removed all the temperature changes in the g-code (else the print head will got to waiting each time)
The ones that have ugly walls were printed with a too high layer thickness and too little flow rate ....
Warning: This setting squeezes down layers, so stay next to your printer. It may get stuck on something that would stick out.
Printing with the fabbster
We suggest to use our "Uma" style:
- Read Netfabb engine for fabbster build styles
- Download from http://tecfa.unige.ch/guides/3dprinting/fabbster/styles/uma
Printing with the Felix
- Default style should be ok, but can make the layers a bit fatter.
Cleaning
Cleaning of .STL files is an absolute must and this software usually does a great job. Click on the red plus sign, then commit.
Export to STL
In the free version, you only can export single object (part) as .STL. Use the free (but more difficult) Meshlabs to merge several objects or buy the Netfabb Pro version :)
If you are a programmer, using OpenScad to position and to merge .STL objects (or other formats) is an option you should consider.
Links
- Download


