Flash colors tutorial
Introduction
This is part of the Flash tutorials.
- Learning goals
- Learn about the color types (normal, gradient and bitmaps)
- Learn about color models (RGB and HSB)
- Prerequisites
- Flash CS6 desktop tutorial
- Flash layers tutorial
- Flash drawing tutorial (at least some of it)
- Quality and level
- This text should technical people get going. It's probably not good enough for beginners, but may be used as handout in "hands-on" class. That is what Daniel K. Schneider made it for...
- It aims at beginners. More advanced features and tricks are not explained here.
- Materials (*.fla files you can play with)
- http://tecfa.unige.ch/guides/flash/ex6/colors-intro/
- The Colors SWF includes a short demo of bitmap colors, the alpha channel, gradients and filters.
- Color types overview
In Flash there are three kinds of colors
- Normal colors (solid)
- Gradients (linear and radial)
- Bitmaps
Both RGB and HSB model is supported for colors. See also the computer colors tutorial
Tools overview
Flash CS6 has several color tools and controls
- In the tools panel
- Paint bucket and ink buckets
- Stroke color and fill color (for most tools). Select colors before you choose a tool to draw
- In the properties panel
- Stroke color and fill color
- Color panel
- Color selection
- Swatches
- Preset colors
How to use the color selection popups
When you select (or change) fill or stroke color, a color popup swatches pane will pop up. You then can select a color with the eye-dropper tool or alternatively from any color in the Flash workspace.
You also can change alpha channel or type a 6 digit hexadecimal RGB Code (see color panel explanation below)
How to use the color and the swatches panels
We recommend to have the color panel docked on top right, else get it with menu Window-Color (or SHIFT-F9).
In order to work with the color or the swatches panel, select an object on the stage.
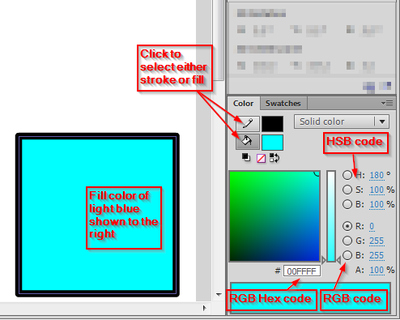
In the color panel you then can:
- Select either stroke or fill for adjustments
- Select various colors (depending on color type)
- Change the alpha channel (i.e. transparency)
- Select the color type (Solid, linear or radial gradient, bitmap fill). See below for more explanations

The swatches panel includes a series of standard colors. These are same ones you get with the Fill controls in the Tools and Parameters panel.
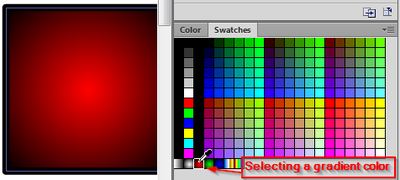
Let's now introduce various color types in more detail.
Solid colors
Solid colors can be defined in various ways (and there is a whole science behind it). Let's just recall a few principles. For more information, please see the Wikipedia links in the color article.
Let's define a few terms first:
- Hue
- means "color"
- Saturation
- means amount of a color you apply, i.e. the intensity.
- Brightness
- How much light you apply. A lot of light makes a the color washed out and very little light makes it very dark.
- Transparency
- How much you can see trough
- See alpha channel below
RGB colors
RGB colors are the most popular ones used in computing applications. A color is defined by the amount of Red - Green - Blue. By default, the CS6 color panel is in RGB mode.
RGB is the way computer monitors work. E.g. to get a nice yellow you need 100% Red + 100% Green + 0% Blue. RGB is a so-called additive color mixing model. “Projection of primary color lights on a screen shows secondary colors where two overlap; the combination of all three of red, green, and blue in appropriate intensities makes white.” (Wikipedia). Now if you project each of these primary colors with different intensity, overlapping colors will change.
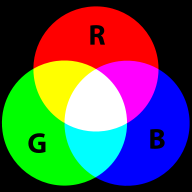
This model is not how colors work when you mix real paint. Then you'd rather work with a red-yellow-blue model. Color printers yet work with another model, i.e. magenta, cyan and yellow (or more).
RGB colors can be encoded in various ways. For Internet formats such as HTML, CSS or Flash, most often a hex triplet is used, i.e. a hexadecimal 6 digit number. With 2 hexadecimal digits you can represent numbers in the range of 0 to 255.
With ordinary numbers you would represent a full red like this:
- (255,0,0) - meaning full red, no green, no blue
The corresponding hex triplet is FF 00 00:
- #FF0000
In terms of percentage of colors you get:
- (100%, 0% , 0%)
Let's now have a look at a few colors in a diagram we copied from Wikipedia on sept 8 2007: It represents "Truecolor", i.e. RGB values in 24 bits per pixel (bpp). In Truecolor, colors can be defined using three integers between 0 and 255, each representing red, green and blue intensities. For example, the following image shows the three "fully saturated" faces of the RGB cube, unfolded into a plane:
| yellow (255,255,0) |
green (0,255,0) |
cyan (0,255,255) | |
| red (255,0,0) |
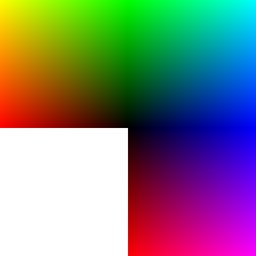
|
blue (0,0,255) | |
| red (255,0,0) |
magenta (255,0,255) |
For more information about colors see links in the color article. Have a look at Wikipedia's great list of colors if you need to find a number for your favorite color name. (If you speak french, get this one. You also may read the Wikipedia Web colors article. It also includes a list of colors and explains what a hex triplet is.
- Using the Flash color panel with solid RGB colors
- It's probably a good idea to starting picking out a standard color from the swatches panel that will display so-called "web-safe" colors. You also could create your own palette.
- Once you start from a "standard" color, you then can either adjust RGB values or color/brightness/saturation with the slider (see the HSB model below) or select another color from clicking into the Color Picker. The color range you will see depend on selections made to the right.
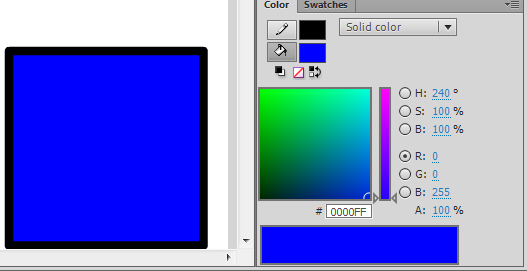
Below is a standard blue (the brightness/saturation slider remains in the middle)
The HSB/HSV model
The HSB (Hue, Saturation, Brightness) also known as HSV (Hue, Saturation, Value) defines a color in terms of three components:
- Hue, the color: Represented as a position in the 360 degrees of a color circle.
- Saturation, the intensity or "purity" of the color: Ranges from 0-100%. 0 means no color (white), 100 means intense color.
- Value or Brightness of the color: Ranges from 0-100%. 0 is always black. Depending on the saturation, 100 may be white or a more or less saturated color.
The Hue scale from 0 to 360 degrees is the following:

In many graphics tools (not in Flash) you get a HSV color wheel that looks like this:
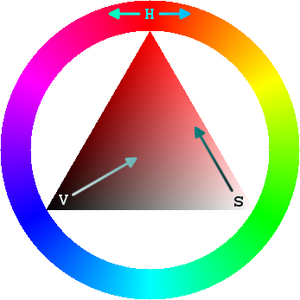
On the outside you can select a color (H), then on the inside you can select V and S.
For more information about HSV, read Wikipedia's HSV color space article.
In Flash, with the slider to the right you can either
- change color
- adjust both Saturation
- adjust Brightness.
Clicking into the color picker will change all three.
Below is a washed out blue with less saturation. We selected the saturation button selected and move the slider to 40%.

Tint and Shade
According to Wikipedia, “In color theory, a tint is the mixture of a color with white, and a shade is the mixture of a color with black. Mixing with white increases value or lightness, while mixing with black reduces chroma. Mixing with any neutral color, including black and white, reduces chroma or colorfulness. The intensity does not change.”
In Flash, tint is a color that you can add to a symbol in motion tweening. Alternatively (but not at the same time) you can modify its brightness. In addition you can change its alpha value (make it more or less transparent)
See the Flash special effects tutorial tutorial.
Flash Color Gradients
Flash supports there are 2 kinds of color gradients (see the picture below)
- Linear: the color changing in one direction
- Radial: the color changing from the center to the outside
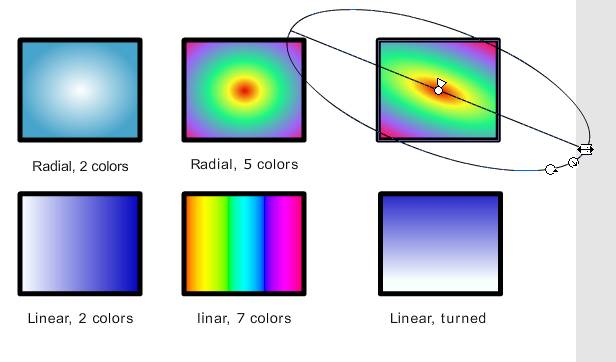
Color gradients work with color bands. You can define 2 or more colors and Flash will fill in intermediate colors between them. The result then depends:
- on the choice of colors
- on the width of the color band (from one color to the next one)
You can change these be defining and dragging color pointers in the Color panel. Read on ...
Defining color bands
There are some built-in gradients (linear and radial) that you may use as is, however you most likely want to define your own. In order to achieve that, you need the color panel and then manipulate the controls in the preview window.
If you select either "linear" or "radial" Type you will see the gradient preview window at the bottom of the color panel:

The little "arrow squares" you now can move from left-to-right are called color pointers and they delimit color bands.
Here is a list of common operations:
- (a) Adjust color bands
- To make a color band smaller or larger, move various color pointers left or right
- (b) Add new color bands
- Click into the area of the color pointers. This will add a new color pointer.
- (c) Change the color of a color pointer
- Click on a color pointer. The selector pointer should have a black arrow (instead of a white). Now select a color in the panel above.
- (d) Remove a color pointer
- Drag it down and off (below the gradient preview window)
- (e) Copy a color from a pointer
- Hold down the mouse for a while will work like the Eyedropper tool
Transforming gradients
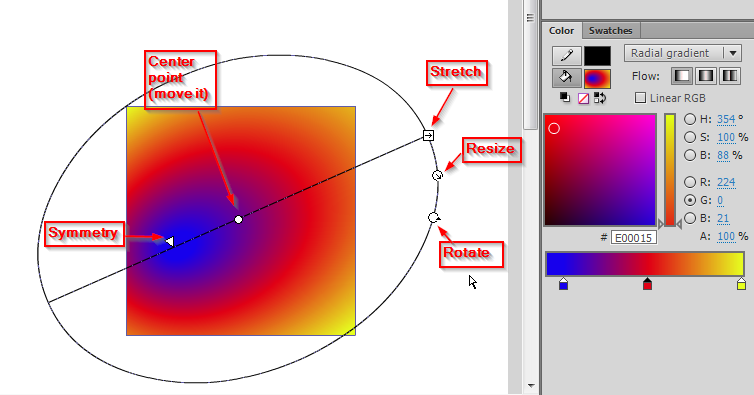
With the gradient transform tool (hidden underneath the Free Transform tool) you can do five things:
- rotate gradients (both linear and radial).
- stretch out the gradient
- stretch the radial gradient in only one direction (make an oval)
- Make the "rings" of a radial gradient asymmetric
- Move the center of the gradient color
- Procedure
- Select the tool (hold down the mouse over the Free Transform tool in the tools panel) and select the Gradient Transform Tool (
 )
) - After selecting an object you will see five handles with which you can: stretch in one direction, resize, turn, make the rings ellipsoid, and finally move the whole gradient. See the screen capture below, which shows the handles for a radial gradient transform:
Stretching or rotating a linear gradient works in a similar way:

The alpha channel
In computer graphics, alpha compositing is the process of combining an image with a background to create the appearance of partial transparency (Wikipedia)
In more simple terms, you can set the alpha to some percentage:
- 100% can't see through
- 80% bad see trough
- 50% in between
- 30% good see through
- 10% good see through, but very little color
- 0% no color left
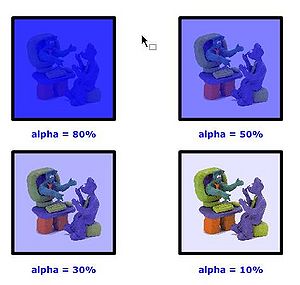
Hint: With the alpha channel you can create other effects than see-through "windows". E.g. you can overlay textures with color or the other way round.
Drawing with bitmaps
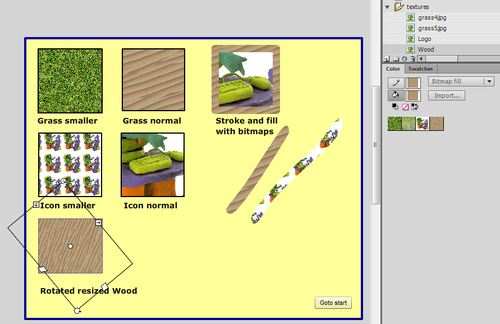
You can use any bitmap (e.g. a picture of yourself) as color. To do so, you firstly must import the bitmap file (e.g. a *.jpg file) and then adjust the size with the gradient transform tool
- Importing a bitmap
There are two solutions:
- You can just paste a bitmap graphic into the library from the clipboard. For example, if you see a nice (and copyright free) texture on the Internet with the Firefox navigator, do the following: (1) View image, (2) Copy Image, (3) CTRL-V into Flash
- Save the image on your computer then click on the Import button in the colors panel.
- Finding textures
- See the texture article
- Using a bitmap
- You can use a bitmap graphics either as stroke or as fill color.
- Adjusting "grain size"
With the gradient transform tool you can adjust how a bitmap will be applied. You can change:
- Size, i.e. whether the bitmap is applied as is, or reduced or magnified in x, y direction or both
- Rotation
- Skew (a kind of distortion)
Select the Gradient Transform tool (![]() ) underneath the Free Transform tool, and then
) underneath the Free Transform tool, and then
- Click on the fill or stroke
- Play with the handles (if the bitmap is big, you may have to search for these handle way out of the stage !)
Filters for symbol instances
You can apply various color changes to all symbol instances (movie clips, buttons and graphics). To do so, play with the Color and Blend controls in the properties panel.
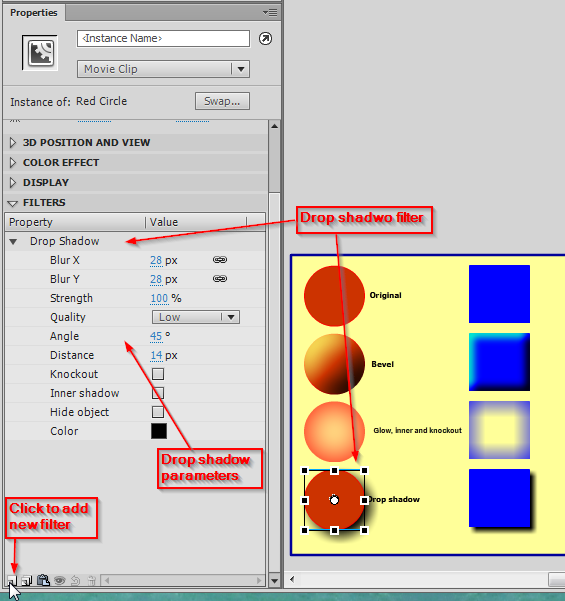
You can add filters (e.g. a gradient glow a bevel or a drop shadow) to movie clip and button symbol instances. Use the Filters panel to do so, (click on the tab in the properties panel), else use menu Windows->Properties->Filters)
To add filters, simply click on the + sign and then play with the parameters. Using different sorts of "Quality" also has an important effect on the rendering, high quality may slow down certain computers.
- Blur X and Blur Y define the size of the affected area
- Strength the force of the filter (more or less)
- Shadow and Highlight, the dark/light colors of the filter effect
- Angle and Distance, direction of the filter effect
- Knockout and Type, whether it applies to the inside and whether the orginal drawing is knocked away.
This is a nice feature that beginners often overlook. So if you need cool looking 3D effects on graphics explore these filters. You also can apply several filters to the same object. In the screen capture below we show an attempt to create a floating 3D button from a simple red circle.
Tip: Since filters are applied to instances of movie clips, you may use them in motion tweens. Examples:
- Create a sun with increased glow (big in start and end frame, small on top)
- Create a flying plane with a drop shadow that is far down.
Links
- General color
- See the color article. It includes links to good Wikipedia articles
- Other kinds of assets
- Adobe links
