Flash CS3 video component tutorial
This tutorial is outdated. It was made for (older) CS3
New version: Flash video component tutorial and Flash augmented video tutorialIntroduction
Video components are prebuilt interface elements (widgets) that will speed up video integration. In particular, the FLVPlayBack Video Component allows to render videos without any ActionScript programming. It includes a nice choice of skins for user controls. Videos also can be enhanced with captioning or they may interact with the rest of the animation. Some of these techniques require some more technical skills, e.g. knowledge of XML and some ActionScript.
- Learning goals
- Learn how to encode *.flv files
- Learn how to use the Flash 9 (CS3) video component for simple video playback
- Learn how to insert and use cue points for various purposes
- Learn how to create text captions
- Learn how to integrate videos with animations and interactive elements
- Learn some more ActionScript 3.0
- Prerequisites for the first part
- Flash CS3 desktop tutorial
- Flash drawing tutorial
- Flash component button tutorial
- Timed Text (only for captions).
- Prerequisites for the second part
- Flash button tutorial
- Flash motion tweening tutorial, Flash shape tweening tutorial, Flash special effects tutorial
- Flash embedded movie clip tutorial
- Moving on
- The Flash article has a list of other tutorials.
- Quality
- This text should technical people get going and may not be good enough for self-learning beginners. It can be used as handout in a "hands-on" class. That is what Daniel K. Schneider made it for...
- Level
- It both aims at beginners (FLV encoding, using the video playback component and embedding a video in the timeline) and intermediate Flash designers (inserting captions and using cue points to trigger animations).
- The executive summary about Flash Videos
Flash has built-in video management components.
- The FLVPlayBack Video Component is really easy to use since it provides a series of ready-made skins (user interfaces) from which you can choose.
- The Caption component requires some XML Editing.
- For more sophisticated video-animation interaction you need to code with ActionScript.
- The executive how-to summary for simple video playbacks
- Encode your video with the Video Encoder. Flash has its own *.flv video format.
- Drag the FLVPlayBack Video Component to the stage.
- Open the component inspector panel. Choose a skin and provide the file name or URL of the *.flv video
Preparing your video in CS3/CS4
In CS3 and CS4, Flash uses a special video format (*.flv) to render videos. You may directly encode your formats with the CS3 or CS4 video encoding tool (that's what I suggest) or wait until Flash will prompt you to encode when you import a video in non *.flv format.
Flash CS5 allows to directly play other formats, e.g. *.mp4. However it is often necessary to adapt the video to your special needs (e.g. make it smaller, clip it, remove frames from the start or the end) and therefore to use the Media encoding tool. In addition, Flash 10/CS5 supports a new more efficient Flash video format: fl4. See below, for a short "how to".
Video encoding with Flash CS3
The Flash package includes a video encoder with which you can transcode various video formats into *.flv format. It also lets you define cue points and edit (somewhat) the video.
Now, open the Flash CS3 Video encoder program directly from the Desktop (i.e. not from Flash!).
Video transcoding
The tool supports most current video formats. You can for example import *.mov, *.avi, *.mpeg, *.dvi, *.wmv, *.3pg and *.mp4 formats in this tool. If you need a video file to play with see the Artwork links at the end of this tutorial.
- Opening a video file
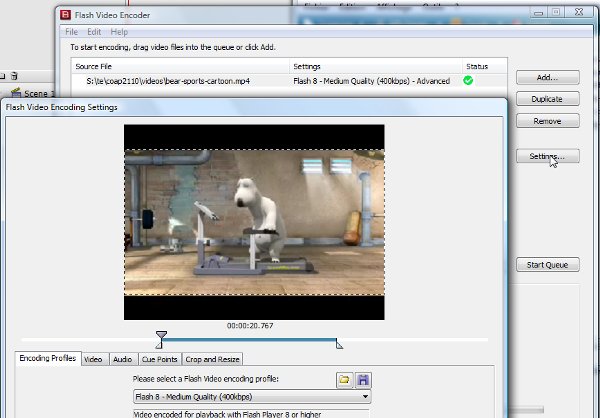
- Open the Flash CS3 Video Encoder tool
- Click on the Add ... button to add a new video.
- Edit
- Click Settings to define output settings and to add video cues, etc. You can just leave the defaults if you like, unless your video file is long and/or big and you want to trim it down.
- Encoding
- Click Start Queue to encode your video. By default, the resulting *.flv file will be saved in the same directory as the source video. Flash will not overwrite an older *.flv version but rather renumber the new version.
Video Editing
The Flash Video Encoder tool has some limited editing capacity you can access through the settings button. Since videos quickly can become huge, you may want to crop off space from top, bottom or left and right and also make it shorter. You also can choose from various levels of video and audio quality.
- Look at the contents
- Move the horizontal glider (yellow triangle) from left to right.
- To resize and crop
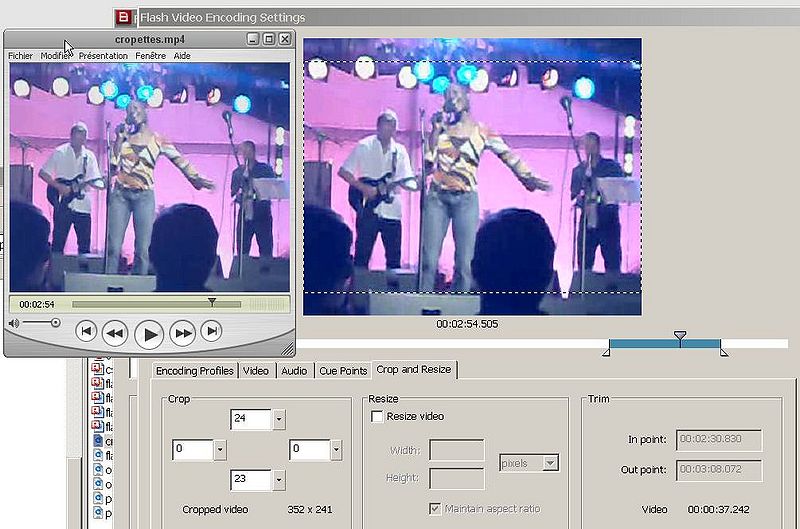
- Select the "Crop and Resize" tab
- You can crop the video (i.e. take of space on top, bottom, right, left.
See the screen capture below.
- To crop off frames at start and at the end
- You cut off frames from the beginning and the end of the original video (move the little triangles below the playhead as shown in the screen capture below.
Tip: If you want to hear the video, just listen to it with an other tool, e.g. the QuickTime Player if your source is *.mp4. Both tools show time in seconds.
It is import to make a video as small as possible if you plan to do timeline animations as shown in the Importing a video to the timeline section.
- Typical quality settings
- Select "video" and "audio" tabs
- Video: For short videos I use the medium Flash quality with default codecs
- Audio: If video quality is bad from start (e.g. made with your cell phone) you can reduce audio to 64 kpbs mono or even less since it can't get worse than it already is.
Cue Points
“Cue points cause the video playback to start other actions within the presentation. For example, you can create a Flash presentation that has video playing in one area of the screen while text and graphics appear in another area. A cue point placed in the video starts an update to the text and graphic, while they remain relevant to the content of the video. (Adobe CS3 Video Encode Help, sept. 2007)”
You don't need cue points for just playing a video, so you may come back later and read about inserting cue points.
There are several ways of adding cue points.
- (1) Adding Cue points in the video encoder
- Select the Cue Points Tab
- Glide forwards and backwards the video play head to select positions you'd like to mark
- Click on the + to add a new cue point.
- Event cue points are used to trigger ActionScript methods when the cue point is reached, and let you synchronize the video playback to other events within the Flash presentation.
- Navigation cue points are used for navigation and seeking.
The difference between these two kinds of cue points are only manifest if you use cue points to search for something. e.g. to trigger animations from cue points, it doesn't matter if the cue point is of type "event", "navigation" or "actionscript". However if you seek a cue point, there will be a difference.
Each cue point consists of a name, a type and the time at which it occurs and we then can retrieve this information in Flash as you will see in handling events from the movie section below. Anyhow, I rather suggest to add cue points through ActionScript or the component's parameters, since you then can add/remove cue points whenever there is a need.
- (2) Adding "ActionScript" cue points with the component inspector
- Through the FLVPlayBack component's parameters, i.e. open the parameter or the component inspector panel (see below). I recommend this method for beginners.
- (3) Adding "ActionScript" cue points with ActionScript
- In ActionScript with the addASCuePoint() method, example:
video_component.addASCuePoint(10.5, "wonder");
The advantage of the ActionScript method is that you easily can change these cue points when adjustments are needed. E.g. you may notice at some point that your video file is too big and you may want to shorten it down. It's muchfaster to change AS code or XML descriptors than entering the cue points again with the encoding tool and faster than editing the component through the inspector.
Disadvantage is that some methods made for navigation cue points will not work.
AS3 example:
video_component.addASCuePoint(40, "End");
video_component is the name you gave to the component instance
Other transcoding tools
Your modern cell phone may encode video with MP4. Flash 9 (CS3) can not directly import this format. If you don't have access to the CS3 Flash Video Encoder tool (an older Flash version may not encode newer formats), you may download the free SUPER tool (it has more features than many commercial tools).
Read the MP4 article to see how I managed to use this free (and excellent) SUPER encoder to go from MP4 to MPV with MPEG3-v2/MP3.
Using the FLVPlayback component
Let's now import a video and use it the simple way. In this example we will show how to import a video I (quickly) made with my Nokia N73 cell phone. The easiest strategy is to directly import a *.flv file.
Using the video with the component first method
The most simple procedure to use a video with the FLVPlayBack component is the following one:
- Step 0 - Get/create a *.flv file
- See above.
- Put it in the same directory as your Flash file.
- Step 1 - Open the component library
- Menu Window->Components or hit Ctrl-F7.
- Dock it next to your library.
- Step 2 - Drag the video component to the stage
- Drag the FLVPlayBack component from the components library to the stage.
- Step 3 - Tell FLVPlayBack where to find the video
- Open the Component Inspector panel (Window->Component Inspect) and dock it next to the library.
- Add the name of a video file in the source field of the parameters. Click on the field and then either type the file name or use the file chooser menu.
- Tick match source FLV dimensions. This will adjust the size of the video control widget to your video.
- Make sure to remove the directory path from the file name. For example, instead of:
- E:\schneide\te\coap2110\ex\component-video-intro\office-dks3.flv
just keep the file name
- office-dks3.flv
Else when you copy both the *.sfw and the *.flv file to some other place you flash file won't find the video anymore and the playback will break.
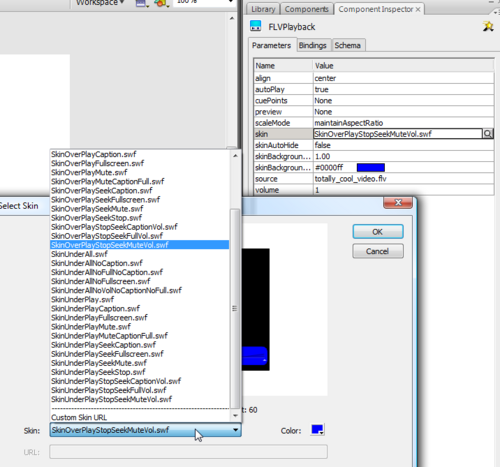
- Step 4 - Adjust the skin
- Play around with various skins in the component inspector panel. Basically you can add/remove various user controls.
- Click on the value of the "skin" parameter. A popup menu will let you select from various skins.
- Finally, you can change the color of the component.
Enjoy ....
Importing the video with the import method
Here is an alternative and longer method for using the FLVPlayBack component.
- Step 1 - FLV files
- Encode the video as *.flv file as described above.
- If you directly import other formats, i.e. *.mov, *.avi, *.mpeg, *.dvi, *.wmv, *.3pg (but not MP4), Flash will at some point open the Video encoder tool. So the result is the same: a *.flv file. It will be saved by default in the same directory as your original video file.
- Step 2 - Import the video
- Create a new layer and call it "video"
- Menu File->Import->Import Video
You then can from a popup menu choose how the video should be deployed (see next step).
- Step 3 - Choose "Standard web server / progressive download"
- If you only have access to a standard web server: Choose "progressive download" from a web server.
- You then can choose from a variety of built-in video control skins for the FLVPlayBack Video Component which will be automatically added to your library (you later can change the skin again, so don't worry now).
The video you will import will simply use the standard video playback component that you also can find in the "Components" panel.
- Step 4 - Fine tune the stage
- Change the background
- Adjust stage size to video size or alternatively add some text or graphics if the stage is bigger. Create a new layer for these.
- You also can change the skins for the video control skin. Simply open the Parameters panel. Scroll down to the skin field and select another one from the popup menu. Same thing for other parameters. You can quite safely play around with them.
- Step 5 - Fix the source file location
You must tell Flash where the video file will sit on your server (see also the next step)
- Click on the video component
- Open the parameter panel (menu Window->Properties->Parameters in case it's not already docked) or the open the Property inspector panel. I prefer the latter since I have it docked next to library and don't need to scroll as much as in the bottom panels.
- Change the source field, scroll down if needed (!). In our case I killed everything in front of the file name office-dks.flv.
For example, instead of:
- E:\schneide\te\coap2110\ex\component-video-intro\office-dks3.flv
I only kept the file name since I plan to put all files in the same directory on the server. Also on my desktop the files sit in the same directory.So I shortened down the path:
- office-dks3.flv
- Step 6 - Tune some parameters
In the property inspector or parameters panel you may set things like:
- Volume: I suggest to turn it down to 0.3 since you will be fed up listening to your video after a while
- AutoPlay: True means that the video will start playing after it loads. False requires the user to press the play button
- Step 7 - Copy the *.flv and *.swf skin file to your web server (optional)
- I suggest to put all files in same directory since they will be easier to manage that way. If you don't, go back to step 5. Also remember that the *.flv file may sit in the same directory where you original video is.
- Do not forget to copy the "*.swf skin file, for example SkinUnderAllNoFullscreen.swf.
- If the video doesn't play...
- Most likely you forgot to define the right source path, either a full URL, a relative URL, or a *.flv file name that sits in the same directory.
- File names are case sensitive on most Web servers ! Also avoid using blanks and other strange characters in your file name.
- Good = myvideo.flv - Bad = my Video.flv
- Results
- flash-cs3-video-simple-server.html
- Source: flash-cs3-video-simple-server.fla
- Video file: office-dks.flv
- Directory: http://tecfa.unige.ch/guides/flash/ex/component-video-intro/
The Flash CS5 Video component and the Adobe Media Encoder CS5
Using the Flash CS5 video component
Using Flash CS5 component is somewhat easier than prior versions and for two reasons:
- On can use *.mp4 videos without prior encoding to a Flash video format
- All operations are now centralized in the properties panel.
Procedure for an *.mp4, *.flv or *fl4 video that already is "ready" for production.
- Open the components panel (Menu Window->Components or CTRL-F7)
- Drag FLPLayback 2.5 on the stage
- Set the name of the video file with source in the Properties panel (e.g. BFB-BBC.mp4)
- Select an appropriate skin
... That's it.
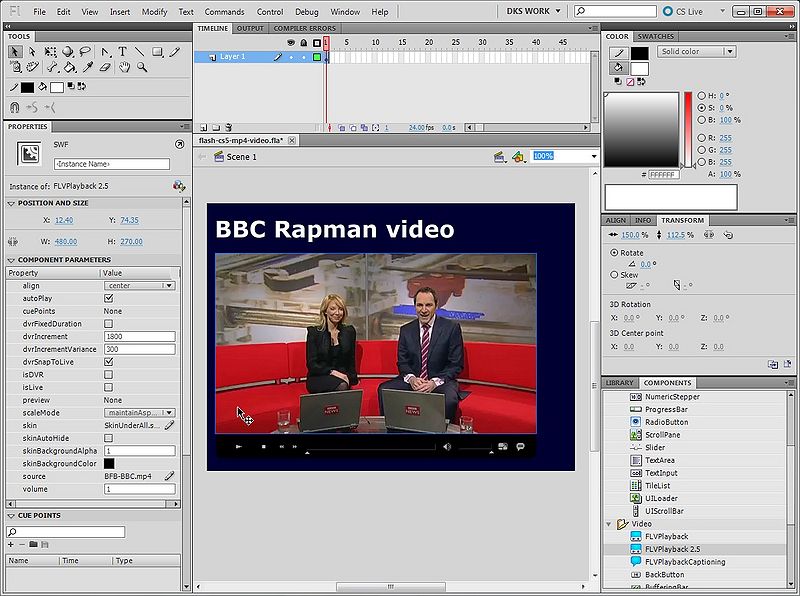
In order to publish the flash file do not forget to put all the files on your web server (!), e.g.
- flash-cs5-mp4-video.html (the HTML file, optional)
- flash-cs5-mp4-video.swfl (the Flash file)
- BFB-BBC.mp4 (the video)
- SkinUnderAllNoFullscreen.swf (the skin library)
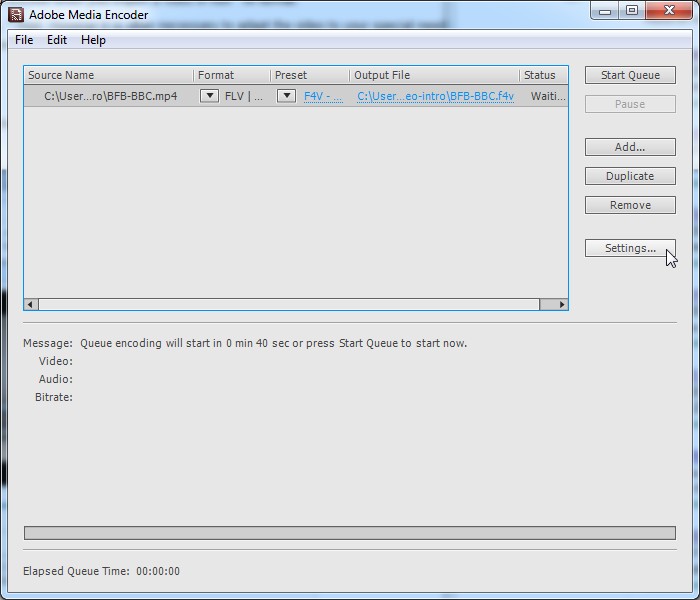
Using the Adobe Media Encoder CS5
- Importing a video
In the welcome screen,
- Click on Add... to add a video for encoding
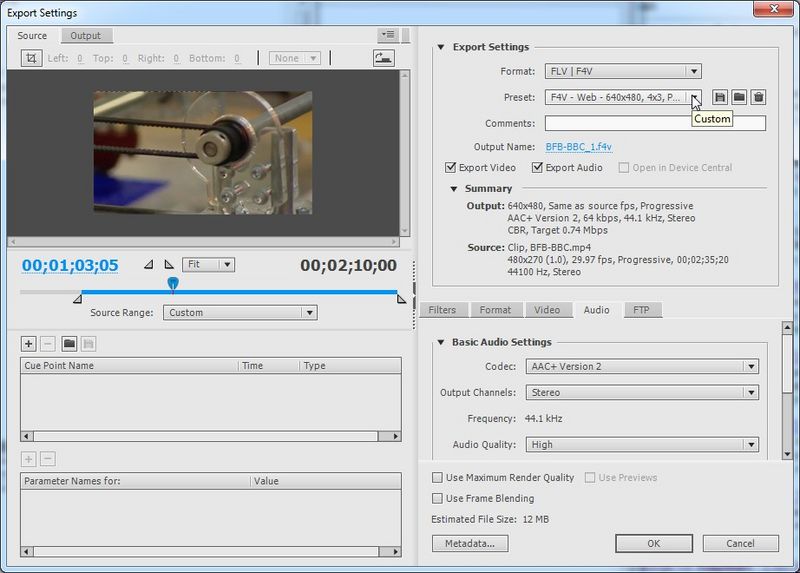
- Select the video (click on the line) and click on Settings ...
- Make adjustments to the settings
- We suggest to select a preset F4V format
- To left, you can remove frames for the start or the end (move around the playhead)
- If you shot the video yourself, you likely also want to do some clipping
- As a general rule, we suggest to add cue points (if needed) in Flash CS5 and not during the encoding ...
Making use of captions
A caption is a text that is displayed dynamically while the video is playing. Captions may serve several purposes:
- You can deploy videos to people with hearing disabilities
- Users can look at videos without making noise
- You can emphasize important passages, or paraphrase or comment voice tracks.
In order for captions to work, you must do three things:
- Use a skin for the playback component that includes a Caption button, e.g. SkinUnderAllNoFullscreen.swf.
- Make use of the FLVPlayback Captioning component (in addition to the playback component)
- Encode captions in an XML file (there are at least two options). This XML file then must be registered with the captioning component.
To import the video, use the same procedure as in Using the FLVPlayback component
The caption component with timed text
- The Timed Text standard and XML
If you are not familiar with XML, you may have a glance at the XML article and maybe the DTD tutorial. Then, we also suggest to work with an XML editor in order to insure that your file is well formed. We suggest the free Exchanger XML Lite. If you don't feel learning XML, just make very sure that you exactly use a template as described below. One missing tag or or some syntax mistake like a missing ">" will make your animation fail.
Flash doesn't support the full Timed Text specification and the documentation at Adobe is rather shaky. For those who are familiar with XML I wrote a little DTD that helps editing. Just grab it from the Timed Text article and also copy/paste the XML template.
Note: Timed Text is defined with a complex XML Schema but since Adobe Flash only implements a subset, it's not worth using this.
- Figuring out time for captions
In order to write this XML file you must know what caption to insert at which time and for how long. For CS3 and CS4 you need to play the movie with an external video player. The CS4 Adobe Media player does show time and maybe other *.flv video players too.
- Get Adobe Media Player. It is free.
- Under Ubuntu, the Totem player works well.
In CS5, there is no need for an external video player, you can preview the video in the authoring tool or alternatively write down times in the Media Encoder tool
In CS3, if you want high precision, you also can load the *.flv file into the timeline (see below) and then play it with View->Bandwidth Profiler on. Write down the frame number for captions and then divide by the frame rate. Hit:
- '.' to stop and then to go forward one frame,
- ',' to go back one frame,
- 'Enter' to start playing again.
- A minimal example XML captioning file
As a minimum we suggest to enter the following data. For each caption enter:
- A <p> </p> tag. Each "p" should include:
- a begin attribute that defines when the caption should appear,
- a dur attribute that defines how long it will stay on screen.
Time is in seconds, but also may use a more complex format like
02:30.5
meaning 2 minutes, 30 seconds and a half.
Here is the file we called timed-text.xml and that we used in this example
<?xml version="1.0" encoding="UTF-8"?>
<tt xml:lang="en" xmlns="http://www.w3.org/2006/04/ttaf1"
    xmlns:tts="http://www.w3.org/2006/04/ttaf1#styling">
  <head>
    <styling>
    </styling>
  </head>
  <body>
   <div xml:lang="en">
      <p begin="1" dur="4">Daniel´s Office</p>
      <p begin="5" dur="5">My Palm Tree (from NYC)</p>
      <p begin="11" dur="7">My Bookshelf</p>
      <p begin="18" dur="5">My favorite Flash Drawing Book</p>
      <p begin="25" dur="5">My DELL XPS Laptop Flash machine</p>
      <p begin="30" dur="5">My Ubuntu Linux workstation</p>
      <p begin="33" dur="5">Working hard on Flash Tutorials using the Xemacs Editor</p>
      <p begin="42" dur="5">The outside (not my bike)</p>
    </div>
  </body>
</tt>
Note: Captions may overlap, i.e. Flash will display a new caption on a new line if the previous one is still on. You can see this in the example we present in the next section.
For now, just grab the template below and add "p" tags, make sure to close them as in the example above. Replace "Let's start" by your own caption of course.
<?xml version="1.0" encoding="UTF-8"?>
<tt xml:lang="en" xmlns="http://www.w3.org/2006/04/ttaf1"
    xmlns:tts="http://www.w3.org/2006/04/ttaf1#styling">
  <head><styling></styling></head>
  <body>
   <div xml:lang="en">
      <p begin="1" dur="4">Let´s start</p>

    </div>
  </body>
</tt>
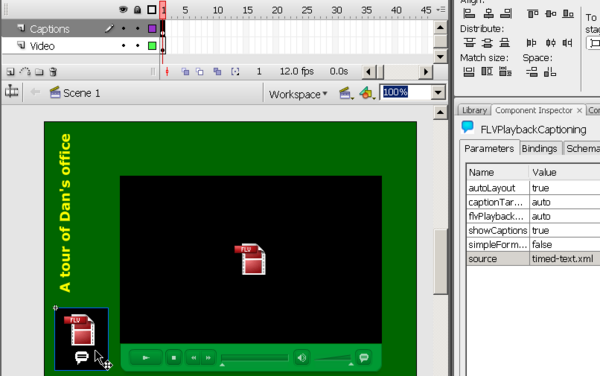
- Using the FLVPlayback Captioning component
- Create a new layer and call it "Caption" or something like that. Go there.
- Then drag the "FLVPlayback Captioning component" somewhere to the workspace or even to the stage.
- Unlike the playback component, this component will not be seen by the end user, so you can place it anywhere.
- Customization of the component
- Click on the component and edit the parameters, either in the Parameters or the Component Inspector panel (CS3 only). Then,
- set showCaptions to true if you want all users to see captions (probably most users don't know how to turn it on or off, so turn it on)
- specify the source file of the Timed Text XML file to download. So, create the xml file now, if you didn't so far. Make sure to get the spelling right.
- The example
- flash-cs3-video-simple-server-caption.html
- flash-cs3-video-simple-server-caption.fla
- XML file: timed-text.xml
- Directory: http://tecfa.unige.ch/guides/flash/ex/component-video-intro/
- Tuning
- You can style text and background of the Caption Box (see below)
- Put down the volume: Set it to 0.5 in the parameters of the FLVPlayer or even lower. I am fed up listening to my own voice, really.
CaptionsBox and Style
As explained in Tom Greens' Captions for Video with Flash CS tutorial, you can use a different text box to display the captions.
- Step 1 - Draw a textbox for the captions to appear
- Create a captions layer if you don't already have one
- Draw a textbox
- Give it the instance name caption_box
- Select font size, color etc.
- Select Multiline
- Make it Dynamic Text (if it is not)
- Step 2 - Configure the component
Tell the captioning component to use the textbox you just made to display captions:
- Open the parameter or inspector panel for the FLVPlayback Captioning component
- Set captionTarget = caption_box
- Set autoLayout = false
- Step 3 - Add some style to the XML File
Just look at this example (file timed-text2.xml). I don't really understand how some styling tags work. I'd expect for instance to behave backgroundColor within a span like in HTML but it doesn't. I don't know this behavior is a feature or a bug or my misunderstanding of the manual.
If something is not clear, please download the *.fla file and look at it. Make sure to verify that both the playback and the captioning component parameters are ok and that you put all the files in your computer or the server (including the skin *.swf, the *.flv and the *.xml file) in the same directory. Do not forget to copy the skin !
<?xml version="1.0" encoding="UTF-8"?>
<!DOCTYPE tt SYSTEM "mini-tt.dtd">
<tt xml:lang="en" xmlns="http://www.w3.org/2006/04/ttaf1"
    xmlns:tts="http://www.w3.org/2006/04/ttaf1#styling">
  <head>
    <styling>
      <style id="title" tts:backgroundColor="transparent" tts:color="red" tts:fontSize="24"/>
    </styling>
  </head>
  <body>
   <div xml:lang="en">
      <p begin="0" dur="9" style="title">Daniel´s Office</p>
      <p begin="5" dur="4">My Palm Tree (from NYC)</p>
      <p begin="10" dur="13" style="title">Books ....</p>
      <p begin="11" dur="7">My Bookshelf</p>
      <p begin="18" dur="5">My favorite Flash Drawing <span tts:color="red">Book</span></p>
      <p begin="24" dur="16" style="title">Computers ....</p>
      <p begin="25" dur="5">My DELL XPS Laptop Flash machine</p>
      <p begin="30" dur="5">My
        <span tts:backgroundColor="yellow" tts:color="black">
        Ubuntu Linux workstation</span>
      </p>
      <p begin="35" dur="5">
        <span tts:backgroundColor="transparent"></span>
        Working hard on Flash Tutorials using the Xemacs Editor
      </p>
      <p begin="40" dur="4">The outside (not my bike)</p>
    </div>
  </body>
</tt>
- The result
- flash-cs3-video-simple-server-caption2.html
- Source: flash-cs3-video-simple-server-caption2.fla
- XML file: timed-text2.xml
- Directory: http://tecfa.unige.ch/guides/flash/ex/component-video-intro/
Adding captions with Cue Points
There is an alternative method. Read Captions for Video with Flash CS3 (Part Two), by Tom Green, Digital Web Magazine, June
Importing a video to the timeline
Now we will look at a very different way of using videos. Instead of using the playback component we will include the video into the timeline (each video frame will be a timeline frame). This will allow us to create videos augmented with animations in an easy way.
Embed into timeline version
If you embed a video into the timeline, then you don't get the ready-made video control as above. Only embed video in the timeline if you plan to add animations the simple way and if the video file is really small. Also you shouldn't care about smaller synchronization problems with the audio track.
Embedded video will make your timeline really long, although you can choose to have it its own timeline. Anyhow, in this example we took the "hundreds of frames" timeline option.
We will insert the video in frame #2. We also will add a play button that will jump to frame 2 and play the video.
- Step 1 - FLV files
- Create one
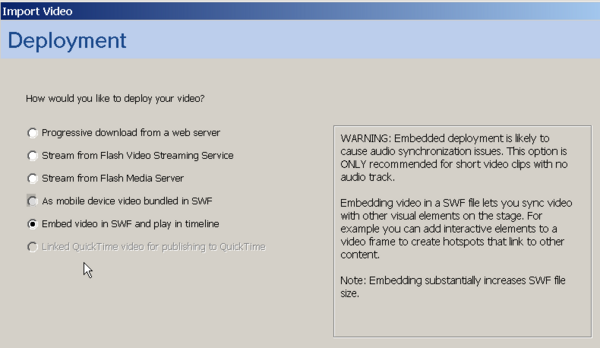
- Step 2 - Import the video as embed
- Create a new layer and call it "video"
- Insert a new empty keyframe in frame 2 (since we don't want the video play on load in this case).
- Go there
- Menu File->Import->Import Video
- In the video deployment dialog, choose "Embed video in SWF and play in timeline".
- Step 3 - Add some simple controls
- You need at least a play button, but adding some extra buttons that will allow a user to jump to given frames also may be handy.
- We just used the button component described in the Flash components tutorial.
In our example we added three buttons:
- The "play button" will move the playhead in frame 2 where the video starts.
- The "Go to Book Scene" button will move it to frame 230 something.
- The "Credits" button will go to the very end.
The ActionScript code:
/* This will stop Flash from playing all the frames
   User must stay in Frame 1 */
stop();

/* Associate a handler function for each button instance */

btn_credits.addEventListener(MouseEvent.CLICK, clickHandler);
btn_play.addEventListener(MouseEvent.CLICK, clickHandler);
btn_book.addEventListener(MouseEvent.CLICK, clickHandler);

/* Instead of writing a function for each button, we just create one.
   In order to understand which button was clicked, we ask from the event
   the label of the button(event.currentTarget.label).
   Then we gotoAndStop(x) to Frame 374 for Credits
   Or we can play the movie that sits in frame 2
*/
function clickHandler(event:MouseEvent):void {
	switch (event.currentTarget.label)
	{
		case "Credits" :
			gotoAndStop(609);
			break;
		case "PLAY" :
			gotoAndPlay(2);
			break;
		case "Go to Book Scene" :
			gotoAndPlay(230);
			break;
	}
}

/* This shows how to open an URL in a WebBrowser */
btn_edutech_wiki.addEventListener(MouseEvent.CLICK, GoToUrl);

function GoToUrl(event:MouseEvent):void {
	var url:String = "http://edutechwiki.unige.ch/en/Flash_video_component_tutorial";
	var request:URLRequest = new URLRequest(url);
	try
	{
		navigateToURL(request, '_blank');
	}
	catch (e:Error)
	{
		trace("Error occurred!");
	}
}
The "embed in timeline option" is probably only useful if you plan to play around with fine grained frame-by-frame jumping around or if you plan to add animations that synchronize with the video as described in the next example. Otherwise it is better to use a external video with the video playback component as described above.
- Results
- flash-cs3-video-simple-embedd.html
- Source: flash-cs3-video-simple-embedd.fla
- Directory: http://tecfa.unige.ch/guides/flash/ex/component-video-intro/
Note: I noticed that when you import more than once a movie, file size will grow a lot ! Probably a side-effect of the undo mechanism. So 'do not do this. If you notice this problem, save the file with "save as". The new version will be ok. (Maybe there is another solution to trim down file size).
Enhanced video embedding into timeline
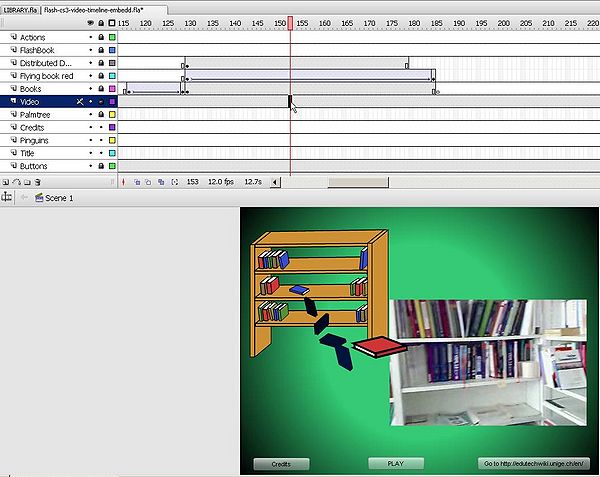
Embedding video into the timeline makes sense (IMHO) if you are looking for an easy way to synchronize other animations with the video. This technique requires no more additional ActionScript knowledge than you need for simple animation and navigation. However, embedded videos will make the *.fla and the resulting *.swf really huge.
In this example, we add various animations (e.g. two motion tweens and a shape tween) to the project. Below you can see that books are tumbling out of a bookshelf while the video shows a "real" bookshelf.
Below is the action script code to implement a simple play button, plus two other ones that are not really necessary, i.e. a "credits" and a "goto ..." button. All the rest is just simple Flash animation.
/* This will stop Flash from playing all the frames
   User must stay in Frame 1 */
stop();

/* Associate a handler function for each button instance */

btn_credits.addEventListener(MouseEvent.CLICK, clickHandler);
btn_play.addEventListener(MouseEvent.CLICK, clickHandler);

/* Instead of writing a function for each button, we just create one.
   In order to understand which button was clicked, we ask from the event
   the label of the button(event.currentTarget.label).
   Then we gotoAndStop(x) to Frame 572 for Credits
   Or we can play the movie that sits in frame 2
*/
function clickHandler(event:MouseEvent):void {
	switch (event.currentTarget.label)
	{
		case "Credits" :
			gotoAndStop(572);
			break;
		case "PLAY" :
			gotoAndPlay(2);
			break;
	}
}

/* This shows how to open an URL in a WebBrowser */

btn_edutech_wiki.addEventListener(MouseEvent.CLICK, GoToUrl);

function GoToUrl(event:MouseEvent):void {
	var url:String = "http://edutechwiki.unige.ch/en/Flash_video_component_tutorial";
	var request:URLRequest = new URLRequest(url);
	try
	{
		navigateToURL(request, '_blank');
	}
	catch (e:Error)
	{
		trace("Error occurred!");
	}
}
- Results
- flash-cs3-video-timeline-embedd.html
- Source: flash-cs3-video-timeline-embedd.fla
- Directory: http://tecfa.unige.ch/guides/flash/ex/component-video-intro/
Working with cue points is another way to have your video interact with other animation. It's a more difficult solution than using timeline videos, but more elegant.
Jumping to cue points
Code for jumping to cue points is fairly easy if you know how to use buttons or button components.
- Insert a video playback component like above
- Give it an instance name like video
- Then copy paste the code below (or do something similar)
As a bonus I added some invisible trees that will become visible when the user jumps to the cue point.
- I imported a SVG drawing and called it trees.
To adapt this code to your needs: Change "XPS" to the name of your cue point. Remove the lines with trees if you don't want this ...
btn_laptop.addEventListener(MouseEvent.CLICK, jumpLapTop);

function jumpLapTop(event:MouseEvent):void {
	video.seekToNavCuePoint ("XPS");
	trees.visible = true;
}
trees.visible = false;
Without trees:
btn_laptop.addEventListener(MouseEvent.CLICK, jumpLapTop);
function jumpLapTop(event:MouseEvent):void { video.seekToNavCuePoint ("YOUR_CUEPOINT"); }
- Example
- flash-cs3-video-goto-cues.html
- Source: flash-cs3-video-goto-cues.fla
- Directory http://tecfa.unige.ch/guides/flash/ex/component-video-intro/
Important notice:
- This code only works with navigation cue points and you can insert with the Flash video/media encoder. If you use ActionScript cue points (inserted with the component inspector or in a script), then use the following line of code:
Replace:
video.seekToNavCuePoint ("XPS");
by:
video.seek(video.findCuePoint("XPS","actionscript").time);
Basically, you first have to search for a cue point by name, then extracts its time, and then give the time to the seek method. Even then, result is not guaranteed. It may work on your local computer, but not in your navigator's flash player - Daniel K. Schneider 13:13, 21 April 2010 (UTC).
Handling events from the movie
Implementing animation that is triggered by the video's encounter of cue points was a bit harder since documentation wasn't so easy to find.
The following code will display a trace of all your cue points in the Flash CS3 output window. To make it work:
- Insert a video component on the stage and add a *.flv source (as explained before)
- Give it an instance name. I called it video_component. If give your component an other name you will have to change the ActionScript code below.
// You must import this class (even when you just script the timeline !!)
import fl.video.MetadataEvent;

video_component.addEventListener(MetadataEvent.CUE_POINT, cp_listener);

function cp_listener(eventObject:MetadataEvent):void {
        trace("Elapsed time in seconds: " + video_component.playheadTime);
        trace("Cue point name is: " + eventObject.info.name);
        trace("Cue point type is: " + eventObject.info.type);
}
When you play the *.flv video you can see these kinds of messages in the output window:
Elapsed time in seconds: 7.485
Cue point name is: palm_tree
Cue point type is: event
Elapsed time in seconds: 9.888
Cue point name is: books
Cue point type is: navigation
Elapsed time in seconds: 20.52
Cue point name is: missing_manual
Cue point type is: event
Elapsed time in seconds: 26.188
Cue point name is: XPS
Cue point type is: navigation
Elapsed time in seconds: 31.674
Cue point name is: ubuntu
Cue point type is: event
Now let's put this information to use and rewrite the code. Since this is near the end of this tutorial we shall make it slightly more complicated. But the resulting animation is still quite ugly. I am just teaching some Flash and I do not have time for decent artwork or even good design. Students should aim at both :)
Let's create some Flash movie clips:
- Hit CTRL-F8 (menu Insert->New Symbol) and select "movie clip"
- Then, double click on the new library item to get into symbol edit mode. Create any animation you like. Make sure that you are aware at which level you edit, i.e. make sure to return to the scene when you are done !!
- Alternatively, you also may import simple Flash animations you made before as movie clips.
Once you got one or more of these animations:
- Create an instance of each on the stage and give it an instance name, e.g.
movie_books
- Then in the AS code you may want to stop() each movie clip instance and also make some of them invisible, e.g.:
movie_books.stop();
movie_books.visible=false;
- Before stopping a video instance, you should make sure that it was playing to avoid script errors. To do that you should check if the instance of your video is null or not, e.g :
If(movie_books !=null) { movie_books.stop(); movie_books.etc();... } Every time you call a property of an object by using the . you should check if there is a possibility that your object is null.
At the heart of cue point events management is an event handler that is registered, i.e. we use exactly the same principle as for user interaction with buttons (Flash button tutorial).
The cuepoint_listener function includes a switch statement that deals with each event it receives.
- For most of these events we play some movie clip. If the movie clip was hidden, make it visible too, e.g.
movie_books.visible=true;
movie_books.play();
- Also we have to stop previous movies or even make them invisible again (as you like)
If you want music textures, you can for example import a sound file into the library and then export it for action script (Right-click on it). Make sure you remember its class name. Else you can dynamically import sound from external files as shown in the Flash drag and drop tutorial.
So here is the complete code you can find in the *.fla file of this example:
import fl.video.MetadataEvent;
// Stop all the animations of the various movie clips
// Make the bookshelf invisible
movie_trees.stop();
movie_books.stop();
movie_books.visible=false;
movie_penguin.stop();
movie_manual.stop();
movie_manual.visible=false;

// This is a sound of the class music
// Was defined by exporting the music file in the library
var music:Music = new Music();
var volume = new SoundTransform(0.2, 0);

// Add a cuepoint for the end and which is not in the flv movie
video_component.addASCuePoint(40, "End");

video_component.addEventListener(MetadataEvent.CUE_POINT, cuepoint_listener);

function cuepoint_listener(obj:MetadataEvent):void {
	switch (obj.info.name)
	{
		case "palm_tree" :
			movie_trees.play();
			break;
		case "books" :
			movie_trees.stop();
			movie_books.visible=true;
			movie_books.play();
			break;
		case "missing_manual" :
			movie_books.stop();
			movie_books.visible=false;
			movie_manual.visible=true;
			movie_manual.play();
			break;
		case "XPS" :
			movie_manual.stop();
			movie_manual.visible=false;
			var song = music.play(0,3,volume);
			break;
		case "ubuntu" :
			movie_penguin.play();
			break;
		case "End" :
			// song.stop();
			movie_penguin.stop();
			movie_penguin.visible=false;
			movie_books.visible=false;
	}
}

/* This shows how to open an URL in a WebBrowser */
btn_edutech_wiki.addEventListener(MouseEvent.CLICK, GoToUrl);

function GoToUrl(event:MouseEvent):void {
	var url:String = "http://edutechwiki.unige.ch/en/Flash_video_component_tutorial";
	var request:URLRequest = new URLRequest(url);
	try
	{
		navigateToURL(request, '_blank');
	}
	catch (e:Error)
	{
		trace("Error occurred!");
	}
}
- Example
Cue points work-through example
Adapt the following example: Look at this first: flash-cs3-video-cue-events-exercise.html
Download:
- flash-cs3-video-cue-events.fla
- Optional (else you can run the example as is): office-dks3.flv
Make this your own cue-points enhanced component video. Prerequisites:
- Flash component button tutorial
- Flash embedded movie clip tutorial
- (Optional) ActionScript 3 interactive objects tutorial
Below is a copy of the AS3 code you should modify. It sits in the Script layer.
import fl.video.MetadataEvent;

/* Instructions:
1. Add a *.flv video to the video component (edit with component inspector)
2. Use a viewer to analyse the video and write down at least 3 moments
   you want to declare as cuepoints. You need a name and seconds
3. Fix the code below:
  a. Add cue points below or in the component inspector
  b. stop all your animations, make them invisible if you like
  c. Add "if clauses" in cuepoint_listener
  d. Edit the jump1 function
*/

// 3.a. Add a cuepoint with ActionScript, else use the component inspector

video_component.addASCuePoint(10.5, "wonder");

// 3.b. Stop all the animations of the various movie clips
// 1. Add more animations here and kill the example anim
// 2. Your embedded clips must have an instance name in the Flash Scene
// copy/paste the two following lines, i.e. add anim2 etc. and adapt

anim1.visible=false;
anim1.stop();

// Optional: Add sound from a sound file in the library.
// Was defined by exporting the music file in the library to AS3
var guitar_music = new Guitarmusic();
var volume=new SoundTransform(0.2,0);

// 3.c Add more if clauses to the cuepoint_listener function
video_component.addEventListener(MetadataEvent.CUE_POINT, cuepoint_listener);

function cuepoint_listener(event) {

	// get the event name
	var event_name = event.info.name;

	// the next three lines will just print out information to the console
	// you later can remove these if you want
	trace("Elapsed time in seconds: " + video_component.playheadTime);
	trace("Cue point name is: " + event_name);
	trace("Cue point type is: " + event.info.type);

	// deal with the cue events
	if (event_name == "wonder") {
		anim1.visible=true;
		anim1.play();  // should be stopped at some point ....
		guitar_music.play();
	}

	/* remove this start comment line
	if (event_name == "something") {
	anim2.visible=true;
	anim2.play();
	}
	remove this end comment line */
}

// 3.d - Adapt to your cuepoint
button1.addEventListener(MouseEvent.CLICK, jump1);

function jump1(event) {
	// next line only works if you created cue points
	// of type navigation with the video encoder
	// video_component.seekToNavCuePoint("wonder");
	video_component.seek (video_component.findCuePoint("wonder","actionscript").time);
	anim1.visible=true;
	anim1.play();
}
Links
Manual entries
- For Designers CS3
- Using the FLVPlayback Component
- Using the FLVPlayback Captioning Component (Flash CS3 Documentation).
- Listening for cue point events - Read this! Including the comment Using the FLVPlayback Component]
- For Designers CS5
Below some more technical links which so far are not really used much in this tutorial.
- ActionScript overview documentation for programmers
Note: (URLs seem to be unstable if they don't work go to Programming ActionScript 3.0
- Working with video (Flash CS3 documentation / Programming AS 3.0)
- ActionScript documentation for programmers
- video package-detail.html
- MetadataEvent.html
- FLVPlayback Component. The class for the flvplayback vido component.
- AS3 FLVPLayback documentation
- VideoPlayer.html. The FLVPlayback class wraps the VideoPlayer class.
- NetStream.html. This one has the onCuePoint Event.
- Timed Text (TT)
- Timed-Text, W3C Specification
- Timed Text Tags (List of supported tabs, Adobe)
Tutorials
- For designers
- Captions for Video with Flash CS3 by Tom Green, Digital Web Magazine, June 2007
- Captions for Video with Flash CS3 (Part Two), by Tom Green, Digital Web Magazine, June2007.
- For programmers
- Cue points and Flash CS3, by Flep, Jul 2007.
Artwork
All Artwork (clipart) is from:
- http://www.openclipart.org/ (sorry I didn't write down names of individual creators). These are SVG files in the public domain I imported via Illustrator (I really can't understand why Flash doesn't support SVG in some ways...)
Sound (except voice track on videos) is from:
Videos
- I made them myself
- You may download videos from the Internet (make sure that copyright allows you to do so). Getting videos from sites like YouTube is not easy, you either have to download a program or use a specialized web site for this (watch out for viruses and porn): Search for "download youtube". You also may dig in your computer's temporary files.
- To download from youtube, I use this Firefox extension: https://addons.mozilla.org/en-US/firefox/addon/3006
- http://video.google.com/ Some videos on google are free to use. They come in various formats. Use advanced search in order to restrict search to duration, particular formats, etc. Then, underneath the video, click on the link watch this video on video.google.com. Else you won't be able to download it. Finally to download, click on "Download video -iPod/PSP.
- http://vids.myspace.com/ Needs special tools to download
- http://youtube.com/ Needs special tools to download

