InkStitch - manual stitches
Introduction
Most professional embroideries require at one point the use of manual stitches, that is to say either embroidery objects ("sets of stitches") created by hand without going through a parameterized drawing, or manual modifications made to the generated "sets of points" that can be seen in the Stitch plan when using Embroider ... to create the machine embroidery files.
You must understand that the points generated from your drawings (lines, backgrounds and rails) have the same technical form as the "manual points". The difference is that the generated forms include lock points, ie 2-3 round trips at the beginning and at the end. In the explanations below, we will first show (a) how to create manual points directly, (b) how to reuse and modify the points generated in the stitch plan layer. (c) how to retouch objects in the stitch plan (without regenerating it), and (d) how to import and use machine files that are commercially available.
Let's start with a little explanation how InkStitch works. The file format used by InkScape (the drawing software) is SVG, the Internet format for making accurate vector drawings. This format can be edited with any editing tool. The Ink/Stitch extension adds annotations to each drawing object that you set to embroider. For example, the expression embroider_running_stitch_length_mm = "2" says that points should be 2mm apart. When you create the embroidery file or a simulation, Ink/Stitch will create stitch objects in the embroidery plane layer. These objects are simple connected segments, defining the path that the embroidery machine will do point by point.
In the techniques introduced in this page, we start from the idea that Ink/Stitch, from the visible layers, will create an embroidery plan containing embroiderable objects. This stitch plan contains a series of paths defining all embroidery stitches according to a simple organization. First, they appear in the order that you specify in your design (see Object -> Objects .) Then the prior and the following object of the same color and are agglutinated in a single stitch object'. The machine will just follow its points from start to finish, using the same thread.
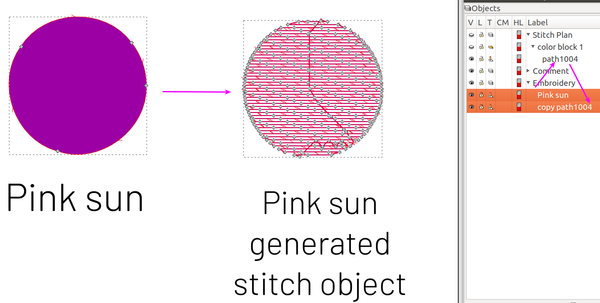
Here is a drawing: On the left a simple round of 15mm without stroke, on the right the stitch object generated in the stitch plan. We simply copied the latter.
A few more explanations:
- Non-parametric objects should not be embroidered and it is suggested to put them in a separate layer. In fact, when they are visible when creating the embroidery file, Ink/Stitch can complain.
- The visible layers, i.e. the parametric objects, will be converted into embroiderable objects that can be assembled in an "embroidery plane" layer. From this plan, Ink/Stitch can create proprietary machine code files (DST, PES, JEF, EXP, VP3, etc.). Embroidery format contains a very technical description of these formats, made by one of the few experts in the field.
- Stitch plan objects can be edited and also copied to another layer. Make sure you never display the embroidery plan plus another layer before creating the embroidery file. It's one or the other.
The examples used below also include code for a border, put in a separate layer, which you can ignore. Some SVG files are attached at the end if you want to play with the examples.
SVG
This small section is for people who have a certain technical background and who know HTML5 (SVG is part of it). There is no need to understand this language to go further in this article, but if you're curious you can take a look at the Static SVG tutorial or some other better tutorial on the Internet! We will just briefly discuss the SVG code for the two paths discussed in the introduction. This may encourage some people to manually edit the code when there is a problem.
Each path is defined by an SVG tag of type path :
<path
......
/>
The coordinates of the points are defined in the attribute 'of' 'with a language too complicated to explain here and which defines points and the connections between these points.
The code for the pink drawing ("Pink sun") is much shorter than the embroidery object generated ("copy path1004") because its shape is defined only by 4 points. In the code, you also see the Ink/Stitch additions to the SVG code, ie the "embroider" attributes that say how to treat the shape (lines 3, 8 and 9) according to your setting. Finally in the code that defines the embroidery object you see a embroider_manual_stitch = "true" attribute, so proof that a generated object is the same thing you create with manual point placement (see below).
<path
       inkscape:label="Pink sun"
       embroider_fill_underlay="False"
       inkscape:connector-curvature="0"
       id="path815"
       d="m 23.195707,270.36104 c 0.184634,4.86353 -5.127906,8.77256 -9.714393,7.16478 -4.6969665,-1.26178 -6.8691498,-7.49073 -3.972794,-11.39945 2.593332,-4.1167 9.184486,-4.35015 12.062475,-0.42724 1.046583,1.31216 1.628887,2.98362 1.624712,4.66191 z"
       style="opacity:1;vector-effect:none;fill:#9c00a5;fill-opacity:1;stroke:none;stroke-width:0.13598354;stroke-linecap:butt;stroke-linejoin:miter;stroke-miterlimit:4;stroke-dasharray:none;stroke-dashoffset:0;stroke-opacity:1"
       embroider_row_spacing_mm="0.33"
       embroider_running_stitch_length_mm="2"
/>

<path
       inkscape:label="copy path1004"
       id="path985"
       style="fill:none;stroke:#9b00a5;stroke-width:0.1058332"
       embroider_manual_stitch="true"
       d="m 45.894006,276.61793 -0.46259,-0.59035 -0.462591,-0.59034 0.462591,0.59034 0.46259,0.59035 -1.16342,-1.48473 -1.414212,-1.41421 -1.414211,-1.41421 -0.920242,-1.61882 v -2 -2 -1.99999 l 1.19952,-1.38072 0.758327,0.1127 h -2.150235 -1.006367 l -1.199213,0.32999 h 2.955579 2.537203 l 0.753075,0.33 h -2.540279 -2.999996 -1.458967 l -0.574864,0.33 h 2.78383 2.999996 2.375943 l 0.482629,0.33 h -2.108573 -2.999996 -2.999996 -1.017884 l -0.416071,0.33 h 2.183954 2.999996 2.999996 1.741564 l 0.360634,0.33 h -1.352199 -2.999996 -2.999996 -2.999996 -0.26972 l -0.318942,0.33 h 1.338661 2.999996 2.999996 2.999996 0.881443 l 0.279243,0.33 h -0.410687 -2.999996 -2.999996 -2.999996 -2.337553 l -0.241359,0.33 h 0.328914 2.999997 2.999996 2.999996 2.90137 l 0.221924,0.33 h -2.373295 -2.999996 -2.999996 -2.999996 -1.298791 l -0.210757,0.33 h 2.259547 2.999996 2.999996 2.999996 1.823043 l 0.169811,0.33 h -1.242855 -2.999996 -2.999996 -2.999996 -2.999996 -0.196532 l -0.151924,0.33 h 1.098454 2.999997 2.999996 2.999996 2.999996 0.652438 l 0.13059,0.33 H 45.289527 42.289531 39.289535 36.289539 34.28916 l -0.103223,0.33 h 2.853601 2.999996 2.999996 2.999996 2.402881 l 0.09985,0.33 h -1.752732 -2.999996 -2.999996 -2.999996 -2.999996 -0.705518 l -0.08237,0.33 h 1.537886 2.999997 2.999996 2.999996 2.999996 1.087154 l 0.07052,0.33 h -0.407675 -2.999996 -2.999996 -2.999996 -2.999996 -2.345721 l -0.05784,0.33 h 0.153559 2.999997 2.999996 2.999996 2.999996 2.709228 l 0.04193,0.33 h -2.001159 -2.999996 -2.999996 -2.999996 -2.999996 -0.927395 l -0.01761,0.33 h 1.695004 2.999996 2.999996 2.999996 2.999996 1.271089 l 0.01349,0.33 h -0.53458 -2.999996 -2.999996 -2.999996 -2.999996 -2.454566 l 0.0204,0.33 h 0.184169 2.999996 2.999996 2.999996 2.999996 2.777314 l -0.01037,0.33 h -2.016945 -2.999996 -2.999996 -2.999996 -2.999996 -0.913769 l 0.0418,0.32999 h 1.621964 2.999996 2.999997 2.999996 2.999995 1.250004 l -0.0561,0.33 h -0.443905 -2.999996 -2.999996 -2.999996 -2.999996 -2.314347 l 0.05762,0.33 h 3.006729 2.999997 2.999996 2.999996 2.637794 l -0.07942,0.33 h -1.808375 -2.999996 -2.999996 -2.999996 -2.999996 -0.662519 l 0.09543,0.33 h 1.317087 2.999996 2.999996 2.999996 2.999996 0.956148 l -0.102228,0.33 H 48.289518 45.289522 42.289526 39.28953 36.289534 34.334747 l 0.135385,0.33 h 2.569401 2.999996 2.999996 2.999996 2.205109 l -0.149968,0.33 H 46.78952 43.789524 40.789528 37.789532 34.789536 34.605517 l 0.17811,0.33 h 0.755907 2.999997 2.999996 2.999996 2.999996 0.375922 l -0.200887,0.33 h -2.425027 -2.999996 -2.999996 -2.999996 -1.326501 l 0.212167,0.33 h 1.864333 2.999996 2.999996 2.999996 1.456025 l -0.257152,0.33 h -0.448874 -2.999996 -2.999996 -2.999996 -2.384154 l 0.259683,0.33 h 2.87447 2.999996 2.999996 2.42624 l -0.321997,0.33 h -1.354244 -2.999996 -2.999996 -2.999996 -0.332652 l 0.331807,0.33 h 0.750844 2.999996 2.999996 2.999996 0.255137 l -1.046572,0.77699 -0.730641,-0.73064 -0.707106,0.7071 -0.707106,-0.7071 -0.707105,0.7071 -0.707106,-0.7071 -1.414212,1.41421 -0.358197,0.3582 -0.614936,-0.16876 h 1.487851 2.557473 l 0.901707,-0.33 H 43.03953 40.039534 38.305161 l -0.66588,-0.33 h 1.650254 2.999996 2.604874 l 0.330151,-0.23655 0.201638,-0.0935 h -0.886666 -2.999996 -2.999996 -1.425284 l -0.454254,-0.33 h 1.129539 2.999996 2.999996 2.104477 -0.749999 -0.749999 0.749999 0.749999"
       inkscape:connector-curvature="0"
/>
Tip: When you can no longer can parametrize a drawing because Ink/Stitch blocks, you can usually just kill these "embroider" settings instead of starting all over again. You can either use the Inkscape XML Tree Editor (CTRL-MAJ-X), or any code editor (also known as text editors or programming editors). There are dozens, for example Brackets
Creating manual stitches
Creating manual stitches is easy, but requires adding lock stitches.
As explained in the official Manual Stitch page, the initial procedure is simple:
- Create a path. Line style or width are irrelevant.
- Open Extensions > Ink/Stitch > Params.
- Enable Manual stitch placement. The other settings will not have any effect in manual stitch mode.
Stitches are defined by the nodes that define a line. If your drawing has curve controls, these will not have any effect.
If your nodes are too far or too close, you will get stitches that are either too far or too close. A good way to visualize distances is to use the Grid
Edit -> Preferences -> Grids. Grid units = mm, set distances to 1 x 1 mm for example- turn the grid on with (Menu
View-> Page Grid
Tip: To transform a smooth form, e.g. the spiral in Inkscape into a series of small connected lines, do the following
- convert the shape to a path if necessary (Path -> Object to Path)
Extensions -> Modify Path -> Flatten Beziers. E.g. select a distance of 2. We used that setting to convert the spiral in the figure below.
You may have to remove, add or move some points using the node editor (F2)
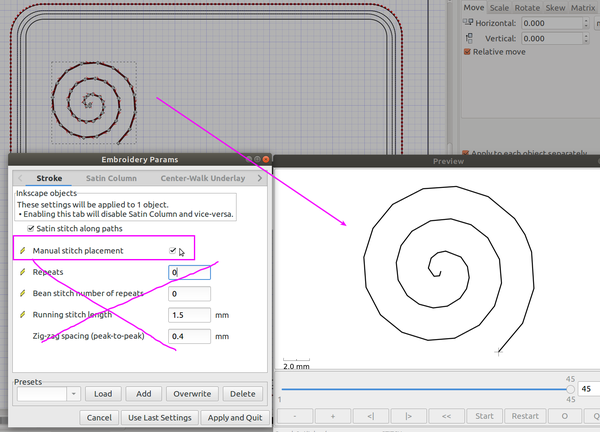
Important tip: The example shown here does not have any lock stitches. You will have to add them if you don't want your embroidery to fall apart quickly. Attaching a command to the selected object does not seem to work (except for the Trim) at the time of writing. Therefore, create manual locks simply by moving back and forth 2-3 times in the beginning and the end.
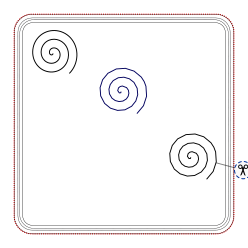
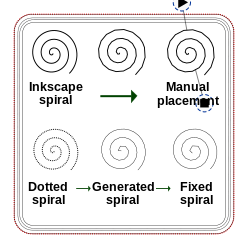
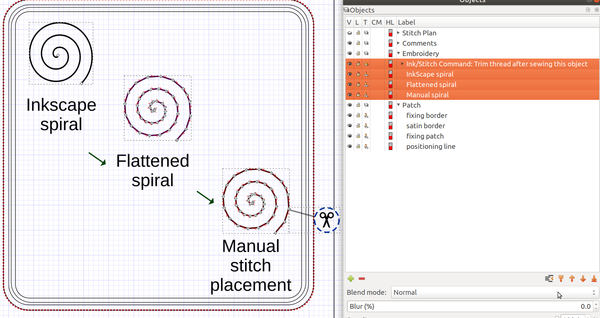
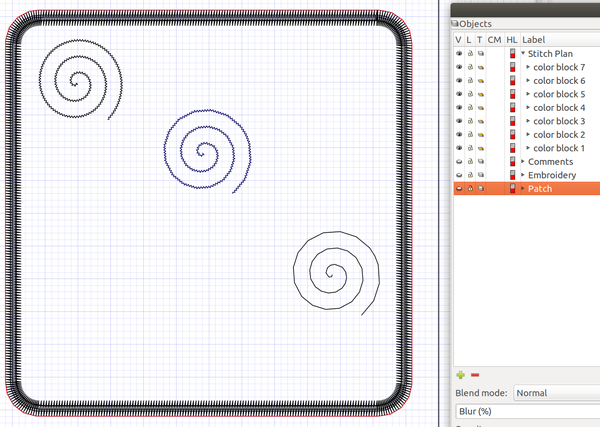
Below we will show both a design view and resulting stitchable objects in the stitch plan. On top left, the original inkscape spiral which will be rendered in an ugly zig-zag. In the middle the flattened spiral, also by default rendered as zig-zag. At bottom right, the flattened object parametrized as <code>manual stitch placement</code> (as explained above)
Using generated stitches as design element
A more often used strategy is to generate a stitch plan defining all the stitches of your embroidery. In principle, InkStitch will create one stitchable object for design objects grouped together by color blocks. Let us call these objects stitchable objects. These objects can be edited since they are just composed of a long line defined by nodes. So far, we think that the best method of doing this is the following:
Step 1: Generate a stitchable object
- Create a design in InkScape
- e.g. create an InkScape Spiral, make it dotted ("Dotted spiral" in the figure below)
- Parametrize in Ink/Stitch
- e.g. in this example, we parametrize the spiral as a simple line (not that we have choice ...)
- Select just this object, then generate the Stitch Plan using
Extensions -> Ink/Stitch -> Embroider....
The result, a single path, will be placed in the Stitch Plan Layer, inside a color block group.
Step 2: Copy and edit the stitchable object
- The generated object in the Stitch plan layer, e.g. path1523 is a defined as manual path (like above), except that it also contains lock stitches in the beginning and at the end.
- Move this object into your embroidery layer ("Generated spiral" in the fig. below).
- Now edit the object, i.e. hit F2 and move, delete, add nodes. In the case shown in the figure below, we just moved nodes at the end and in the beginning. Make sure that when you move lock stitches (several stitches that go back and forth) together, this is a little bit tricky ....
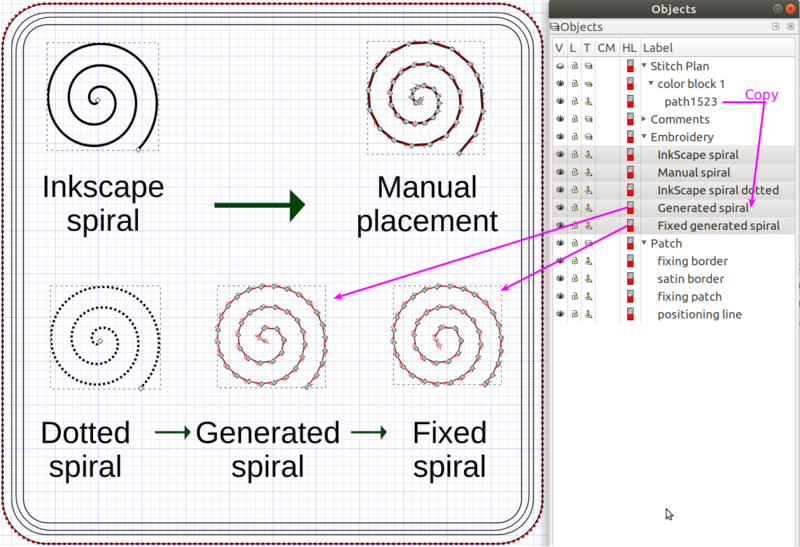
Fixing generated stitches
The principle is the same as above, except that we do not copy stitch packs. Let us assume that you are perfectly happy with your design objects, but not with the generated stitches. In that case, we suggest generating the whole stitch packs and edit these in place, i.e. in the Stitch Plan directory.
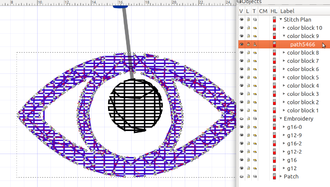
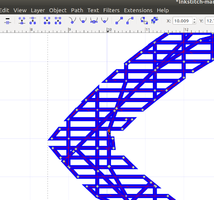
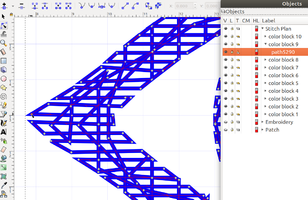
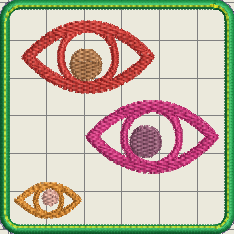
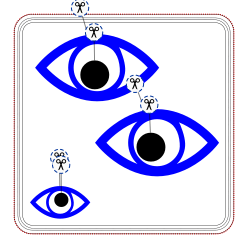
The following example shows a modified small eye in the lower left. We displaced a underlay stitch and also elongated the eye a bit.
Important: In order to generate the modified embroidery file, keep the Stitch Plan unhidden and keep hidden all the other layers (do not regenerate) ! You can produce a stitch file either by clicking again on embroidery... again, or through "Save as".
-
Œil, generated in the Stitch Plan
-
Small eye, being modified (dragging an underlay segment)
-
Petit Œil, after modifications.
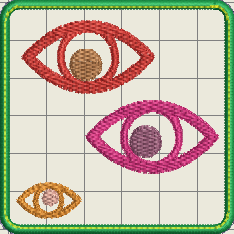
Below is a simulation as seen in Wilcom Truesizer (since we use the DST format, colors are randomly chosen). The little eyes at the bottom of each look a bit different. The one to the right has a more pronounced left corner
-
Simulation before correction to the generated stitches
-
Simulation after corrections (left corner of lower left small eye)
Files
If you want to play with some of the example discussed, you can start from one of the following SVG files (click, click, then "save file as")
Import machine code
Ink / Stitch allows you to import several machine formats. This allows you to reuse models purchased or found for free on the Internet. The easiest format to use is probably DST because it is an industrial format that works with a lot of machines (including our Brother). On the other hand, you can not change the size of these objects a lot, since they are defined as lines of stitches to embroider . We discuss a real example that you can reproduce.
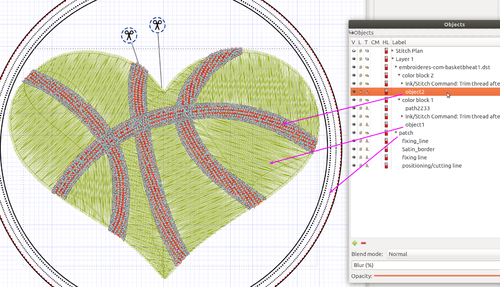
Let's try to import a heart for basketball players found on the site of embroideres.com and which does not ask to register. The file is 10.3 x 84.3 mm, a good size to cover a big moth hole on a sweater but too big to fit into a patch made at TECFA in the outreach events.
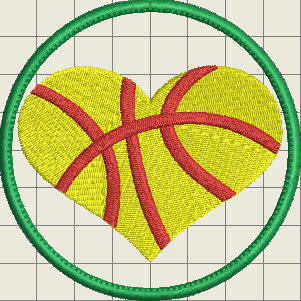
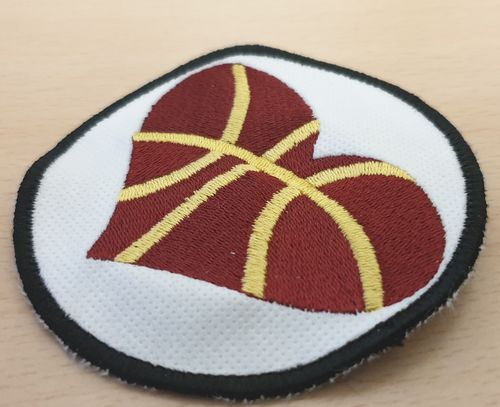
In our opinion we can enlarge or reduce an embroidery plan by 10% (this is what some embroiderers allow). If one decreases by 20-30%, the embroidery becomes dense, so about 5 threads / mm instead of 4 and 1.2mm spacing between the dots instead of 1.5. The following simulation shows the heart in an 8cm patch. It was reduced to 70%, so in principle not embroiderable without changing thread and needles finer. It was embroidered on a patch with standard needles and thread and it is effectively veiled ....
 |
 |
 |
 |
If you can not import a machine format (DST, PES, JEF, etc.), first try converting your file to another format. There are several free converters, see an this list. For example, we recommend Wilcom TrueSizer or Pulse Ambassador or MyEditor. Note that you can also use that software to convert a file produced by Ink/Stitch (it is advisable to export in DST in this case) to a slightly exotic format.
