Brother PR1050X

Introduction

The Brother PR1050X is a high-end consumer and professional entry level embroidery machine and we (TECFA) bought one in August 2017 in order to introduce our educational technology students to computerized embroidery and to organize outreach events.
In Switzerland, list price is 12'000 CHF, in Germany 11'000 Euros. Street prices can be less and even lesser for education. We got ours from Nähfox. Since there wasn't any reseller in Geneva or nearby and the one in St-Gallen (my home town and Switzerland's textile and embroidery capital) offered a really nice price and good service we decided to bear with the 8 hour drive forth and back from Geneva...
In 2020, TECFA offered another one to our university's new fablab ... and it offers free embroidery courses.
See also:
Unpacking and installation
The machine is usually sold and installed with a training course, and picked up in a shop or delivered. That was the case for our 2017 acquisition. In January 2020 we bought a second machine for our fablab and managed to had it delivered in a huge impressive box. Unpacking, installing and configuring was easy. No calibration of thread tension was needed so far.

Specifications
- The machine can stitch up to 10 different colors with one needle at the time
- Size: 48 x 48 x 60cm ?
- Size of the box: ?
- Weight: 44 kg (60 kg in the box ?)
- Size of a table (add-on): 70 - 100 cm height, 49 cm length, 80 cm width
Connectivity
- USB host cable
- USB media slot
- SD card slot
Thread colors
- Default colors
- Each needle bar can be assigned a color through either the control panel or software (the latter is called manual color sequence).
- Thread colors in a design can be sorted at the control panel (this may mess up order of printing of course)
- Several manufacturers/makes color schemes are builtin. E.g. Madeira Poly, Sulky, R-A Poly.
Needles
Brother recommends the following "household needles":
- HAX 130 EBBR (Organ)
- Schmetz 130/705 H-E
These types have a flat side (130) and slightly rounded tip (H-E). Of course, you may have to switch the needle H-E type for unusual fabrics, e.g. 90/14 Denim 130/705 H-J needles for jeans.
Typically, size 75/11 (0.75 mm) with #40 thread is used, but you can use finer needles, e.g. 65/9 (0.65mm) or 60 (0.6 mm) for #60 thread or thicker 90/14 (0.9 mm) ones for #30 thread.
Thicker threads require more tension, and thinner threads less.
Formats
The Machine can not directly stitch from design files like EMB or ART.
PES
- The PES format is the most important native machine instruction format for both small and semi-professional Brother embroidery machines. Designs can be somewhat modified.
- Several version of PES seem to exist. Newer versions may not work on older machines
- PES is the default format to export from your embroidery software.
PEN
- A Brother format that only works on some machines that can stitch "Disney" designs. Some machines can be registered to decrypt.
PEC
- An older Baby Lock/Brother/Deco format. Avoid.
PHC
- Older Brother format. Avoid.
DST
- DST is a Tajima data file and it does not include color information (therefore avoid for this). However it includes cuts for jumpstitches of the same color (therefore use it). See p. 227 or the Brother Manual.
Hoops
The machine comes with several frames for each of which several hoops can be attached. By default you will get four standard frames that will attach on both sides. These are not suitable for repairing ellbow holes (one of my favorites) or stitching into a shirt or jeans pocket. Get the compact set for that. In addition, we recommend buying the long frame for arms/legs.
In addition to the for standard frames and hoop sets you can acquire, below are a few.
- Border frame
- Cap frame
- Clamp frames (for shoes)
- Clamp frames for delicate tissues (recommended)
- Magnetic frames for fast hooping
- Cylinder frames (legs and sleeves)
- Jumbo frame (requires turning)
- Quilt frame
- Small size frame kit (recommended)
- Sleeve frame (recommended)
Standard
You cannot stitch up the edges. Roughly speaking you can stitch the inner size minus 2cm vertically and minus 4cm horizontally.
| Name | Embroidery size (width x height) | Physical Size inside (width x height) | Frame holder | Remarks |
|---|---|---|---|---|
| PRPH360 - Extra-large | 36.0 x 20.0cm | 39.5 x 22.0cm | A | Use the table |
| PRH180 - Large | 18.0 x 13.0 cm | 23.0 x 15.0 cm | A | none |
| PRH100 - Medium | 10.0 x 10.0 cm | 14.0 x 12.0 cm | A | |
| PRH60 - Small | 6.0 x 4.0 cm | 8 x 6.0 cm | A |

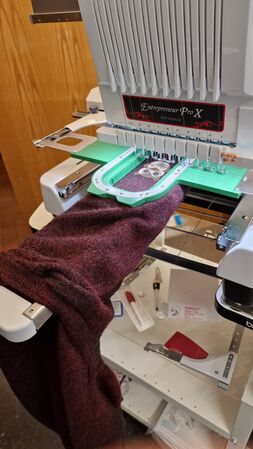
It is recommended to use the table (see the picture at the beginning) in when you use the extra-large hoop and/or a large tissue.
Compact frame set
These frames are attached with a single arm to the small E frame, i.e. they will stick out and are well suited for stitching inside sleeves and legs or pockets that are not too narrow. Make sure to understand that you cannot stitch up to the edges, e.g. frame 50 can only do 50 x 50mm and not 60 by 60 for example !
| Name | Embroidery size (width x height) | Physical Size inside (width x height) | Frame holder | Remarks |
|---|---|---|---|---|
| Frame 70 (horizontal/landscape oval) | 6.0 x 4.1 cm (?) | 9.0 x 5.5 cm | E | For small designs on anything that has enough space (e.g. trouser legs) |
| Frame 50 (square) | 5.0 x 5.0 cm | 6.8 x 6.8 cm | E | Good for embroidery on (larger) jeans pockets and larger gloves |
| Frame 55 ("round" oval) | 4.4 x 3.8 cm | 6.0 x 5.0 cm | E | |
| Frame V (vertical/portrait oval) | 3.3 x 7.5 cm | 5.0 x 9 cm | E | Good for embroidery on gloves and shirt pockets. Not sure that 7.5cm is correct. |
-
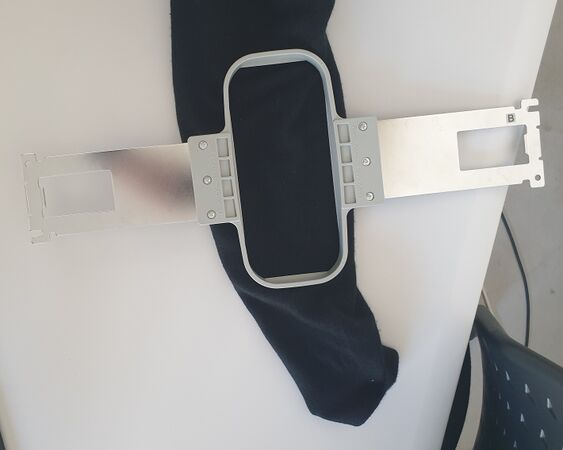
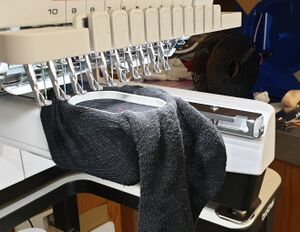 Stitching a sock with the small vertical 33x75mm Brother V frame
 -
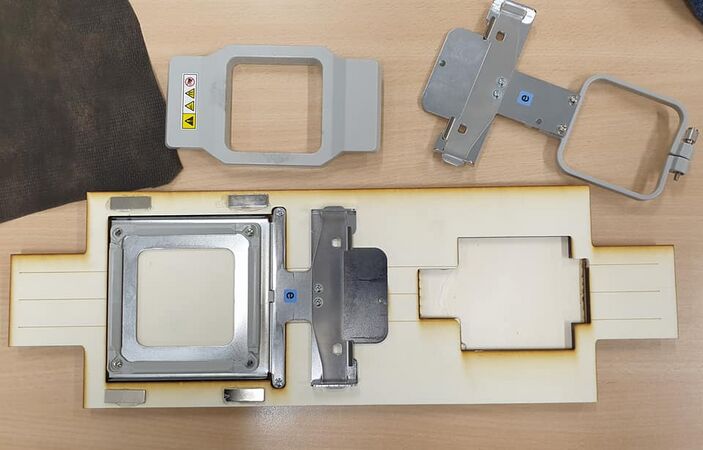
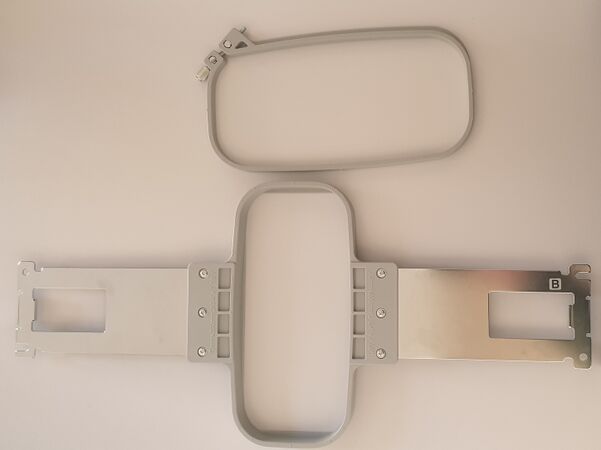
![50x50mm and 33x75mm frames with frame holder E. ]]](/mediawiki/images/thumb/c/c0/Brother-pr-small-frames.jpg/294px-Brother-pr-small-frames.jpg) 50x50mm and 33x75mm frames with frame holder E. ]]
50x50mm and 33x75mm frames with frame holder E. ]]

![50x50mm and 33x75mm frames with frame holder E. ]]](/en/File:Brother-pr-small-frames.jpg)
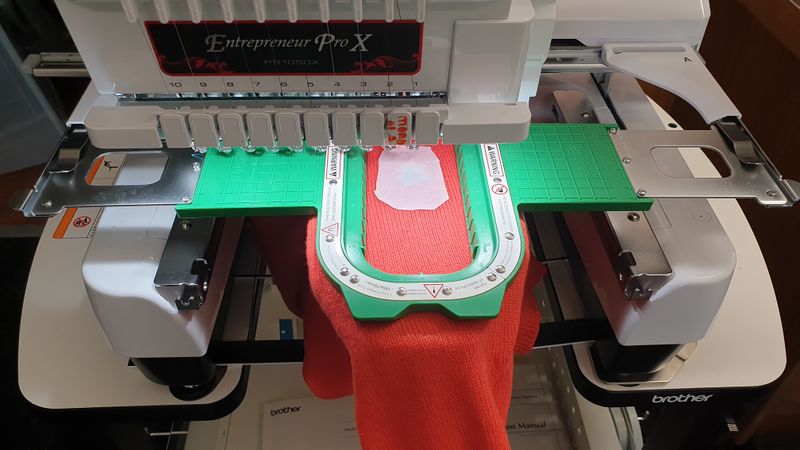
Magnetic frame 5x5
Very practical frame for stitching on various delicate or thick fabrics (or anything that is, but there is less adherence than with a classic frame)
| Name | Embroidery size (width x height) | Physical Size inside (width x height) | Frame holder | Remarks |
|---|---|---|---|---|
| Magnetic frame PRMH50 | 50 mm (H) × 50 mm (W) | E | Very practical |
-
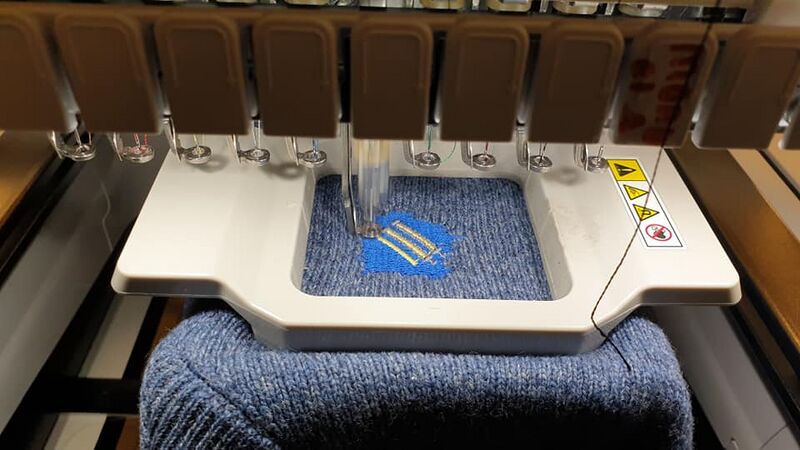 Brother PRHM50 magnetic frame in action
 -
 DIY hooping station


Maggie magnetic frame 10x10cm (13x13)
(purchased Nov 2021)
| Name | Max. embroidery size (width x height) | Physical size (width x height) | Frame support | Remarks |
|---|---|---|---|---|
| 130mm x 130mm (5.5in) Maggie Frame / Magnetic Maggie PR Hoop | 100mm x 100mm | A | This frame is unofficial (not supported by Brother). It is convenient for embroidering on clothes, including thick jackets. Then the hoop is very fast: Put a stabilizer on the frame, put the garment and clac.
Be careful with your USB keys, credit cards etc.. The magnetic field can destroy data. Do not use if you have a pacemaker! Use it with the A frame in a wide position and make sure that your design is less than 10x10cm and centered. Else you will stitch on plastic. |
Tips for use:
First of all you should know that you have to use a wide position of the frame holder A, so a virtual field of 30x20cm (approx.). This makes it quite possible to bump against the edges of the frame and damage a needle or worse. Therefore, you have to do as on an old embroidery machine and check the embroidery field before embroidering.
- Check that the design does not exceed 10x10cm.
- Set the frame manually to 10x10 if you want to be safe.
- Have the outline done (2nd or 3rd screen).


Maggie Magnetic Frame 150x150 (175x175)
(bought in oc 2022)
| Name | Max size embroidery (width x height) | Physical size (width x height) | frame holder | Remarks |
|---|---|---|---|---|
| 175mm x 175mm (6.5in) Maggie Frame / Magnetic Maggie PR Hoop | 150mm x 150mm (well in my opinion you can go up to 160x160 being careful) | A | This frame is unofficial (not supported by Brother). It is practical for embroidering on garments, including thick jackets. Circling is very fast: Put a stabilizer on the frame, put the garment and click.
Beware of your USB keys, credit cards, etc. The magnetic field can destroy data. Do not use if you have a pacemaker! |
Usage tips:
Know first that it is necessary to use a wide position of the frame support A, therefore a virtual field of 30x20cm (approximately). This makes it entirely possible to bang against the edges of the hoop and damage a needle or worse. Consequently, it is necessary to do as on an old embroidery machine and check the embroidery field before embroidering.
- Check that the drawing does not exceed 15x15cm or 16x16 if you feel confident
- Have the contour done (2nd or 3rd screen).

Sleeve frame Maggie 5x17.5 (79x195)
| Name | Max. embroidery size (width x height) | Physical size (width x height) | Frame support | Remarks |
|---|---|---|---|---|
| Sleeve frame (vertical oval) | 5 x 17.5 cm (official)
6 X 18 cm (if you are careful) |
7 x 19.5cm | A | Caution: This type of frame can damage the machine or at least break a needle. It must be used with the A-frame in a wide position. This means that it is your responsibility to pay attention to the dimensions of your design, i.e. max. 5cm in width (!), although I go as far as 6cm :)
Also, heavy garment can make it bump into the free arm unless you buy the Tubular Frame Table PRTT1, which we strongly recommend. However, that adds a lot to the cost (~250 Euros). |
-
 Sleeve frame
 -
 Sleeve frame placed on a sweater sleeve. As it goes the other way, the sleeve can slip up and down the free arm
 -
 Sleeve frame with brother table for tubular frames


Maggie large frame 300x85 (320x105)
| Name | Max. embroidery size (width x height) | Physical size (width x height) | Frame support | Remarks |
|---|---|---|---|---|
| 320mm x 105mm Maggie Frame / Magnetic Maggie PR Hoop | 300mm x 85mm (et un peu plus si vous faites attention) | 32x10.5cm | A | Useful to stitch large lettering or other wide frames on cloth.
|

Clamp frame
(Bought in spring 2020)
| Name | Embroidery size (width x height) | Physical Size inside (width x height) | Frame holder | Remarks |
|---|---|---|---|---|
| Clamp frame M (PRCLPM1AP) | 100 mm × 100 mm | D | Very practical, in particular to embroider on delicate cloth |


Sleeve frame
The sleeve frame is attached on both sides. This means that the sleeves should not be too narrow. This frame is very practical for embroidery on legs of pants.
| Name | Embroidery size (width x height) | Physical Size inside (width x height) | Frame holder | Remarks |
|---|---|---|---|---|
| PRHSL200 Sleeve frame (vertical oval) | 7.0 x 20.0 cm | 11.5 x 23.5cm | B |
-
 Sleeve frame
 -
 Sleeve frame used on a sweater


Cap frames
The cap frames allow embroidery of baseball caps and similar. They come with their own frame holder.
| Name | Embroidery size (width x height) | Physical Size inside (width x height) | Frame holder | Remarks |
|---|---|---|---|---|
| PRCF3 Cap Frame | 130 x 60 mm (5" x 2.4") | No in our possession. | ||
| PRCF1 Cap Frame | 360mm x 60mm (14"x 2 3/8") | Allows to embroider a large surface (ear to ear). Requires calibration when first used |


Spare parts:
- Little plate to insert: XC7150051 SHEET, also called adjustment spacer / Polster (German)
Tubular Frame Table
The "Tubular Frame Table (PRTT1)". Very easy to use, increases the quality of embroidery on the sleeves because it will carry the weight of the garment. Also essential for a heavy magnetic frame like the Maggie "sleeve frame" (see above). It is quite expensive (about 250 euros)
-
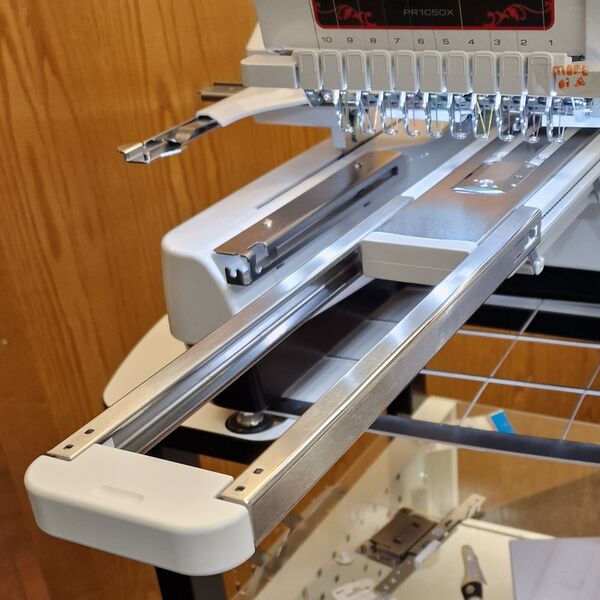 Table for sleeve frame
 -
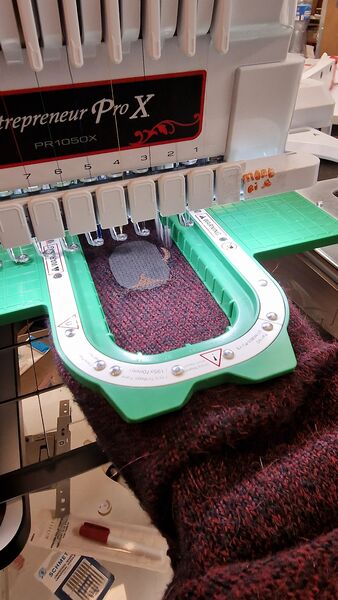 Table for sleeve frame inserted and used
 -
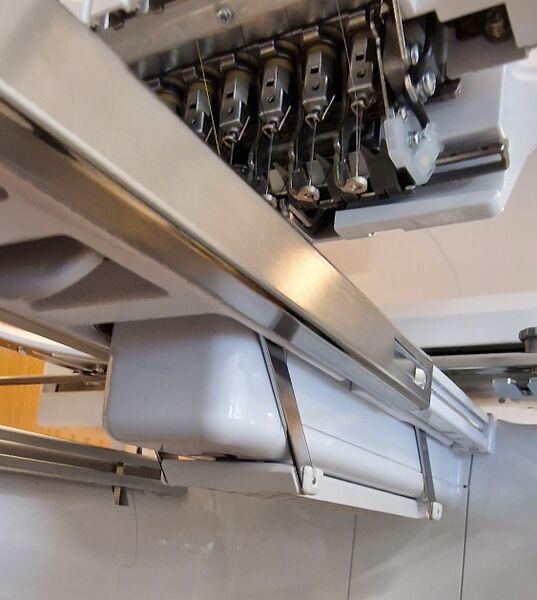 Table for sleeve frame inserted


Regular maintenance
See also the manual. It includes instructions.
Protection
If you let sit your machine during weeks or month, it is a good idea to buy some protection. A barbecue cover will nicely do the trick and does not cost much. Use it to test embroidery on nylon and it will look less ugly.
Example: Velway Housse Barbecue Housse Bâche de Protection Résistante de 210D Oxford Protection BBQ à Gaz, Couverture de Grill Anti-Vent/Anti-UV/Anti-l'eau/Anti-l'Humidité/Antipoussière 147x61x117cm Noir, on Amazon.fr
Oiling the hook
This should be done each time, i.e. when you turn the machine on. There are two methods:
- Manual
- Open the hook cover
- Remove the bobbin case
- Turn the handwheel until the the hook appears to the right
- Add a drop of oil onto the hook
- Turn the handwheel several times (this makes sure that the oil gets better distributed)
- Insert the bobbin
- Close cover
- Assisted
- Touch the maintenance icon, then the oil button
- As above, remove bobbin and apply oil
- Touch "OK" after that
- Insert bobbin
- Close cover
Cleaning the hook and bobbin case
To be done, each time a new bobbin is inserted. (Manual, p. 286)
Clean the hook
- Open the hook cover and remove the bobbin case
- Use the included cleaning brush to remove any lint and dust.
- Put back bobbin (click) and close cover.
Clean the bobbin case
- Remove the bobbin from the case
- Now use a thick sheet of paper (e.g. a clean business card) to remove debris from the tension-adjusting spring
- Use the brush to remove debris from the case.
- Insert bobbin into the case, put back the case and close the cover.
Oiling the needle bars
Should be done every 40-50 hours of operation (for each needle, i.e. 10 times), pages 288-89 and 63 of the operations manual.
- Remove the bobbin underneath (else you could create a mess while turing)
- Select one needle bar at a time. To do so:
- Select maintenance icon (second to the right)
- Touch the key for the needle bar you want to oil (from 1 to 10)
- Click OK
- Turn the wheel counterclock wise to bring the needle to its lowest position
- Apply a drop oil as high as possible on the needle bar, in any case, above the felt washer.
Repeat for each needle. After that, it probably is a good idea to stitch a little something that is not important, in case you spilled too much oil.
Cleaning around the needle plate
About once per month.
- Turn of the machine
- Remove the needle place (remove two screws)
- remove the spacer
- Use the brush to clean from the moving knife, the fixed knife, etc.
- Put the spacer back.
Cleaning the thread paths of the upper threads
Periodically meaning ???
See p. 287 of the operations manual.
Firmware upgrades
Download and explanations:
As of Aug 2018, the last update was from 09/20/2017 (1.21)
Trouble shooting
To repair serious stuff, it is best to ask a service technician. Otherwise, you must get your hands on a service manual, which is probably not easy.
To put the machine in test mode:
- Switch the machine on while pressing the start/stop, thread trimming and automatic needle threading buttons, i.e. the fist three buttons
The hook of the threading mechanism is bent
Since the hook is bound by two lateral sheets of metal it is difficult to bend it back. I suggest that you try anyhow. However, you then probably have to adjust the left/right position of the threader.
Solution 1
The best solution is to replace the whole automatic needle threading mechanism piece and give the task to a service person. If you replace the threading mechanism yourself as explained further down, you also have to go through the steps below (solution 2 or 3), i.e. adjust !
Quoting brother: “If the hook of the automatic needle-threading mechanism is bent or damaged, contact your authorized Brother dealer.”
Solution 2
Quickest solution is to adjust left/right position in test mode without opening the machine. This may or may not work, depending on the alignment of the position of the shaft.
- Put the machine in test mode (see just above)
- Select
#12: Needle threaderunderMAIN BOARD TEST MODE. - Press the
L-R positionand the standard needle bar (=10). Feel free to select another needle position, we suggest #1 to the right. - Press
CLOSEto return to the test mode selection screen and select#06: Threader test. - Press
Manual moveand move the hook to the front of the needle eye. - Loosen the black screw (see picture below) of the hook holder. You may have to turn the shaft (axis) with a plier before you can see this black screw.
- To adjust left/right position: rotate this shaft. Make sure that it is aligned (sitting ready in front of the hole). You also can try by pulling forward the threader mechanism.
- Tighten the little back screw once you are satisfied with the position. If you cannot do this because the black screw is in a bad position, try the next solution.
- Re-press
Manual moveto return the hook to its original position. The tryThreader. If it works, you are almost done. - Check that the hook passes through the needle eye for all needle bars.
Once you are done, check if the hook enters by moving the head to another position, e.g. move to #6 as above, and press Manual move. The threader hook should be in from the needle eye. If you feel confident, press Threader.


Solution 3
Third, and best solution is to open the machine in order to get a better working condition. We did test this procedure and it did work with a slightly bent hook.
- Remove the plastic panels to the right of the machine (you can insert one tip of the pincers into the hole to remove the plastic caps, then use the included white philips screwdriver)
- You now can more easily adjust everything, you also can move back and forth the threader.
- The procedure is the same as above, except that now with small flat screwdriver you can better loosen or tighten the screw that is to the right. If your hook is bent to left (from your point of view), the hook must be moved to the right, so open the screw.
- Put the needle in position 1 (in maintenance mode, as explained above)
Warning: If the screw to the right sticks out too far, the threader can become stuck.

See also:
- How to Replace the PR600/PR620/650/655 Needle Threader
- Brother PR series Auto Threader (Needle Threader)
- In french Changement de l'enfileur sur machine à broder Brother PR
To order a spare part:
- Look for part number XC5732151. It should cost around $20 Euros max (German: Einfädler, French: enfileur)
- Dittrich (Germany) sells it online.
Replacing the threader
Replacing the threader includes the steps explained above, but at some point you will have to remove the threader and replace it with a new one.
- Remove it by pulling it to the left, after lifting the left side up with a flat screwdriver (it is "clipsed").
- Adjust height: This is done by moving up and the lever mechanism (loosen two screws to the right of the machine). [Picture needed)
- Adjust left/right position: As explained above: loosen the small black hex key of the shaft (make sure that it points forward), then turn the screw to the right with a flat screwdriver. The needle should slightly touch the right hand rail of the threader.
(better explanation need to be written, sorry, search for a youtube video).
Repeated wiper error
A wiper error occurs for more than one reason. For example the machine can not re-thread. In that case, the threader is defect - see above - or the thread is too thick or the hole in the needle too small.
Another reason is that it cannot cut the thread during a needle change. For the latter problem it is possible that the knife that cuts the thread has become dull. It can be replaced. It also could be misaligned. However, in most cases there is just some stuck filament between the knives that you cannot see and needs to be removed. Do this:
- Switch of the machine
- Remove the needle plate
- Put the machine in maintenance mode: Press all three buttons at the bottom of the screen when you switch on
- Select MAIN BOARD TEST mode
- Select #3 Trim test
- Press Trim Move. The knives will now move and you can see if something is stuck between the knives.

The Touch Screen Interface
Below we shall mention a few tips. For normal operations, consult the fine manual.
Embroidery Settings
(chapter 4 of the manual) Color settings (p 133, 143)
- On page 5 of the settings screen, set manual color sequence to
on
Machine Settings
The settings screen includes seven screens. There is not much to change for starters ...
Add a stop before a color

When creating appliqués or embroidery patches, you should stop the machine when needed, e.g. for patches after stitching the border outline.
Use the following method to add Pause locations before a thread color is used: Select the "several pages symbol" (top left symbol in the picture) in the embroidery setting screen, i.e. the second screen you get when you load a design (after adjustments) and before you associate threads with colors. You then can select colors and click on the "hand" symbol. Import: The stop occurs before the color starts stitching the chosen thread. E.g. the picture shows a situation where we want the machine to stop after stitching a (black) line. We therefore select the (light blue) thread section that will be stitched next.
Tuning the tension
Firstly, always check (1) if you oiled parts as explained above and (2) more importantly if the machine is correctly threaded. It is very "easy" to make a mistake ! (3) Also check the needles, i.e. whether they are bent or sticky.
Too much white (bobbin color) on top
If this happens for all threads, it is probably best to tighten the screw of the bobbin. Read the manual, page 124.
You should do the following:
- As explained in the manual, take out the bobbin case, then attach the included weight to the thread. Normally you use pre-wound bobbins and your kit includes the L weight. If you use a bobbin winder, use weight S.
- Hold the bobbin case against a wall.
- If the bobbin case goes down at a slow pace, the tension is OK, if it goes down to fast, tighten the screw (e.g. a quarter turn). Then repeat.
- If the problem is not fixed, then you may have to loosen all upper threads.
If it is a single thread, then loosen the upper tension (after checking if it is correctly threaded !).
- First loosen the big tension knob
- You also can adjust the small pretension knob (before the big ones).
Test pattern
- A built-in embroider pattern allows checking the thread tension.
- More generally speaking, the pattern can be seen from the back side of the fabric.
Filament is breaking
Tension can be too tight or you got bad quality filament. Also check the needle.
Locks or loops appear on the top side
- Manual p 126
- The upper tension is too loose, try tighten the knobs (firstly the big ones), then then pretension knob.
Links
Official
- Manuals and Drivers
- YouTube
- How to operate PR series, 36 videos from the official BrotherSewingEuope channel. Maintenance videos are towards the bottom:
- Manuals in French
Other
You may want to contact other resellers for two reasons. (1) Buy cheaper compatible articles, e.g. we got a nicely working 10x10 cm frame. (2) Get spare parts as quickly as possible, e.g. a threading mechanism. Below a few links we found (no guarantee).
- Sewingmachinesales (UK)
- Refreshsewing (UK)
- Embroiderymachines (UK)
- Dittrich (DE)
- Silmoh, e.g. thread presser lower base