InkStitch - basic use
Basic use of InkStitch
You can try to following steps in order to test the extension and to learn about basic functionality. This section needs updating. In newer versions one cannot stitch an object that has both fill and stroke !! - Daniel K. Schneider (talk) 15:52, 30 September 2019 (CEST)
Step 1 - draw an object
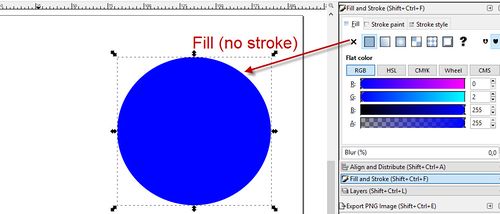
Create an object, e.g. a circle, with a blue fill for example.
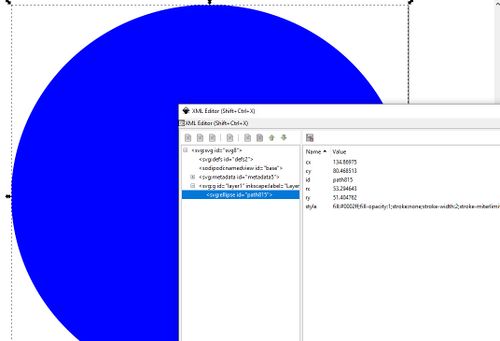
The SVG code defining the object uses the SVG ellipse tag.
  <ellipse
       style="fill:#0002ff;fill-opacity:1;stroke:none;stroke-width:2;stroke-miterlimit:4;stroke-dasharray:none;stroke-dashoffset:0;stroke-opacity:1;paint-order:stroke fill markers"
       id="path815"
       cx="134.86975"
       cy="80.468513"
       rx="53.294643"
       ry="51.404762" />
You can open the builtin XML tree editor if you want to check the code (CTRL-SHIFT-X or Edit > XML editor ).
Step 2 - convert to path
Transform all objects you want to paths (if you have several objects)
- Select all object(s), e.g. hit CTRL+A
- Menu Path->Object to Path
An SVG Path includes both numbers representing positions and letters representing drawing and moving operations, including Bezier curves and Arcs. You do not need to understand how this works. Only make sure that all objects you plan to stitch are represented by a path. To check this, open the XML editor, then click on the object in the workspace. The XML code will be highlighted.
<path
  style="opacity:1;fill:#ffff00; fill-opacity:1; stroke:#0000ff; stroke-width:5.92615652; stroke-miterlimit:4; stroke-dasharray:none;stroke-opacity:1"
  d="M 230.87657,650.45123 A 106.87944,106.87944 0 0 1 123.99713,757.33067 106.87944,106.87944 0 0 1 17.117691,650.45123 106.87944,106.87944 0 0 1 123.99713,543.57179 106.87944,106.87944 0 0 1 230.87657,650.45123 Z"
  id="path4147" />
Objects that are not of "Path" type, are ignored by InkStitch (remember that!)
Step 3 - Parametrize SVG path for embroidery
Select at least one object. Play with the parameters, available in menu Extensions -> Ink/Stitch -> English -> Params. There are actually quite a lot compared to other SVG to embroidery translators.
For now, we just suggest accepting the defaults. We shall explain more parametrization in the next section. You also will learn later that InkStitch will add properties to SVG paths, defining how stitch objects should be created from each drawing.
Step 4 (optional) - Inspect in Inkscape
You can translate the parametrized object to an embroidery object ready for stitching.
Menu Extensions -> Ink/Stitch -> Embroideryand then choose the format and the location on your computer (default location : in the folder "inkstitch extension).
OR
File > Save a copyand choose an embroidery file format (*.pes, *.jef etc.) according to the file format accepted by the embroidery machine.
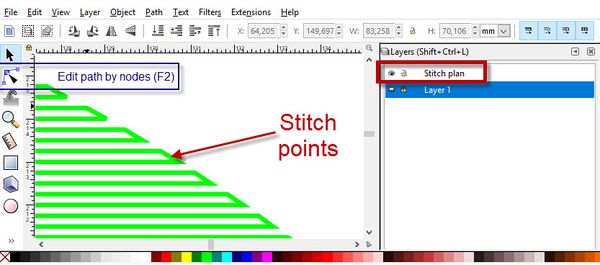
You now also will have a new layer that includes the Stitch Plan, i.e. the objects that have been exported as Stitch objects. You can check this to visualize the points that will be stitched. Alternatively you could use an embroidery viewer
In order to examine the Stitch points
- select the Stitch Plan layer and hide the others (this should be done automatically after using the Embroidery operation).
- Select the Edit Path tool in Inkscape
- Zoom in
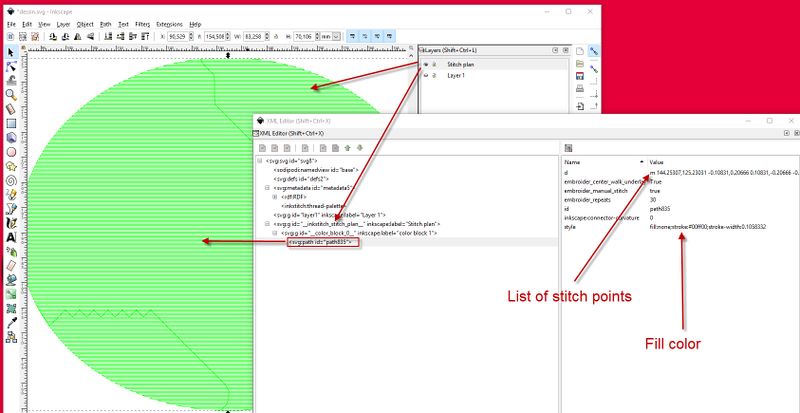
If you look at the SVG code, you can see that your path are now annotated with stitching information. In addition, the new stitch plan layer contains two huge path objects - one for the border and one for the fill - that define all the points to be stitched, plus the stroke color for both. Since the circle was split into two objects with strokes, there is of course no more fill.
Step 5 (optional) - Embroidery simulation
Menu Extensions -> Ink/Stitch -> English -> Simulate will display a stitch point simulation. This is similar to what you can when you parametrize.
Menu Extensions -> Ink/Stitch -> English -> Print/ Realistic preview generates a printable web page that includes the design plus important stitching information
- If you tick the "Realistic" Box at the bottom of the web page, it will display a high quality simulation, i.e. the kind one gets with visualization en conversion software.
- Please understand that generating a "realistic" print version can take some time, e.g. several minutes on low-end PCs.
Step 6 - Create the Embroidery file
You can either create a stitch file for a selection of objects or for all path objects. To create an embroidery file for the whole design:
- Click into some empty space (in order to deselect)
- Menu
Extensions -> Ink/Stitch -> English -> Embroidery. Alternatively, you also can usemenu file -> Save a copy - Select the format of your machine. In case you are unhappy with the result, select a widely used format such as Tajima (DST) and then use a free translator to convert to your proprietary format.
- Type a directory name where you can find your files, e.g. c:\users\__you__\Desktop on windows or /home/schneide/schneide/embroidery/inkstitch under Linux. The file will remember this information.
You can skip the next step providing some technical details about how embroidery objects are represented in Inkscape.
Tip: If you plan to create several stitch formats, you should use menu file -> Save a copy
Simple embroidery parametrization of SVG objects
InkStitch can produce four kinds of stitch packs from an SVG object: Running stitches, simple zigzag, satin columns and fill stitches.
- A filled stitch area from SVG path with
filldefined - Simple zigzag or running stitches (lines) from SVG objects with
strokedefined - Two objects (an area and a zigzag/line) from a path that has both fill and stroke
- Satin stitches from a path that includes two "polyline" subpaths
Summarized:
- SVG Fills can only translate to areas (also called tatami stitches or fills)
- Strokes translate to simple zigzag or simple lines
- A path with two lines can translate to satin columns. They either must have the same amount of nodes or you can add "rungs".
Paths with fills to embroidery areas
SVG fills are translated to areas filled with a typical "tatami" pattern. You can define an underlay, density and orientation (rotation), and add trim and stop code, i.e., have the machine cut the thread and/or stop.
In order to parametrize a fill:
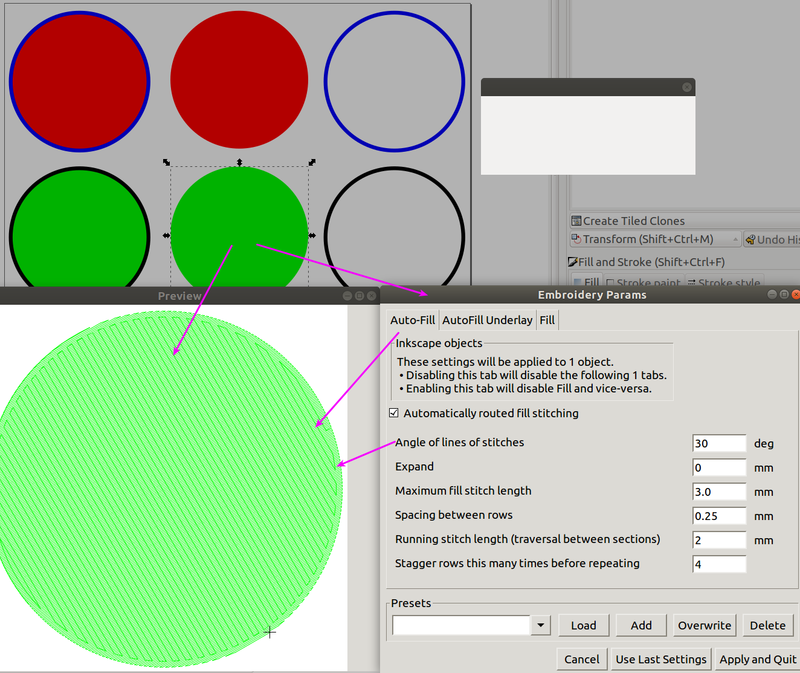
- Select an path object that has a fill and no stroke (e.g. something like the green or the red circle below)
- Open the parameter popup window: Menu Extensions -> Ink/Stitch -> English -> Params
You will see a little popup that say "Params working, please wait". Just move it out of the way and ignore it. Now look at the Embroidery Params popup window. It will have three tabs (see grey popup in the next screen capture).
- Auto-Fill: Try to change the fill angle. You can also can add STOP and Trim code if they are supported by the stitch file.
- AutoFill Underlay: Add an underlay, i.e. stitches that will be stitched underneath the pattern. This will add some stability and also a little 3D effect. Do not make it too dense.
- Fill: An alternative to auto fill
Paths with strokes to zigzag stitches
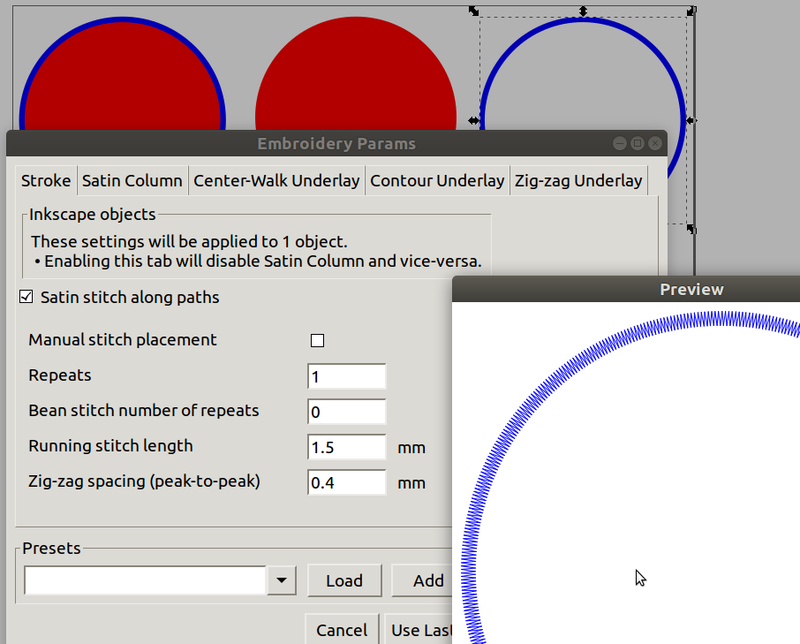
SVG strokes are translated to simple zigzag or satin stitches that can have an underlay. If you open again the Param popup (Menu Extensions -> Ink/Stitch -> English -> Params), you will see different tabs:
- Stroke (used by default)
- Satin Column
- Center-Walk Underlay
- Contour Underlay
- Zig-Zag Underlay
By default, there will be a simple Satin stitch (i.e. a zigzag) for a fat stroke, as shown in the following screenshot. Ignore the satin column, since InkStitch cannot translate simple strokes to satin columns.
- Small zigzags are difficult to stitch since they pull and distort the tissue a lot. If you can, go for line thickness between 2 and 3 mm. Otherwise, use less density.
Paths with fills and strokes
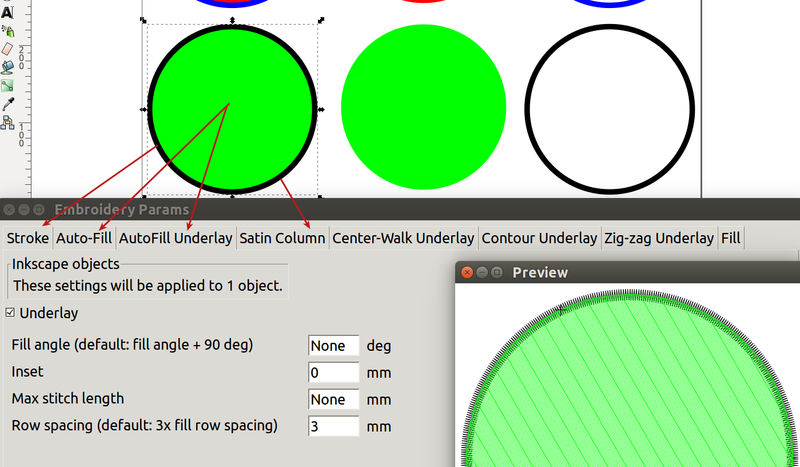
Objects that have both fill and stroke will allow parametrization of both, i.e. the param popup will present the combined tabs from the area and stroke parameters.
If we understand right, strokes of objects that allows have fills can only translate to simple zigzag, not satin stitches that create rounded corners. Workaround:
- Copy paste (in place) the object
- Remove the fill from one of these
- Remove the stroke from the other.
Attaching special commands
Inkstitch, since version 1.15 (?) allows to attach machine commands to an object. For example:
- Adding a TRIM code to an object will have the machine cut the thread. A single needle machine then also should stop but not a multi-needle machine
- Adding a STOP code to an object will have the machine stop. This does not work with all embroidery formats.
- Fill starting and end position.
Use Menu Extensions -> Ink/Stitch -> English -> Commands and explore.
Attached commands will be visualized with SVG drawings that themselves will not be stitched (of course)
Summary
Ink/Stitch provides good basic functionality for creating Stitch files with Inkscape.
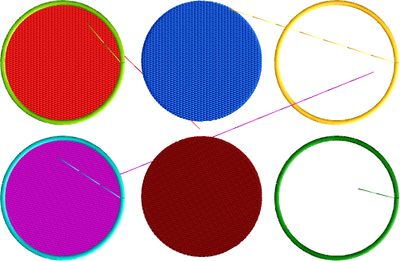
Stitch files in Tajima DST or Brother PES formats are accepted by our Brother multi-needle machine, as you can see in tutorials that follow this chapter.
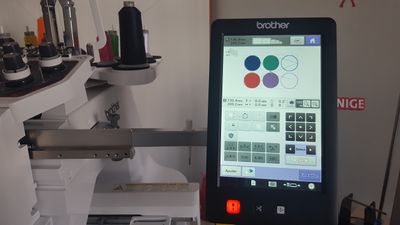 Stitch file accepted by our Brother PR1050X |
Remarks:
- This test has been conducted with an early version of Ink/Stitch.
- Colors are wrong since the thread palette used in the viewer of Stitch Era and the embroidery machine are different from the default. Thread palettes are difficult to understand...
- There were some extra extra stitch sections that should not be stitched (the little lines).
In this section we just presented basic functionality. In particular, InkStitch allows creation of satin columns from "rails", technically defined as a path with two sub-path lines. Read on !
Copyright modification
Contents of this page including pictures and SVG files are also available under the GNU Free Documentation License and the Attribution 4.0 International (CC BY 4.0) license.
The Inkstitch project can use any element (text fragments, SVG files, pictures) for the project's official docs without giving attribution (just copy and paste).
