Flash drawing tutorial: Difference between revisions
m (→Brush tool) |
|||
| Line 283: | Line 283: | ||
Again, you also can change paint of shapes and object, by first selecting the thing in the stage, and then by making changes in the properties or the colors panels. | Again, you also can change paint of shapes and object, by first selecting the thing in the stage, and then by making changes in the properties or the colors panels. | ||
Tips: | |||
* If you can't select a fill color, then try to click on the black and white icon [[image:Black_and_white_tool.png]] and then set the colors again. I don't know if that is a bug or a feature .... | * If you can't select a fill color, then try to click on the black and white icon [[image:Black_and_white_tool.png]] and then set the colors again. I don't know if that is a bug or a feature .... | ||
* '''If the paint bucket "won't work" on a complex drawing''' then: | |||
** Make sure that the area is closed (no gaps between the enclosing strokes or shapes) | |||
** Also try making the area you want to fill into a single drawing: menu Modify->Combine Objects->Union | |||
==== Eyedropper tool ==== | ==== Eyedropper tool ==== | ||
Revision as of 12:58, 23 January 2013
<pageby nominor="false" comments="false"/>
Introduction
- Learning goals
- Learn about some features of the Flash CS3 drawing environment
- Learn painting and drawing simple (!) objects
- Prerequisites
- Flash CS3 desktop tutorial or Flash CS4 desktop tutorial
- Flash layers tutorial (first part)
- Related pages
- texture and clipart (import media elements)
- Materials (*.fla files you can play with)
- http://tecfa.unige.ch/guides/flash/ex/drawing-intro/
- Quality and level
- This text should technical people get going. It's probably not good enough for beginners, but may be used as handout in "hands-on" class. That is what Daniel K. Schneider made it for. Screen captures were made with CS3, but the overall logic is the same for CS4 and CS5.
- Next steps
- More about drawing: Flash object transform tutorial and Flash arranging objects tutorial
- Any other introductory tutorial indexed in the Flash article.
- Alternative
Setting up the stage
Besides choosing the right settings for publication (Flash version) with which we shall not deal here, you should select the right size for your your stage, i.e. the size of your future flash document. You can do this either when you create a new file or later.
Defining document size
- Creating a new document
Flash lets you create a new document from various templates: File->New. Then choose from General or Templates.
These templates either just define the size of your stage or load "half-baked" interactive applications that you will have to clip. Ignore the latter for now ...
- Size of the stage
- Version of Flash (e.g. Actionscript 2 or 3 or AIR for desktop/mobile phone applications)
- The Media Playback templates contain for example tools to make a slideshow.
Anyhow, for learning about Flash's drawing feature, don't worry about the template to choose from. Just make sure that you have enough space to draw. If an initial size turns out to be too small or too big, you simply can modify the document's size (see next).
- Modification of a document
With Modify->Document (or by clicking on an empty spot in the stage and then changing the properties) you can:
- Redefine the size of the stage.
- Change the background color
- Give it a title and a short description
What size for a Flash document ?
Size of your Flash document depends on its purpose. Since Flash documents (unlike well made HTML pages) have a fixed size, you must find a good compromise between readability (users should be able to read and distinguish all elements) and the horizontal/vertical space you flash clip will use.
- Larger flash documents
A default documents takes up 550x400px. This makes the document viewable without scrolling on a computer with a bad screen resolution of 800x600px. Do not forget that a screen also contains a tools bar (in most Operating systems) and that Flash is usually viewed within a web browser that also contains menu bars, a bottom bar and some pixels to the left and right.
Anyhow, most people today have bigger screen resolutions so you certainly can go bigger than 550x400.
- Banners and other embedded items
Advice depends on their purpose. Think hard about your potential target population (small screens, big screens, mobile phones, etc.)
Configuration of the drawing environment
Firstly you should know that drawing tools exist in two forms:
- Drawing tools in the main tools panel (that appears by default on top left of the desktop if you selected the "designer" configuration)
- Tools available through various panels
Below is a screenshot I made from a simple drawing using the oval tool and the pencil tool.
- You can see that the properties panel (left) will display properties of the object that is selected or being drawn. E.g. when you use the pencil, it will display color of the stroke, size of the stroke, type of the line, fill color, etc.
- The same is true for the color panel that we display in the lower right.
Since these panels give you shortcut access to features of objects you are drawing, it's a good idea to keep them open while you draw.
Some definitions
Strokes vs. fills
- When you draw something with a pencil tool
 or another drawing tool like the pen or the line tool, then the lines you draw are called strokes.
 - Wen you crate graphics with the rectangle
 , oval, etc. tools you will by default both get strokes and fills. The insides of these drawing objects are fills and the outlines are strokes, i.e. both have various forms of color. You may choose to remove either stroke or fill (using the
  no color icon in a color selection tool.
 - When you use the paint tool
 , then you create fills (not strokes).
Colors
There are several types of colors:
- None: You may choose to draw without fill or stroke
- Solid: Standard colors
- Linear: Gradient color changes that go from one side to another
- Radial: Gradient color changes that goes from inside out
- Bitmap: You can paint with an imported bitmap. This is particular useful with textures. E.g. to draw floors, walls or outdoors scenes with repetitive tiles.
To select a color type, there is a pull-down menu in the color panel.
- Read the Flash colors tutorial if you want to know more colors and gradients ...
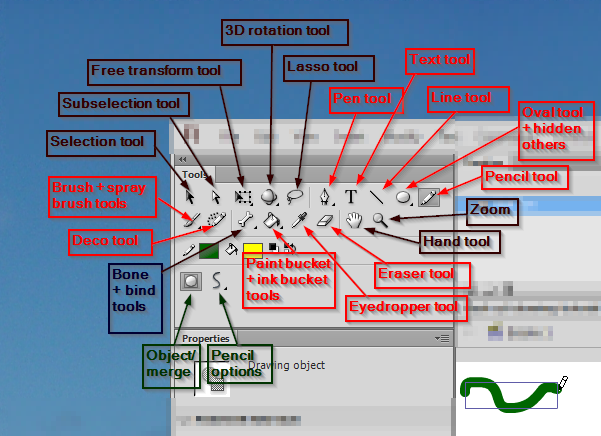
The main tools panel
The main tools panel contains the major drawing tools. We suggest to leave this panel docked in the upper left side (since it's frequently used). But depending on your screen size, you can display it either grouped (as shown) or as a long column (try the "essentials" workspace layout).
The main tools panel organizes tools by different categories:
- First, selection and transformation tools
- Next Drawing tools (annotations in red)
- Next, color manipulation, eraser etc,.
- Next color selection
- Finally, options (these change according to the tool that you select)
Options change according to tool that is selected. E.g. in the screen capture to the left you can see how the tools panels shows with the selection tool (left) and the brush tool (right).
Some tools are piled on top of each other, i.e. there are variants of a similar kind. In this case you can see a little down arrow in the icon. To see variants you must press the left mouse for a while or Shift-click. E.g. instead of the Oval tool you could for example display/access the Rectangle tool.
Merge (shape) vs. object drawing
Flash has two drawing models:
- The merge model will erase shapes below something you draw (but not graphic objects as defined next)
- The object drawing model draws shapes as separate objects (that you later can manipulate like in a typical vector graphics program).
Usually, you rather should work with the object model since the shape of each object can be easily modified later on. However the merge model can be used to draw complex shapes, e.g. you can draw a circle and then carve off things by drawing over it. The merge mode is also useful when you "paint" things (as opposed to drawing). You later can convert "paintings" to objects of course.
By default, the object model may be turned off, so turn it on by clicking on the Object drawing button. You can find in the options section of the tools panel after clicking on some drawing tool (e.g. the Pencil). You can see if it's on when there is a rectangle drawn around the button, like this: ![]()
You can see the difference between the 2 kinds of objects created in the Properties Panel:
- Objects are called Drawing Objects
- Simple drawings (from the merge model) are called Shapes.
The behavior of tools changes according to mode used and it's not so obvious to remember what Flash does.
- In merge mode
- In merge mode, when you draw a shape over another shape, it erases the shape underneath by default. You can change this with the control options (see later)
- When you draw another object (line, pencil, etc.) it will draw over the painting, but not erase it.
- In object mode
- Shapes drawn in object mode with the brush tool are drawn either within, on top or behind objects depending on how to set the controls of the brush tool.
- Shapes drawn in object mode with the pencil, the pen tool etc. are drawn on top of other objects. But in the object mode they can be moved behind with the right-click->Arrange context menu.
If you already tried to draw more complex shapes, you noticed that it is difficult to work with a single layer (e.g. to select objects), so you now have to learn how to work with layers.
- If you are not familiar with layers, please read the Flash layers tutorial now.
- Conversions
- To convert an object (instance) into its original components : Right click->Break apart
- To convert some shapes into a drawing object: Select them first (e.g. with the Lasso), then select Menubar Modify->Combine Objects->Union
- To convert some shapes into a symbol, Right-click; Convert to Symbol
List of standard tools
Also see the figure "Items of the Flash CS3 tools panel" above in order to identify the corresponding icons in the tools panel. Some tools are stacked on top of each other. Hold down the mouse button for while to see the hidden ones.
Selection tool
The selection tool (![]() ) lets you select elements (shapes, strokes, fills, symbols, bitmaps) in the work area by clicking on it (simple click). If you wish to select several objects together hold down the SHIFT key or use a the lasso or a selection box (click then drag the mouse).
) lets you select elements (shapes, strokes, fills, symbols, bitmaps) in the work area by clicking on it (simple click). If you wish to select several objects together hold down the SHIFT key or use a the lasso or a selection box (click then drag the mouse).
Advanced uses:
- Double-clicking would put you into object editing mode for various parts (depending on where you click). To return from this mode (which we will not explain here), double-click in some empty area in the workspace.
- This tool also can act as a distortion tool ! See the Flash object transform tutorial. If no object is selected (e.g. click on an empty spot in the workspace), then you can use this tool to distort shapes. Move it close to an edge or a corner and pull as soon as the cursor changes. Always make sure that you see a big "cross-hair" cursor before you start moving around anything.
Subselection tool
The subselection tool (![]() ) allows you to select paths of an object so that you can make more sophisticated modifications. Click on the outlines of objects. You then can drag around the little squares and dots that will appear, i.e. modify portions of shapes. See the Flash object transform tutorial for details.
) allows you to select paths of an object so that you can make more sophisticated modifications. Click on the outlines of objects. You then can drag around the little squares and dots that will appear, i.e. modify portions of shapes. See the Flash object transform tutorial for details.
If you want to modify a symbol (in the properties panel you can see something like "Instance-of") you have to break it apart: Right-click->Break Apart.
Free Transform and Gradient Transform tools
The Free Transform tool (![]() ) will allow you to make several kinds of transformations.
When you select an object with this tool and then move the mouse over different spots, you will that the mouse cursor changes shapes. Each one will allow you do different transformations:
) will allow you to make several kinds of transformations.
When you select an object with this tool and then move the mouse over different spots, you will that the mouse cursor changes shapes. Each one will allow you do different transformations:
- Scale an object: double-ended arrow
- Rotate an object: circle arrow
- Skew (distort an object): double ended double arrow
To do a proportional scale, hold down the SHIFT key and then drag a corner.
There are more options to the free transform tool, e.g. so-called envelope transform, see the Flash object transform tutorial if your are curious about this.
The Gradient Transform tool (![]() ) is hidden below the free transform tool (by default) and allows you to change the ways in which color gradients flow.
Hold down the mouse for a while and then change the tool. See the Flash colors tutorial.
) is hidden below the free transform tool (by default) and allows you to change the ways in which color gradients flow.
Hold down the mouse for a while and then change the tool. See the Flash colors tutorial.
Lasso tool
With the lasso tool (![]() you can select several objects or parts of a shape.
you can select several objects or parts of a shape.
This tool also includes a "magic wand" mode (see the optional controls) and a polygone lasso (![]() that allows selection by clicking on several spots.
that allows selection by clicking on several spots.
If you want to edit parts of a shape, either double-click on the object until it becomes a shape or break it apart (right-click menu).
Pen tool
The pen tool (![]() ) allows you to make the most complex drawings, i.e. defining paths using so-called Bezier curves. Do not confuse this with the more simple pencil tool.
) allows you to make the most complex drawings, i.e. defining paths using so-called Bezier curves. Do not confuse this with the more simple pencil tool.
See the Flash pen tutorial (currently unfinished ...)
Text tool
Add text.
In the properties panel you may define various text properties such as fonts, color and positioning, alignment, etc. If you click on the paragraph symbol, you can define indent, line spacing and margins.
Line tool
The line tool (![]() ) allows drawing simple lines (no surprise here ...)
) allows drawing simple lines (no surprise here ...)
Rectangle and other tools
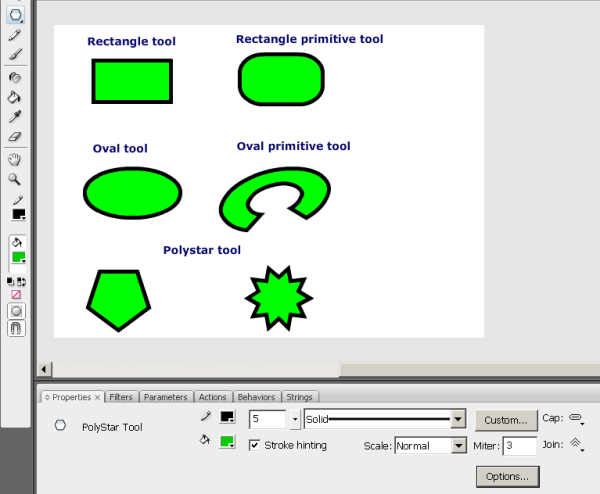
On the same spot of the tools panel you got several tools. By default you will see the rectangle tool. To select another tool: hold the left mouse button down for while and then select the one you want.
- Rectangle tool (by default): Draw simple rectangles. In the parameter's panel you can define strokes and filling properties.
- Rectangle primitive tool: Lets you define additional properties like rounded corners
- Oval tool: Draw ovals
- Oval primitive tool: Define in addition other features, such as start/end angle, inner radius etc.
- Polystar tool: Define polygons and stars (there is a small pull-down menu in the properties panel that you should not overlook !)
Below you can see a few drawings. The screen capture has been taken with the Polystar tool activated.
Pencil tool
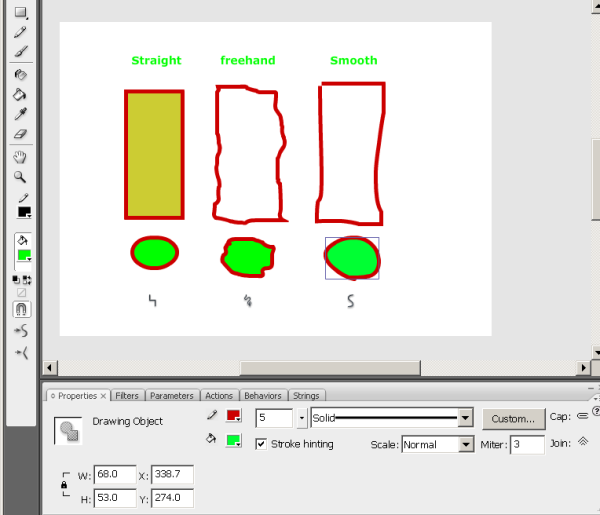
With the Pencil tool you make drawings like with a Pen. However, there is optional support to draw straight or smooth lines since drawing with a mouse isn't very obvious. You can define various options.
- "Line" drawing Options
In the options section you can select different ways of drawing support. I.e. the the straight icon looks like this: ![]() .
Below is a screen-dump that demonstrates the difference between straight, freehand and smooth drawing.
.
Below is a screen-dump that demonstrates the difference between straight, freehand and smooth drawing.
- Stroke, color and line properties.
In the properties panel you can define various options like stroke (pen) color, fill color, various dashes or not, and how the end of lines should look.
Brush tool
The paint brush tool lets you paint, i.e. create shapes (![]() ) made of simple fills. There are several special effects and several modes.
) made of simple fills. There are several special effects and several modes.
- Object or merge mode
- In merge mode you only can paint fills
- In object mode you can add a stroke to your painting (by default it is off). Look at the properties panel.
- The Brush Mode
With the "Brush Mode" in the options section (not the properties panel) you can select the paint mode. Make sure to understand these and to verify that the wanted mode is on, else you likely run into frustrations ...
- Paint Normal: paints over lines and fills on the same layer. Like painting with a "heavy" paint.
- Paint Fills: Fills empty areas leaving lines unaffected.
- Paint Behind: Paints in blank areas of the Stage on the same layer, leaving lines and fills unaffected (this may be be default, I am not sure).
- Paint Selection: Applies a new fill to a selection. Therefore, before you start painting select a fill color first, then select the object with the selection tool, then paint. This is the quickest way to color drawings.
- Paint Inside: Fills the area within a "fill" (i.e. where you start paining) and does not overpaint lines. If you start painting in an empty area outside a fill, painting will not affect existing filled areas.
- Selection of brushes and size
Choose from the options in the options section ....
Ink Bottle tool
This tool allows you to apply color changes to the strokes of drawings.
- Select the ink bottle
- Then select either a Stroke color (and/or a Fill Color if the object is a graphic) from controls in the main tools panel. If want to make more sophisticated changes (e.g. apply a gradient) do this through the color panel.
- The click on objects you want to change.
You also can change the color of a fill or stroke through the properties panel or the color panels, but make sure to select the object(s) you want to change first.
Paint bucket tool
The paint bucket tool works like the ink bottle tool but it is used to change colors of paintings. You also can fill in empty areas (insides of drawings made with the pencil for example)
- First, click on the paint bucket tool
- Select fill color (and style)
- If you want to fill an area that is not entirely closed, you can do so by modifying the gap size by changing the "Gap size" control in the tool panel options. E.g. choose "Close medium gaps".
- Then click on the shape or the area you want to fill
Again, you also can change paint of shapes and object, by first selecting the thing in the stage, and then by making changes in the properties or the colors panels.
Tips:
- If you can't select a fill color, then try to click on the black and white icon
 and then set the colors again. I don't know if that is a bug or a feature ....
 - If the paint bucket "won't work" on a complex drawing then:
- Make sure that the area is closed (no gaps between the enclosing strokes or shapes)
- Also try making the area you want to fill into a single drawing: menu Modify->Combine Objects->Union
Eyedropper tool
You can select a color from some spot on the workarea. The tool will then automatically change to the paint bucket tool (see above).
Erasor tool
Erase stuff. See the Flash object transform tutorial for details.
Option controls and tools configuration
Some option tools are always displayed, some only for certain tools.
Hand tool
- Move the stage around (useful for big drawings/small screens or with a strong zoom)
Zoom tool
- Zoom in/out
Pen color
- Select the pen (stroke) color
Fill color
- Select the fill color
Swap color
- Change fill color to stroke color
Configuration of the Tools panel
The Tools panel can be configured via Edit->Customize Tools Panel (but for now I suggest not to change anything there).
Configuration of drawing settings
Select Edit->Preferences and then change parameters in the section Drawing. (no need to do this now). Basically you can modify how Flash helps you drawing objects (e.g. connected lines, vertical/horizontal) and how it identifies objects when you click on them.
Painting simple objects
In this chapter we will show how to make a complete (but simple!) drawing. Disclaimer: Daniel K. Schneider doesn't even remotely feel to be graphics designer. If you are not familiar with layers, you now really should have a look at the Flash layers tutorial
Firstly, you can find lots of free clipart (drawings) on the Internet. As a principle it is a better idea to search for vector graphics as opposed to bitmaps and for three reasons:
- Vector graphics are smaller
- They can be re-edited
- They adjust nicely to size. A smaller or bigger version still looks as good as the original.
To find vector objects you can for instance type in Google "free clipart download" or see the links in the clipart article (finding good and free clipart on the web is not easy).
Most often, clipart is distributed in *.wmf format (Windows Meta File format). Flash can handle this format. It also can handle Illustrator *.ai format, Enhanced Windows Metafile *.emf, Freehand, Flash *.swf, and Autocad *.dxf. It can not handle SVG (but you can open SVG files with Illustrater and then copy/paste).
You also can import a series of bitmap formats like the "standard" *.png, *.jpg, *.gif, but also Photoshop *.psd and a variety of Quicktime formats if it is installed on your computer.
Drawing fuzzy objects
The basic principles for paint-challenged people like me is the following:
- Create a new layer. It is usually a good policy to create a new layer for each drawing. Do not worry about size and position at this stage, since you can later move the drawing around and resize it.
- Zoom in (like 200%), e.g. with View->Magnification
- Select merge mode from the Object Drawing tool and set the brush tool to overpaint.
- Keep the painting as simple as possible
- Use large Pencils or brushes for starters, then small ones to work on borders if needed.
- Use the eraser to trim off strokes that went too far
- Draw stuff that will go to the background first and then overpaint
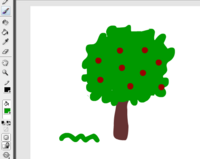
E.g. To the right is a simple apple tree with a green snake (I later erased).
Drawing animals and such
- Find a recipe to draw these, e.g. on Google type: "how to draw a cat"
- Then reproduce if you can ;)
- Rather use object mode and disable stroke since these models often ask you to overlay ovals. Without stroke you may overlay various geometric shapes of the same color.
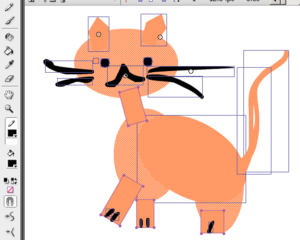
E.g. here is a cat made as explained in Creature Features.
Alternatively you also can first draw the object with the pencil tool (or the pen tool) and then use the Paint Selection or Paint inside mode of the brush tool to apply colors.
Of course in the same drawings you can mix pencil, pre-built objects like rectangles and paint. E.g. draw the outline of house with the pencil and then draw the roof with the paint tool.
Save each object as symbol
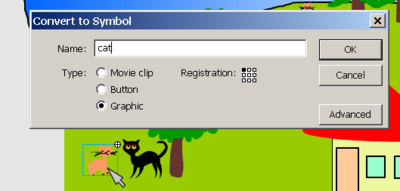
Once you are happy with a drawing, you should convert it to a (reusable graphic symbol): Right-click->Convert to Symbol; Graphic. E.g. call it "cat". You then can remove the layer you used to draw this object, since the raw drawing is no longer needed.
Once you have it in the library you can use several times, in various sizes and distortions. You also can copy the object and e.g. make a new one with different colors ... If you are unhappy with the results (as I ought to be), you can just break a graphic apart and restart again...
When you insert a library object into stage you can make it smaller. Drag it from your library into the stage (but onto another layer) and then select the Free Transform tool; Press Shift (proportional reduction) and make it as small (or big) as you like.
Importing clipart
Flash can handle various vector formats and even better: you can modify these within Flash. However, most free clip art is in the SVG format and that cannot be directly imported to Flash (Shame on adobe !)
To import:
- File->Import->Import to Stage or alternatively Import to Library
- If you import it to the stage and like it, then save it to the library with Right-click->Convert to Symbol; Graphic as explained above.
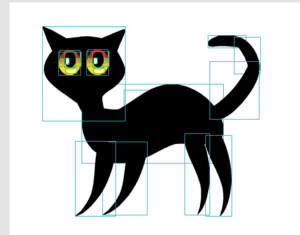
E.g. here is a cat I imported from Free Clip Art. This site has free clipart images for personal use. You can use them for school, fun, non-profit Web sites, and other personal needs.
- Using SVG Clipart
- Get one from http://www.openclipart.org/
- Display the SVG image in your browser, then just File->Save As the SVG page
- Open the SVG in Adobe Illustrator
- Select All
- Copy
- Paste to Flash (using default settings)
- Use directly ALT-CTL-S to resize.
Read more in Clipart
Adding background and Sky
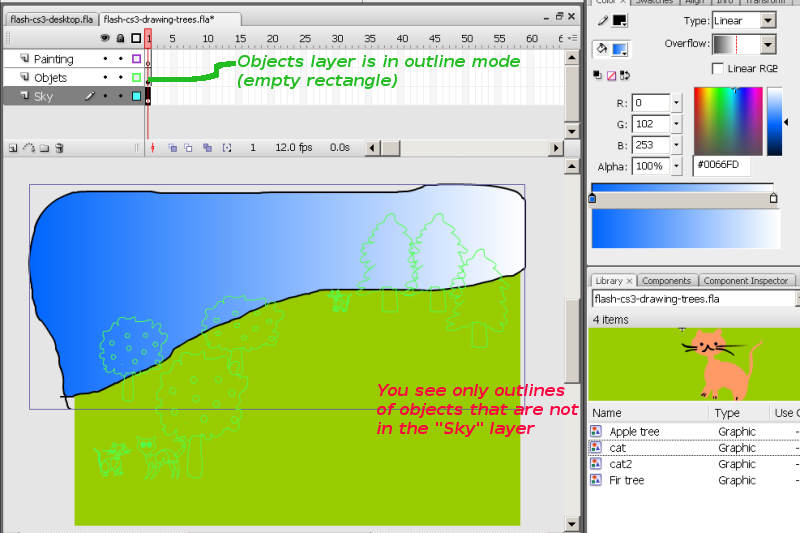
I suggest to draw background stuff with a new layer You can do this beforehand or after. In order to see either background or objects you can put all other layers in "outline mode". Click on rectangles near each layer or on the rectangle on top.
- First of all you can change the background of the stage: Modify->Document; then change the background color.
- If the layer with your background drawings (e.g. sky) is drawn over the objects instead of the other way round, just move this layer (either to the top or to the bottom depending on your settings).
A result (sort of)
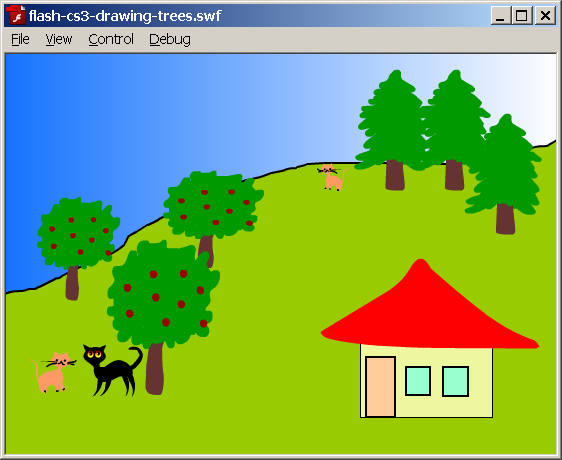
Here is the result of a three times two trees, two of my cats, an imported cat and a little house.
Using textures
Of course, you may find the grass to be too ugly. A good solution might be to replace a background color with textures. Search on the web for "free textures grass" and save the file (usually a *.jpg).
You should be aware that there are textures and textures meant to be tiled. Simple pictures (if smaller than the stage) will produce tiles that you can see (not exactly what you want). So instead you can search for something "free tileable grass textures". If you can't find good tiles, you may learn how to do this with this Photoshop from DadyyCool.
- You then can resize the image if it is too big and/or crop it.
- After that, deselect all objects (click in the gray area) or select the object you want to paint.
- Then open the color panel and select type: Bitmap from the pulldown menu. Import the bitmap and select it (you also will find a copy of the bitmap in your library).
- Then paint the outline of your textured area with the brush tool (in the "Paint behind mode" (see brush tool above)
- Then fill the rest with the paint bucket.
- You can change the way textures are applied with the free transform tool (see Flash colors tutorial).
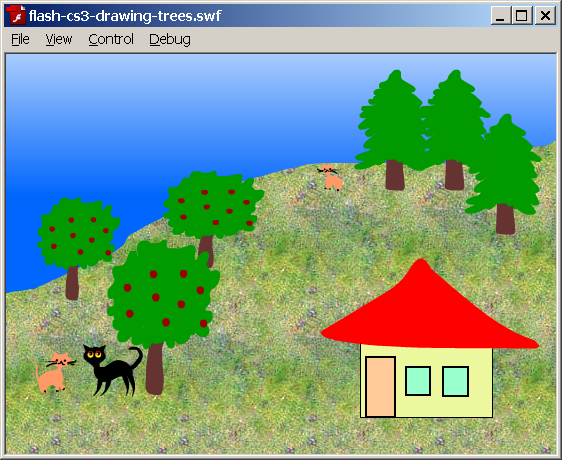
This result is not exactly better, but it's different and you can see that you can draw with bitmaps :). Of course one now also should repaint the house and the trees. I also rotated the gradient for the sky by the way.
Of course, one can do better graphics and colors. See more advanced Flash tutorials on drawing, e.g. the Flash object transform tutorial, the Flash arranging objects tutorial or the Flash colors tutorial
Files to download
You can download the *.fla files here:
- http://tecfa.unige.ch/guides/flash/ex/drawing-intro/
- flash-cs3-drawing-trees.fla is the one with a simple background
- flash-cs3-drawing-trees3.fla uses gradients and drawings outside the stage are clipped away (so it's a clean version of the above and I will use this one in the Flash motion tweening tutorial).
- flash-cs3-drawing-trees2.fla is the one with the textures.


