Netfabb engine for RapMan: Difference between revisions
mNo edit summary |
|||
| (9 intermediate revisions by the same user not shown) | |||
| Line 1: | Line 1: | ||
{{ | {{Incomplete}} | ||
This piece is outdated, has not been updated for a while - [[User:Daniel K. Schneider|Daniel K. Schneider]] 09:47, 9 May 2012 (CEST) | |||
== Introduction == | == Introduction == | ||
| Line 5: | Line 7: | ||
The '''netfabb Engine for RapMan''' Basic is a cheap Software Suite to generate a [[g-code]] for a [[RapMan]] 3D Printer. | The '''netfabb Engine for RapMan''' Basic is a cheap Software Suite to generate a [[g-code]] for a [[RapMan]] 3D Printer. | ||
The Engine is | See also: | ||
* [[Netfabb engine for RepRap]] | |||
The Engine is an add-on to the free [[Netfabb Studio tutorial|netfabb Studio Basic]], i.e. when you buy the engine for RapMan you get another version of Studio Basic that includes the same functionality (mesh edit and repair functions) plus the g-code generator. | |||
[[image:netfab_for_rapman_engine_451.jpg|thumb|600px|none|Screenshot of Netfabb engine for RapMan]] | |||
== Calibration == | == Calibration == | ||
| Line 20: | Line 27: | ||
We found that the calibration file for version 4.5.1 could not be printed with the default settings or without "truly manual help". | We found that the calibration file for version 4.5.1 could not be printed with the default settings or without "truly manual help". | ||
Disclaimer: Problems and solutions presented here represent what 18:16, 29 April 2010 (UTC) experienced with version 4.51 Beta and a RapMan 3.1/2.08 firmware/BFB hot end. Things may be different for your setup and with other versions... | |||
[[image:bad-raft2.jpg|thumb|600px|none|Aborted calibration print]] | [[image:bad-raft2.jpg|thumb|600px|none|Aborted calibration print]] | ||
| Line 178: | Line 187: | ||
Performance: | Performance: | ||
So far, I only made test with | So far, I only made test with [http://www.thingiverse.com/thing:2608 a combination] (download) of a [[doblo factory|duplo-compatible block]] and an artistic hand. | ||
[[image:doblo-lugo-hands.jpg| | [[image:doblo-lugo-hands.jpg|thumb|600px|none|Doblo + hand / Lugo + hand benchmarks]] | ||
Doblos underneath: | Doblos underneath: | ||
[[image:netfabb451-vs-skeinforge2.jpg| | [[image:netfabb451-vs-skeinforge2.jpg|thumb|600px|none|Comparison test (underneath)]] | ||
Doblos standing: | Doblos standing: | ||
[[image: | [[image:skeinforge_vs_netfabb451.jpg|thumb|600px|none|Comparison test (standing)]] | ||
At various speeds and settings the result is fairly consistent: | At various speeds and settings the result is fairly consistent: | ||
| Line 192: | Line 201: | ||
* Block (in particular the roof) is much better with Skeinforge | * Block (in particular the roof) is much better with Skeinforge | ||
When I print the same object in Lego size (x,y,z divided by 2) both have trouble printing the Lego block more or less correctly. | When I print the same object in Lego size (x,y,z divided by 2) both have trouble printing the Lego block more or less correctly. The hand is surprisingly well done for both given its size (but better with Netfabb). | ||
== Links == | == Links == | ||
Latest revision as of 08:47, 9 May 2012
This piece is outdated, has not been updated for a while - Daniel K. Schneider 09:47, 9 May 2012 (CEST)
Introduction
The netfabb Engine for RapMan Basic is a cheap Software Suite to generate a g-code for a RapMan 3D Printer.
See also:
The Engine is an add-on to the free netfabb Studio Basic, i.e. when you buy the engine for RapMan you get another version of Studio Basic that includes the same functionality (mesh edit and repair functions) plus the g-code generator.
Calibration
The calibration part
Unlike skeinforge, this software works with a calibration procedure. For each kind (an color) of polymer, you will have to print out 16 calibration squares whose walls you then have to measure with a caliper.
In other words, netfabb Engine figures out the properties of your printer through calibration.
Problems with printing
We found that the calibration file for version 4.5.1 could not be printed with the default settings or without "truly manual help".
Disclaimer: Problems and solutions presented here represent what 18:16, 29 April 2010 (UTC) experienced with version 4.51 Beta and a RapMan 3.1/2.08 firmware/BFB hot end. Things may be different for your setup and with other versions...
- Solutions
In the expert settings, we reduced temperature range and halved print speed and RPM for the rafts.
As an alternative or in addition:
- Just when it starts printing the rafts (after printing the pillars), hit ESC and raise the temperature for ABS to something over 250. It doesn't matter if the raft sticks to the calibration walls. Be careful with PLA. If it is higher than 215 with ventilation or higher than 210 without, it may "weaken" and will block because it has become "wobbly" and can't be pushed anymore.
- press down by hand the filament while the rafts on top of the pillars are printed. Dont't do this of course when it prints the calibration walls, filament should come in ok.
For PLA (rapman v3.1, 2.08 firmware, BFB pre-assembled hot end):
- Temperature low = 205
- Temperature high = 210
- Extruder speed (RPM) = 50
- Speed = 25
For red ABS
- Temperature low = 245
- Temperature high = 257
- Extruder speed (RPM) = 50
- Speed = 25
Print bed of the RapMan was a tight 5 sheets of 75g recycled print papers away from hot end.
In addition: you could lower all print speeds, but I refrained from that.
- Explanation attempt
When the RapMan goes into "overdrive", i.e. "ultra speed" plus extrusion rate of 2800 (280 RPM) or higher, the stepper motor can't pull in enough filament since there is some "holding back" if you use the standard RapMan setup (filament coming along the black cable housing). Since both PLA and ABS is rolled this can create some tiny tension that is bad enough to stop the flow at a speed of 50 and higher extrusion rates. Btw. some experts seem to make their filament coming directly from the top, i.e. they build a filament holder that then is attached to the ceiling...
Measuring
Once you got the test calibration part printed you will have to measure each wall. Here is some advice I got from both the manual and the BFB forum.
- Take three measures at least for each.
- Take the smallest one (except if you think that it's a printing failure)
- Hold down the caliper towards mid-height of a wall
Calibration profiles and expert settings
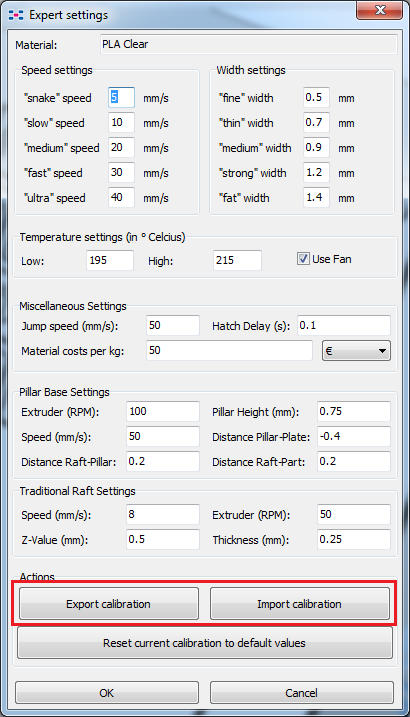
After calibration, Netfabb will not remember values for individual letters, but compile all the data into a profile. Some of these data can be changed through the expert settings:
Under Windows, Netfabb will store the profiles somewhere in your home/application data (that can change from windows to windows version) E.g.
C:\Users\_YOU_\AppData\Roaming\NetFabb\bitsfrombytes
~/NetFabb/bitsfrombytes/extruder1_bfb_pla_translucentgreen.xml
You also can export/import these files via a menu in the expert settings.
Example file: Translucid PLA - April 2010
<root>
  <layersize>0.25</layersize>
  <temperature>
    <high>212</high>
    <fan>1</fan>
    <low>207</low>
  </temperature>
  <calibration_support>
    <speed>8</speed>
    <extruder>32</extruder>
    <z>0.400000005960464</z>
  </calibration_support>
  <material>
    <costs>0.0500000007450581</costs>
    <currency>1</currency>
  </material>
  <pillar_raft>
    <extruder>50</extruder>
    <speed>25</speed>
    <downz>-0.400000005960464</downz>
    <top>0.75</top>
    <spacing1>0.100000001490116</spacing1>
    <spacing2>-0.400000005960464</spacing2>
  </pillar_raft>
  <hatchdelay>0.100000001490116</hatchdelay>
  <fastspeed>50</fastspeed>
  <traditional_raft>
    <speed>8</speed>
    <extruder>50</extruder>
    <z>0.400000005960464</z>
    <thickness>0.300000011920929</thickness>
  </traditional_raft>
  <speeds>
    <snake>5</snake>
    <slow>10</slow>
    <medium>20</medium>
    <fast>30</fast>
    <ultra>40</ultra>
  </speeds>
  <widths>
    <fine>0.5</fine>
    <thin>0.699999988079071</thin>
    <medium>0.899999976158142</medium>
    <strong>1.20000004768372</strong>
    <fat>1.39999997615814</fat>
  </widths>
  <filament>
    <name>default_layersize</name>
    <layertype>default</layertype>
    <medium>
      <fast>75.9375</fast>
      <slow>25.3124980926514</slow>
      <snake>14.2382793426514</snake>
      <ultra>90</ultra>
    </medium>
    <fine>
      <medium>10.6292524337769</medium>
      <slow>8.68055438995361</slow>
      <snake>4.807692527771</snake>
    </fine>
    <thin>
      <fast>56.5384635925293</fast>
    </thin>
    <strong>
      <medium>55.2960052490234</medium>
    </strong>
  </filament>
  <filament>
    <name>half_layersize</name>
    <layertype>half</layertype>
    <fine>
      <medium>12.5</medium>
      <snake>2.4038462638855</snake>
    </fine>
    <thin>
      <fast>46.7727241516113</fast>
    </thin>
  </filament>
  <filament>
    <name>double_layersize</name>
    <layertype>double</layertype>
    <medium>
      <fast>109.349998474121</fast>
      <slow>29.7551021575928</slow>
      <snake>15.0619821548462</snake>
      <ultra>202.499984741211</ultra>
    </medium>
  </filament>
</root>
Netfab vs. skeinforge
Skeinforge:
- Let's you control many parameters that define printing (globally)
- User decides everything
- is free
Netfabb:
- has a calibration procedure that identifies precise features of a printer
- implements dynamic printing, i.e. different handling of different kinds of parts, i.e. fine prints are printed much slower and with less filament
- is easier to use, i.e. user only defines print quality (vs. print time)
Performance:
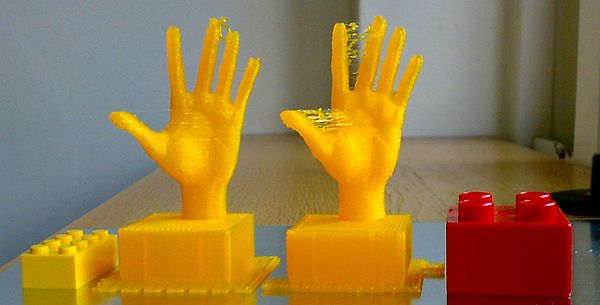
So far, I only made test with a combination (download) of a duplo-compatible block and an artistic hand.
Doblos underneath:
Doblos standing:
At various speeds and settings the result is fairly consistent:
- Hand is better with Netfabb
- Block (in particular the roof) is much better with Skeinforge
When I print the same object in Lego size (x,y,z divided by 2) both have trouble printing the Lego block more or less correctly. The hand is surprisingly well done for both given its size (but better with Netfabb).
Links
- Netfabb


