« RapidMiner Studio » : différence entre les versions
| Ligne 53 : | Ligne 53 : | ||
=== Lancement de RapidMiner et chargement des données === | === Lancement de RapidMiner et chargement des données === | ||
[[File:RapidMiner_Studio_Tutorial1_B. | [[File:RapidMiner_Studio_Tutorial1_B.png|100px|thumb|left|Fig.1 : Text Mining Extension]] | ||
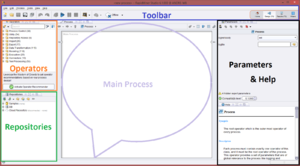
[[File:RapidMiner_Studio_Tutorial1_C. | [[File:RapidMiner_Studio_Tutorial1_C.png|300px|thumb|right|Fig.2 : The workspace]] | ||
As you launched RapidMiner Studio (v. 6.1.1000) you will need to install the Text Mining extension. RapidMiner works with extensions that plug into the core system. | As you launched RapidMiner Studio (v. 6.1.1000) you will need to install the Text Mining extension. RapidMiner works with extensions that plug into the core system. | ||
Version du 27 janvier 2015 à 15:15
Introduction
Rapidminer est à la fois un logiciel open source gratuit, et un produit commercial, destiné au mining (de texte, d'images ou autres) en général.
RapidMiner propose des fonctionnalités de "data mining" et de "machine learning" dont : chargement de données et transformation (ETL), pré-traitement et visualisation, modélisation, évaluation et déploiement de données. Les processus de "data mining" peuvent être construits à partir d'opérateurs "intégrables les uns aux autres", décrits dans des fichiers XML et créé dans l'interface graphique (GUI) de RapidMiner. Le logiciel a été écrit en Java. Il intègre également des schèmes d'apprentissage et des évaluateurs d'attributs de l'environnement de "machine learning" Weka ainsi que des schèmes de modélisation statistique du R-Project. (traduit de la page Wikipedia de RapidMiner)
Installation
- L'installation de RapidMiner Studio est très facile sur Windows (testé avec Windows 7 x64, Windows 8 x64 et Windows 10 technical preview x64), à partir de l'exécutable téléchargé sur la page de votre compte RapidMiner (l'inscription est obligatoire).
- L'installation de RapidMiner Studio sur Mac OS X s'est révélé être compliquée, du fait de ses dépendances en Java. Le système intègre Java 1.8 (OS X 10.10.1) et RapidMiner demande la version 1.7 ne détectant que la version 1.6.
Note : RapidMiner Studio est désormais un logiciel commercial, l'utilisation de celui-ci (et de ses fonctions de base) est désormais limité à 14 jours après avoir fait la demande de license.
Un jeu d'outils complet
Tout d'abord, il me semble important de dire que RapidMiner Studio - et RapidMiner Server qui le complète - est un jeu d'outils complet, plus qu'un logiciel spécifique. Le site web de RapidMiner nous dit que RapidMiner vous laisse parcourir et exécuter avec facilité parmi plus de 1500 opérations.
Dû fait de cette complexité, je n'explorerais et décrirais que certaines des fonctionnalités de RapidMiner Studio. Je m'intéresserais donc tout d'abord au "mining" de texte classique, à partir de documents locaux; j'explorerais ensuite comment il est possible avec cet outil, d'importer, de transformer et d'analyser des tweets (tweets mining).
Les principales forces de RapidMiner selon ses éditeurs sont :
- Un environnement visuel - "code-free" - que l'on peut utiliser sans maitriser de langage de programmation
- Sa disponibilité sur les principaux systèmes d'exploitation et plateformes
- Sa principale fonction est le "design" de processus d'analyses
- Analyses prédictives
- Chargement de données
- Transformation de données
- Modélisation de données
- Visualisation de données
- Extension par API
- De nombreuses sources de données : Excel, Access, Oracle, IBM DB2, Microsoft SQL, Sybase, Ingres, MySQL, Postgres, SPSS, dBase, Text files, et d'autres encore ...
- RapidMiner vous permet de travailler avec différents types et tailles de sources de données
Examples d'utilisation
Si les éditeurs de RapidMiner nous disent qu'il est possible de faire à peu près tout ce que l'on souhaite avec RapidMiner, une fois pris en main le logiciel n'est pas suffisamment intuitif et ergonomique pour trouver son chemin.
- J'ai donc choisi tout d'abord d'explorer une fonction de base du logiciel, c'est à dire le text mining.
- Dans un deuxième exemple, j'expliquerais comment utiliser concrètement les processus de text-mining pour miner et analyser des tweets sur Twitter.
Basic text mining
Comme décrit précédemment, nous allons tout d'abord voir de quelle façon RapidMiner mine du texte. Nous allons utiliser des processus de minage de texte servant à :
- Charger et extraire les mots de fichiers textes, de deux répertoires différents
- Ignorer certains mots non pertinents (stop list)
- Générer des résultats
- Visualiser ces résultats
La question à laquelle nous tenterons de répondre est : "Quels mots sont les plus représentés dans un corpus de textes relatifs au domaine de la littérature, et dans un corpus de textes du domaine de la photographie ?"
Lancement de RapidMiner et chargement des données
As you launched RapidMiner Studio (v. 6.1.1000) you will need to install the Text Mining extension. RapidMiner works with extensions that plug into the core system. The Text Mining extension can be found in RapidMiner Marketplace, which can be accessed from Help > Updates and Extensions (Marketplace) as shows the figure 1.
After restarting the software, we can start working with it. First of all create a New Process. You will see now the main window of RapidMiner Studio, and I will briefly describe the main zones of the working space :
- In blue we have the main toolbar
- In orange we can see all the operators that we can use in our processes
- In green we have the repositories
- In purple we have the main process windows, where we will be able to see process results and progression
- In black we have parameters of each element of or process and help
From here, we will first of all find our operator Process Documents from Files (screenshot here) and we will drag it into the Process zone, in the center. At this point we have our operator in our process, and we need to set his parameters. Clic on our operator in the main process area, and see which parameters you can set on the right side. First parameter is text directories which we will set right away.
Note : On the right side of your toolbar you can see a four-element menu that allows you to switch between Design and Results (also with F8 and F9 keys) that will be very useful. If your results aren't what you were expecting, or you made a mistake when designing your process, you can easily return from the results to the design area.
- In my case, i have a directory on my Desktop which name is "data"
- In /data/, I have /litterature/text1.txt and /photographie/text2.txt
- I will set up my text directories like suggested in the Fig. 3 and give both a different name to be able to show results depending on text directory
In next section we will talk about operators, and we will come back to Process Documents from Files parameters to choose which vector we want RapidMiner to create.
Tokenize & define StopWords
Now that we have our Process Documents from Files operator in our Main Process area and our text directories set up correctly, we need to connect our operator Process Documents from Files on the left (from inp to wor) and on the right (from exa to res, and wor to res). This will allow the data to be processed.
We will now define what steps (or processes) should be executed during our Process Documents from Files operator. So by double-clicking on it, we can see it's inside. We will now add a Tokenize operator that can be found in operators area (in Tokenization) on the left. Tokenize will separate words making them independent values. One of RapidMiner big values is that graphic user interface, that allows you to build processes quite naturally. We will also be able to add Filter Stopwords (french) - because my text files are in french - into our main Process Documents from Files operator, also by dragging it. You should see something like in Fig. 5 above.
View result
If your main operator is connected (input - output) and that inside of it, your Tokenize operator and your Stopwords operator are also connected to each other, and to input and output as suggests the figure above, you should be ready to launch the process which should generate your results.
Before clicking on the launch button, i want to make you notice that we didn't change the Vector Creation parameter of our Process Documents from Files. That parameter allows you to set the type of visualization you want the software to create from the data given.
If you launch the process leaving the default value (TF-IDF), RapidMiner will present you the results in different ways. First you have two tabs, WordList and ExampleSet.
WordList View
In the WordList view tab (Fig. 6) we have an occurrences analysis.
- First column presents the words found in documents
- Second column presents the attributes of words (which in my case are equal to the words themself)
- Third column shows Total Occurences (how many times we can find the word in all documents)
- Fourth column shows Document Occurences (in how many documents we can find the word)
- Fifth and sixth column shows Text Directory Occurences (how many times we can find the word in each text directory)
ExampleSet View
In the ExampleSet view tab (Fig. 7) we have a left menu with five tabs. I will try to present them :
- First tab is an Overview of the process. We can find there each text directory, each document processed and some other informations.
- Second tab is Statistics, and allows you to see statistics about the data given.
- Third and fourth tabs are Charts and Advanced Charts and allows the user to visualize some default charts, or build advanced and customized charts that feed in the data and analysis results of our text mining process.
- Fifth tab allows the user to save annotations into the process.
Note : Fig. 8 shows you some of the charts view types that RapidMiner proposes.
Export results
When it comes to export results in RapidMiner Studio, each extension and RapidMiner Studio function will allow to do different sort of things. For example, after a text mining process, data will be available in different forms :
- WordList view will allow you to export the spreadsheet in image (png, svg, jpg, eps, pdf), to print it, or you can even copy/paste the spreadsheet data into Microsoft Excel or Google Drive Spreadsheets.
- ExampleSet view also allows the user to copy/paste the data from the software, to print it or to export it as an image.
Note : The export as an image function seems to allow you to export all software main area (in the center) but not to export individually an image.
Tweets mining and analysis
Introduction
RapidMiner Studio allows you to extract, transform and analyse data from A to Z with it's core functionalities and free plugins. Unfortunately, some Cloud extensions and functionalities are premium, and pricey. I will explain here how you can extract and analyse tweets only using the free version of RapidMiner Studio and a third-party service for the tweet extraction.
Tweets extraction
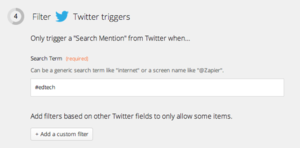
First of all you need to get your data that you want to input in RapidMiner. In our case, we need the tweets that we want to process. As said before, some third-party services allow you to extract tweets automatically from Twitter : I will present Zapier, which "connects the web apps you use to easily move your data and automate tedious tasks". A zap is a connexion between two services, that you can set up to automate tasks.
For our task, I connected Twitter and Google Drive, and specified that I want Zapier to look for an hashtag (#edtech) and to save each tweet containing that value in a new text file, in a Google Drive folder. Once you have the relevant amount of tweets, you can save your Google Drive folder in a local place in your computer, that you will specify to RapidMiner. I got nearly 8'000 tweets in a few days. You have now your data ready to start using it with RapidMiner.
Data transformation
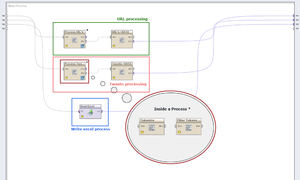
After having all our tweets in a directory on the computer, we can proceed with RapidMiner. We need to make a process that will take our directory as input, and that will output data that can be analysed and visualised. The figure bellow show all my three processes that I will explained bellow.
Let's first focus on the orange process, the Tweets processing :
- First, the "module" Process documents from files, named Process tweets, allow us, like in the previous tutorial, to specify a directory where text files are. We need to specify, inside this "module", which actions will be triggered.
- As we want to take out from all tweets the hashtags only, we need to tell RapidMiner to Tokenize first all words (by cutting them where white spaces are).
- Then we need it to filter the Tokens created to keep only the hashtags. That is done with regular expressions, that select only words starting by # symbol, and followed by letters or numbers.
- When the Process Tweets "module" is finished, it outputs a WordList that can be converted to a ExampleSet by the Tweets->Data "module". That will allow us to treat this words as data and to use it later.
If we look closer the URL processing, it's made just as the Tweets processing.
- We have a Process documents from files "module", named Process URL's that will put all files in the directory in a loop, and will execute for each of them two operations :
- Tokenize, explained before.
- Filter tokens, that will this time keep only links tweeted. We use a regular expression to keep only "words" starting by "http://".
- Finally we convert this WordList in an ExampleSet again to be able to connect it to the Result output point.
Data analysis
Once the process showed before is complete and valid, you can test it to see if data outputed is what you were waiting for. My process gets me three ExampleSets, as i had three ouput points connected. I will present now two of these ExampleSets and talk then about the third one, the Read Excel process.
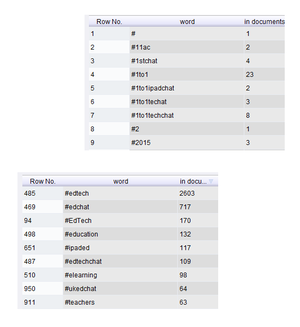
My first process had as objective to show which hashtags were represented most, combined with #edtech hashtag. The "Tweets->DATA" ExampleSet show us that. You can see it in a data view (table) which can be sorted and in other ways like charts.
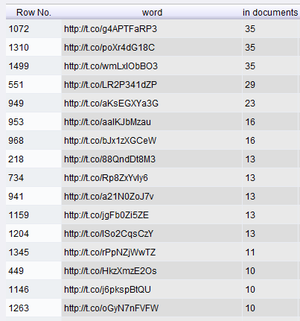
- Figure 1 shows the data view, we can there see all hashtags and the number of documents (tweets) in which they were.
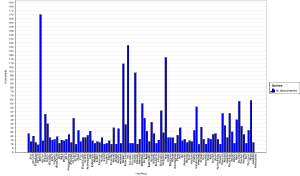
- Figure 2 shows a graphic with most represented hashtags.
My last process, read Excel, is the easiest way I found to filter tokens depending on the "In documents" value. As some hashtags like #EdTech, #edTech, #Edtech were some of the most used hashtags, as I didn't used a case sensitive action to remove capital letters, and because de graph wasn't "viewable" due to the huge amount of different hashtags, I needed to filter my final data. I looked how to do it, and tried different ways, but didn't manage to do it. What I did is that I exported the data resulting from my "Tweets->Data" process, in a Microsoft Excel file. I then deleted all unwanted lines (equivalent hashtags and hashtags less represented) to keep only the most used hashtags. I created a process in RapidMiner that reads that file and outputs it's data : I then have filtered data, that can be showed.
- The figure 2 graphic is the result of the Read Excel process. It only contains the most used hashtags, and filters the "equivalents" hashtags. It is important to say also that the most used hashtag (#edchat) has also been removed to better view of the others hashtags.
Finally, my second process extracts links from the tweets, to see which kind of content could be behind the most tweeted links.
URL analysis
As I said before I used RapidMiner to process my tweets and extract only the links. As I could not find a functionality in RapidMiner that allows me to ping an URL and to get it's real URL (all links in twitter are shortened with an URL Shortener) to be able, for example, to check which domains are more represented, I did it manually.
I kept only the five more tweeted URL's and checked them. Here they are :
- Humour picture about generational technology gap (Twitter.com, in 35 tweets)
- 9 traits of good digital citizens (Brilliant-Insane.com, in 35 tweets)
- Infography about digital citizenship (Twitter.com, 35 tweets)
- Insightsed which was unavailable (ressource limit is reached, in 29 tweets) on 17.12.2014 @ 15:30 UTC+1
- 5 Strategies to Reach At-Risk Students with Technology (EdtechMagazine.com, in 23 tweets)
Results and comments
Process tweets results
- First, I was able to see that capital letters are taken in consideration in tweets. We choosed #edtech hashtag, but others were used like #EdTech, #Edtech or #edTech.
- Secondly, the most used hashtag was clearly #edchat in nearly 700 tweets. Second was #education (132) and #ipaded (117) was third.
Process URL results
- We can see that in the top 5 links, two of them target to status on Twitter with images. One is an infography about digital citizenship, and the other one is a funny picture.
- We can see that the three other links are website articles about subjects between education and technology, what our hashtag is used for.
Comments
This process has the main objective of showing how we work with data in RapidMiner. Of course I only explored a very small amount of it's functionalities and strengths. I think that the process that processes tweets could be much better : it could analyse hashtags that are together in a tweet, could analyse how many hashtags are used, on average, in every tweet. I could also cross the hashtags represented in #edtech tweets with the ones represented in #edchat tweets for example.
As said before, the process treating links could be more automatised : it could resolve "real domains" automatically, and we would be able then to count or mesure which articles or even domain names (websites) are more represented.
Finally, it was sometimes pleasant to work with RapidMiner, sometimes not. It's own structure is kind of easy to understand and use once you understand it, and the visual input-output points, the inclusive documentation that gives you information about the data that can enter and exit a "module" help a lot when you're beginning. Rapidminer also allow to do use full version of the software, for a limited time, which is very positive.
Unfortunately some actions are not easy to find (as the Zoom out action, that only can be accessed clicking on a graph with the mouse and dragging the mouse upper-left), and it's kind of difficult to navigate in the build-in "modules" and find the one you need for an operation.
Links
Official
- RapidMiner Home page. It includes interactive video tutorials.
- RapidMiner Wiki
- (use search or "All pages" since the main page as of March 2012 doesn't include navigation links)
- Links to support groups for RapidMiner -- Data Mining, ETL, OLAP, BI. See also this wiki entry
Get RapidMiner
Documentation / Tutorials
- Assignment 1: RapidMiner (Alex) (Text Mining, Brigham Young University)
- Stanford University Lane Medical Library article "What is RapidMiner?"
- Opinion Mining with RapidMiner - A Quick Experiment

