InkStitch - emoji embroidery
Introduction
This article explains how to embroider emoji with InkStitch. It is especially aimed at people who want to recover and improve cloth (upcycling) , for example sweaters with small moth holes.
See also:
- Stitch Era - embroider an emoji (semi-professional embroidery software, in french only so far)
- web folder which contains some SVG (source and InkStitch), PES and DSG (Stitch Era) files
- fr:Emoji (in french, so far)
- Stitch Era - broder un emoji Same article in french (but contains more information, i.e. a number of "case studies")
This page contains embroiderable SVG: Click until the SVG displays as a web page (so just display the SVG design, nothing else), then save this *.svg page from your browser CTRL-S. Make sure it's SVG, saving a raster image displayed in this page won't do it. You have to click twice on an image displayed on this page, first to display the page with an image + its documentation (images in a wiki are reusable resources that have a separate life!), then click again on the image to get to the SVG. The "media" links display the SVG page directly. Just save it. You will find the SVG file in your downloads (unless you know how to configure your browser).
The emoji
According to Wikipedia, “Emoji (絵文字, pronounced [emodʑi]), is a term derived from Japanese for pictograms used in e-mail messages and web pages.”. Many emojis are standardized as Unicode characters that can be displayed in multiple environments such as instant messengers, email clients, web pages (HTML) and various social networks such as Facebook and Twitter. In 2020, the latest version of the emoji game is defined in the document Unicode Technical Standard #51, version 13.1. This standard defines an emoji as “colorful pictograph that can be used inline in text. Internally the representation is either (a) an image, (b) an encoded character, or (c) a sequence of encoded characters.”
The word emoji is masculine and its plural is either emoji or emojis according to Wiktionary. In summary (simplified), emoji are characters in fonts that are displayed either with a "text" style (simple graphics) or with more complex graphics that include color variations.
In summary, an emoji is defined by
- a drawing
- a Unicode character code (one or more combined characters, sometimes with a "Zero Width Joiner", pronounced "zwidge")
- an optional short name (not standardized, used mostly in cats)
- an official name in the "Common Locale Data Repository" (CLDR)
- keywords that facilitate the search
Download the SVG of an Emoji
To find an emoji and a graphic you like, we advise you to check Emojipedia first.
There are several sites that allow you to download emoji. See fr:Emoji for more information. In Dec 2020, we recommend Iconify.design which provides several emoji games (collections). You can either first choose a collection (below we list the most important ones) and search for an emoji in the collection, or search among all emoji on the site. Note that some collections are not complete according to UniCode 13 (or better) definitions.
Emoji collections of Iconfiy.design:
- Twemoji (Twitter, strongly recommended)
- Noto Emoji (Google, recommended)
- OpenMoji
- Emoji One (Colored)
- FireFox Emoji
Once you've found your emoji, you can either download the SVG code (useful if you know how to use the SVG editor) or the SVG file (recommended). Note that the SVG code may contain a black rectangle that hides the drawing and that you will have to remove.
Principles to embroider an emoji
To understand what happens next, you need to be familiar with the basic principles of InkStitch (creating fillings and satins) and know how to do manipulations in InkScape, such as "difference" and "union" of objects and breaking knots.
'Since SVG designs are made in several layers, they should be simplified and, as a general rule, take care to create small overlaps. It is recommended that you never embroider more than 2 wide layers, otherwise the embroidery becomes too stiff.
Be aware that in (semi) professional embroidery software such as Stitch Era software, digitizing an emoji is less complicated, because the digitizing procedure includes an option to eliminate overlaps and it is very easy to add borders to embroidery objects.
The designs are not necessarily made in the same way. Some emojis are much easier to embroider than others ....
Important InkScape Operations
- To start, you have to choose your emoji. Some are very simple to embroider, some a little less and some are more difficult. Overall we advise beginners to start from the SVG made by Twitter, so a character in the font Twemoji . Most of the emojis have paths without strokes with a simple fill.
- You have to adapt the size. We decided to standardize them around a length or height of 45mm. So we can embroider them with a typical small frame of 5x5cm. The imported objects have various sizes, because in SVG the size displayed, for example in a web page or in a font, can be adapted without problems.
- All colors with gradient must be replaced by a single color.
- You have to kill the objects that complicate, especially when you are a beginner. Typically: all tiny objects (less than 3mm), all kinds of shadows, some contours.
- A drawing for the screen is often made with a lot of layers on top of each other. There is, to our knowledge, no method to simplify/flatten such a structure quickly. So you have to manually subtract large objects placed on top of another large object. We start at the bottom of the stack: first we make a copy of the element to be subtracted, reduce it a little
CTRL_(so that there is an overlay, and then select the object that should have a hole and the duplicate object and make the subtractionCTRL_-. - It is interesting to embroider some borders with a triple stitch or satin. In this case we can duplicate the object (path) which will have a border. The duplicated object will be emptied of the fill and will have either a dotted line to create a single or triple stitch, or a thick line that can be transformed into satin with the satin tools.
- The columns ("snakes" from 1 to 4mm) should be embroidered with a satin stitch. I advise to enlarge them to at least 1.5mm. An ideal width for a small embroidery is around 2.5mm. Then, to make satin you need to know how to break stitches, make bridges, unite stitches, reverse direction, add steering crossbars, etc.
- Depending on the use, you have to choose the filling rate. To fill moth holes, we tighten the stitches a little (2.25 for a filling) and define a fairly dense undercoat (or we simply leave 2 layers of drawing superimposed).
- Overlapping and juxtaposed fillings must be oriented in different directions (to be set in the parameters).
- To embroider rather large shapes (4cm) you have to think about a stretch compensation if you think of making an outline with a line. Otherwise, you just have to overlap all the paths. So use the function outset/inset
CTRL_) and CTRL_(. - At the end, you have to sort the objects in the "objects" panel. The first one to embroider at the bottom. It is also advised to attach cuts (if your machine manages them) and to move the in and out stitches (see the example of the "microbe"). If you have a multi-needle machine, we can do a minimum.
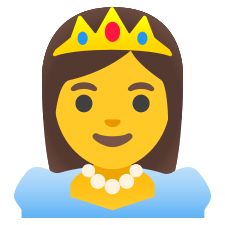
👸 Example of digitizing with a princess from the noto collection (google)
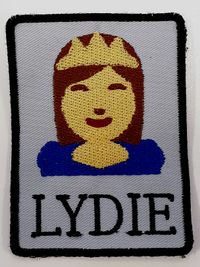
To follow this example, we advise you to download the SVG of the emoji "princess" from Iconify.design: noto:princess.svg.
Step 1: Basic preparation:''.
- Open the SVG file
- Display the "objects" panel
- Kill the black rectangle on top of it (is it a download bug?)
- Rename the important items (in the objects menu: double click on a path)
- Kill the superimposed elements that do not bring anything to the embroidery (some gradients)
- Set size: select all objects in all layers (
CTRL-ALT-A). Then set the size. To plug a hole, we advise between 40 and 50mm.
Step 2: Eliminate overlaps.
Eliminating superimpositions is the most difficult part and usually the following method is recommended: process the objects from bottom to top (back->front position) in the object panel and do mostly subtractions (operator "difference" CTRL_-).
For the princess, you need for example
- subtract the sweater from the oval for the hair.
- subtract the neck from the sweater
- subtract the hair from the top of the face circle
- unify the top hair with the oval for hair
SHIFT-select, thenCTRL-K - Subtract the yellow face from the hair
- subtract the crown from the hair
Example: To subtract a "sweater" object from an "oval" object, you need to
- Duplicate the sweater:
CTRL_D(or contextual menu->Duplicate) - Select the oval
- Add the duplicate sweater to the selection
CTRL_Click - Menu Path -> Difference
CTRL_- - Repair the color if necessary.
Note: An alternative way to flatten a drawing faster would be to export the drawing as a PNG file, then draw the image with colors (explanations to do).
Step 3: Adding slight overlays
Then it is necessary to enlarge some objects so that they have small superimpositions, this to avoid that there remain spaces between the embroidered objects due to the "pull effect". We advise to use the function Path->Outset , CTRL_) or Path->Inset , CTRL_(.). Before using this function, it is recommended to set the outset amount to 1px. Preferences -> -> Behaviour -> Steps -> Inset/Outset by.
You can leave max. two overlapping layers for small objects (eyes, mouth, necklace, etc.).
Then, if you have a machine with only one needle, unify similar colors and sort the colors in order as much as possible
Step 4: Optional Improvements.
- Replace fillings with satins
- Add contours (satin or triple stitches or single stitches)
- Optimize jumps
Files to download:'''.
- Original (without the black rectangle): media:princess.svg.
- File without overlays media:princess-1.svg.
- File ready for setup media:princess-2.svg.
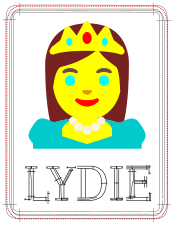
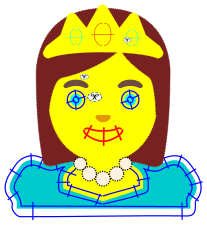
- Embroidery patch media:patch-princess-lydie.svg
- Embroiderable file: media:princess-3.svg. (model with satins and triple stitches)
-
Original
-
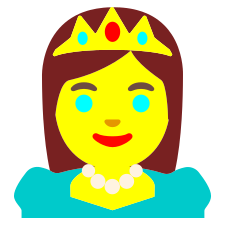
Without overlays
-
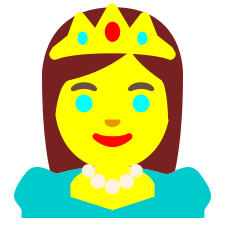
With small overlays (2px)
-
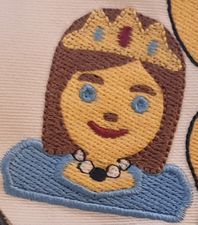
Embroiderable patch with a simple model (parameterized designs)
-
Embroiderable SVG with satins and triple stitches
-
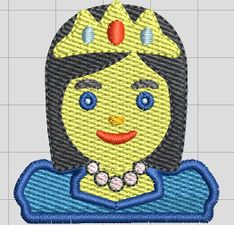
Simulation
-
Simulation of the version with satins
To do:
- Lighten the collar (e.g. remove the locking stitches)
Commented examples
See the french sister wiki for 20+ other examples
😱 Face screaming in fear
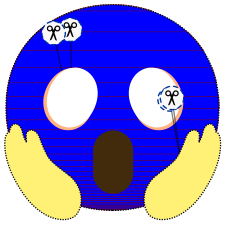
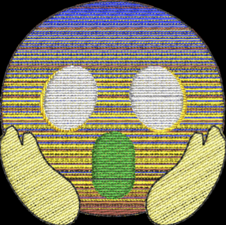
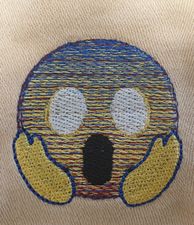
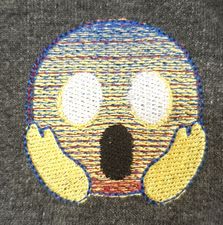
The face screaming in fear 😱 (also called Home Alone, Scream, Screaming Face, Screaming Face in Fear) is another popular emoji. The Google noto shape has gradients and we will show how to create a face gradient with XML code editing and stitch manipulation of the embroidery design.
Initial preparation in Inkscape
- Kill 2-3 objects of the face that have gradients/transparency
- Kill most of the orange shadows of the face and hands
- Remove the gradient from the face
- Put a line around the hand (duplicate the object, then make it a dotted line)
- Option: Put a line around the face or a satin.
- Enlarge eyes
CTL_) - In the object menu, flatten the structure (ungroup) and reorganize the order: face - mouth - eyes - hands - hand contour.
Create a gradient
Creating a gradient in InkStitch is not yet a well-developed and tested feature, so it's hidden and you'll have to work with code. Making a good gradient in embroidery is quite complicated, but to create something that is acceptable, we'll use the following simple method:
- Create a light background with a yellow thread
- Create a blue gradient fill from top to bottom, so a line spacing that goes from 4 threads/mm (0.25mm spacing) to less than 1/mm (5mm spacing).
- Then we'll do the opposite with red. Dense at the bottom and wide apart at the top.
So:
- Duplicate the face twice and name each version "blue face" / "red face", put them at the bottom of the stack.
- The first face will be yellow with little density: 0.33 mm distance between lines, 2mm running stitch length.
- Normal setting for blue and red, but attention:.
- uncheck the underlay, otherwise we have 8 layers to stitch (2x yellow, 2x blue, 2x red, 2x eyes/hands)
- uncheck underpath, otherwise it will be visible.
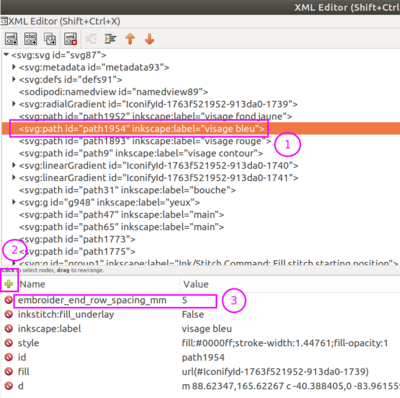
- Open the XML editor and add an attribute
- Select the blue face
- Click on the small + (in green) and create a new attribute embroider_end_row_spacing_mm.
- Name=
end_row_spacing_mmValue=5
- Repeat this for the red face.
Invert the red gradient.
- We have a problem: the red gradient also starts at the top (and moving the starting point to the bottom is useless)
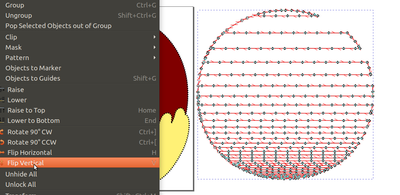
- So we will generate the embroidery stitches for this object, then copy/paste this object, then flip it upside down.
- Select the red circle, then
View and export->Embroidery plan preview. - Then flip the embroidery object to the right in the image below:(Path -> Vertical Flip)
- Then put the generated manual stitches instead of the red face, on top of the blue circle: To do this you have to move it into the embroidery layer and position them (use the menu Layer / layers for this). To finish, kill or move the old red face to an unembroidered layer.
-
Original
-
Modified version (embroiderable)
-
Version with gradient (embroiderable) (download)
-
Simulation, version 1 (triple dots to redo for example)
-
Embroidery, Version 1
-
Embroidery, Version 2
'To do / try.
- Enlarge a little bit the outline.
- You can consider non-linearly densifying the gradients, but it's manual work and I don't want to, because it's easy to do with Stitch Era as shown in Stitch Era - embroidering an emoji.
- Redo the stitches
- Possibly densify the blue and red. Or a 2-color solution
- Embroider with a heavy hoop and two layers of stabilizer (instead of the more practical magnetic frame)
Links
Emoji SVG files
- Twemoji de Twitter (requires technical skills, i.e. pulling a GitHub archive): format SVG et PNG
- OpenMoji.org (as of Nov 2020, supports version 13): format SVG et PNG
- Noto Emoji fonts de Google (requires technical skills, pulling a GitHub archive): format SVG et PNG
Emoji Catalogues
- Unicode® Emoji Charts v13.1 Listes officielles pour la version 13.1.
- OpenMoji.org permets de chercher des emoji avec leur nom (en Anglais) et de télécharger des images
- decodeunicode.org
- Emojipedia
