InkStitch - embroidery logos
Introduction
Creating professional logos is probably fairly difficult. However, you can fairly easily create a logo if the original drawing or picture is not too complicated.
Mediawiki Logo
We suggest that you support your favorite open source projects by stitching their logo on your cloth and bags. A good start would be Mediawiki, i.e. the software that runs Wikipedia and this wiki.
Get the original logo or take it from here:

Before it can be stitched, this logo needs some work. In addition, overlaps must be removed.
Mediawiki logo with simple fills
The SVG file is composed of a few complex path that cannot be stitched as is. Each petal and each letter should become a path. Petals are not really separated by space, but someone painted some white lines on top. We either could stitch these or (as we do here) remove them.

- Select all and ungroup once
Create a single path for the flower
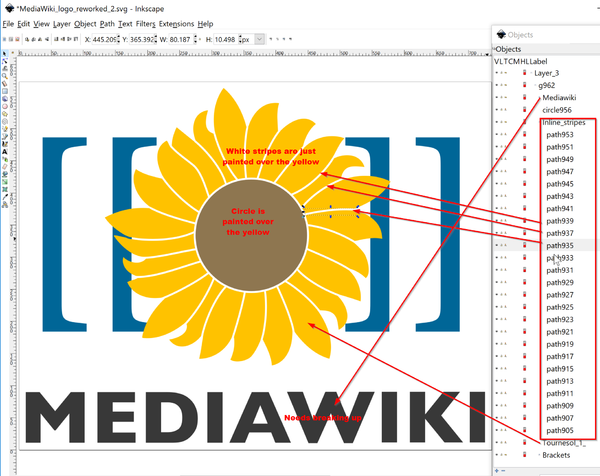
In the original, the flower is composed of single path that defines the yellow and 25 little white stripes that separate visually the petals. Now let use separate the petals for real. We shall do that by subtracting the white traits from the yellow sunflower outline.
- Open the objects panel.
- Select all the white little stripes (inside the group Inline stripes)
- Make the strokes a bit fatter, e.g. 1.5mm
- Transform the (still selected) strokes to paths (Menu path:Stroke to path).
- Merge all these new "stripe" paths into a single path (CTRL-K)
- SHIFT-Select the yellow flower (Tournesol_1_), followed by the new combined "stripes" path
- Menu Path -> Difference.
- Fix the petals with the Node Editor (optional, I did not)
You now should only have a yellow flower left, the stripes should be gone. If not, repeat the above.
Fix the center of the flower, i.e. keep the circle but remove the yellow behind
- Select the center circle
- Transform it to a path (Menu Path -> Object ot Path)
- Copy/paste in place. You now have two objects
- CTRL-select Flower and the new center drawing
- Menu Path -> Difference
You now removed the overlap of the circle in the center with the flower petal behind, i.e. you created a big hole in the yellow drawing
Remove some junk left by Illustrator and use cleanup procedures
- Open the XML editor
- Kill the metadata section (use the little "remove node" icon on top)
- Now Select All and Ungroup
- File -> Cleanup
- File -> Save as optimized SVG
Break apart the tournesol
The current drawing cannot be stitched yet because both the flower and the lettering are very complicated paths that should be broken up into simpler ones.
- Select tournesol
- Path -> Break Apart
- Select Mediawiki text
- Path -> Break Apart
- Fix the "D" letter (SHIFT select outside, then the inside. Then make a difference as above)
- Fix the "A" letter
Put everything into a layer
- Create a new layer
- Select all and move to new layer
Parametrize
- Select all
- Menu Extensions -> Ink/Stitch -> English -> Params
- Select Autofill with an underlay
Mediawiki logo with simple fills - result
(simulated)
To stitch the following, Ink/Stitch v. 1.90 (or higher) is required in order to produce a machine embroidery file. Older versions may crash - 18:04, 18 June 2018 (CEST)
However, the drawing is really large - 19cm X 14.6cm and you might consider reducing the whole. The beauty of an SVG-based format is that this is not very complicated. Of course, if you reduce a lot then you may have to use different parameters.
However, to reduce it to 50%, no changes are required.
- CTRL-A, lock width X height in the menu bar and change ....
- Adjust document size
- Regenerate the stitch file
 |
 |
 |
 |
Mediawiki Logo with satin stitches
Creating a satin stitch version takes some more time. We shall explain how, but make sure to read at least the first two sections in the InkStitch - satin columns tutorial !

You will have to go through the following steps to create nice sating stitched flower petals
(1) Reorganize the file
Firstly the file should be reorganized and include different sub-layers for each type of embroidery.
- Center
- petals (sub layer with 24 petals)
- Lettering ("Mediawiki") (sublayer with 9 letters)
- braces (sub layer with the four braces)
(2) Transform the petals into paths with a stroke
- Select all the petals
- Remove the fill, add 1mm strokes and make them yellow
- Move the center circle away (temporarily)
(3) Create two subpath for each petal
- Show the tool controls bar (Menu View -> Show/Hide)
- open the Edit nodes tool
- Remove the segment at the bottom of each petal: Select the bottom segment and click
Delete segment between two non-endpoint nodes - Select a single node on the top a each petal and break the path there:
Break path at selected nodes - Select the path and smooth it (Hit 1 or 3 times CTRL-L)
- Select one of the two subpath and reverse the direction (Menu: Path-Reverse)
(4) Parametrize for satin stitching
- Menu Extensions -> Ink/Stitch -> English -> Params
- Select the
Satin column taband tick "Custom satin column"
If the number of nodes is even in each subpath, then you will get this

If you get an error message like error: satin column: object path924 has two paths with an unequal number of points (5 and 6), either make the points even or add at at least one rung as explained in the InkStitch - satin columns tutorial. In the picture below we added three rungs.

Fixing the petals (points 3 and 4) should take you at least 2 hours ! :(
(7) Fix the border of the center
- Copy/paste-in-place the center
- Transform one of these into a fill (just remove the white stroke)
- Remove the fill from the other and Path: Stroke-to-path
- Remove the fill from this new path and make the stroke 1mm or smaller
- Create a satin object (align directions of the sub-path and make an break the path at two opposing nodes)
- Parametrize as satin stitch
(6) Result
We reduced the final drawing to 7cm (from the original 19 x 14.6cm)
 |
 |