Flash mask layers tutorial
This entry is part of the Flash CS3 tutorials and it should be upgraded to CS6 at some point - Daniel K. Schneider (talk) 20:12, 25 February 2013 (CET)
Introduction
- Learning goals
- Learn how to add mask and masked layers to animations
- Prerequisites
- Flash CS3 desktop tutorial
- Flash drawing tutorial
- Flash object transform tutorial
- Flash colors tutorial
- Flash frame-by-frame animation tutorial
- Flash motion tweening tutorial
- Flash shape tweening tutorial
- Flash embedded movie clip tutorial for guided masks
- Moving on
- The Flash tutorials article has a list of other tutorials. E.g. you could start learning how to make interactive programs with the Flash button tutorial.
- Level and target population
- Beginners (but see the prerequisites)
- Quality
- Rather low. This tutorial doesn't contain many details, just some short "how to"s and feature demonstrations.
- To Do
- Filters
“For spotlight effects and transitions, use a mask layer to create a hole through which underlying layers are visible. A mask item can be a filled shape, a type object, an instance of a graphic symbol, or a movie clip. Group multiple layers under a single mask layer to create sophisticated effect” (About mask layers, retrieved 16:51, 8 October 2007 (MEST)).
Mask and masked layers
Masks are layers that will allow you to see what is underneath through a sort of hole (i.e. a drawing). You then can animate this hole with a motion tween for example. Masked layers are the layers underneath.
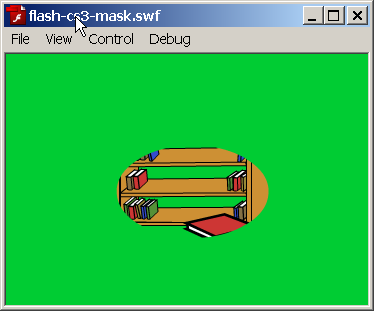
In the following picture, a mask lets you see part of bookshelf through an oval.

Step 1 - Create some contents:
- Put these contents in one or several layers. We will turn these layers "masked" in step 3.
Step 2 - Add a mask layer:
- On top of these layers, create a new layer
- Right-click on the layer name and select Mask. This layer will mask the others and it should contain a single graphic element (shape, graphic symbol or group).
Step 3 - Define the masked layers:
- The layer just beneath the Mask layer already should be masked. If it is not, right-click on the layer name and select Masked.
- You can turn other layers underneath to be masked with the same procedure. Move normal layers to a position after the mask layer or an already masked layer or create new ones...
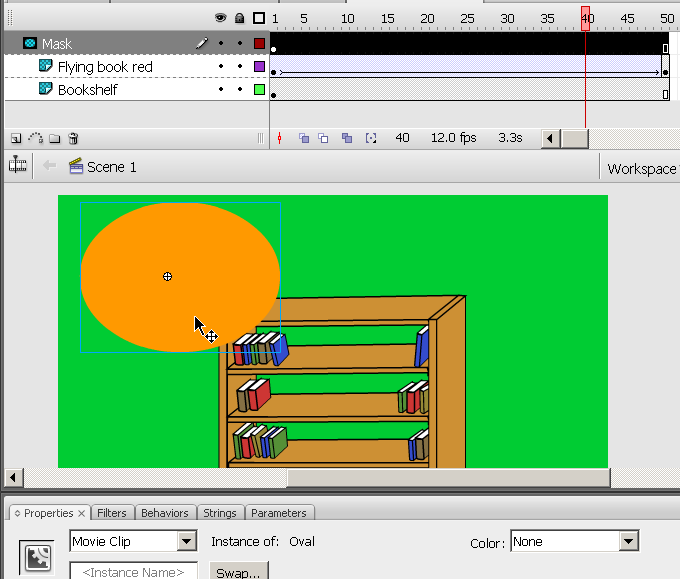
To undo a masked layer, just right-click and revert back it to "normal". We show a picture of mask and masked layers further down. Such static masks are of course not very interesting, so let's move on ...
Masks animated by a simple motion tween
Non-linear motion tweens are simple to create in CS4 to CS6. In CS3, you must learn how to create guided tweens using an embedded movie clips (see below)
Step 1 - Add a simple motion tween:
- Select the mask layer
- Draw a non-editable object (graphic object, symbol)
Step 2 - Do a motion tween
- Like in a normal motion tween as explained in the Flash motion tweening tutorial.
The user will only see things that will lie underneath the tweened object. E.g. if you move a circle, only the stuff that sits under the moving circle will be shown.
Example:
- flash-cs3-mask.html
- Source: flash-cs3-mask.fla
- Directory: http://tecfa.unige.ch/guides/flash/ex/special-effects
Shape tweens with mask layers
- Step 1 - Draw a shape in the mask layer
- Step 2 - Do a shape tween
The tweened shape will determine what parts of the drawing in the masked layer(s) you can see.
Guided motion tweens with mask layers (CS3)
The principle is not the same as for the simple motion tween. You will have to created an embedded movie clip in the mask layer. If you don't understand embedded movie clips, read the Flash embedded movie clip tutorial.
Step 1 - Create a movie symbol
- Select the mask layer
- Create an embedded movie clip, e.g. in frame 1
- E.g. Create first a drawing then Right-click->Convert to Symbol, select Movie Clip
- E.g. Menu Insert New Symbol (CTRL-F8), then draw the object in symbol edit mode.
Timeline might look like this:

Step 2 - Edit the movie symbol
- Double click on the symbol
- Create a guided motion tween (this implies that you should again make the graphic into symbol, then proceed in the same way as normal guided motion tweening).
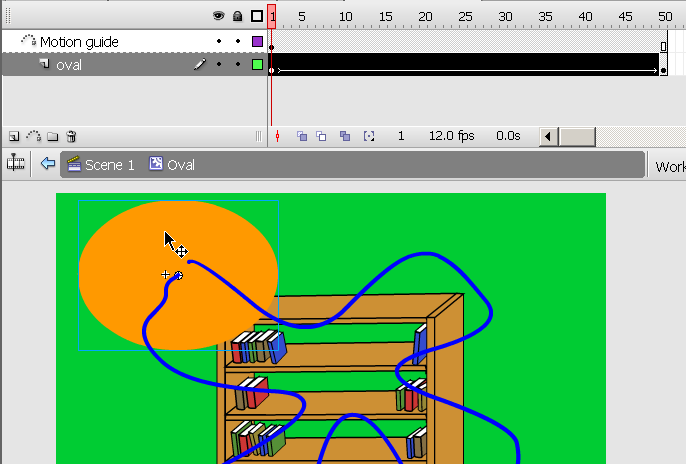
Your embedded movie clip might look like this:

Example:
- flash-cs3-mask-2.html
- flash-cs3-mask-2.fla
- Directory: http://tecfa.unige.ch/guides/flash/ex/special-effects
Links
- Work with mask layers, a section of "creating animation - animation basics" of the Adobe Using Flash Manual].
- For CS4: See also Graphic Effects Learning Guide for Flash CS4 Professional. Things did change since CS3 ....
