Flash component button tutorial - AS2
This is part of the flash tutorials
Introduction
Warning: This tutorial shows how to use button components with obsolete ActionScript 2 coding. You may consider reading the Flash component button tutorial
- Learning goals
- Learn how to use the component button with ActionScript 2
- Prerequisites
The following tutorials are recommended but not fully necessary
- Moving on
- Level and target population
- Beginners
- Quality
- Quality may be fairly low, ActionScript 2 is outdated.
In Flash CS3 there exist two fundamentally different kinds of buttons:
- Button symbols (objects). See the Flash button tutorial. Graphically speaking, button symbols can be just any kind of drawing and their visual behavior is highly customizable.
- Button components. These are part of the built-in components library and that provides some easy to interface components. Graphically speaking, these buttons are some kind of nice looking, semi-transparent rectangles.
Button components are a bit easier to use than button symbols.
- Design goal of the example
The goal is to make a sort of simple Flash web site. The user at all times will have a menu to the left that will allow him to navigate to different contents.
Have a look at the flash-cs3-simple-slide-show-menu-AS2.html example before you start reading.
Note: In the Flash button tutorial we also demonstrated how to do this with built-in and home-made buttons.
- Step 0 - Open the component library
- Make sure that you are working with ActionScript 2. I.e. when you create a new file, select Flash (ActionScript 2.0) or change the publish settings.
- Window->Components or hit CTRL-F7
- Then dock this panel somewhere
.... of course, you can do this also in Step 3.
- Step 1- Planning the layers
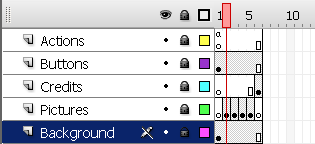
In this example we will work with five layers:
- Actions: will include a little Action Script code
- Buttons: will include the buttons (displayed on all "pages")
- Pictures: Contents we want to display
- Credits: A special page for the "who's done it" (we also could have used the pictures layer for this).
- Background: A simple background that will remain stable.
So the timeline roughly will look like this:

Create these layers now
- Step 2 - Add pictures or other contents
- Decide how many pictures you want (we took four)
- Select the Pictures layer
- Frame 1 is reserved for a Title page.
- Create a few new empty keyframes (hit F7) and fill them with pictures or any other content or drawings you'd like. See button tutorial if you don't know how to import pictures. Btw pasting a picture to the stage also does the trick.
- Step 3 - Get buttons from the library
- Select the buttons layer
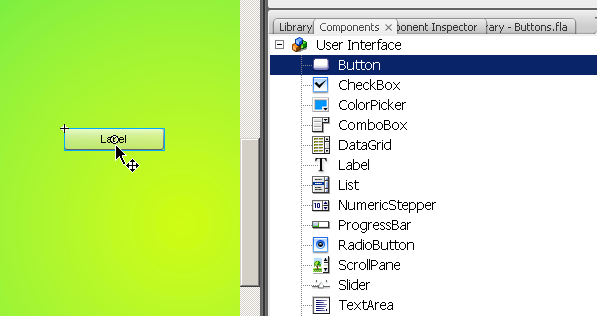
- Open the component library, select "User Interface" and drag as many buttons to the stage as you have pictures. Add an extra one for the credits page.

- Put them into a good position. You may use the Align panel to align and distribute properly (see the Flash arranging objects tutorial if needed).
- Step 4 - Name the buttons
- Click on a button (make sure to lock other layers)
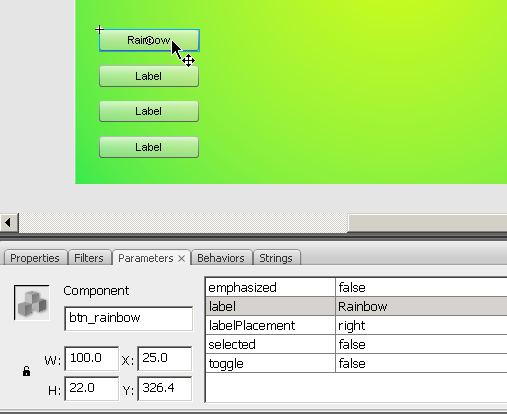
- Select the Parameters panel (menu Window->Properties->Parameters)
- Give the button instance a unique name: e.g. btn_rainbow is fine. ("btn" means "button" and "rainbow" because this button will lead to a rainbow picture). To be safe:
- Start the label name with a letter
- For the rest use letters, digits or the underscore "_".
- Do not use whitespaces or punctuation characters or dashes !!
- I suggest that you use only lower case letters (Names are case sensitive)
- Then change the label parameter of the button. This is what the user will see. Type anything there, but don't make it too long (it's a button after all). If your text is bigger than the label, change its width in the same panel, i.e. modify the W: field.
Notice how different it is to work with a component vs. using buttons as explained in the Flash button tutorial

Make sure you did this to all buttons.
- Step 5 - Add ActionScript
ActionScript 2 code is much simpler than ActionScript 2. The (good) reason why the much more powerful ActionScript 3 is more complicated is that ActionScript 3 allows to program Flash *.swf without even opening the Flash authoring environment. It's a language also made for programmers who do not necessarily like this frame-based tool and who prefere to develop with an IDE like Adobe Flex.
- Open the Action Layer, Click in Frame 1
- Hit F9 to open the "Actions-Frame" panel. In case it is docked with the parameters, you may undock it to have some more space. Then insert the code below.
stop();

btn_rainbow.onPress = function() { gotoAndStop(2); };
btn_tecfa.onPress = function() { gotoAndStop(3); };
btn_bosses.onPress = function() { gotoAndStop(4); };
btn_my_computers.onPress = function() { gotoAndStop(5); };
btn_credits.onPress = function() { gotoAndStop(6); };

btn_edutech_wiki.onPress = function () {
  getURL("http://edutechwiki.unige.ch/en/Flash_components_tutorial", "_blank");
};
This is much simpler than the ActionScript 3 code found in the Flash component button tutorial. We just use the following syntax:
- name_of_button_instance.onPress = function () {
- gotoAndStop (N);
- };
Note: Instead of putting this code in the Action layer in one single script, we also could have attached it to the buttons as we did in the Flash button tutorial - AS2's simple slide show.
- Results
- flash-cs3-simple-slide-show-menu-AS2.html
- Grab the flash-cs3-flash-cs3-simple-slide-show-menu-AS2.* files from
Improvements to be made / exercise
- If you got more and/or bigger pictures, you actually should not include the pictures in the *.swf, but rather load these from the Internet.
You then have to use how to use/program a preloader (we will cover this in some other tutorial).
- You may add text (labels) to each picture
- You also could add another URL button (e.g. I should add one to the TECFA Logo on top left).
- Exercise
- Add some contents to frame one and add a "home" button to navigate there.
Customizing buttons
You can customize button skins, but this is not easy.
- Double click the button on the stage
However, before you try this:
- Be aware that you can change width and height simply though the parameters panel
- Color will adapt to background (buttons are transparent)
Read more about Customizing the Button at Adobe