Stitch Era - interface features for working with a design: Difference between revisions
m (using an external editor) |
m (using an external editor) |
||
| Line 83: | Line 83: | ||
Grouped items shows as so-called packs. | Grouped items shows as so-called packs. | ||
When you select | When you select a embroidery object in the manager or when you click on an object in the workspace (doesn't matter) you then will see its properties in the '''Object Inspector'''. | ||
[[image:stitch-era-object-manager.png|frame|none|Object manager and Object inspector (stitch objects shown)]] | [[image:stitch-era-object-manager.png|frame|none|Object manager and Object inspector (stitch objects shown)]] | ||
In the screen capture above, you can see the "body" (fill) properties of a stitch aread that is a so-called area pattern. E.g. you can see that we use a pattern called PTM-0044 and that stitch density is 4 lines/mm. All these parameters can be changed. In the bordeline tab you then could add a border (e.g. a zigzag stitch) and in the ''More'' tab you can define exit/entry points and trims. Note: You also can change parameters through the menu bar on top, but I prefer doing it through the inspectors. Both methods are just fine. | In the screen capture above, you can see the "body" (fill) properties of a stitch aread that is a so-called area pattern. E.g. you can see that we use a pattern called PTM-0044 and that stitch density is 4 lines/mm. All these parameters can be changed. In the bordeline tab you then could add a border (e.g. a zigzag stitch) and in the ''More'' tab you can define exit/entry points and trims. Note: You also can change parameters through the menu bar on top, but I prefer doing it through the inspectors. Both methods are just fine. | ||
Revision as of 16:58, 16 June 2011
This article or section is currently under construction
In principle, someone is working on it and there should be a better version in a not so distant future.
If you want to modify this page, please discuss it with the person working on it (see the "history")
Introduction
Stitch Era has a fairly complex interface. The purpose of this piece is to introduce some features and tricks that you will need for many different tasks. We will not explain how to draw and manipulate vectors, stitch sections, etc. but introduce some tools that will help understanding what you have got on your screen.
Interface layout
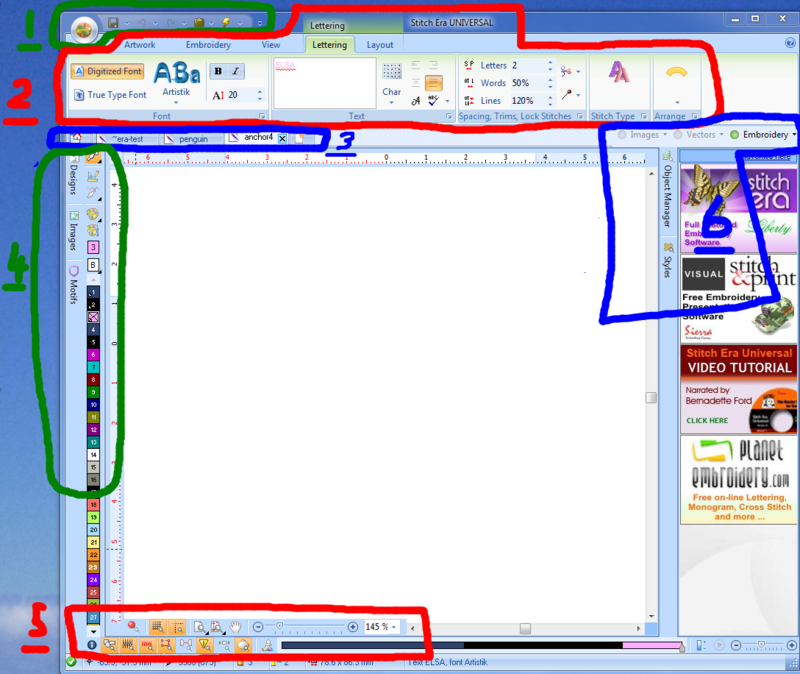
Let's just recall the general layout of the interface. The annotated screen capture below shows its most important areas. In this tutorial we will focus on stuff that is below and to the right.
- File Menu button and quick access toolbar
- Open / write design and embroidery files
- (Re) process stitches (lightning menu)
- Main tools / Ribbon bar
- These can change contextually.
- Artwork
- Allows to import bitmaps and vector graphics
- Draw vector shapes that do not include stitching information yet. This is maybe the preferred way to start drawings as opposed to directly inserting stitch parts available through the Embroidery tab or Designs->Create sections.
- Embroidery
- Define materials and hoop
- Retrieve patterns
- Allows to insert stitch parts
- View
- Allows to define various view parameters (including a refresh button and a satellite view)
- Includes snap and measure tools
- Body
- Change parameters of a fill (shapes)
- Border
- Change parameters of a stroke (lines)
- Layout (Rescale, rotation, etc. but also repetitions)
- Tabs on top of ribbon bar show types of selected object and help you understanding what you can do with it.
- Area (shows what you can change for a selected part, i.e Body+Border+Layout)
- Path (shows what you can change for a stroke, i.e. border + layout)
- Lettering (shows that you can change lettering and layout)
- Block (shows that you selected more than one object)
- Artwork (shows what you can do with selected vector graphics)
- Convert (shows that you could convert a vector image to stitches)
- Package ?
- Document bar
- Allows to open/close documents and create new ones.
- Clicking on the home icon will bring you to the start page.
- Show/hide vectors/stitch sections (to the very right, near the object manager). These buttons are important.
- Create and edit tools / color management / color palette
- Some of the functionalities are also available through the main menu
- Designs
- Select Object (press mouse button for a while for options): Press this to return to select mode !
- Create Sections: Define how to create new different kinds of parts, i.e. fills vs. strokes, kind of stitches.
- Edit Stitches
- Images (changes contextually, e.g.:
- When stitchable object is selected: Change Color palette and optimize Needles
- When a vector object is selected: Change color, etc.
- Motifs
- Provide information about "needles" that will be used. In single needle machine, think of this as threads that you will have to change.
- Double-click allows to change parameters, e.g. the color, thread make/model and number.
- Display and reference controls (at the bottom)
- Object manager, Inspector and Styles (to the right)
- The object manager gives you fine grained control over images, vector objects and stitch objects. Open it all the time, if your screen is large enough !
- Recall: the three little toggle buttons (images, vector objects and embroidery objects) on the document bar allow to show/hide these three types of objects.
We call the big rectangle in the middle where you can see your design the workspace
Getting out of a tool
If you think that you are stuck with editing something and want to abort, try two things:
- ESC (escape from editing)
- F11 (escape from a tool, i.e. put the workarea/mouse in selection mode)
Object manager
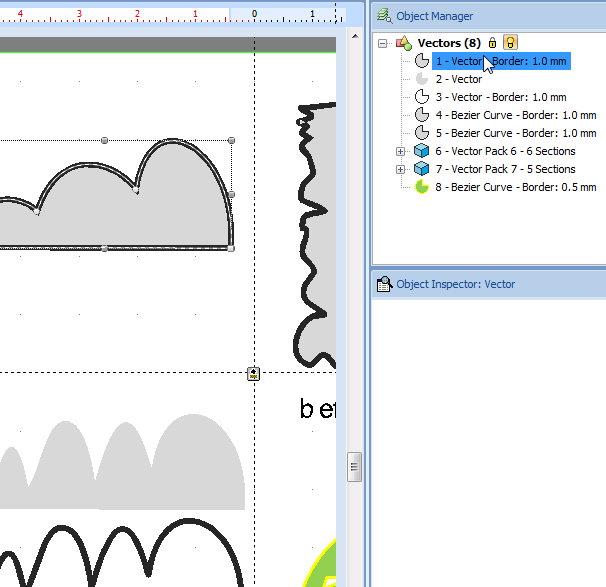
Please locate the Object manger (vertical tabs to the right). We shall use it very often.
The Object manager displays both a list of vectors and of embroidery objects (stitch sections). You should be aware all the time whether the tiny little vectors and embroidery buttons (to the upper right of the workspace (the big panel in the middle) are on (green) or off ("red") or inactive ("grey"). In other words, you can hide stuff and not see it anymore...
Items in the object manager are sorted according to stack and stitch order. Objects being displayed / stitched last are at the end. You can change order, but dragging one or more items (use CTRL or SHIFT to select several). You also could change order by clicking on the More tab in the inspector and then change through the "123" button. Finally, each object is displayed with some summary information.
- Vector objects show ordering number, type, border, etc. Filled, border-only for fill+bordered item show differently.
- Stitch objects show ordering number, type, underlay type and number of stitches
Grouped items shows as so-called packs.
When you select a embroidery object in the manager or when you click on an object in the workspace (doesn't matter) you then will see its properties in the Object Inspector.
In the screen capture above, you can see the "body" (fill) properties of a stitch aread that is a so-called area pattern. E.g. you can see that we use a pattern called PTM-0044 and that stitch density is 4 lines/mm. All these parameters can be changed. In the bordeline tab you then could add a border (e.g. a zigzag stitch) and in the More tab you can define exit/entry points and trims. Note: You also can change parameters through the menu bar on top, but I prefer doing it through the inspectors. Both methods are just fine.
When you use auto-digitzing procedures as we do, you rather would parametrize such things earlier, i.e. before you create the stitch section from drawing vectors. However, I found that often some adjustments are necessary.
Zooming
When working with vectors and embroidery objects you sometimes have to zoom in a lot.
- To zoom into the right spot,
- Click on the zoom area tool bottom or hit F6,
- then move the cursor over the center of area you plan to work with.
- then rotate the mouse wheel.
- Another zooming-in option is to use the pull-out menu of the same zoom area button and select the zoom level. Professional seem to work at 600%...
- To see the whole picture again: Click on the button next to it (Maximize Total) or hit CTRL-F6
- Finally, if zoomed, you need to see other parts of your design, you can use the hand to "drag" the workspace around (nothing will be changed in the drawings just your view of it ...)
F6 / CTRL-F6 are the only two shortcuts I know by heart for now. I really use it all the time...
Hiding and locking objects
We mentioned this before, but often you have to turn on/off either view of vector objects or view of stitch objects. If both are on, you may get confused. As rule: Always turn of vector object view when you edit stitch sections !
- Use the little buttons on top right to turn on (green) or off (red)
Now these buttons are also pull-down menus that give you additional hide/unhide and lock/unlock facilities.
You may for example hide stitch sections. This is very convenient when you work with objects that print on top of each other. See the screen capture below.
Warning: Before you freak out if at some point you can't see vectors or embroidery stitch sections or parts ... have a look at these tools. They will tell what should show/not show and what is locked/unlocked !
Rendering of stitch sections
You can look at stitches in two fundamentally different ways.
- Normal view, i.e. some sort representation that shows stitches as dots and lines
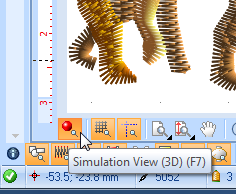
- 3D view, a kind of simulation that shows how the printed object would look. This simulation is not very good, but nevertheless helpful.
To turn 3D view on/off, use the little red ball in the lower left or hit 'F7
If a static view is not enough, you then can examine and simulate the stitching process in three ways as shown in the screen capture below.
1) If you tick Navigation View, navigation controls will appear to the right of the play head and and that allow you to navigate forward and backward in your design and jump to different points of interest, e.g.
- section to section
- stitches by 10's or 100'.
- color to color
2) To the very right, there is a simulation player (including a control for speed and thickness of stiches). Hit the little forward arrow in order to simulate what your embroidery machine will do.
3) you also can move the play head forth and back (left/right). The play head is the little white cursor that looks like a house.
Depending on whether 3D view is on or off you will get a different view.
This tool is crucial for spotting potential trouble in your design, e.g. parts that are stiched over others when they should not. Of course, you do think about these things, but there is always 1 or 2 things that are missed.
Finally, the simulator tools also to enter Stitch Editing mode through the little pull-down button (something we don't do yet). I believe that you will land on the stitch where you halted the simulation.
To exit from the stitch editor is not obvious, hit the the select object button in the design panel upper left or hit F11


