Stitch Era - interface features for working with a design
Introduction
Stitch Era has a fairly complex interface. The purpose of this tutorial in the Stitch Era embroidery software series is to introduce some features and tricks that you will need for many different tasks. We will not explain how to draw and manipulate vectors, stitch sections, etc. but introduce some tools that will help you understanding what you have got on your screen and introduce the idea that you can change the (many) properties of each object in quite simple ways.
This tutorial is by no means complete. I will add stuff now and then. An initial version was written in 2011. It was partially updated for Stitch Era 17 in fall 2017 and needs to be updated for Stitch Era 20.1 (2021)- Daniel K. Schneider
Interface layout
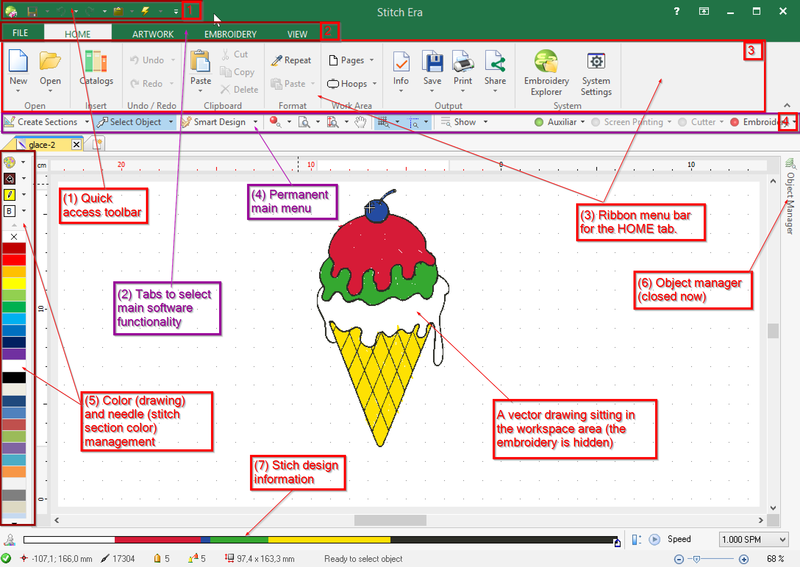
The following screen capture shows the Stitch Era 17 Liberty screen with the Home tab selected. There are three menu bars on top: A tiny "quick access" toolbar (1)on top, a fluid ribbon bar with tabs in the middle (2,3), and a main menu bar below (4)

Some of these interface section are stable, others (e.g. the big ribbon bar and the color menu) adapt to both selected tabs and selected objects.
- Save button and quick access toolbar. The most important button is the lightening button that will compute stitch sections when pressed. Its pull-down menu allows automatic stitch section creation (not recommended because power hungry). Untick !
- Ribbon menu tabs to select main software functionality.
- Main ribbon menu bar. This toolbar will adapt its tools ribbons to the tabs (see above) and the selected object on the workspace
- Permanent small main menu bar for functionality that people probably use often
- Color and needle management
- Object manager (open/close)
- Stitch design information.
Below is a rough list of functionalities. As we shall explain later and in other tutorials, some functions are available through more then one tool. E.g. whenever possible we use the object inspector for (re)parametrizing stitch sections. Other people might use the main ribbon bar menu or the context menu.
File Menu button and quick access toolbar
The tiny quick access bar on the very top left of the screen does only include three important tools.
- Open / write design and embroidery files
- Redo / undo an operation
- (Re) process stitches (lightning menu). By default Stitch Era will compute stitches each time you change a parameter, the shape or the position of a stitch section. I suggest turning this off (pull down menu) and then only generate stitches once your are done editing.
Main tools / Ribbon bar (without selecting objects)
Contents of the ribbons will change when you select a tab (but also when you select and object in the workspace). The following tabs are available at all times (see the screenshot above and below)
File- Will exist from the work space and allow saving and exporting. You also find options there, i.e. change some parameters like units and also define shortcuts.
Home- Define hoops size (important)
- Print (creating a paper summary of your design) etc.
- Embroidery explorer. Browser your system for embroidery files and open or import. E.g. you can import various machine formats and then edit stitches.
- ....
Artwork- Allows to import bitmaps, process and translate to vector graphics
- Draw vector shapes that do not include stitching information yet. This is maybe the preferred way to start drawings as opposed to directly inserting stitch parts available through the Embroidery tab or Designs->Create sections.
- ....
Embroidery- Create stitch sections
- Create letters and monobrams
- Sort stitch sections by color
- ....
View- Allows to define various view parameters (including a refresh button and a satellite view)
- Includes snap and measure tools
Main tools / Ribbon bar (with Artwork and vector selected in the workspace)
When you select Artwork, you can open images, vectors and create vectors. However, the main drawing tools only will appear once you have a picture or vector shape in the workspace. You will see Vector and Layout subtabs under a Artwork tab as the following screenshot shows

- Vector
- Change parameters of strokesd (lines) and fills
- Add shapes and text or draw freehand
- Layout
- Allows to resize and position
- Remove holes
- Split vectors with the help of a split line
- .....
Main tools / Ribbon bar (with embroidery / stitch object select
When you select the EMBROIDERY tab instead of the ARTWORK tab you can convert vectors and have access to embroidery creating tools that also can be found in the Create Sections pull down menu.
- Art to Stitch tool: will appear when you either select a single vector drawing or select all. In the latter case you will again see the Artwork Vector/Layout tabs. Don't let this confuse you and make sure that you can find it again, since it is IMHO one of the most important tools...
The main menu includes several important tools,
- Show/hide vectors/stitch sections (to the very right, near the object manager). These buttons are important.
- View object tools (more are in the View tab)
- Selection tools (e.g. object or area).
- Panning tool (the hand)
- ....
Select Stitches: A tiny pull-down menu will be available on top of the needle tools if you click on a stitch section or if you select the embroidery tab. It allows defining how to select stitches for further manipulations. (To manipulate a stitch, enlargen then select. To insert stitches use the context menu)
Vector colors: Whan a vector object is selected you can change its color
When you select a stitch object your can optimize needles and change needle (thread) palettes. Double-clicking on the little color allows icon below the palette (or directly on the thread color) allows to change parameters, e.g. the color, thread make/model and number.
Object manager, Inspector and Styles (to the right)
The object manager gives you fine grained control over images, vector objects and stitch objects. Open it all the time, if your screen is large enough !
Recall: the little toggle buttons in the main menu (top right) allow to show or hide objects of different types.
We call the big rectangle in the middle, where you can see your design, the workspace

Older versions of Stitch Era had a somewhat different layout (most screenshots in the tutorial were made with these) The annotated screen capture to the right and that you could enlargen shows its most important areas. We could distinguish about 6 different important areas:
- File Menu button and quick access toolbar
- Main tools / Ribbon bar (on top)
- Document bar
- Create and edit tools / color management / color palette (left)
- Display and reference controls (at the bottom)
- Object manager, Inspector and Styles (to the right)
The Object manager and the object inspector
The object manger and the inspector are handy and crucial tools for working with stitch sections. Most parametrizations can be achieved through these two tools (as opposed to using the ribbon menus or the context menu which is also possible).
Please locate the Object manger (vertical tab to the right). We shall use it very often. When you open it, it will also display the object inspector. The Object manager lists pictures, vectors and embroidery objects (stitch sections) that you are using in a design.

Items in the object manager are sorted according to stack and stitch order. Objects being displayed / stitched last are at the end. You can change order by dragging one or more items up or down. Press the CTRL or the SHIFT key to select several. You also could change order by clicking on the More tab in the inspector and then change through the "123" button. Finally, each object is displayed with some summary information.
- Vector objects show ordering number, type, border, etc. Filled, border-only or fill+bordered items show differently.
- Stitch objects show ordering number, type, underlay type and number of stitches
Grouped items show as so-called packs.
When you select an embroidery object in the manager or when you click on an object in the workspace (doesn't matter) you will see its properties in the Object Inspector.

In the screen capture above, you can see the "body" (fill) properties of a stitch area that is a so-called area pattern. E.g. you can see that we use a pattern called "default" and that stitch density is 5 lines/mm. All these parameters can be changed. In the borderline tab you then could add a border (e.g. a zigzag stitch) and in the More tab you can define exit/entry points and trims. Note: You also can change parameters through the ribbon menu bar on top, but I prefer doing it through the inspector. Both methods are just fine.
When you use auto-digitizing procedures as we do, you rather would define parameters for areas and paths earlier, i.e. before you create the stitch section from the drawings (vectors). However, I found that most often some adjustments to stitch sections are necessary.
Show and hide objects
You should be aware all the time whether the Auxiliary or Embroidery buttons (at the upper right of the workspace) are on (green) or off ("red") or inactive ("grey"). In other words, you can hide stuff and not see it anymore...

In prior versions of Stitch Area, Artwork was available under Vectors

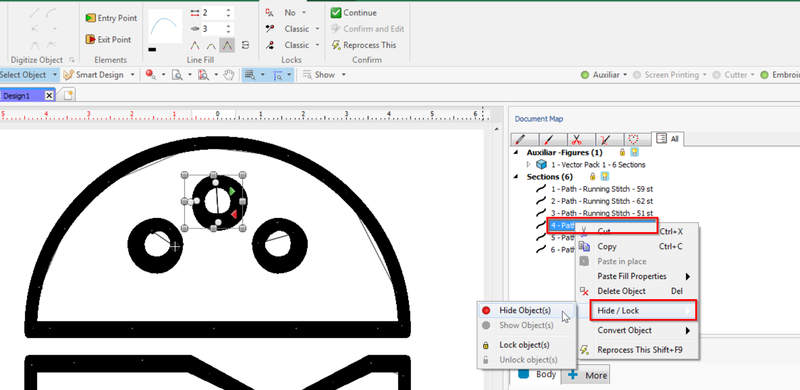
In addition, you could show/hide and lock/unlock individual objects (right click on an object in the document map panel)
Killing objects
You can select one or more objects in the object manager and then kill them by pressing CTRL-X. Like in most programs, holding down the SHIFT key allows to select several objects in a row and pressing CTRL allows to pick out several single objects.
Important notice about embroidery - vector editing round tripping:
If you decide to rather work at the vector objects level, then you probably want to go back to vector level if you notice that some drawings don't render as they should because the drawings need adjustments.
You now have two options:
- Kill all embroidery objects. To to so, click on Sections in the Object Manager (this will select them all), then hit CTRL-X. We suggest not to use CTRL-A in the workspace and then kill since you also may kill all the vector objects that way ....
- Kill selected embroidery objects only. In that case you will have to re-digitize just the vector objects that were used to create these. The procedure is the same. Select the (maybe redesigned) vector objects and click on To Embroidery -> Art to Stitch (or some other digitizing method).
In any case:
- Avoid killing vector objects by mistake
- Avoid generating two or more stitch areas that represent the same vector object (unless you want to, e.g. if you plan to generate a manual border and a fill separately you would use the same vector shape and digitize once with a border and once with a fill). In short, before re-digitizing: kill the stitch section(s) that you want to replace. Else you will stitch two or more of the same.
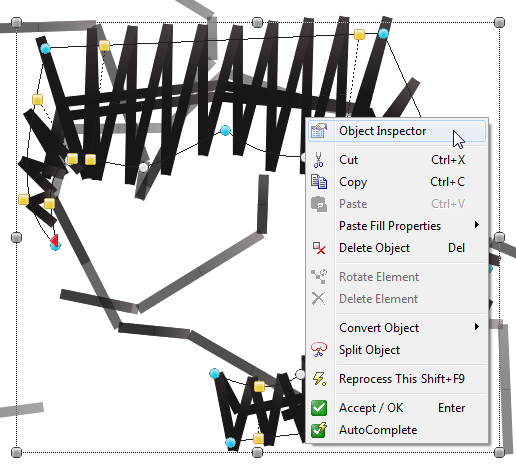
Objects in the workspace can be manipulated through a context menu (in addition to other tools).
Below we just show a few examples that demonstrate the fact that many operations on a selected object or a selected part of an object (like a node) can be achieved through this quick access method. The same operations are usually available through the main menu on top and/or the object inspector.
Dealing with embroidery objects, i.e. a Zigzag area:

The following screen shot shows that instead of using the right-click menu in order to change the Fill-mode, you also could do this through the main menu bar. In addition one could use the inspector shown to the right.

The following picture shows that you will get a different menu when you click on one of the little dots that will show after selecting an object. This is somewhat tricky (zoom in lot). The selected dot just on top left of the menu is a so-called corner node that defines a turn in the area shape definition. The yellow points define lines that define stitch directions, etc. Stuff that we won't explain here. We just wanted to show that you should be aware of what you selected on the screen.

The picture below demonstrates that vector objects are simpler than embroidery objects. However, drawing operations are simpler and that's the reason why I prefer creating designs with vector graphics first.

Getting out of a tool
If you think that you are stuck with editing something and want to abort, try two things:
- ESC - escape from editing / drawing something
- F11 - escape from a tool, i.e. put the work area/mouse in selection mode
- If you were zooming with F6, hit F6 again
Zooming
Zooming controls are in different locations depending on the software version. In Stich Era 17, there are two pull down menus in the menu bar on top of the workspace. In addition, you can click on the View Tab and the zooming controls are to the left.

When working with vectors and embroidery objects you sometimes have to zoom in a lot. To zoom into the right spot there are two options:
- Click on the zoom area tool button, or hit F6,
- then drag the cursor over the center of area you plan to work with.
- then rotate the mouse wheel to adjust
Alternatively, select the object in the Object Manager to right and then hit SHIFT-F6. This will fill the workspace with the selected object. Another zooming-in option is to use the pull-out menu of the same zoom area button and select the zoom level. Professionals seem to work often at 500%. To see the whole picture again: Click on the button next to it (Maximize Total) or hit CTRL-F6. Finally, if zoomed, you need to see other parts of your design. Use the hand to "drag" the workspace around (nothing will be changed in the drawings just your view of it ...)
In older versions of the software, the zoom tools were at the bottom:

F6 / CTRL-F6 / SHIFT-F6 are some of the few shortcuts I know by heart for now. I really use it all the time... tiny little vectors and
Hiding and locking objects
Hiding/showing types of objects
We mentioned this before, but often you have to turn on/off either view of vector objects or view of stitch objects. If both are on, you may get confused. As rule: Always turn off vector object view when you edit stitch sections ! The same is true if you add hotfix designs.
- Use the little buttons on top right to turn on (green) or off (red)
- These buttons also include a pull-down menu (not shown here) that allows to lock/unlock this "layer" (type of object). The buttons in this case will turn orange.

Hiding/showing and locking/unlocking individual objects
It sometimes is useful to hide or lock and individual objects. In the object manager, use the context menu (right click).

In Stitch Era 11, there were pull-down menus to hide/unhide and lock/unlock.

Warning: Before you freak out if at some point you can't see vectors or embroidery stitch sections or parts ... have a look at these tools. They will tell what should show/not show and what is locked/unlocked !
Rendering of stitch sections
Processing of stitches
When you digitize a vector graphic you will create stitch sections. Alternatively you may directly draw stitch sections through the embroidery panel. However, we usually prefer creating a vector (art) object first.
Stitch sections are not yet stitches. They just define the shape of an area or a path were stitches should go and also define lots of parameters, e.g. stitch density, type of fill, etc.
In order to generate stitches, you either must press the generate stitches button on top (f9) or you may turn on automatic generate in the generate stitches pull-down menu (lightning button on top in the quick access bar).
We rather suggest not to use the automatic generation since it puts quite a lot of strain on the processor when you make lots of modifications to the stitch sections.

Looking at the stitches of your design
You can look at stitches in two fundamentally different ways.
- Normal view, i.e. some sort representation that shows stitches as dots and lines
- 3D view, a kind of simulation that shows how the printed object would look.
To turn 3D view on/off, use the little red ball in the main menu bar (Stitch Era 17) or the lower left (Stitch Era 11) or hit F7 or use the ribbon in the VIEW tab. In addition there is a separate simulation view window.

The 3D view can be parametrized by clicking on Draw Mode or in the Simulation tool. E.g. you can adjust light angle, luminosity and quality of drawing. In the simulation tool you can set:
- quality (slider)
- luminosity (slider)
- light source angle (turn the ball)

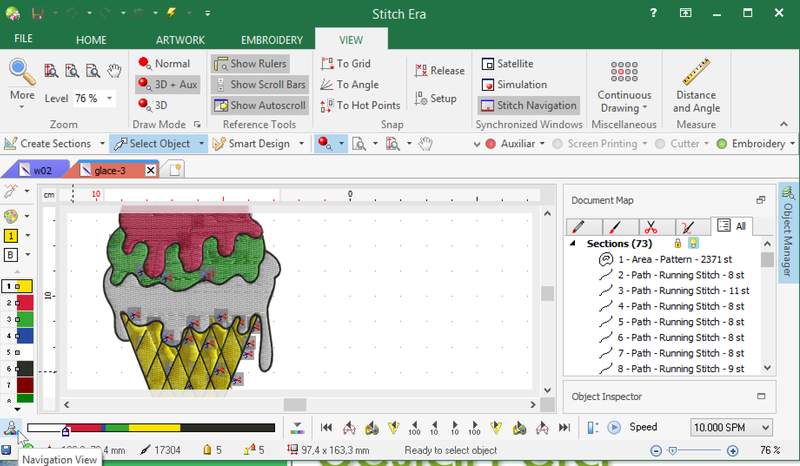
If a static view is not enough, you then can examine and simulate the stitching process in three ways as shown in the screen capture below.

1) If you tick Stitch Navigation, navigation controls will appear at the bottom and that allow you to navigate forward and backward in your design and jump to different points of interest. In order to enable this you must both tick Stitch Navigation in the View panel (this will enable stitch information at the bottom of the window) and the little "running man" icon at bottom left. You can navigate:
- section to section
- stitches by 10's or 100'.
- color to color
2) To the very right, there is a simulation player (including a control for speed and thickness of stitches). Hit the little forward arrow in order to simulate what your embroidery machine will do.
3) you also can move the play head forth and back (left/right). The play head is the little white cursor that looks like a house.
Depending on whether 3D view is on or off you will get a different view.
This tool is crucial for spotting potential trouble in your design, e.g. parts that are stitched over others when they should not. Of course, you do think about these things, but there are always 1 or 2 things that are missed.
Again, older versions of this software, do have a different layout. E.g. Stitch Era 11 had more controls at the bottom.

Finally, the simulator tools also to enter Stitch Editing mode through the little pull-down button. You will land on the stitch where you halted the simulation and can manipulate stitches through the context menu (right click)

To exit from the stitch editor is not obvious, hit the the select object button in the design panel upper left or more simple, hit F11

Finishing tools
When you work on a larger complex design and auto-digitize from vector art, you may wind up with lots of stitch sections that are not ordered by needles. This will then cause a problem for folks who hate changing threads.
You may use the By Color tool in the Embroidery tab as shown aside and as explained in more detail in the Stitch Era - vector and thread color tutorial.
However, if you designed a careful stack order beforehand - in particular if you digitize from vector graphics - you easily can mess up everything. I.e. you will have to move sections again in the object manager.
Use it, but with care ....
Using other software to look at your design
I find the Stitch Era 3D rendering of designs good enough to see what roughly will happen. However, other (free) programs provide much nicer results. As you can see in various tutorials, I sometimes use these when I don't feel embroidering a design and/or taking pictures.
- WILCOM TrueSizer. Reads most formats.
- Bernina Artlink, reads most formats, but cannot read *.jef
- Pulse ambassador Reads most formats and includes an animation tool for the stitching process (little icon on top).
- MyEditor produces the most pretty 3D view, since it includes a shader, i.e. simulates the effect of light source. You may set the position of the source and its intensity (menu View->Set Light source). Finally it has a color manager, a sequence viewer and a practical radar window (Menu View->Rollups)
The caveat of using such software is that none will read Sierra *.dsg files. I.e. you will have to produce an embroidery file first. In the picture below you can see the same *.jef file. Colors may come out wrong. Also, the relation between thread colors in Stitch Era and the way *.jef files encodes this information is something that I don't fully understand yet. I.e. would it have made a change if would have used a Madeira palette instead of the system one ?
My two favorite programs are Wilcom (simple to use and accurate) and MyEditor (most pretty and radar view panel)


