Stitch Era - creating embroidery with hot fix stones: Difference between revisions
mNo edit summary |
mNo edit summary |
||
| Line 105: | Line 105: | ||
[[File:stitch-era-17-rocket-7.png|thumb|none|600px|Windows made with 7 2mm stones]] | [[File:stitch-era-17-rocket-7.png|thumb|none|600px|Windows made with 7 2mm stones]] | ||
'''(9) Option B: Add a single stone for each window''' | '''(9) Option B: Add a single stone for each window'''. Adding individual stones and editing is explained in more detail in the [[Stitch Era - creating hot fix designs]] tutorial. | ||
* Untick Auxiliar and Embroidery and tick Hotfix | * Untick Auxiliar and Embroidery and tick Hotfix | ||
* Kill all the hotfix areas | * Kill all the hotfix areas | ||
| Line 111: | Line 111: | ||
* Hotfix Tab | * Hotfix Tab | ||
* Click on Manual | * Click on Manual | ||
* Now a bit tricky: Open Manual Hotfix / BEAD tab before clicking and select the right stone size. If it is not in the palette, you can add it using "Add bead". | * Now a bit tricky: Open Manual Hotfix / BEAD tab before clicking and select the right stone size. If it is not in the palette, you can add it using "Add bead". | ||
[[File:stitch-era-17-rocket-8.png|thumb|none|600px|Windows made with single 7mm (SS34) stones]] | [[File:stitch-era-17-rocket-8.png|thumb|none|600px|Windows made with single 7mm (SS34) stones]] | ||
* To fine tune | * To fine tune positions of stones, use the Edit Hotfix menu (on top of the stones palette to the left) | ||
* To exit manual setting, open another tab | * To exit manual setting or edit hotfix, open another tab and click on something. | ||
Read [[Stitch Era - creating hot fix designs]] for some more explanation. | Read [[Stitch Era - creating hot fix designs]] for some more explanation. | ||
Revision as of 17:48, 23 October 2017
Introduction
This beginner's tutorial for the Stitch Era embroidery software explains how to create embroidery designs that include hotfix stones.
- Tutorial home page
- Stitch Era embroidery software
- Learning goals
- Digitize a vector graphic into an embroidery plus hotfix stones
- Prerequisites
- Stitch Era - creating embroidery from vector images
- Stitch Era - creating hot fix designs
- Related pages
- Hotfix stone
- Materials
- You can reuse the pictures. In the wiki, click on picture to make it larger, then click again and save it.
- Quality and level
- This text should technical people get going with Stitch Era. I use it for an optional master degree course in educational technology.
- Last major update
- October 2017.
This tutorial will combine some concepts and procedures from two other other tutorials, i.e. Stitch Era - creating embroidery from vector images and Stitch Era - creating hot fix designs. We will go through a simple example
Example
Let's create a little rocket with nice crystal windows. We can find one on OpenClipArt
- Download Rocket icon By pitr
- Make sure to get the SVG file, e.g. click on the picture and then save as.
(1) Resize the rocket in Inkscape. Since the Rocket is fairly small we would like to make it bigger, i.e. make it fit into a 10cm by 10 embroidery hoop. According to our experience, scaling works better in a vector editing tool. However, as you shall see, the result won't be usable, but for a mysterious reasons, scaling the drawing before does something good.
- Open the Rocket in Inkscape
- Select all, ungroup
- Open the transform menu (CTRL-SHIFT-m or Menu Object -> Transform)
- Tick "scale proportionally"
- Enter 95mm or 40 mm if you prefer a smaller size. 9.5 x 9.5cm can be considered a fairly large embroidery for this type of drawing.
- Save the file as plain SVG.
(2) Import the scaled SVG rocket to Stitch Era
- Define a hoop size. We suggest 10 x 10cm
- Artwork tab -> Open Vector file. You now should see the rocket. As you can see, Stitch Era does not take into account scaling using viewports as Inkscape does.
(3) Adjust the size in Stitch Era
- Click on the rocket (do not use CTRL-A)
- Ungroup (using either the context menu or Artwork->Layout tab->Ungroup ALL)
- CTRL-A
- Artwork->Layout tab
- Set width to 90 (not 95, because we will need some extra space) or less, e.g. 40 if you want a small embroidery.
- Reposition in the middle (You can use the To Design tool in the ribbon bar, i.e. align horizontal and vertical with respect to the Design, i.e. the hoop).
Save the file as, e.g. rocket-1.dsg
(4) Adjust the size of the borders. The black borders of the parts (i.e. yellow body, blue windows and red fins= are too small for nice satin stitches. Let's make them just a bit bigger for now, i.e. 2mm.
- CTRL-A
- Vector Tab
- Set thickness of lines to 2mm as shown in the screenshot below.
Save the file as, e.g. rocket-2.dsg
(5) Flatten the drawing. This is not necessary for this rocket but we recall this in case you work with another rocket. Most often vectors drawings use several shapes that are piled on top of each other. In embroidery, one normally uses single layers (plus a bit of underlay), otherwise the stitched design will get very stiff and can break needles, etc....
- CTRL-A
- Layout Tab
- Combine vectors -> Simplify
After simplifying you may have to add some overlap again.
(6) Digitize the rocket. Read the Stitch Era - creating embroidery from vector images tutorial first, if you don't understand the concept. Below we just outline the steps.
- CTRL-A
- Embroidery tab
- Art to stitch
- Select Art to stitch (intelligent)
- Select Objects to fill -> Fill Areas and Borderlines (we do want to keep the black borders)
- Select Artwork Unaltered (or process overlaps if you didn't simplify your geometry)
To verify the result, tick on Embroidery. If stitches are not yet generated, then hit F9 (or FN f9 on some computers) or the lightening icon on top. Verify if the black borders overlap with the yellow and red parts. In principle they should. Otherwise, make then bigger.
Save the file as, e.g. rocket-3.dsg
Before you move on, we just would like to recall that you can hide or show various types of objects, i.e. auxiliar (includes the vector graphics), embroidery sections and hotfix designs. The main menu bar below the the ribbon menu bar includes buttons that you can tick on or off for viewing / hiding. If the button is greyed, objects to not exist.
If you are unhappy with the stitching, you can change the parameters of the various stitch sections (see the Stitch Era - adjusting stitch sections tutorial). You also can kill all the Sections and start digitizing again. Warning: Each time you digitize a vector object it will create a new stitch (or hotfix section) and keep the old one !
(7) Remove the stitched rocket "windows". As planned, we would like to used hotfix stones instead of embroidery for the windows.
- Untick Auxiliar in the menu bar. Since you need to preserve all the vector drawings for the windows it is better to hide the drawings. This way cannot kill any by mistake !
- Open the Object manager (to the right, see the previous screen capture). You now can see the document map panel to the right.
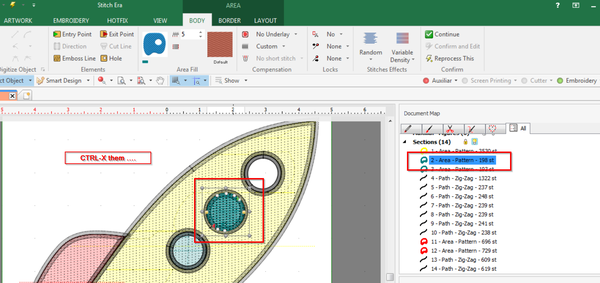
- Kill the blue window stitch objects
- You also can kill the black circles surrounding the blue window. As you can see by clicking on the black path in the Object Manager, we got two times three borders. One times three borders is enough, unless you do want doubly stitched ones.
Now, to create the windows, you either you could a single SS34 stone for each window or many tiny ones, e.g. SS6 (2mm).
(8) Option A: Add small hotfix stones
- Tick Auxiliar and untick Embroidery in the menu bar
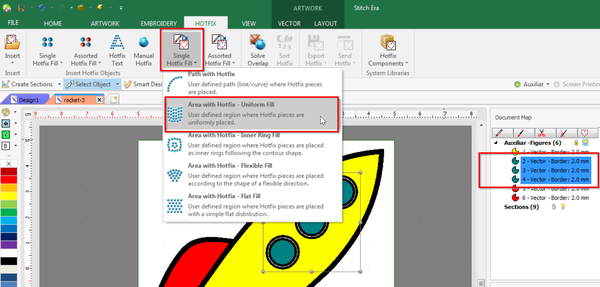
- Select the three windows (hold down the CTRL key while you select one by one)
- Open the Hotfix Tab
- Menu Single Hotfix fill -> Areas with Hotfix - Uniform fill
- Untick Auxiliar
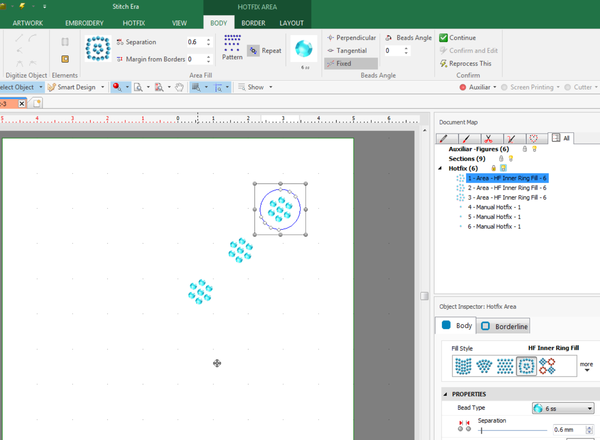
- Select the three hofix areas
- Set the stone size and other parameters. The following picture shows SS6 size, 0.6mm distance, and HF Inner Ring Fill pattern. You also could manually add a stone in the middle (see below)
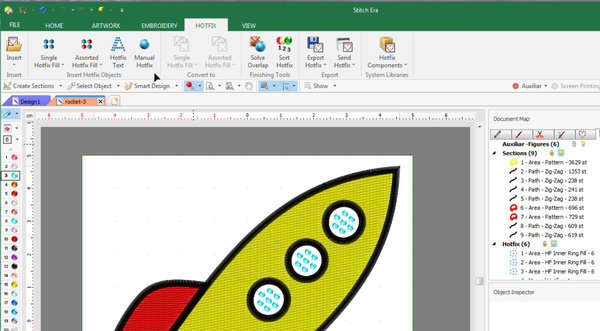
- Tick the embroidery tab to see the result.
(9) Option B: Add a single stone for each window. Adding individual stones and editing is explained in more detail in the Stitch Era - creating hot fix designs tutorial.
- Untick Auxiliar and Embroidery and tick Hotfix
- Kill all the hotfix areas
- Tick Embroidery
- Hotfix Tab
- Click on Manual
- Now a bit tricky: Open Manual Hotfix / BEAD tab before clicking and select the right stone size. If it is not in the palette, you can add it using "Add bead".
- To fine tune positions of stones, use the Edit Hotfix menu (on top of the stones palette to the left)
- To exit manual setting or edit hotfix, open another tab and click on something.
Read Stitch Era - creating hot fix designs for some more explanation.


