Flash CS3 frame-by-frame animation tutorial: Difference between revisions
m (using an external editor) |
m (using an external editor) |
||
| Line 29: | Line 29: | ||
The principle of all sorts of animations made with drawings (you also can script) is that you draw various versions of the same object in different frames. | The principle of all sorts of animations made with drawings (you also can script) is that you draw various versions of the same object in different frames. | ||
A frame is a drawing that is displayed at a given time. | A frame is a drawing that is displayed at a given time. In the timeline, each little box is a frame and they are numbered from 1 to .. | ||
When you start drawing with Flash, everything is drawn by default into a first frame in [[Flash layers tutorial|layer]] | When you start drawing with Flash, everything is drawn by default into a first frame in [[Flash layers tutorial|layer]] 1. | ||
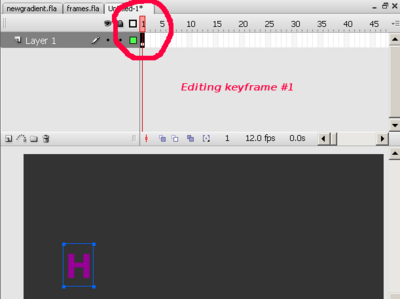
[[image:flash-cs3-frames1.png|thumb|none|400px|The default keyframe is frame # 1]] | [[image:flash-cs3-frames1.png|thumb|none|400px|The default keyframe is frame # 1]] | ||
E.g. if you insert a letter, for example, you will see something like this: | E.g. if you insert a letter, for example, you will see something like this: | ||
* | * The first frame in the timeline will have a dot inside | ||
* The playhead (the red rectangle) sits on top of frame one | * The '''playhead''' showing the current frame (the red rectangle) sits on top of frame one. | ||
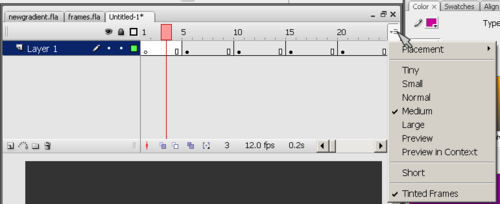
Btw. if you feel display of timeline elements is too small, you can fix this with the time line options (little pull-down menu in the upper right). This menu also allows to display a preview of the animation (but takes up space of course). | |||
Now let's | [[image:flash-cs3-timeline-options.png|thumb|500px|none|Time line options pulldown menu]] | ||
== Simple letter after letter animation == | |||
The *.fla, *.swf and *.html files ''flash-cs3-frame-by-frame-hello.*'' can be found [http://tecfa.unige.ch/guides/flash/ex/frame-by-frame-intro/ here] | |||
Now let's do a most simple frame-by-frame animation. | |||
We will produce an animation that will display the word "HELLO", one letter after each other. The principle is quite simple: We will insert new letters in new keyframes. One could do this by inserting "H" into keyframe 1, then add "E" to keyframe 2 etc. We will do something slightly different here, i.e. we insert a keyframe every 5 frames. | |||
; Step 1 | ; Step 1 | ||
We start drawing the first letter "H" in frame 1 (alternatively you may start in frame 5, i.e. the user won't see the "H" when the frame loads. | We start drawing the first letter "H" in frame 1 (alternatively you may start in frame 5, i.e. the user won't see the "H" when the frame loads. | ||
Anyhow, later on you always can add extra empty frames. | Anyhow, later on you always can add extra empty frames. | ||
; Step 2-5 | ; Step 2-5 | ||
| Line 79: | Line 83: | ||
For this animation about 15 frames are about right I think. | For this animation about 15 frames are about right I think. | ||
(3) You may also align the letters. But you have to do this in the same way for each keyframe, else they will jump around, which actually may be an effect you like. Anyhow, next time make sure to place your objects '''exactly''' where they should be. | (3) You may also align the letters. But you have to do this in the same way for each keyframe, else they will jump around, which actually may be an effect you like. To align objects, there is an align pane (''Window->Align''). | ||
Anyhow, next time make sure to place your objects '''exactly''' where they should be. | |||
; Step 8 | ; Step 8 | ||
Now you can publish this as a web page. | Now you can publish this as a web page. | ||
* | * Make sure to safe the animation in some place you can find. | ||
* Then, click on an empty spot in the stage and click the "Publish Settings" button or menu ''File->Publish Settings''. | |||
* Click the ''publish'' button when you are happy with the settings. It will put all the necessary files in the same directory where your *.fla file sits. For the moment, you can just click on the Flash *.swf file and see if it works. | |||
== Frame-by-frame animation of reusable Flash elements == | |||
Revision as of 17:27, 29 August 2007
This article or section is currently under construction
In principle, someone is working on it and there should be a better version in a not so distant future.
If you want to modify this page, please discuss it with the person working on it (see the "history")
<pageby nominor="false" comments="false"/>
Definition
Frame-by-frame animation means that to display one image after each other.
- Learning goals
- Learn about basic frame by frame animation
- Prerequisites
- Flash CS3 desktop tutorial
- Flash layers tutorial (first part)
- Flash drawing tutorial (at least some of it)
- Quality and level
- This text should technical people get going. It's probably not good enough for beginners, but may be used as handout in "hands-on" class. That is what Daniel K. Schneider made it for...
- It aims at beginners. More advanced features and tricks are not explained here.
- Materials (*.fla file you can play with)
- http://tecfa.unige.ch/guides/flash/ex/frame-by-frame-intro/ (NOT YET!)
- The executive summary
Purpose: Frame-by-frame animation gives you very detailed control over the movie (since it's the technology animation pictures were made until recently when 2D and 3D computer animation techniques came into the existence). Disadvantage is the this is very time consuming work. Therefore, most often, designer use a combination between frame-by-frame animation and interpolation techniques (called tweening in Flash lingo).
Basic steps:
- Insert drawings in various keyframes
The Time line and keyframes
The principle of all sorts of animations made with drawings (you also can script) is that you draw various versions of the same object in different frames.
A frame is a drawing that is displayed at a given time. In the timeline, each little box is a frame and they are numbered from 1 to ..
When you start drawing with Flash, everything is drawn by default into a first frame in layer 1.
E.g. if you insert a letter, for example, you will see something like this:
- The first frame in the timeline will have a dot inside
- The playhead showing the current frame (the red rectangle) sits on top of frame one.
Btw. if you feel display of timeline elements is too small, you can fix this with the time line options (little pull-down menu in the upper right). This menu also allows to display a preview of the animation (but takes up space of course).
Simple letter after letter animation
The *.fla, *.swf and *.html files flash-cs3-frame-by-frame-hello.* can be found here
Now let's do a most simple frame-by-frame animation.
We will produce an animation that will display the word "HELLO", one letter after each other. The principle is quite simple: We will insert new letters in new keyframes. One could do this by inserting "H" into keyframe 1, then add "E" to keyframe 2 etc. We will do something slightly different here, i.e. we insert a keyframe every 5 frames.
- Step 1
We start drawing the first letter "H" in frame 1 (alternatively you may start in frame 5, i.e. the user won't see the "H" when the frame loads. Anyhow, later on you always can add extra empty frames.
- Step 2-5
Now we repeat this procedure by adding new letters in new frames. So first we will transform frame 5 into a new keyframe. The important thing is to understand that there are two kinds of new keyframes:
- Blank ones that will clear the stage, i.e. in the animation the objects will be gone
- Keyframes that carry "forward" contents of the keyframe before. We will use this one.
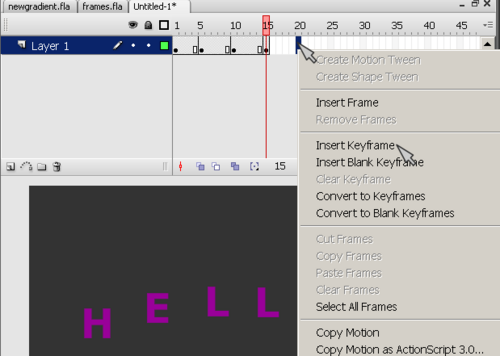
The procedure is the following (see the picture)
- Right-click in a frame, then select Insert Keyframe (not insert blank keyframe).
Repeat this, until you incrementally spelled ou "HELLO".
- Step 6
Test if it works:
- Firstly you simply can move back an forth the playhead (red rectangle that sits on the top of the timeline)
- Then you can test the movie (menu Control->Test Movie).
- Step 7
Now we want to tune a few things:
(1) You may not be happy that the movie starts with letter "H" alread displayed. Right-Click on Frame 1 and Insert Frame (not a keyframe!). Then drag the black dot in the new frame 1 to frame 2. Finally insert a few new frames by click-right on frame 1 again.
(2) Your Movie may be too slow or too fast. Flash animation is not time-based (as in SVG for instance) so you have to fix a frame rate. You can change the frame rate (number of pictures shown/second) in two ways:
- Click on an emtpy spot on the stage and change the rate in the properties panel that you should see below
- Menu Modify->Document (CTRL-J)
For this animation about 15 frames are about right I think.
(3) You may also align the letters. But you have to do this in the same way for each keyframe, else they will jump around, which actually may be an effect you like. To align objects, there is an align pane (Window->Align). Anyhow, next time make sure to place your objects exactly where they should be.
- Step 8
Now you can publish this as a web page.
- Make sure to safe the animation in some place you can find.
- Then, click on an empty spot in the stage and click the "Publish Settings" button or menu File->Publish Settings.
- Click the publish button when you are happy with the settings. It will put all the necessary files in the same directory where your *.fla file sits. For the moment, you can just click on the Flash *.swf file and see if it works.


