Embroidery stitch type: Difference between revisions
m (→Stitch Era V17) |
|||
| Line 79: | Line 79: | ||
Stitch Era defines the following taxonomy in the Object manager. By default, zigzag stitches are satin. | Stitch Era defines the following taxonomy in the Object manager. By default, zigzag stitches are satin. | ||
# Path | # Path | ||
## with running stitch | ## with running stitch | ||
## with zag-zag (includes satin) | ## with zag-zag (includes satin) | ||
| Line 100: | Line 100: | ||
## with elastic pattern | ## with elastic pattern | ||
## with elastic programmable stitch. | ## with elastic programmable stitch. | ||
<gallery> | |||
stitch-era17-fill-style-1.png|Line fills | |||
stitch-era17-fill-style-2.png|Column fills | |||
stitch-era17-fill-style-3.png|Area fills | |||
</gallery> | |||
As you can see, various stitch types can be used with various embroidery objects, e.g. zig-zag (satin) can be used for lines, columns and areas. "Turning areas" are just Areas with added direction lines. | As you can see, various stitch types can be used with various embroidery objects, e.g. zig-zag (satin) can be used for lines, columns and areas. "Turning areas" are just Areas with added direction lines. | ||
Revision as of 17:10, 17 July 2018
I will try to revise this over the next few days and also include some software specific approaches if I can find the information
Basic Stitch types
According to Wikipedia, retrieved 12:00, 2 June 2011 (CEST), an embroidery stitch, “is defined as the movement of the embroidery needle from the backside of the fabric to the front side and back to the back side. The thread stroke on the front side produced by this is also called stitch. In the context of embroidery, an embroidery stitch means one or more stitches that are always executed in the same way, forming a figure of recognisable look. Embroidery stitches are also called stitches for short. Embroidery stitches are the smallest units in embroidery. Embroidery patterns are formed by doing many embroidery stitches, either all the same or different ones, either following a counting chart on paper, following a design painted on the fabric or even working freehand.”
There are many stitch types, but we could distinguish three plus two main types according to function
- Running stitches for stitching lines
- Satin stitches are used to stitch wider lines, AKA columns. Typically, a narrow zigzag stitch is used.
- Fill stitches (to fill in larger sections in various ways)
- Jump stitches (i.e. no stitches), to get from one point to another. Those can be manually cut away once the machine has embroidered the pattern.
- Lock stitches should be used at the end of all elements (in particular columns and fills)
Ripka, Mychko and Deyneka in a literature review, found several taxonomies.
Running stitches
The bean stitch uses a pattern like two stitches forward and one stitch back, i.e. this type of running stitch will create a strong solid line.
-------
Parameters:
- length
- repetition (passes of thread, usually between one and three)
ZigZag and Satin stitches
The Satin stitch also known as Damask stitch is used in most cultures and both in hand and machine embroidery. Satin stitches are used for small "colums", e.g. lettering or borders.
There exist several variants. A normal satin stitch uses parallel straight stitches which is a kind of zig-zag stitch.
|/|/|/|/|
A typical zigzag stitch looks more like this:
/\/\/\/\
Parameters:
- Stitch length
- Angle (usually orthogonal, but small columns need oblique stitches)
- Density
- Underlay
Fill stitches
Are use to fill in larger areas. Each advanced software will offer numerous built-in patterns.
Parameters: many, e.g.
- The pattern (motif) itself
- Stitch length (often by default about 4mm)
- Density
- Direction
- Underlay
- Size of (sub) motives
Manufacturer stitch type taxonomies
Implicitely or explicitely, embroidery software manufacturers define types of stitches. Basic terminology is the same, but can different a lot in details, e.g. Stitch Era's "E-Stitch" becomes a "Blanket" in Wilcom software, and a "radial fill" becomes a "ripple".
Stitch Era V17
The Stitch Era software (extensively documented here and also in French also makes the classic distinction between lines and fills but it also defines four basic shapes: Paths, Columns, Uniform areas (with one direction line), Turning areas. To that we can add "low level stitch editing", lettering, monograms and other apparel functionality (e.g. hot stones).
Stitch Era defines the following taxonomy in the Object manager. By default, zigzag stitches are satin.
- Path
- with running stitch
- with zag-zag (includes satin)
- with E-stitch
- with programmable Stitch (e.g. various patterns/motives)
- Column
- with zig-zag
- with E-Stitch
- with fill pattern
- with programmable stitch (various patterns/motives)
- Area
- with pattern: various tatami fills, both simple and embossed with patterns
- with programmable stitch, decorative fills (typically made with lines)
- with applique
- with cross stitch
- with radial fill
- with texture: similar to programmable stitches, but irregular patters, e.g. smaller and larger fish
- with zig-zag
- with E-stitch
- with elastic pattern
- with elastic programmable stitch.
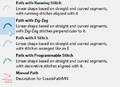
Line fills
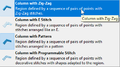
Column fills
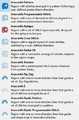
Area fills


As you can see, various stitch types can be used with various embroidery objects, e.g. zig-zag (satin) can be used for lines, columns and areas. "Turning areas" are just Areas with added direction lines.
Digitizer V5.5 taxonomy
Digitizer is a 1500$ embroidery suite made by Wilcom and sold by Janome. It is similar to Wilcom's own Hatch Digitizer sold at 1100$. Different stitch types are organized in different ways.
The tables of contents of the Digitzer 5.5 manual distinguishes line stitches, decorative lines, stain stitching, tatami fills, embossed fills, motif stitching, cross stitch and stipple fills. Hatch 1.0 organizes its chapters in line stitches, Satin stitch, Tatami fills, Embossed fills, Motif stitch, Cross stitch, Stipple fills, Curved fills, Feather edge, Gradient fills.
The Stitch types introduction section of Digitizer 5.5 discrimates the following:
- Line stitch: Line stitches, Satin, Motif
- Fill stitch: Satin, Tatami, Embossed, Curved, Motif, Cross Stitch, and Stipple.
Looking at the software organization the picture is again slightly different, a user can define fill and outline with stitch types that are presented in a flat way. In addition, so-called stitch effects will change the fill.

Below is combination of items found, that we organized in a more hierarchical fashion.
- Outline
- Line Stitches
- Single Run
- Triple Run
- Sculpture Run
- Decorative lines
- Motif
- Backstitch
- StemStitch
- Sculptured
- ZigZag
- Blanket
- Satin
- simple Satin
- 3D satin
- Turning satin
- Line Stitches
- Fill
- Tatami. The typical fill stitch for filling large and irregular shapes. Made of rows of run stitches
- Satin. To fill narrow shapes. Can be used with auto-split for filling larger areas
- 3D Satin
- Embossed. A fill stitch with artistic effects
- Motif. A kind of repetitive drawing. Patterns are repeated in rows to create decorative fills
- Curved fills: Follow the contour of a shape and can create some kind of curved light/shade 3D drawing effect
- Contour: Similar as a fill or emboss patterns but follows the curve of the object.
- Ripple: Reproduces the outline of the object spiraling out of the center.
- Cross Stitch
- Stipple: Run stitching that meander more or less randomly in a fill
- Stipple Single Run
- Stipple Backstitch
- Stipple Stemstitch
- Blanket
- Stitch effects
- Curved fills (see above)
- Feather edge: Create rough edges and imitate fluffy textures.
- Gradient fill: Varies stitch spacing, e.g. to use with tatami fills.
As you can see, several stitch types can both be used for contour (lines) and fills. Also there is a third category, "Stitch effects" allowing to modify fills. Again some functionality is duplicated.
Filling strategies and patterns
A first questions is how to fill in sections (areas). One ground rule is to use a variety of stitches and stitching directions and for two reasons:
- Push/pull effect can be compensated (see below)
- The design looks more interesting.
Good digitizing software should help with that.
A second question concerns density. In programs like Stitch Era, density is measured in terms of lines / mm. For example its default density of 5 means a stitch every 0.2mm and this is fairly dense. Density of 4 also should still look dense. E.g. in Embird Studio, default density seems to be 4.