RapMan
Introduction

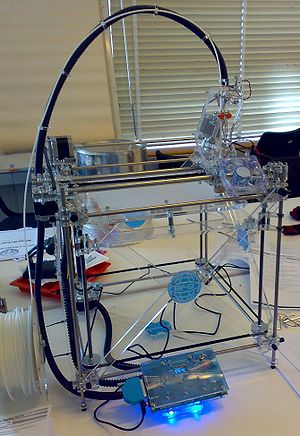
RapMan was one of the first commercial kits of the RepRap 3D printer sold from 2009. RepRap is short for Replicating Rapid-prototyper since it was developed in a research project on self-replicating machines. TECFA bought its kit in november 2009 and we assembled it in the end of January 2010 (File:Invoice490DanielSchneider.pdf) As of 2019, it is displayed as museum piece in our location at Uni Pignon, Geneva.
See also:
- The fab lab article for a wider perspective with respect to this kind of technology.
- Assembling the RapMan V3.1 3D printer
- Fabbster 3D printer
- Felix 3D printer
- First steps with the RapMan V3.1 3D printer and the related BfB Axon and/or Skeinforge for RapMan and/or Netfabb engine for RapMan for details about the tools that allows to generate g-code, i.e. the CAM code that will drive the printer.
- Post processing of 3D polymer prints
- All my RapMan related entries.
- There is also a RapMan essentials wiki book and a RapMan wiki book (everything included) that you can download as PDF.
This 3D printer builds the parts up in layers of plastic with the help of a custom-made Thermoplast Extruder. The machine takes a 3mm diameter filament of a polymer, forces it down a heated barrel, and then extrudes it as a melt out of a fine nozzle. The resulting thin stream is laid down in layers to form the parts that RepRap makes. The extruder should work up to a temperature of 260 degrees Celsius. It works with various polymers like ABS (Lego-like plastic) and polylactic acid. The extruder can move left/right (X axis) and forward/backward (Y axis) The printed object sits on a platform that will move down (Z axis)
Printing instructions are written in a language called G-code. A user will copy a g-code file to an SD card. This card is then inserted into a slot of the RapMan board for printing.
Assembling RapMan V3.1
Assembly of V3.1 RapMan takes at least three full days. It can be done by any person who has good reading skills, patience and some "gift" for assembly. Bits from Bytes did produce a mostly very good set of documentation.
It is very important to understand what you are going to build. E.g. it's a good idea to look at a video like thisfilm made for BECTA.
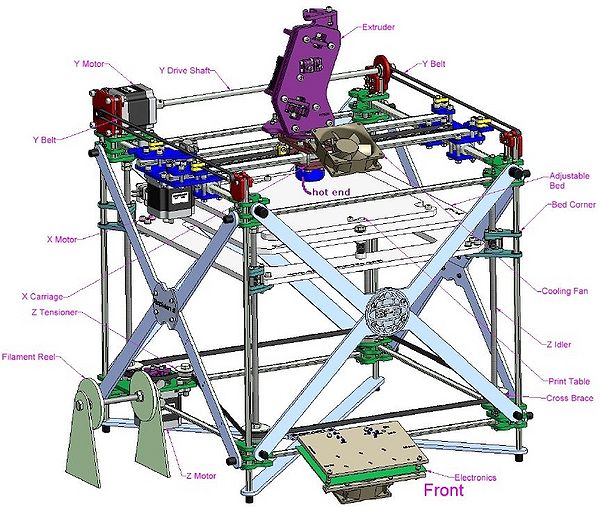
You also should understand more or less the following picture:

Further reading: Our Assembling the RapMan V3.1 3D printer provides a more detailed overview of the assembly procedure. In addition, you may consult both the Bits from Bytes "build" forum and the BFB wiki.
First steps with RapMan V3.1
If you managed to assemble you RapMan in a correct way, printing simple objects is fairly easy:
- Download an .STL file from somewhere
- Convert to g-code with skeinforge or Netfabb basic
- Print ...
See the First steps with the RapMan V3.1 3D printer. It attempts to explain all the basics.
See also:
- Skeinforge for RapMan for details about the tool that allows to generate g-code
- G-code CAM code that will drive the printer.
- Post processing of 3D polymer prints
Software tools and tool chain
Process overview
There are three situations:
- You just want to print existing models with a minimum of hassle
- You may take existing models and adapt (or even merge parts)
- You'd like to model printable 3D objects
(1) Modeling:
To model, there are several options:
- Create a mashup (take several objects and combine them)
- Learn how to use a multi-purpose 3D modeling software
- Use some special purpose easy-to-use modeling software
- Learn how to use Computer-aided design and manufacturing software
- Scan a real object, e.g. with the low cost David Laserscanner
(2) Combining meshes
Meshes (different objects) may be combined / merged. You can do this with the free Netfabb Studio and Meshlab programs. Creation of simple mashups with Netfabb and Meshlab is explained in the Meshlab for RapMan tutorial article.
An easier solution is to acquire the Netfabb Professional. It can export several objects (originally from *.STL files and other sources) as a single .STL file.
(3) Create and fix the .STL
In most cases, your 3D general purpose modeling or CAD program can't directly produce g-code. You first must export the model to .STL (or another format like *.PlY).
You then may need to fix your .STL model, i.e. first make sure it has the right size and the right position. But there may be more tricky issues, like repairing "holes" (use Netfabb for this)
The coordinate system of the RapMan puts the origin in the middle. To manipulate size and coordinates, there are some options:
- Use skeinforge: turn on multiply plugin in skeinforge, setting the matrix to 1x1 or another value
- Use Netfabb for more simple resizing and moving operations (that's what I use)
(4) Create G-code
Then produce the g-code, e.g. with Skeinforge or with Netfabb basic.
Typical tool chain scenarios
... for beginners !
Reusing ready to print objects
- Get a model from Thingyverse (or another repository for 3D printable objects. Make sure to select one that has a "rapman" or "reprap" tag on it. A fun thing to do would be printing all the Beco blocks. Since they are all similar, you can vary printing parameters and learn about calibration of small simple object printing without having to look at the same object...
- You likely will find almost directly usable .STL files, but you may have to align them to x/y/z = 0. You also may find various source formats produced with various 3D modelers.
- Import to skeinforge or netfabb and generate g-code. In both cases, make sure that it sits in the right position.
- Then verify the g-code manually
Build an easy model with an easy 3D modeler
- Build a model with Google sketchup
- Export to Collada .DAE
- Import to Meshlab and save as .STL
- Import to NetFabb and repair, then save as .STL again
- Import to skeinforge and produce g-code
- See Sketchup 3D printable objects tutorial for an example
Merge meshes
- Do as above, i.e. either build 2 or more models or grab them from somewhere.
- See also the Netfabb Studio tutorial for an example on how to create easy duplo-webdings mashups
- Import all to Meshlab as "layers", flatten the layers and export as .STL
- Then as above
In education
See
- Teaching Resources (BitsforBytes Wiki)
- 3D printers in education
A last word of advice

- At some point you really must understand the interaction of relationship between Head speed (how fast the extruder moves on the X/Y axis) and extrusion Rate (RPM, how much plastic comes out) and how they impact Layer thickness.
- Always extrude 1/2 m of filament before printing. Also play with temperatures. E.g. 247 for ABS may be too much.
- Make sure that your .STL files have the x/y/z values set right. Minimal z value = 0. The middle of the object should roughly sit on x=0 and y=0. Get the free Netfabb Studio to achieve this. Also use this software to clean up bad .STL files.
- Then move on and try to figure out how to calibrate for different parts of objects and different kinds of objects. As we mentioned before, Skeinforge documentation is not easy to understand (in the absence of better you can wade through the forums or read this or buy the for RapMan Basic software.
- Home print head with the menu in the board and switch it off/on after each printing (in particular if you print high objects or if you manually moved the extruder).
- Do not leave your printer unattended ! Make sure that filament wheel turns smoothly and that the pressure wheels are tight: Tighten quite a lot (without forcing), then untighten when the motor stops, i.e. you hear a loud clicking.
- Print some spare parts once you figured out how to correctly print ABS (have to check it they correspond to V3.1, I thing that having a second extruder gear would quite smart.
Moving on:
Explore other RapMan-related articles in the category RapMan. You may follow the order suggested in the wiki book.
Links
BitsfromBytes RepRap
- Bits from Bytes. Sells RepRap kits (£750 / CHF 1270).... i.e. the one we describe here. This web site also includes a forum and a wiki. You need both.
- The forum is the place to look for advice and help.
- The wiki includes information that can not be found in the PDF manuals, in particular with respect to modeling and printing. E.g.
- Skeinforge
- Rapman v3.1 building and getting started overview (On BitsfromBytes Wiki, cloned from an early version of this article on 12 March 2010)
Research Reprap 3D printer
- RepRap, a British project, is short for Replicating Rapid-prototyper. This 3D printer builds the parts up in layers of plastics. It can be assembled from parts bought in various places. There exist many commercial designs derived from various RepRap versions, see 3D printing.
- RepRap Project (Wikipedia)
- Introduction to Reprap, retrieved 24 June 2009.
- RepRap Official Blog
- Spare parts: See reprapsource. German company that sells spare parts.
Polymers
- We only bought ABS and PLA rolls from Bits from Bytes
- There are alternative solutions, e.g. orbi-tech in Germany is rumored to have good easily printable PLA.
Tools
See 3D modeling and Computer-aided design and manufacturing for two kinds of 3D modeling tools. Google sketchup is probably the easiest tool for beginners.
For 3D printing you then need specific tools to repair STL files and to generate the g-code:
- Skeinforge (a tool chain for producing g-code)
- The skeinforge announcement and troubleshooting blog
- download of the software
- netfabb (an integrated software tailored for additive fabrication, rapid prototyping and 3D printing)
- Official netfabb website
- can resize, position and repair STL.
- A base version (netfabb Studio) is free, Netfabb professional is 700 Euros (plus VAT), educational pricing is available on demand.
- A commercial reprap plugin can generate g-code. I.e. this is an alternative to skeinforge.
- SolidView light (not needed)
- SolidView light is a free program with support for SFX, STL, SolidWorks, VRML, and OBJ CAD files. I.e. it can be used to look at STL files.
- Pleasant3D (not needed)
- Pleasant3D Visualization of STL plus minor editing in order to be printable on MakerBots/Rapmans: Move, rotate, resize.
- Meshlab (not needed, to convert files to .STL and to merge .STL files)
- MeshLab
- See Meshlab for RapMan tutorial. Meshlab is the open source, portable, and extensible system for the processing and editing of unstructured 3D triangular meshes.
Rapman sites by users
- rapman3d.savoie A hour's drive away from TECFA :)
- Planet RepRap. This is an aggregator that pulls in information from many sources.
- Google reader RepRap RepStrap Aggregate Feed, bundle created by nuaetius
See 3D assets for a longer list
- Thing to make (Rapman wiki)
- thingyverse.
Print services
If you like your prototype and want it printed more professionally. Several kinds of materials, including metal...
- Shapeways. They take STL, VRML, Collada & X3D formats with some constraints, e.g. less than 500'000 polygons, a watertight mesh, etc.
- Sculpteo
Propaganda
- BCC Video / early 2010)
- Media (BitsforBytes Wiki)
- A film made for BECTA starring David White.