Flash video component tutorial
Introduction
Video components are prebuilt interface elements (widgets) that will speed up video integration. In particular, the FLVPlayBack Video Component allows to render videos without any ActionScript programming. It includes a nice choice of skins for user controls. Videos also can be enhanced with captioning or they may interact with the rest of the animation. This is discussed in the Flash augmented video tutorial
- Learning goals
- Learn how to encode *.flv and (older) *.f4v files
- Learn how to use the Flash 11 (CS6) video component for simple video playback
- Prerequisites for the first part
- Flash CS6 desktop tutorial
- Flash drawing tutorial
- Flash component button tutorial
- Moving on
- Flash augmented video tutorial
- Flash video captions tutorial
- The Flash article has a list of other tutorials.
- Quality
- This text should technical people get going and may not be good enough for self-learning beginners. It can be used as handout in a "hands-on" class. That is what Daniel K. Schneider made it for...
- Level
- It both aims at beginners (FLV encoding, using the video playback component and embedding a video in the timeline) and intermediate Flash designers (inserting captions and using cue points to trigger animations).
- The executive summary about Flash Videos
Flash has built-in video management components.
- The FLVPlayBack Video Component is really easy to use since it provides a series of ready-made skins (user interfaces) from which you can choose.
- The Caption (subtitle) component requires some XML Editing. Read the Flash video captions tutorial.
- For more sophisticated interactions with a video you need to code with ActionScript, as explained in the Flash augmented video tutorial
- The executive how-to summary for simple video playbacks
- If your video uses a format that is not *.flv, *.f4v or *.mp4 of if you plan to reduce its size or trim it then prepare it first with the Adobe Media Encoder. This tool is included in the Flash distribution. It may differ a bit from the full CS6 version.
- Drag the FLVPlayBack Video Component to the stage.
- Open the component inspector panel. Choose a skin (user interface configuration) and provide the file name or URL of the *.flv video
Note: In CS3 and CS4, only the Adobe *.flv format was supported. Since Flash 10/CS5, Adobe provides the more efficient *.f4v format and also directly supports other formats for playback.
Using the Flash video component
Using Flash CS6 (and CS5) component is really easy
- You can use *.mp4 videos without prior encoding to a Flash video format
- All operations are centralized in the properties panel
- The only difficulties relate to file path operations (correct paths and copying files)
In most cases, you would have to adapt your video file, i.e. at least make it smaller and cut of unwanted beginning and end.
Just below we explain the procedure for an *.mp4, *.flv or *.f4v video that already is "ready" for production.
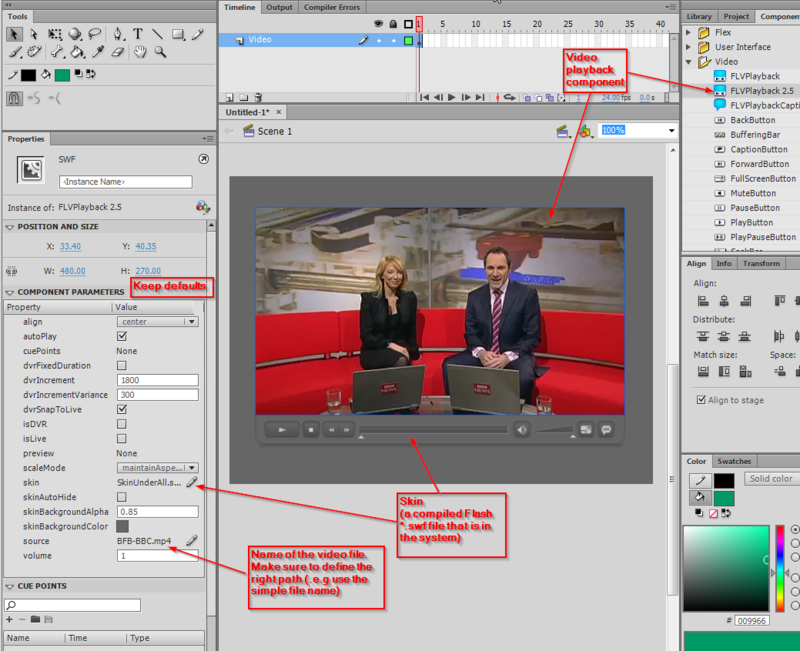
Step 1: Drag the component to the stage and save the file
- Open the components panel (Menu Window->Components or CTRL-F7)
- Drag FLPLayback 2.5 on the stage
- Now save your Flash file, else it will not work, since Flash will not find the video file !
- Copy the video file into the same directory as your flash file (unless you know how to deal with relative file paths, something that you may have learned creating HTML pages using pictures)
Step 2: Configure the properties of the component
- Select the component
- Set the name of the video file with source in the Properties panel (e.g. BFB-BBC.mp4). Make sure to shorten the file path!
- Bad: C:\...\flash\ex6\screenshots\my_video.mp4
- Good: my_video.mp4
- Select an appropriate skin. A skin will define what kinds of controls the user will have. You also can make adjustements to the color
- Keep the defaults for starters, e.g. maintainAspectRation for starters.
... That's it.

Step 3: Publishing a flash file that uses video
If you plan to publish the flash file on a web site or if you mail your application, do not forget to include all the files, for example
- flash-cs6-mp4-video.html (the HTML file, optional)
- flash-cs6-mp4-video.swf (the Flash file)
- BFB-BBC.mp4 (the video)
- SkinUnderAllNoFullscreen.swf (the skin library)
Example files:
- flash-cs6-video-component.html
- flash-cs6-video-component.fla (Flash source)
- BFB-BBC.mp4 (original video)
The video shows the first 3D printer I owned, a RapMan (bought sometimes in 2009).
Using File import
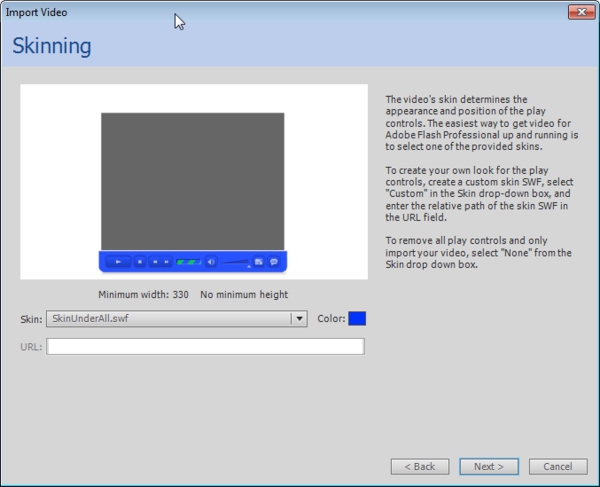
As an alternative, you could use the File import menu. However, you might make wrong choice and therefore we do not recommend this procedure. This procedure will use the standard FLVPlayback component (not the more versatile version 2.5)
(1) Import the video file
- Menu File -> Import -> Import video
(2) Select the skin
(3) Click next and adjust the parameters
Using the Adobe Media Encoder CS6
The Adobe Media encoder can be found in the Program menu of your system (Windows/Mac) or in the File Import process in Flash CS6 as explained in the previous section.
Important: You cannot transcode or edit *.flv files !! Use another source format like *.mp4 ! I can't explain why, but it's Adobe's choice ....
Simple transcoding
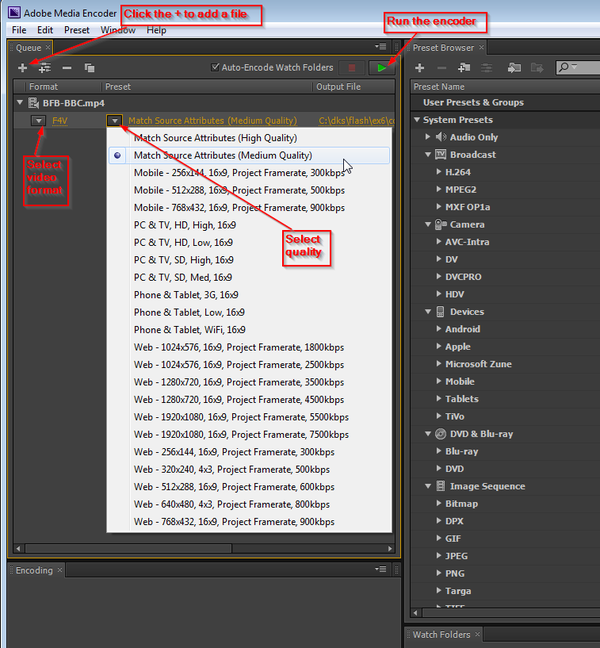
- Click on + to add a video for encoding
- Select the video format. By default, the Flash F4V format is selected
- Select the quality
- Press the green arrow button to launch the encoding. The resulting file will be put in the same directory as the source video.
Editing
The Media Encoder allows to "edit a video file in various ways. It is not a full video editor like Premiere, but allows to do a few very useful operations:
- You can remove frames in the start or the end
- You can clip each side (top, bottom, left, right). This is particularly useful, if you shot the video yourself, e.g. with a cell phone.
- You also can add so-called cue-points. However we suggest not to use this feature and rather use so-called ActionScript cue points.
The editor is difficult to find. Do the following
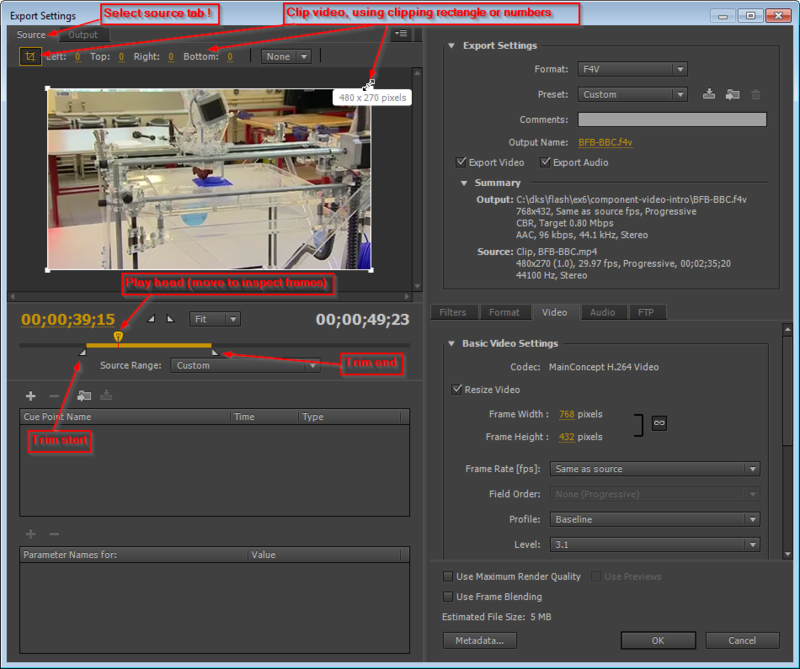
- Select the output video line (underneath the imported video, see the screen capture above: the *.flv file is selected)
- Menu Edit -> Export settings or hit CTRL-E (...fine name ....)
The picture below explains, how to make a few edits.
- Clip the video: Click on the Source tab first, select the rectangle icon to the left, then either change the values of left, top, right, bottom or use the clipping rectangle
- Look at frames: Move the yellow play head
- Remove frames from the start and/or the end: Use the small white triangles
Once you are done:
- Click on OK
- The click on the green arrow button to encode (as above)
Links
Finding videos on the Internet
Finding and downloading videos
- You may download videos from the Internet (make sure that copyright allows you to do so). Getting videos from sites like YouTube is not easy without download helpers (see below). Therefore, try sites like http://vimeo.com first.
- Firefox video download helper extension: https://addons.mozilla.org/en-US/firefox/addon/3006
- Google video search: http://video.google.com/. Use advanced search in order to restrict search to duration.
Video sites:
- http://vimeo.com/ Includes open source (creative commons) videos. After a search, you can tick a box for only showing downloadable videos.
- http://vids.myspace.com/ Needs special tools to download
- http://youtube.com/ Needs special tools to download
Adobe documentation
- Flash Professional / Create video files for use in Flash, at Adobe, retrieved Feb 18 2013.
- The FLVPlayback component
- Media Encoder Help / Help and tutorials at Adobe, retrieved Feb 18 2013.


