Flash components overview
This article or section is currently under construction
In principle, someone is working on it and there should be a better version in a not so distant future.
If you want to modify this page, please discuss it with the person working on it (see the "history")
Overview
Components are prebuilt interface elements (widgets) that will speed up programming of interactive Flash pages. This is part of Flash CS3 tutorials.
- Learning goals
- Learn how to create and use some Flash 9 (CS3) components
- Learn a little bit of Action Script 3 to run something with a button.
- Prerequisites
- Flash CS3 desktop tutorial
- Flash drawing tutorial
- Moving on
- The Flash article has a list of other tutorials.
- Flash Video component tutorial
- Quality
- This text should technical people get going and may not be good enough for self-learning beginners. It can be used as handout in a "hands-on" class. That is what Daniel K. Schneider made it for...
- Level
- It aims at beginners. More advanced features and tricks are not explained here.
- Learning materials
Grab the various *.fla files from here:
- The executive summary
Flash has a few built-in components (called widgets or gadgets in other contexts) and the will allow to you to build an interactive environment more quickly than by coding all by yourself.
However, making good use of most of these components still requires basic knowledge of ActionScript. In this article we will try to show a few design patterns that you can copy and adapt.
- The executive summary
- Open the component library (Window->Components or CTRL-F7)
- Drag a component to the stage
- Fill in some Parameters
- Add some action script that will handle user action events.
Introduction
- ActionScript (AS2) vs. ActionScript (AS3)
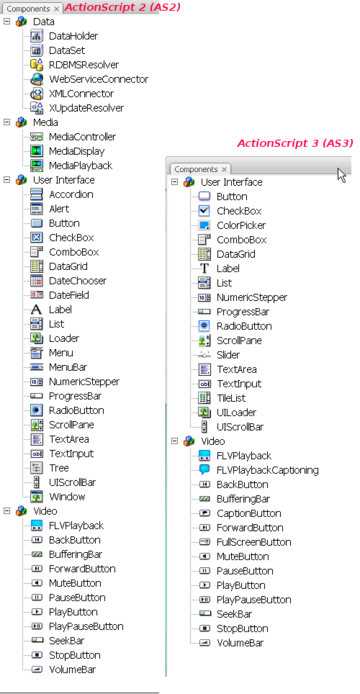
- In CS3, a component library is available for both versions
- The AS3 one is smaller as you could see in the screenshot above. We shall focus on Flash 9 and Action Script 3 here. However, the principle of using an AS2 parameters is the same.
In this article we going to look at User Interface components, see the Flash video component tutorial for the Video elements.
- To open the component library
- Window->Components or CTRL-F7
- I suggest to dock it against your library.
- Warning - AS2 components are different from AS3 components (!!)
- It really is important to plan adhead, i.e. you must decide whether you work with AS2 or AS3 before you start using any component !
- As long as you don't use components, don't insert ActionScript code you can easily switch between various Flash and ActionScript versions. Once you start using AS or AS-based components you can't !
- Installing other components.
You can just open a component file, but then it will not be permently in your System. To make them permanent:
- Quit Flash
- Copy to either:
- C:\Program Files\Adobe\Flash CS3\language\Configuration\Components
- Macintosh HD:Applications:Adobe Flash CS3:Configuration:Components
- Goal
The goal is to make a sort of simple Flash Webpage. The user at all times will have a menu to the left that will allow him to navigate to different contents. http://livedocs.adobe.com/flash/9.0/main/wwhelp/wwhimpl/common/html/wwhelp.htm?context=LiveDocs_Parts&file=00000488.html#wp149914 We will build several versions of this. Have a look at the "standard" 3 menu-based slide show before you start reading. Also we will introduce some ActionScript by using a "language" that is hopefully appropriate for non-programmers.
- Step 1- Planning the layers
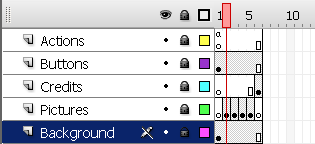
In this example we will work with five layers:
- Actions: will include a little Action Script code
- Buttons: will include the buttons (displayed on all "pages")
- Pictures: Contents we want to display
- Credits: A special page for the "who's done it" (we also could have used the pictures layer for this).
- Background: A simple background that will remain stable.
So the timeline roughly will look like this:
Create these layers now
- Step 2 - Add pictures or other contents
- Decide how many pictures you want (we took four)
- Select the Pictures layer
- Layer 1 is reserved for a Title page.
- Create a few new empty keyframes (hit F7) and fill them with pictures or any other content or drawings you'd like. See button tutorial if you don't know how to import pictures.
- Step 3 - Get buttons from the library
- Select the buttons layer
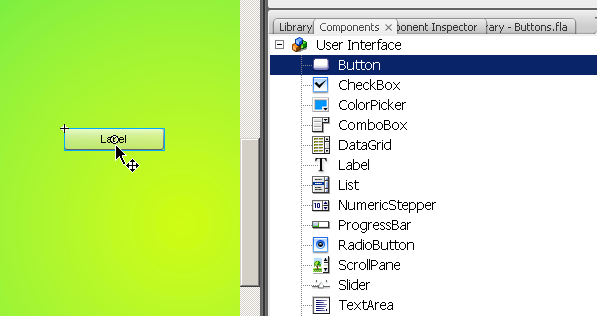
- Open the component library, select "User Interface" and drag as many buttons to the stage as you have pictures. Add an extra one for the credits page.
- Put them into a good position. You may use the Align panel to align and distribute properly (see the Flash arranging objects tutorial if needed).
- Step 4 - ActionScript 3 principles
ActionScript 3 does not allow to attach scripts to buttons. One can only script frames in the timeline. In order to script a component we basically have to do three things.
- Give name to the component (i.e. the movie instance)
- Fill in some parameters, e.g. add a label for the button
- Add some ActionScript to the timeline that will:
- Associate a user interaction event (e.g. user clicks) to some action function
- Program the action function
- Step 5 - Do It for each button
- Click on a button (make sure to lock other layers)
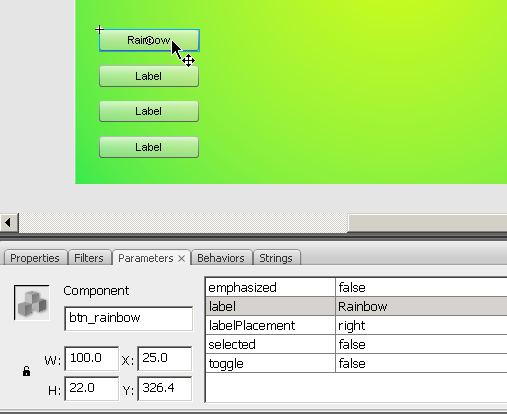
- Select the Parameters panel (menu Window->Properties->Parameters)
- Give the button instance a unique name: e.g. btn_rainbow is fine. ("btn" means "button" and "rainbow" because this button will lead to a rainbow picture). To be safe:
- Start the label name with a letter
- For the rest use letters, digits or the Underscore "_".
- Do not use whitespaces or punctuation characters or dashes !!
- I suggest that you use only lower case letters (Names are case sensitive)
- Then change the label parameter of the button. This is what the user will see. Type anything there, but don't make it too long (it's a button after all). If your text is bigger than the label, change it's width in the same panel, i.e. modify the W: field.
Notice how different it is to work with a component vs. using buttons as explained in the Flash button tutorial]]
Make sure you did this to all buttons.
- Step 6 - Open the ActionScript panel
- Open the Action Layer, Click in Frame 1
- Hit F9 to open the "Actions-Frame" panel. In case it is docked with the parameters, you may undock it to have some more space.
- Then paste all the code in steps 7 to 8. Maybe open our flash-cs3-simple-slide-show-menu.fla file and copy from there.
Note: Code that is delimited by /* */ represents so-called comments, i.e. code that is not interpreted by Flash, but that we inserted just to remember what our code is supposed to do.
It's always a good idea to document your code ...
- Step 7 - Stop the ahttp
- //livedocs.adobe.com/flash/9.0/main/wwhelp/wwhimpl/common/html/wwhelp.htm?context=LiveDocs_Parts&file=00000488.html#wp149914nimation from playing in frame one
The stop() instruction will stop Flash from playing all the frames, i.e. we want the user to stay in Frame 1 after the file loads.
stop();
- Step 8 - Associate buttons with handler functions
Associate a handler function for each button instance:
- Syntax: button_name.addEventListener(Event.type, function_name
Lines below mean:
- If the user clicks on the btn_rainbow with the mouse, then the function clickHandler defined below will execute.
btn_rainbow.addEventListener(MouseEvent.CLICK, clickHandler);
btn_tecfa.addEventListener(MouseEvent.CLICK, clickHandler);
btn_bosses.addEventListener(MouseEvent.CLICK, clickHandler);
btn_my_computers.addEventListener(MouseEvent.CLICK, clickHandler);
btn_credits.addEventListener(MouseEvent.CLICK, clickHandler);
- Step 9 - Write a clickHandler function
Note: you could have chosen an other name, but as rule function names should be sort of meaningful to you and people who read your program
Instead of writing a function for each button, we just created a single one. This code contains a so-called switch (or case) statement. It's syntax is the following:
switch (value) {
  case value_1 :
    /* do something */
    break;
  case value_2 :
    /* do something */
    break;
  ....
  }
http://livedocs.adobe.com/flash/9.0/main/wwhelp/wwhimpl/common/html/wwhelp.htm?context=LiveDocs_Parts&file=00000488.html#wp149914 In order to understand which button was clicked, we ask from the event the label of the button (event.currentTarget.label).
Then we goto frame x and ask it to stop again with the instruction gotoAndStop(x).
function clickHandler(event:MouseEvent):void {
	switch (event.currentTarget.label)
	{
		case "Rainbow" :
			gotoAndStop(2);
			break;
		case "TECFA" :
			gotoAndStop(3);
			break;
		case "Bosses" :
			gotoAndStop(4);
			break;
		case "My computers" :
			gotoAndStop(5);
			break;
		case "Credits" :
			gotoAndStop(6);
			break;
	}
}
- If things go wrong
- Make sure that your syntax is correct. One single ";" missing and your program will fail. In the ActionScript window click on the "Check syntax" icon.
- Also indent your code properly. Simply click on the "Auto Format" icon.
- Make sure that the Action layer extends to the end of your timeline. Put code in frame 1 and then hit F5 in the right-most frame you use ("insert frame" and 'not insert keyframe !)
- Make really sure that your code is in frame 1 and in the Action layer.
- Make sure that button instance names and label names are exactly the same in the Parameters panel and your Script.
Here is the picture of the timeline again:
Notice the little "a" in frame 1 of the Actions layer. It means "ActionScript code inside" :)
- Extra Step 1
This shows how to program a button that will open an URL in a Web Browser (look at the example file you can download).
btn_edutech_wiki.addEventListener(MouseEvent.CLICK, GoToUrl);

function GoToUrl(event:MouseEvent):void {
	var url:String =  "http://edutechwiki.unige.ch/en/Flash_components_tutorial";
	var request:URLRequest = new URLRequest(url);
	try
	{
		navigateToURL(request, '_blank');
	}
	catch (e:Error)
	{
		trace("Error occurred!");
	}
}
- Results
- flash-cs3-simple-slide-show-menu.html
- Grab the flash-cs3-simple-slide-show-menu.* files from
Too complicated ?
You may write this code in a slightly simpler but less elegant way: If you have no programming knowledge, you rather may work from the code below. The result will be same, though I changed to color of the background: 3 menu-based slide show
So here is what you need to change:
- (1) Event listener registration
So the principle is: For each button you got to register an event listener function. Change:
- The number of addEventListener definitions (here we got five)
- Make sure that each btn-xxx corresponds to names you gave to your own button instances
myButton.addEventListener(MouseEvent.CLICK, Handler_A);
- (2) Define event listener functions
- Copy/Paste/Change definitions of functions
- So change the name of the function, e.g. clickHandler_1 into Handler_A and the frame it has to jump to.
function Handler_A(event:MouseEvent):void {
    gotoAndStop(2);
}
Note: Formatting in ECMAScript -like languages does not matter. You could have written the above line as:
function Handler_A(event:MouseEvent):void {gotoAndStop(2); }
However, make sure to keep delimiters like the { } ; !!
- Start from this complete code
/* This will stop Flash from playing all the frames
   User must stay in Frame 1 */
stop();

/* Associate a different handler function for each button instance:
   Syntax: button_name.addEventListener(Event.type, function_name
   Lines below mean:
   * If the user clicks on the btn_rainbow with the mouse,
     then the function clickHandler defined below will execute
*/
btn_rainbow.addEventListener(MouseEvent.CLICK, clickHandler1);
btn_tecfa.addEventListener(MouseEvent.CLICK, clickHandler2);
btn_bosses.addEventListener(MouseEvent.CLICK, clickHandler3);
btn_my_computers.addEventListener(MouseEvent.CLICK, clickHandler4);
btn_credits.addEventListener(MouseEvent.CLICK, clickHandler5);

/* Each function defines where to move the playhead in the animation.
   E.g. clickHandler2 will go to frame 3 and then stop
   */

function clickHandler1(event:MouseEvent):void {
	gotoAndStop(2);
}
function clickHandler2(event:MouseEvent):void {
	gotoAndStop(3);
}
function clickHandler3(event:MouseEvent):void {
	gotoAndStop(4);
}
function clickHandler4(event:MouseEvent):void {
	gotoAndStop(5);
}
function clickHandler5(event:MouseEvent):void {
	gotoAndStop(6);
}

/* This shows how to open an URL in a WebBrowser */

btn_edutech_wiki.addEventListener(MouseEvent.CLICK, GoToUrl);

function GoToUrl(event:MouseEvent):void {
	var request:http://livedocs.adobe.com/flash/9.0/main/wwhelp/wwhimpl/common/html/wwhelp.htm?context=LiveDocs_Parts&file=00000488.html#wp149914URLRequest = new  URLRequest("http://edutechwiki.unige.ch/en/Flash_components_tutorial");
	navigateToURL(request, '_blank');
}
- Results
- flash-cs3-simple-slide-show-menu-fewcode.html
- Grab the flash-cs3-flash-cs3-simple-slide-show-menu-fewcode.* files from
You work with Flash 8 ?
The AS3 script above will not work in Flash 8. You have to work with the AS2 component library. This also means that you'd have to delete the buttons in the above example if you want to convert to AS2. If you make a fresh start, no problem, the component button looks and behaves almost the same as its AS3 version as you can see in the screen capture below:
- The AS2 button component
- Just change the label and if necessary the width parameter (E.g. we set W: to the left to 400 since the btn_edutech_wiki needs to be large).
Make sure that you open a new ActionScript 2 file (or if work in CS3 and forgot, change the Publish Setting to AS2 before you start using buttons.
- ActionScript 2 code
ActionScript 2 code is much simpler. The (good) reason why the much more powerful ActionScript 3 is more complicated is that ActionScript 3 allows to program Flash *.swf without even opening the Flash authoring environment. It's a language also made for programmers who do not necessarily like this frame-based tool and who prefere to develop with an IDE like Adobe Flex.
Anyhow, here is the code inserted in frame 1 of the "Action" layer:
stop();

btn_rainbow.onPress = function() { gotoAndStop(2); };
btn_tecfa.onPress = function() { gotoAndStop(3); };
btn_bosses.onPress = function() { gotoAndStop(4); };
btn_my_computers.onPress = function() { gotoAndStop(5); };
btn_credits.onPress = function() { gotoAndStop(6); };

btn_edutech_wiki.onPress = function () {
  getURL("http://edutechwiki.unige.ch/en/Flash_components_tutorial", "_blank");
};
As you can see, it is much simpler. We just use the following syntax:
- name_of_button_instance.onPress = function () {
- gotoAndStop (N);
- };
Note: Instead of putting this code in the Action layer in one single script, we also could have attached it to the buttons as we did in the Flash button tutorial's simple slide show.
- Results
- flash-cs3-simple-slide-show-menu-AS2.html
- Grab the flash-cs3-flash-cs3-simple-slide-show-menu-AS2.* files from
Improvements to be made / exercise
- If you got more and/or bigger pictures, you actually should not include the pictures in the *.swf, but rather load from the Internet.
You then have to use how to use/program a preloader (we will cover this in some other tutorial).
- You may add text (labels) to each picture
- You also could add another URL button (e.g. I should add one to the TECFA Logo on top left).
- Exercise
- Add some contents to frame one and add a "home" button to navigate there.
Customizing buttons
You can customize button skins, but this is not easy.
- Double click the button on the stage
However, before you try this:
- Be aware that you can change width and height simply though the parameters panel
- Color will adapt to background (buttons are transparent)
Read more about Customizing the Button at Adobe
AS 3 built-in component overview
- http://livedocs.adobe.com/flash/9.0/main/wwhelp/wwhimpl/common/html/wwhelp.htm?context=LiveDocs_Parts&file=00000488.html#wp149914
- http://livedocs.adobe.com/flash/9.0/main/wwhelp/wwhimpl/js/html/wwhelp.htm
Each component has a series of parameters that you can modify in order to change the component's appearance and behavior.
The most important parameters can be simply changed through the Parameters panel (menu Window->Properties>Parameters)
Alternatively, you also can use the Components Inspector.
Other parameters only can be changed through ActionScript coding.
Button
(see above)
CheckBox
ColoPicker
ComboBox
DataGrid
Label
List
Numeric Stepper
ProgessBar
RadioButton
ScrollPane
Slider
TextArea
TextInput
TileList
Uploader
UIScollBar
- See also the Flash Video component tutorial which is in a separate article.
Links
Component libraries
- Meta-Index at HotScripts.com (but not sorted by Flash version ....)
- * Adobe Exchange beta (various licences, also commercial). Not everything a component.
- Atellis (Good reflection component).
For component programmers
(to sort out, will in the future move this to some AS3 tutorial)
- Quick Tips for Making ActionScript 3 Components by Ben Stucki.
- ActionScript 3.0 Forums at Kirupa.com. Also includes [ ActionScript 3 Tip of the Day]
- Animating Dynamic MovieClips in AS3 by Kirupa.
- Eric Cancil. A blog with AS3 code.


