Flash frame-by-frame animation tutorial: Difference between revisions
m (→Introduction) |
m (→Introduction) |
||
| Line 56: | Line 56: | ||
* Insert drawings in various keyframes (as seen in the picture above). Any graphic will do. You also could use as many layers as you like. Technically speaking frame-by-frame animation ''is'' simple ! | * Insert drawings in various keyframes (as seen in the picture above). Any graphic will do. You also could use as many layers as you like. Technically speaking frame-by-frame animation ''is'' simple ! | ||
* Over time (from frame to frame), these drawings should differ only a bit in general. | * Over time (from frame to frame), these drawings should differ only a bit in general. | ||
* Drawing a simple chain as above: (a) do one drawing | * Drawing a simple chain as above works like this: | ||
** (a) do one drawing | |||
** (b) make sure that it is selected, then hit F6 to copy the drawing to a new frame | |||
** (c) Click into the new frame and modify, | |||
** (d) hit F6 .... | |||
'''Play time:''' | '''Play time:''' | ||
Revision as of 15:10, 16 January 2013
<pageby nominor="false" comments="false"/>
Introduction
Frame-by-frame animation means displaying a series of images, one image after another. That creates the illusion of a movie. Real movies actually work that way too.
- Learning goals
- Learn basic Flash CS6 frame-by-frame animation, one kind of Flash animation.
- Learn about embedded movie clips and symbol edit mode.
- Save a frame-by-frame animation as reusable movie clip.
- Learn about some object transformation features
- Prerequisites
- Flash CS3 desktop tutorial
- Flash layers tutorial
- Flash drawing tutorial (for starters some of it, at some point you'll have to dig into it a bit)
- Flash animation overview
- Moving on
- If you want to do serious frame-by-frame animation, you probably better drawing skills. In particular, you should read the Flash object transform tutorial and the Flash arranging objects tutorial since you'll have to change graphics from one frame to the next one.
- If you respect our advice on "being modular", you also should look at the first parts of the Flash embedded movie clip tutorial
- The Flash article has a list of other tutorials. You probably should continue with the Flash classic motion tweening tutorial or Flash CS4 motion tweening tutorial. It will teach how to make fly things. You also can read the Flash shape tweening tutorial which tells how to do morphing animation.
- Quality
- This text should technical people get going and may not be good enough for self-learning beginners. It can be used as handout in a "hands-on" class. That is what Daniel K. Schneider made it for...
- Level
- It aims at beginners. More advanced features and tricks are not explained here.
- Materials (*.fla files you can play with)
- http://tecfa.unige.ch/guides/flash/ex6/frame-by-frame-intro/
- Alternative version
- Flash CS3 frame-by-frame animation tutorial (deprecated)
- The principle
Purpose: Frame-by-frame animation gives you very detailed control over the movie (since it's the technology used to make animation pictures until recently before different 2D and 3D computer animation techniques came into the existence). Disadvantage is that frame-by-frame drawing is very time consuming work. Therefore, most often, designers use a combination of frame-by-frame animation and interpolation techniques (called tweening in Flash lingo). Often, frame-by-frame animation is used to animate single objects that in turn can be used as part of larger Flash animations. A typical example are buttons that highlight when you move the mouse over them or when you click on them.
Flash animations are defined through so-called timelines. Each flash file has a timeline, i.e. the so-called main timeline. Within each flash file you then can insert so-called embedded movie clips. Each of these has their own timeline. In other words, you can include animated objects within animations.
According to Adobe's Creating your first Flash Professional CS6 document, “The Timeline controls the timing that specifies when elements in the movie appear on the Stage. The playhead begins at Frame 1 and moves from left to right as the movie proceeds through the frames. Drag the layers in the Timeline to arrange the layering order of graphics on the Stage. Graphics in the higher layers appear to be placed on top of the graphics in the lower layers.”
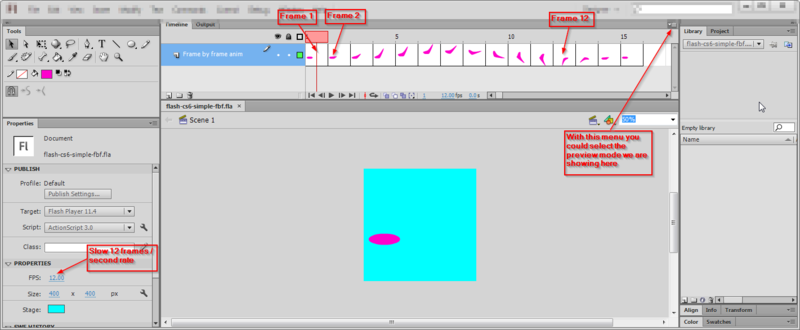
The following example is a very simple animation that lasts for 15 frames. Since we set the frame rate to 12 frames/second, it will last about 1.25 seconds.
Files:
- flash-cs6-simple-fbf.html
- flash-cs6-simple-fbf.fla (source code)
Below a screenshot of this example.
Executive summary of the procedure:
- Insert drawings in various keyframes (as seen in the picture above). Any graphic will do. You also could use as many layers as you like. Technically speaking frame-by-frame animation is simple !
- Over time (from frame to frame), these drawings should differ only a bit in general.
- Drawing a simple chain as above works like this:
- (a) do one drawing
- (b) make sure that it is selected, then hit F6 to copy the drawing to a new frame
- (c) Click into the new frame and modify,
- (d) hit F6 ....
Play time:
- Either load this flash-cs6-simple-fbf.fla file and make some modifications
- Or implement a quick and dirty animation yourself.
Testing the result
- Press CTRL-Enter (or menu Control-> Test Movie).
The big decision - film or modular thinking
When you plan a simple flash project, you can think of it in two very different ways
- Plan to work like a computer designer and think of your flash as combination of modular elements. We prefer that design philosophy.
- Plan to work like a Flash graphic designer and use hundreds of frames and dozens of layers, i.e. use a "film" metaphor. Most Flash textbooks for non-programmers would teach you this.
Animations are called "movie clips". This is confusing, but can be explained by the Flash history. A flash file as whole can be a movie clip. But you also can have clips within clips within clips, e.g. a Flash file can contain several movie clips that in turn may contain other clips.
Let's have a look at two variants of an example that will demonstrate these principles.
Flying rocket in the main timeline
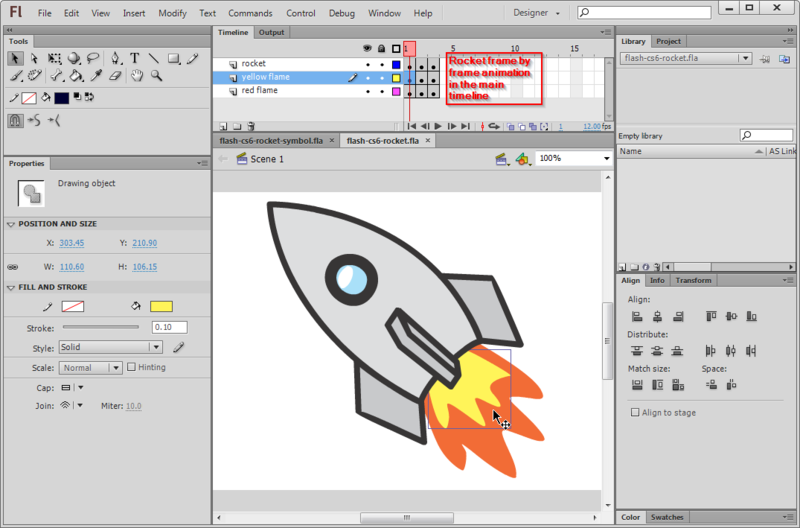
The following screenshot shows a rocket frame by frame animation made in the main timeline.
- The animation only uses three frames, i.e. we only implement some minimalistic "flaming" animation.
- We use three layers for drawings, one for the rocket and two for the flames
- Yellow flaming is made with three different drawings in frames 1-2-3 (layer 2)
- Red flaming is made with three different drawings in frames 1-2-3 (layer 3)
If you want to add a second, a third rocket and other flying objects you will have to duplicate the three layers. In the six new layers you will have to move the drawings to positions. This is awfully complicated and we will not show an example. Therefore, in most cases, do not create animations in the main timeline.
Example to look at and to play with:
- flash-cs6-rocket.html (result)
- flash-cs6-rocket.fla (fla source code)
Flying rocket symbols, no main timeline animation
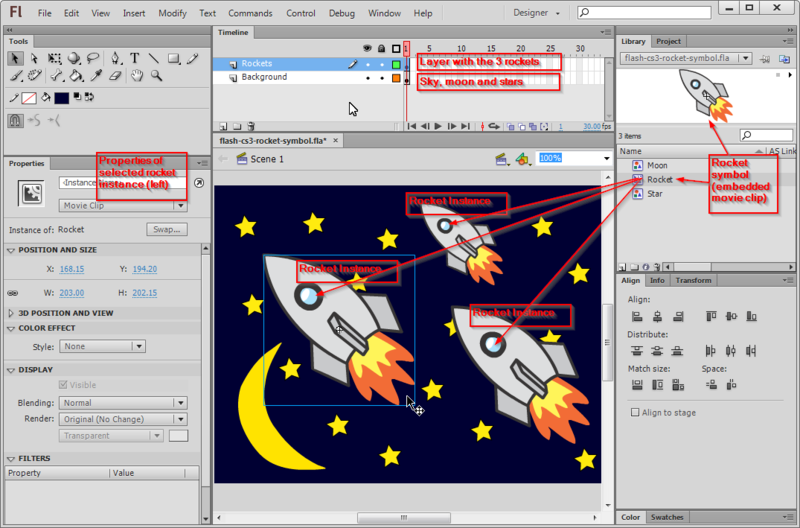
A much smarter way is to define a single rocket as a so-called embedded movie clip, also called movie clip symbol. Think of an embedded movie clip as flash within flash.
- We use one layer for the background (sky, moon and starts)
- We use another layer to position several instances of the same rocket movie clip that sits in the library. As you can see we also changed their respective size.
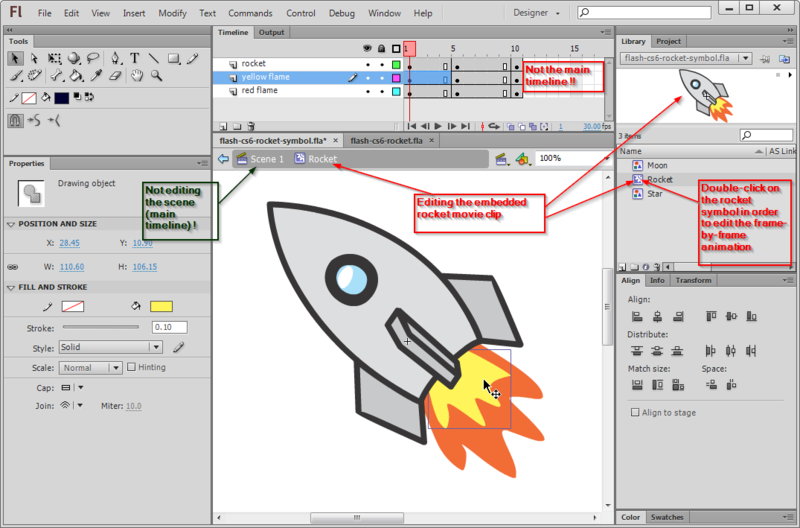
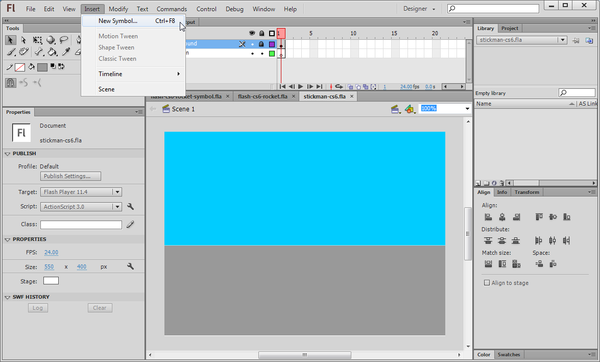
An embedded movie clip (also just called symbol or movie clip symbol) has its own timeline. You can create a new symbol via the menu Insert->New Symbol (Ctrl-F8) or by selecting an object on the stage, right click -> Convert to symbol.
Once you got a rocket movie clip, you can create as many instances as you like. Just drag the clip from the library to the stage. What's even better is that you could copy one movie clip symbol from one flash file to a different one. I.e. you easily can reuse your components.
Example:
- flash-cs6-rocket-symbol.html (Result)
- flash-cs6-rocket-symbol.fla (Source code)
Rocket science, i.e. how to work with frames in order to create some sort of pulsing flame, is explained further below in this article. Let's now introduce the frame-by-frame animation engineering.
Read more about embedded movie clips in:
The timeline and keyframes
The principle of frame-by-frame animations made with drawings is that you draw various versions of the same objects in different frames. These are then displayed one after each other in rapid order (most often between 12-24 frames / second).
Frames and key frames
A frame is a drawing that is displayed at a given time. Usually any drawing uses several layers.
In the timeline, each "stop" is called a frame. Frames are numbered from 1 to whatever length your animation has. Let us start by introducing the meaning of a few symbols in the timeline. We later will come back to these.
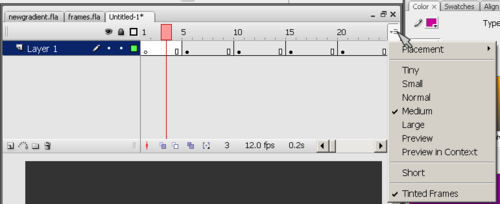
If you feel that display of timeline frames is too tiny, you can fix this with the time line options (little pull-down menu in the upper right). This menu also allows displaying a preview of the animation (but that takes up space of course).
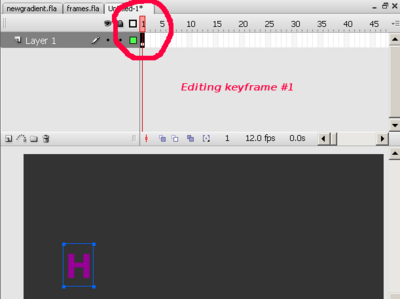
When you start drawing with Flash, everything is drawn by default into a first frame in layer 1.
E.g. if you insert a letter, for example, you will see something like in the screen capture just above.
- The first frame in the timeline will have a dot inside. Therefore, if you see a frame with a ".", it means that there is a drawing inside the frame for this layer. A frame with contents is called a keyframe.
- A frame with a small white circle is called an empty keyframe. It will display nothing.
- A frame without a dot, doesn't have any drawing inside and it will either display the drawing from the prior keyframe (black dotted frame to the left) or nothing if there is no keyframe to the left.
- The playhead showing the current frame (the red rectangle) sits on top of frame one by default and you can move it around to inspect your animation.
Executive summary - creating a frame-by-frame animation
Before pressing a button or using the menu, make sure that your are positioned in the right frame in the right layer. It also is a very smart idea to lock all other layers (see the Flash layers tutorial)
Let's recall the principle:
- Frame-by-frame animation works by displaying drawings after drawings at a rapid pace. By default, Flash CS6 will show 24 frames (drawings) by second.
You don't need to have a drawing in every frame, i.e. a keyframe every five frames is good enough. A keyframe is a frame that contains a picture or other object. In the timeline, a keyframe is indicated by a black dot.
Here are some useful shortcuts:
- F6 - Copy the graphics of the previous keyframe (Insert Keyframe).
- F7 - Inserts a blank keyframe
- F5 - Extends the drawing of the previous keyframe in the timeline up to this point (Insert Frame).
Right-click on a frame gives you more options, e.g. destroy or empty a frame...
The procedure:
- Create a new layer or reuse a layer
- Draw something (for starters, try a "stick man").
- Insert 3-5 empty frames: Press F5 4 times
- Click on the last frame (the white rectangle)
- Press F6 - Create a second keyframe with content identical to the first
- Slightly change the design of this new keyframe
Repeat as desired (ie 3 times F5 and F6, go to the end, then change the drawing). If your animation is complex, using multiple layers
In your timeline, you should see something like:
Now, add a nice static background:
- Create at least one new layer and draw a picture, such as a sky.
- Go up to the last frame of the animation and for each of these new layers, press F5. You should see something like this the timeline:
Now test your animation sequence:
- Press CTRL-Enter (or use the menu Control-> Test Movie)
- You can also move the red control that sit on top of the timeline to the left or to the right.
We now will introduce three frame-by-frame animation examples. We sometimes will do this in the main time line of the *.fla file. Alternatively (and better), you first should create a new so-called movie clip symbol and then edit that object.
A simple stickman
We will shortly show how to create a "stickman" animation using an embedded movie clip. Look at stickman-cs6.html first.
Step 1 - New Flash file and background
- Create a new Flash file
- Draw a simple background in the first layer and call it "background" or something. E.g. we just drew 2 rectangles...
- Lock this layer
- Create a new layer and call it Stickman animation
Step 2 - Create a drawing and make it a symbol
- In the new layer created in step 1, create your drawing
- Select all the elements
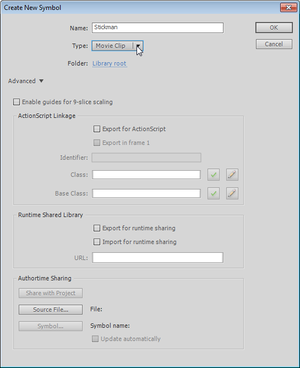
- Right click -> Convert to symbol. Select "Movie Clip" and name it "Stickman"
- Kill the drawing on the stage (!). Don't worry, it now sits in the library
- Now drag the Stickman from the library to the stage. You could make several clones and adjust their respective size in the properties panel. You might see something like this:
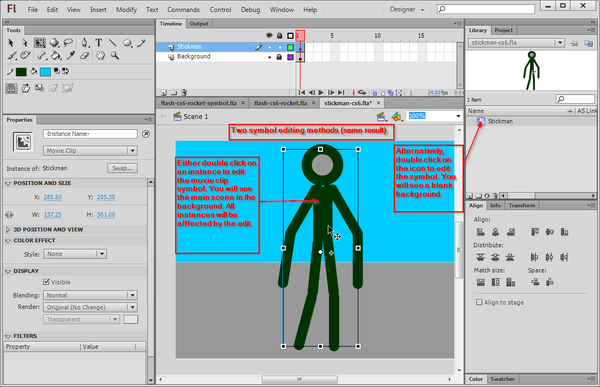
In order to edit this movie clip symbol again, double click on the object on the stage or double click on the library item. In the first case, you will see the background as shown in the next picture
Simply click on "Scene 1" about the stage in order to return to the stage...
Step 2 alternative - Create a new embedded movie clip first
- Insert a new symbol (Ctrl-F8)
- Call it "Stickman" and make it of type "Movie Clip"
- Your now are editing the Stickman symbol. You should see an empty stage, "layer 1" and a little + sign in the middle
- Start drawing around this "+" sign which roughly should be in the center of your drawing.
Step 3 - Frame by frame animation
(same for both methods)
- Hit F5 (about 5 times)
- Click in the frame with the white rectangle or the one after it
- Hit F6 (create new keyframe with a copy of the old one)
- Modify the drawing a bit, e.g. just turn an arm
- Hit F5 (about 4 times)
- Hit F6
Repeat ...
Drawing tips:
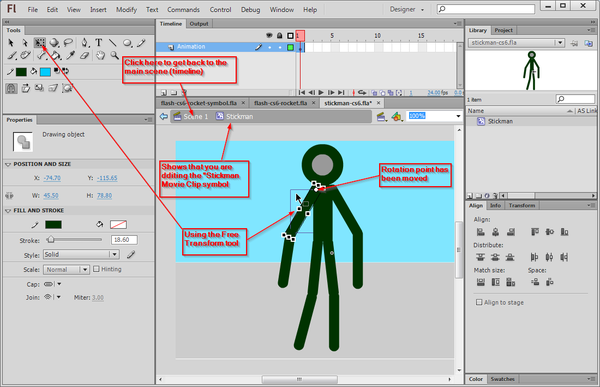
If you play with a stickman, then you might learn how to use the Free Transform tool (![]() ) in order rotate limbs (change the center point and rotate).
) in order rotate limbs (change the center point and rotate).
- Select the tool

- Select a limb and move the little white circle towards and end
- Then move the mouse to a corner until the mouse cursor changes to rotation. Then drag to rotate.
- Read the Flash object transform tutorial for more information
Enjoy !
Example:
- stickman-cs6.fla (source)
- stickman-cs6.html
A simple letter after letter animation
The following animation was made in the maintime line and with Flash CS3. You can open the example files in Flash CS4/5/5.5/6 without problems. The only problem one may encounter with CS3 files is that since CS 5.5 fonts must be embedded (that's a small change).
Have a look at the this simple animation first.
The *.fla, *.swf and *.html files flash-cs3-frame-by-frame-hello.* can be found at http://tecfa.unige.ch/guides/flash/ex/frame-by-frame-intro/
We will produce an animation that will display the word "HELLO", one letter after each other. The principle is quite simple: We will insert new letters in new keyframes. One could do this by inserting "H" into keyframe 1, then add "E" to keyframe 2 etc. In order to slow down the animation, we insert a keyframe about every 5 frames.
- Step 1
We insert the letter "H" in frame 1 (alternatively you may start in frame 5, i.e. the user won't see the "H" when the frame loads. Anyhow, later you always can add extra empty frames.
- Steps 2 to 5
Now we repeat this procedure by adding new letters in new frames. So first we will transform frame 5 into a new keyframe. It is important to understand that there are two kinds of new keyframes:
- Blank ones that will clear the stage, i.e. the objects will be gone. That's not what we want here.
- Keyframes that carry "forward" contents of the keyframe before. We will use this one.
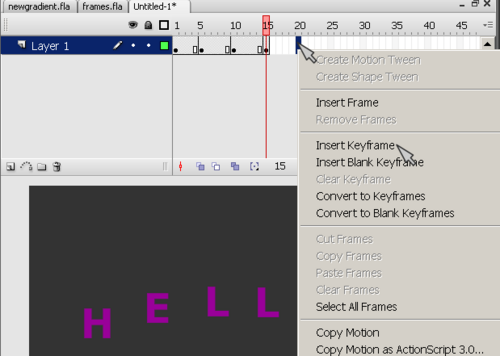
The procedure is the following (see the picture below)
- Right-click in a frame, then select Insert Keyframe (not insert blank keyframe). Alternatively hit F6, i.e.use the [Flash CS3 keyboard shortcuts|shortcut]].
Repeat this, until you incrementally spelled out "HELLO".
- Step 6
Test if it works:
- Firstly you simply can move back and forth the playhead (red rectangle that sits on the top of the timeline)
- Then you can test the movie though the menu Control->Test Movie or hit CTRL-Return. This will open a up a new window where you can see more or less what an end-user would see.
- Step 7
Now we want to tune a few things:
(1) You may not be happy that the movie starts with letter "H" already displayed. Right-Click on Frame 1 and Insert Frame (not a keyframe!) or hit F5. Repeat this 4-5 times. Then hold down the mouse and drag the black dot in the new frame 1 to frame 5.
(2) Your Movie may be too slow or too fast. Flash animation made with the CS3 drawing tools is not time-based (as in SVG for instance) so you have to fix a frame rate. You can change the frame rate (number of pictures shown/second) in two ways:
- Click on an empty spot on the stage and change the rate in the properties panel that you should see below
- Menu Modify->Document (CTRL-J)
For this animation, about 15 frames are about right I think.
(3) You also may align the letters. But you have to do this in each keyframe, else they will jump around, which actually may be an effect you like.
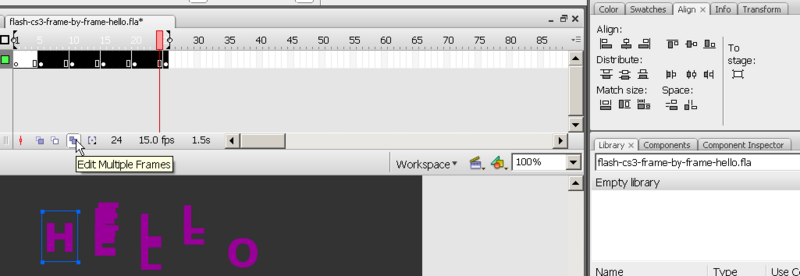
To align all letters in all frames: Click on the Edit multiple frames button.
- Then, you can select the frames you want to edit together by moving the "[" "]" sliders on top of the timeline
- Then select letter-by-letter groups, then use the align pane (Window->Align), but untick To stage.
This tool is quite dangerous, since it's hard to control what happens in each frame. Make sure to save your file before you engage in this ! Anyhow, next time make sure to place your objects where they should be.
- Step 8
Now you can publish this as a web page.
- Make sure to save the animation in some place you can remember, because Flash will put the exported Flash, HTML and JavaScript there.
- Then, click on an empty spot in the stage and click the "Publish Settings" button or menu File->Publish Settings.
- Click the publish button when you are happy with the settings. It will put all the necessary files in the same directory where your *.fla file sits.
- Then click on either the Flash *.swf file or the *.html file and see if it works.
As an exercise, you now can add extra keyframes after frame 1,5,10, etc. and move up or down letters. Alternatively, read on ...
Frame-by-frame shaky animation
Sometimes, e.g. in trailers or in little advertisement boxes you can see some sort of shaky or jittery icons, like in the example we are going to discuss now.
The *.fla, *.swf and *.html files flash-cs3-shaking-hello.* can be found here: http://tecfa.unige.ch/guides/flash/ex/frame-by-frame-intro/
- Step 1 - change stage size
- Define size and background color of your stage (I use 400x200 px this time). To do so, click with the selection tool on an empty spot of the stage and change the properties of the stage in the properties panel (usually shown below the stage).
- This time, we will use two layers, so create 2 layers, call one of these "hello".
- Step 2 - draw a hello word
- In the "hello" layer, draw the word "Hello" with the pencil for a change
- Select the pencil
- Put the Pencil tool into "Smooth mode".
- Put Flash into object mode (circle in the options area of the tools panel)
- Select a wide stroke (15px or more)
Go back to the drawing tutorial if you don't how to use object mode and how to set the smooth control for the pencil.
- Step 3 - fix the hello word
- You may have to fix the Word "Hello", since despite smooth mode your drawing may not be so hot.
- Firstly use the Free Transform tool to adjust size, rotation, etc. of each letter.
- Then use the Subselection tool to fix certain letters, probably your "o" will be ugly.
- To do good work, you need to set magnification to something like 400 (Menu View->Magnification).
- Then you can drag around the distortion points' (squares) and kill some of these and/or move the curve control handles (dots attached to a line).
- You can read further explanation about envelope transforms
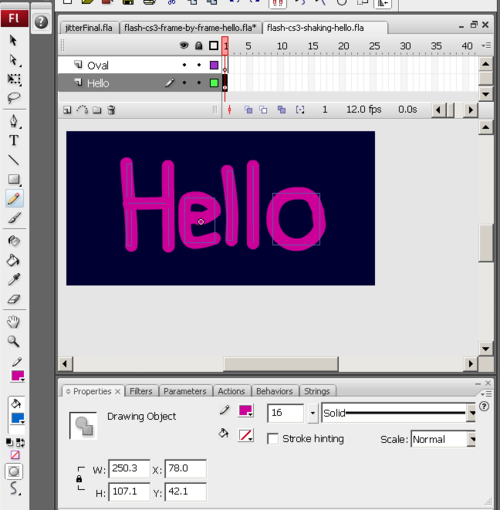
- Finally select all letters with the selection tool and center them. You may also may make the whole drawing bigger or smaller (just change the "W" property in the properties panel while everything is selected, i.e. see the screen capture below).
So now you should have (very) roughly something like this:
- Step 4 - Draw an oval
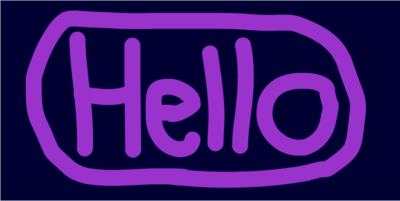
- Draw an oval or something around the "Hello" word if you want. Use another layer for this and lock the "Hello" layer while you do this. See the Flash layers tutorial if you don't know how to use layers.
- Again, use the subselection tool to fine tune if needed. If you need more explanation about object transformation, have a peek at the Flash object transform tutorial.
- Step 5 - Make a new keyframe for both layers
Create a new keyframe in frame 2 (as explained above).
- Hit F6 or Right-click; Insert Key Frame for the "hello" layer
- Hit F6 or Right-click; Insert Key Frame for the "oval" layer
- Now you should have a copy of both the "hello" word and the Oval in the new frame.
- Step 6 - Make changes
- Now you can make slight changes to your drawings in frame 2 (so make sure that frame 2 is selected !)
- I changed color a bit for both the oval and the hello word.
- Unlock the "hello" layer if it's still locked.
- "Edit->Select All"
- Change the color in the properties window
- Then twist a little bit some letters and maybe the Oval
- You can do this for instance with the subselection tool or the Freetransform tool. (I only used the subselection tool and basically turned a few Curve control handles).
Below is a picture of the slightly altered graphics:
- Step 7 - Add other frames
Just two frames will do, but you can add more of course :)
This example was a bit more professional. We tried to select a good stage size and made some efforts to get the drawings right.
Rocket science
Frame-by-frame animation is also quite useful if you want to create animated objects that you then can reuse in another animation as a movie clip. Let's first look at this little rocket we shall discuss.
The *.fla, *.swf and *.html files flash-cs3-rocket.* can be found here: http://tecfa.unige.ch/guides/flash/ex/frame-by-frame-intro/
I imported this rocket from Uncyclomedia Commons:
- It's an SVG file that I first opened with Illustrator.
- I then copy/pasted it to Flash. See the Clipart article (i.e. the section on Importing to Flash).
Now we would like to animate the flames of this little rocket.
- Step 1 - Break the rocket into components
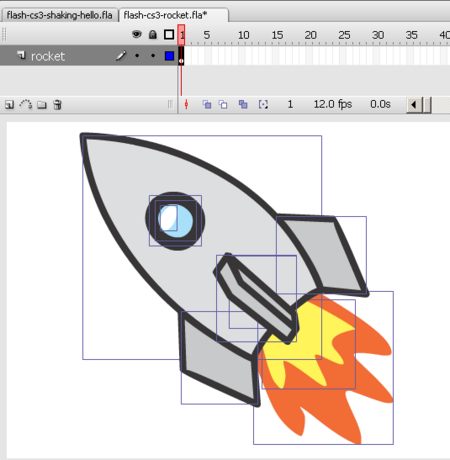
- Break the rocket apart (right-click->Break Apart). You now should see various rectangles drawn around its various shapes.
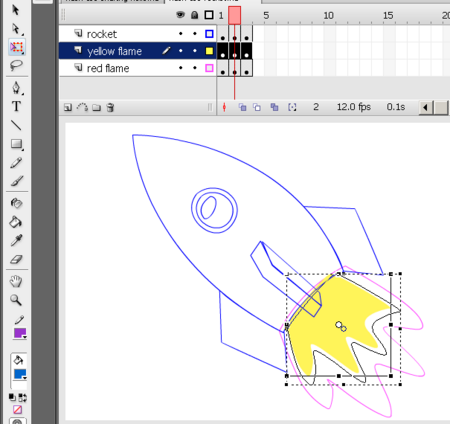
- Flames are made with 2 shapes (the two rectangles in the lower right)
- Step 2 - Put the flames into another layer
The easiest way is to use distribute these to other layers
- Select the 2 flames (hold down the SHIFT key and click on the orange and yellow parts
- Then Right-click->Distribute to layers
- Rename the two layers you created.
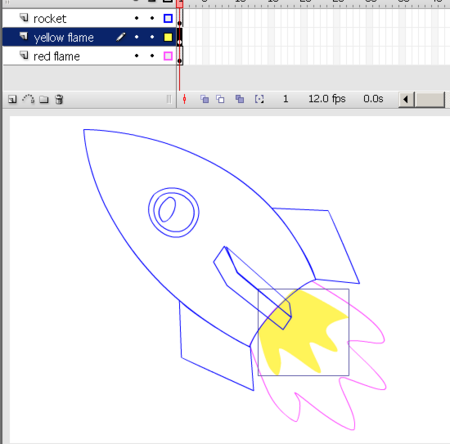
Now you should have something like in the screen dump below. I am positioned in the yellow flame layer and show the other two as outlines.
- Step 3 - Duplicate frame 1 to frames 2 and 3 in these two layers.
- As explained above, in frame 2: Right-click->Insert Keyframe. Do this for each of the three layers
- Repeat this for frame 3.
- Step 4 - Change the flames for each frame
- I simply used the Free Transform tool and dragged the rectangle towards the lower right.
- By doing this you also might have moved the rectangle itself, just push it back underneath the rocket... (either with the arrows, or with the selection tool).
- In order to get this right, you should each time put all the other layers (rocket plus one of the flames) in outline mode with the layers tool.
- Step 5- Tuning
- The animation is now a bit too fast. We would like to get the kind of effect you see in old and cheap cartoons on TV.
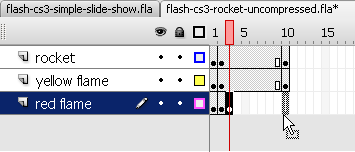
- If you wish you can drag the keyframes (each dot to the right). I made a keyframe in every 5, but I also adjusted the Framerate to 30/second. That's good TV quality. (click on workspace and adjust in properties panel)
- Then you also could improve drawing of the flames (see the Flash object transform tutorial and/or add more keyframes. Finally, you could add motion tweens between the keyframes. I didn't do this since motion tweening is not part of this tutorial.
- Step 4 - Test and publish
- Test and enjoy :)
- Publish
- Step 5 - Export as a video clip only
File->Export Movie will just save a *.swf Flash animation file (no HTML and JS).
There are two ways of exporting an *.swf movie.
- "Normal", i.e. compressed. This means that when import this flash file into another flash file, you can't edit the object anymore.
- "Uncompressed". This means that after you import the rocket you can edit it somewhat. To get this option, untick Compress Movie in the settings dialog that will pop up.
- Step 6 - Turn it into a movie clip symbol (optional)
You also can turn this whole animation into a movie clip symbol. This is best strategy if you want to build a library of fully editable flash movie clips you can import into other animations. Also, as we shall point out later, you actually could start by creating a movie clip symbol and then create an animation.
- Select all layers and frames (click on the first layer, then SHIFT-click on the last). Make sure that every frame and layer in the timeline is black
- Copy all the frames (everything) Menu Edit->Timeline->Copy Frames
- Menu Insert->New Symbol. Tick the Movie clip option and give it a good name, e.g. "Rocket".
- Then you should be in Rocket editing mode and just see "Layer 1" on top
- Put the cursor in the first frame
- The paste the whole rocket code: Menu Edit->Timelines->Paste Frames
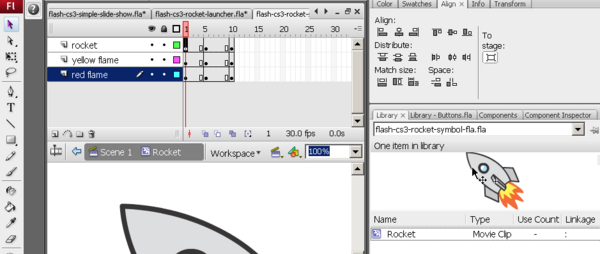
You now should see something like this:
Next you can copy this symbol to another flash file which you may call my_library.fla. We just killed everything in the file (except the symbol) and saved it under a different name (flash-cs3-rocket-symbol.fla)
- Result
Now we have two versions of rocket *.swf move clipt that we can reuse in another Flash animations
- flash-cs3-rocket-uncompressed.swf. This version also has the improved flames
In addition we have file *.fla file with just a rocket symbol inside. You can copy/paste symbols from one flash file to another one.
Below is a short how-to re-use *.swf files , but you also can directly go and read the Flash motion tweening tutorial.
Reuse frame-by-frame animations as movie clips
Reuse of swf files
The swf flash files we just created can be used as components in new Flash animation, although we would rather recommend using embedded movie clips for that purpose.
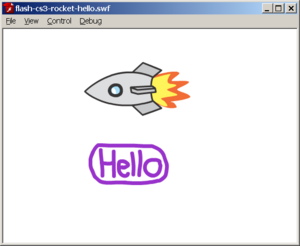
The *.fla, *.swf and *.html files flash-cs3-rocking-hello.* can be found here: http://tecfa.unige.ch/guides/flash/ex/frame-by-frame-intro/
- Step 1 - Import *.swf files into the library of a new Flash file
- Create a new flash file (File->New)
- Then import stuff you made: File->Import->Import to library
- Select the flash-cs3-rocket.swf file
- Do the same with the flash-cs3-shaking-hello.swf file
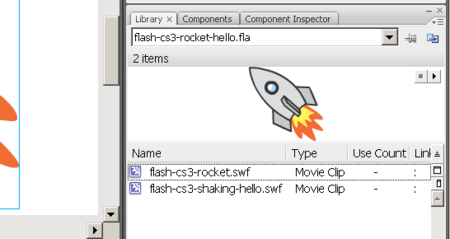
You now have a nice rocket and a flashing hello in your library:
- Step 2 - Drag the symbols (movies) to the stage
- Drag the item in the library onto the stage
- Now your rocket is too big :(
- No problem. Use the Free Transform tool to make it smaller and to rotate
- Hold down the SHIFT key when you resize it from a corner !
Here is the result:
- Step 3 - Learn about motion animation
Of course, now you should do a moving animation with these flashing objects. See the Flash motion tweening tutorial and before this enjoy the flying rocket:
Creation and reuse of embedded movie clips
Let us recall an important design principle. In the simple Rocket science example and in the others too, we created the animation in the main time line. Alternatively, as explained in the beginning, you should first start by creating a new symbol:
- Either create an initial drawing and then convert it to a movie clip symbol. Double click on an instance for editing and creating the animation.
- Or use menu Insert->New Symbol to create a new one. Tick the Movie clip option and give it a good name, e.g. "Rocket". Then you land directly in symbol editing mode and you can create an animation for just this object.
- Once you are done with symbol editing, double-click on "scene" in the edit bar (on top of the stage) or click on the little "back arrow". Always make sure that know whether you edit just a symbol or whether you are in the main timeline (the whole scene) !
Read more in the Flash embedded movie clip tutorial about creating and using embedded movie clips. This tutorial will also introduce some ActionScript code that is needed to stop/start embedded animations.
Also remember that you can copy/paste anything from one *.fla file to another and this includes movie clips. So it's a good idea to create somewhere a private library (a *.fla file) that includes all your major artwork.
Links
Example materials
Example files used (including *.fla source) can be found here:
- Click on either an *.html or *.swf file to see.
- Get just the *.fla file if you want to make modifications. The standard copyright of this wiki applies.

