MakeCode: Difference between revisions
| Line 54: | Line 54: | ||
* The Blocks Toolbox which give you "blocks" for coding. | * The Blocks Toolbox which give you "blocks" for coding. | ||
** Basic blocks (input, light, loops ...) | ** Basic blocks (input, light, loops ...) | ||
** Advanced blocks | ** Advanced blocks by clicking on <code>Advanced</code>. You will have 1)additionnal blocks such as pins, functions and so on and 2) Extensions which will give you access to special libraries such as servos,gamepad, mouse .... | ||
* The coding workspace where you drag and drop blocks from the toolbox. | * The coding workspace where you drag and drop blocks from the toolbox. | ||
Revision as of 16:51, 10 September 2019
Introduction
“Microsoft MakeCode brings computer science to life for all students with fun projects, immediate results, and both block and text editors for learners at different levels.” (Hands on computing education, retrieved August 22, 2019).
Makecode looks similar to Snap! and Scratch, i.e. it is a visual programming language. It also allows saving and working with JavaScript code.
As of August 2019, several environments can be programmed with makecode:
- Makecode Minecraft, the online Minecraft cube-based online worlds.
- Makecode Microbit, the educational board from BBC.
- Circuit Playground Express, to program the Adafruit Circuit Playground Express. Short examples are below, in the Adafruit Circuit Playground Express and Adafruit GEMMA articles.
- Makecode LEGO Mindstorms, the LEGO educational robotics environment
- Cue, an educational robot.
- Makecode Arcade, to program a set of gaming consoles from various brands, e.g. BrainPad Arcade (quote a "Coding Mini Computer for learning and making, robots, games and electronics"), Adafruit PyBadge (credit card size board that runs CircuitPython, MakeCode Arcade or Arduino), Meowbit (a card-sized graphical retro game computer with allows you coding with Makecode arcade and Python).
- Makecode Chibichibi, an environment for circuit stickers and other tools for paper circuits, which blends circuit building and programming with arts and crafts.
See also:
Adafruit MakeCode
Supported boards
So far (Aug 2019), MakeCode works with
- the Adafruit Circuit Playground Express board of the Adafruit FLORA system.
- the Adafruit PyGamer board, based on a ATSAMD51J19A micro-controller chip, with 512KB of flash and 192KB of RAM, and 8 MB of QSPI flash for file storage
- the Adafruit PyBadge a credit-card sized board, also based on a ATSAMD51J19 (in Beta, as of Aug 2019).
All of these boards also work with CircuitPython and Arduino. Code can be directly downloaded into board via USB. It will be compiled into some kind of machine language.
Online editors
- The online MakeCode editor for the Playground Express is https://makecode.adafruit.com/. The site includes some walk-through tutorials and some examples. The platform includes that familiar palette with programming elements, a workspace for the program, and a simulator to the left.
- The online editor for PyGamer and PyBadge is https://arcade.makecode.com/, i.e. the generic Microsoft Arcade programming environment.
Overview of Makecode environment
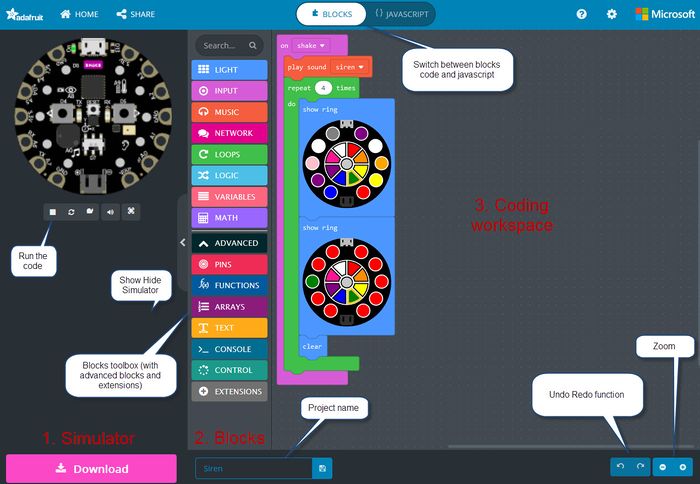
Makecode is an online environment composed of three parts (see image below)
- The simulator which allow to test your code by clicking on "play".
- The Blocks Toolbox which give you "blocks" for coding.
- Basic blocks (input, light, loops ...)
- Advanced blocks by clicking on
Advanced. You will have 1)additionnal blocks such as pins, functions and so on and 2) Extensions which will give you access to special libraries such as servos,gamepad, mouse ....
- The coding workspace where you drag and drop blocks from the toolbox.
On the image below, you will find a quick presentation of the environment :
Circuit Playground Express Example
The following simple example shows that a simple application can be done in short time, even by beginners.
Notice: Make sure to save more complex code and maybe create versions. I did loose the blocks code for an example at some point by playing around with the "explorer" functionality.
Block code
The following code will activate on shaking the board and repeat four times a sound and a blinking (from blue to red/yellow) since one ring is shown one after the other.
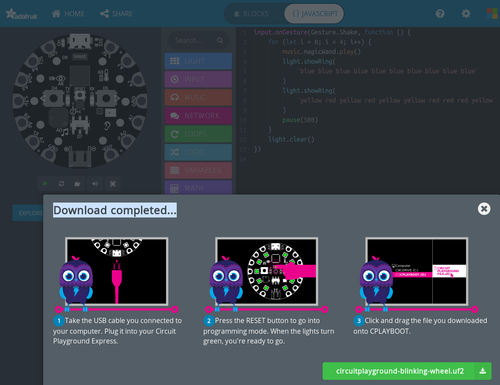
The corresponding JavaScript code is
input.onGesture(Gesture.Shake, function () {
    for (let i = 0; i < 4; i++) {
        music.magicWand.play()
        light.showRing(
        `blue blue blue blue blue blue blue blue blue blue`
        )
        light.showRing(
        `yellow red yellow red yellow yellow red red red yellow`
        )
        pause(500)
    }
    light.clear()
})
Downloading
- Plug in the USB B cable
- Press the reset button on the board. All the LEDs should become green
- Save the the code in the
CPLAYBOOTdrive. (D:) on my machine.
Note that you can drag and drop a file from your computer directly in the online editor to edit it.
Sharing
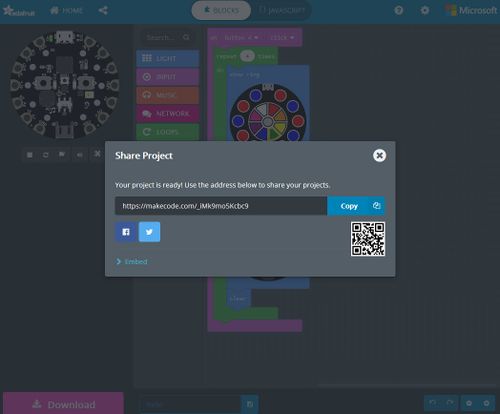
Share your code by clicking on share button. After confirming the title of the project, you will have a URL link to share.
Links
- Makecode environment
- Coding the Circuit Playground Express: general course to learn code on Makecode.


