Felix TEC-4.1 3D printer: Difference between revisions
m (→Calibration) |
|||
| Line 98: | Line 98: | ||
Felix-tec4-1-pic7.jpg|Second print, [http://beekee.ch/ Beekbox], designed by a TECFA team, led by [https://tecfa.unige.ch/perso/widmerv/ Vincent Widmer] (PhD student). | Felix-tec4-1-pic7.jpg|Second print, [http://beekee.ch/ Beekbox], designed by a TECFA team, led by [https://tecfa.unige.ch/perso/widmerv/ Vincent Widmer] (PhD student). | ||
</gallery> | </gallery> | ||
=== Summary === | |||
Unboxing, readying, and calibrating was easy and the first print went well. | |||
I really do like the new flexible platform. It can be removed and put back easily. | |||
I probably will like this printer better than the [[Felix Pro 1 3D printer]] since it seems to be more robust. | |||
* The Pro1 does have a sensitive Z sensor that can require hardware calibration work once it experienced stress (see next item). Since semi-automated calibration is easy I don't need fully automatic calibration, although it ''is'' a nice feature. | |||
* The Pro1 has a second print head. This is interesting for printing with different plastics for support, but a second print head can become a problem spot when printing large horizontal structures that may have slicer mistakes. E.g. I did managed to get the print heads ripped off with [[3D_printing_of_digital_elevation_models#Slicer_and_printer_settings_for_digital_elevation_models|a vulcano for example]]. | |||
That being said I returned the Pro1 for a Pro2 upgrade and I will be able to compare two printers of roughly the same age. | |||
Revision as of 20:19, 26 November 2018
Introduction

The Felix TEC4.1 is a 3D printer made by FELIXprinters and that started shipping in 2018. It features semi-automatec calibration of the print bed, an optional dual head, etc. and strong, reliable steel extruders. This article shortly describes some of my experience and (if possible) some tips
This model is an evolution of the Felix 1.0 3D printer we bought in 2010, the Felix 2.0 3D printer we got in 2013 and the Felix 3.0 we did not buy.
- Daniel K. Schneider 26 nov 2018-
See also:
- RapMan (our first 3D printer assembled in Jan 2010, not used any more, but no modern printer will beat its look)
- Fabbster 3D printer (given away)
- Felix 1.0 3D printer (bought in 2012 and still working)
- Felix 2.0 3D printer (bought in 2013 and still working)
- Felix Pro 1 3D printer (bought in 2015)
Technical specifications
- Layer resolution
- Minimum layer height: 0.05 mm,
- Maximum layer height: 0.25 mm
- Extruder / nozzles
- Dual detachable full metal hotends (one is retractable)
- 0.35mm (0.25, 0.5mm, 0,7 options)
- Max 275 C
- Print volume
- 255 x 205 x 225mm
- Print bed
- heated, up to 105 C ?
- Detachable and flexible (quick removal of prints !)
- Semi-Automatic calibration (For leveling, a Z-Sensor will probe and then tell which of the two buttons to turn and how much. For z-probe, this is done through the control)
- Print materials
- Many (PLA, TPE, ABS, PVA, Wood, Glass, PET(G)
- Software
- In principle, one could use any controller/slicer software. As of Nov 2018 there are profiles for the following slicers: Repetierhost (Cura), K Simplify3D (commercial). Repetierhost is configured and distributed through Felix.
- Connectivity
- USB Cable
- SD Card
Unpacking, assembly, configuration, calibration
Unboxing
The box arrived in good shape and unboxing is easy and fast. It was ordered on Tuesday Nov 20 and arrived in my office on Monday morning, Nov 26, 2018.
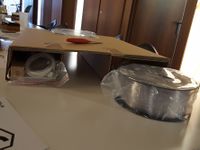
- Unboxing and readying the Felix TEC 4.1

Box
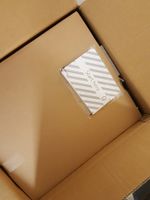
Opened Box, with instructions.
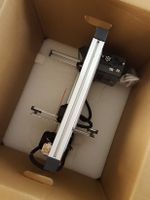
Top removed
Top that included all spares, cables, extra spares, and three rolls
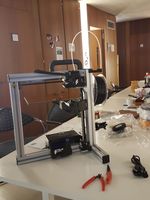
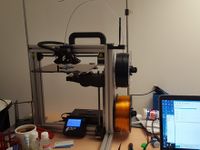
Assembled


Assembly
I takes about 15 minutes to unpack and assemble the printer. - 5 strips that hold elements have to be cut - the handle on top has to be fixed
PC Configuration
Download Repetierhost as distributed by Felix. The installation also will propose to install a serial driver.
Calibration
The printer is shipped with a 23 pages quick start guide. It includes
- 8 pages of specifications, basics, part list, unboxing, handle fixing, etc.
- The calibration routine for a single head printer takes two pages. I carefully read these, since this a new feature for me.
The printer may just work out of the box but I did not try that.
- The build platform must be leveled.
- In the display unit, select control->Level Build PLT.
- Turn front or rear wheel left of right X degrees as displayed, then test again.
Calibrating the Z-Probe, i.e. adjusting the right z height is done via software (i.e. the printer will remember). Here are my slightly modify tips, since the instructions are a little less clear.
- Put a large sheet of thick paper (120g) or two sheets of ordinary printer paper on the platform.
- Click Control->Calibrate Z-Probe
- Now if your paper is stuck on the platform, i.e you cannot remove move the paper, turn the wheel right to lower the platform
- If you wish you now can insert the Felix calibration card
- Then turn the wheel left to rise the platform until there is a good amount of friction, i.e. you can still pull the card away without dammaging it (I prefer the first layer to be very close).
First prints
There was no failed print nor any trial with the Felix logo that ships with RepetierHost.
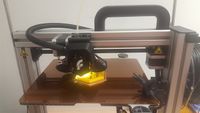
- First print was a spinning top with special (strong) using Felix PLA and default slicer values. After the print, I re-calibrated the Z-Probe as described above since the the first surface layer was not squashed enough. I used the Felix calibration card, but with a good amount of friction. I also may increase flow rate a bit and printer with a slightly higher temperature... more about this later when I find time to print more complex objects.
- Second print was a Beekee box with PETG from Felix (not completed at time of writing). I raised default temperature a bit to 220 degrees and slowed down first layer speeds a bit.
- First two prints
First print, a simple spinning flower top I designed.
Second print, Beekbox, designed by a TECFA team, led by Vincent Widmer (PhD student).


Summary
Unboxing, readying, and calibrating was easy and the first print went well.
I really do like the new flexible platform. It can be removed and put back easily.
I probably will like this printer better than the Felix Pro 1 3D printer since it seems to be more robust.
- The Pro1 does have a sensitive Z sensor that can require hardware calibration work once it experienced stress (see next item). Since semi-automated calibration is easy I don't need fully automatic calibration, although it is a nice feature.
- The Pro1 has a second print head. This is interesting for printing with different plastics for support, but a second print head can become a problem spot when printing large horizontal structures that may have slicer mistakes. E.g. I did managed to get the print heads ripped off with a vulcano for example.
That being said I returned the Pro1 for a Pro2 upgrade and I will be able to compare two printers of roughly the same age.