Flash animation overview: Difference between revisions
m (using an external editor) |
|||
| Line 7: | Line 7: | ||
;Learning goals: | ;Learning goals: | ||
:Learn about basic motion animation | :Learn about basic motion animation, i.e. move an object from A to B, to C ... | ||
;Prerequisites: | ;Prerequisites: | ||
:[[Flash CS3 desktop tutorial]] | :[[Flash CS3 desktop tutorial]] | ||
| Line 23: | Line 23: | ||
In Flash, you can create several kinds of animations and associated special effects. To create motion animation, there are 2 options: | In Flash, you can create several kinds of animations and associated special effects. To create motion animation, there are 2 options: | ||
* Frame-by-frame animation (like they used to do for cartoons). | * Frame-by-frame animation (like they used to do for cartoons). This is very time consuming of course. | ||
* Tweening. [http://en.wikipedia.org/wiki/Tweening Wikipedia], retrieved 20:45, 7 August 2007 (MEST) defines {{quotation|Tweening, short for in-betweening, as the process of generating intermediate frames between two images to give the appearance that the first image evolves smoothly into the second image. Inbetweens are the drawings between the keyframes which help to create the illusion of motion. Tweening is a key process in all types of animation, including computer animation. Sophisticated animation software enables one to identify specific objects in an image and define how they should move and change during the tweening process. Software may be used to manually render or adjust transitional frames by hand or use to automatically render transitional frames using interpolation of graphic parameters.}}. In other contexts, one uses also "morphing". E.g. [http://www.pcmag.com/encyclopedia_term/0,2542,t=tweening&i=53271,00.asp PCMag] (retrieved 20:45, 7 August 2007 (MEST)) defines tweening as {{quotation|An animation technique that, based on starting and ending shapes, creates the necessary "in-between" frames. See morphing}}. | * Tweening. [http://en.wikipedia.org/wiki/Tweening Wikipedia], retrieved 20:45, 7 August 2007 (MEST) defines {{quotation|Tweening, short for in-betweening, as the process of generating intermediate frames between two images to give the appearance that the first image evolves smoothly into the second image. Inbetweens are the drawings between the keyframes which help to create the illusion of motion. Tweening is a key process in all types of animation, including computer animation. Sophisticated animation software enables one to identify specific objects in an image and define how they should move and change during the tweening process. Software may be used to manually render or adjust transitional frames by hand or use to automatically render transitional frames using interpolation of graphic parameters.}}. In other contexts, one uses also "morphing". E.g. [http://www.pcmag.com/encyclopedia_term/0,2542,t=tweening&i=53271,00.asp PCMag] (retrieved 20:45, 7 August 2007 (MEST)) defines tweening as {{quotation|An animation technique that, based on starting and ending shapes, creates the necessary "in-between" frames. See morphing}}. | ||
=== Layers === | === Symbols Layers === | ||
You should use a different layer for each animation. If you | Animated objects should be (graphic) symbols. To convert an object to a symbol use ''right-click''. | ||
You should use a different layer for each animation. If you plan to animate several of your objects, there is a practical shortcut to distribute each object to a new layer: | |||
# Select objects you want to distribute (e.g. with ''right-click->select all'') | # Select objects you want to distribute (e.g. with ''right-click->select all'') | ||
# Then, ''Modify->Timeline->Distribute to layers | # Then, ''Modify->Timeline->Distribute to layers | ||
So the principles is: Each object to be animated must be symbol in a separate layer. All the other objects can remain in a single layer. | |||
== Introductory example == | == Introductory example == | ||
We will use the drawings made for the [[flash drawing tutorial]] and move | We will use the drawings made for the [[flash drawing tutorial]] and move one of the cats around. | ||
The principle of motion tweening is quite simple: | The principle of motion tweening is quite simple: | ||
* Firstly define position of | * Firstly define position of an object at two or more different times | ||
** We call these ''keyframes'', since objects are frozen in different states | ** We call these positions in time ''keyframes'', since objects are frozen in different states. | ||
** | ** Btw, you also can other features than position of an object in different frames. | ||
* Then, apply some interpolation method (''tweening'') between the two keyframes. | * Then, apply some interpolation method (''tweening'') between the two keyframes. | ||
** Simple motion tweening is a linear path | ** Simple motion tweening is a linear path. | ||
** | ** You can also apply a motion tween along a path (but this is bit more complicated). | ||
=== Moving a cat from x to y === | === Moving a cat from x to y === | ||
You may want to lock all other layers. This way you are sure not edit by mistake a frame for another layer. | |||
; Create a layer | ; Create a layer | ||
* Select the layer with the object (graphic symbol) you want to animate | * Select the layer with the object (graphic symbol) you want to animate, in our example we called the layer "Animation cat". | ||
* Put an object inside, e.g. drag from your library, or cut/paste or copy/paste from an other layer. | * Put an object inside, e.g. it drag from your library, or cut/paste or copy/paste from an other layer or *.fla document. | ||
; Create a first keyframe | ; Create a first keyframe | ||
* Right-click for example in position 5 and ''Insert Keyframe'' | * Right-click for example in position 5 and ''Insert Keyframe'' | ||
* You should still see the object you want to animate, move it to its starting point which can be outside the stage | * You should still see the object you want to animate, move it to its starting point which can be outside the stage. | ||
; Create a second keyframe | ; Create a second keyframe | ||
* Right-click somewhere in the timeline, e.g. | * Right-click somewhere in the timeline, e.g. at 50 and ''Insert Keyframe'' again. | ||
* Drag the object to its final position which can be outside the stage again. | * Drag the object to its final position which can be outside the stage again. | ||
* The timeline | * The timeline for the layer including this object should now include a solid line with an arrow (if it is dashed something went wrong). See screen dumps below. | ||
; Click on a random frame between the two keyframes | ; Click on a random frame between the two keyframes | ||
| Line 63: | Line 69: | ||
[[image:flash-cs3-motion-tweening1.png|frame|none|Moving a cat]] | [[image:flash-cs3-motion-tweening1.png|frame|none|Moving a cat]] | ||
The result should look like this: | The result should look like this in the screen capture below: | ||
* Between the two keyframes you see a solid line with an arrow. | * Between the two keyframes you see a solid line with an arrow. | ||
* You should see your object somewhere in the middle of the two keyframes. | * You should see your object somewhere in the middle of the two keyframes. | ||
| Line 69: | Line 75: | ||
[[image:flash-cs3-motion-tweening2.png|frame|none|Moving a cat]] | [[image:flash-cs3-motion-tweening2.png|frame|none|Moving a cat]] | ||
; Test | ; Test it | ||
* ''Control->Test Movie'' | * ''Control->Test Movie'' | ||
* Alternatively, you can | * Alternatively, you can glide (left-right) the red rectangle on top of the red line that displays the current frame in the timeline. It will manually move the object to a position within the interpolation path. | ||
; Make sure that all the static objects are displayed during the movie | ; Make sure that all the static objects are displayed during the movie | ||
Objects that are | Objects from other layers that are only defined in frame 1 (the default) will not show anymore once the animations starts. | ||
In order to make these visible until the end you should do the following: | In order to make these visible until the end you should do the following: | ||
* Rick-Click in frame 1 | * Rick-Click in frame 1 and ''Convert to keyframes'' (if layers are unlocked it should convert them all, else do it one by one). | ||
* Then click on the white rectangle inside the grey | * Then click on the little white rectangle inside the grey rectangle and drag each to the last frame of your animation. The result should look as in the screen capture above, i.e. each animation track is gray and at the end you see a white rectangle. | ||
=== Adding more motions and shape tweens === | === Adding more motions and shape tweens === | ||
Revision as of 16:28, 8 August 2007
<pageby nominor="false" comments="false"/>
Definition
This is part of some Flash tutorials.
- Learning goals
- Learn about basic motion animation, i.e. move an object from A to B, to C ...
- Prerequisites
- Flash CS3 desktop tutorial
- Flash layers tutorial (first part)
- Flash drawing tutorial (at least some of it)
- Quality and level
- This text should technical people get going. It's probably not good enough for beginners, but may be used as handout in "hands-on" class. That is what Daniel K. Schneider made it for...
- It aims at beginners. More advanced features and tricks are not explained here.
- Materials (*.fla file you can play with)
- http://tecfa.unige.ch/guides/flash/ex/motion-tweening-intro/
Introduction
Frame-by-frame vs. tweening
In Flash, you can create several kinds of animations and associated special effects. To create motion animation, there are 2 options:
- Frame-by-frame animation (like they used to do for cartoons). This is very time consuming of course.
- Tweening. Wikipedia, retrieved 20:45, 7 August 2007 (MEST) defines “Tweening, short for in-betweening, as the process of generating intermediate frames between two images to give the appearance that the first image evolves smoothly into the second image. Inbetweens are the drawings between the keyframes which help to create the illusion of motion. Tweening is a key process in all types of animation, including computer animation. Sophisticated animation software enables one to identify specific objects in an image and define how they should move and change during the tweening process. Software may be used to manually render or adjust transitional frames by hand or use to automatically render transitional frames using interpolation of graphic parameters.”. In other contexts, one uses also "morphing". E.g. PCMag (retrieved 20:45, 7 August 2007 (MEST)) defines tweening as “An animation technique that, based on starting and ending shapes, creates the necessary "in-between" frames. See morphing”.
Symbols Layers
Animated objects should be (graphic) symbols. To convert an object to a symbol use right-click.
You should use a different layer for each animation. If you plan to animate several of your objects, there is a practical shortcut to distribute each object to a new layer:
- Select objects you want to distribute (e.g. with right-click->select all)
- Then, Modify->Timeline->Distribute to layers
So the principles is: Each object to be animated must be symbol in a separate layer. All the other objects can remain in a single layer.
Introductory example
We will use the drawings made for the flash drawing tutorial and move one of the cats around.
The principle of motion tweening is quite simple:
- Firstly define position of an object at two or more different times
- We call these positions in time keyframes, since objects are frozen in different states.
- Btw, you also can other features than position of an object in different frames.
- Then, apply some interpolation method (tweening) between the two keyframes.
- Simple motion tweening is a linear path.
- You can also apply a motion tween along a path (but this is bit more complicated).
Moving a cat from x to y
You may want to lock all other layers. This way you are sure not edit by mistake a frame for another layer.
- Create a layer
- Select the layer with the object (graphic symbol) you want to animate, in our example we called the layer "Animation cat".
- Put an object inside, e.g. it drag from your library, or cut/paste or copy/paste from an other layer or *.fla document.
- Create a first keyframe
- Right-click for example in position 5 and Insert Keyframe
- You should still see the object you want to animate, move it to its starting point which can be outside the stage.
- Create a second keyframe
- Right-click somewhere in the timeline, e.g. at 50 and Insert Keyframe again.
- Drag the object to its final position which can be outside the stage again.
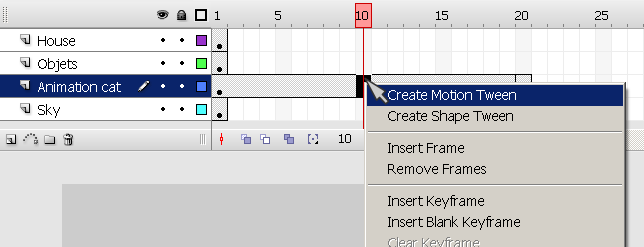
- The timeline for the layer including this object should now include a solid line with an arrow (if it is dashed something went wrong). See screen dumps below.
- Click on a random frame between the two keyframes
- Then in the properties panel, use the Tween pull-down menu and select motion. Alternatively, you can just right-click between frames and Create Motion Tween.
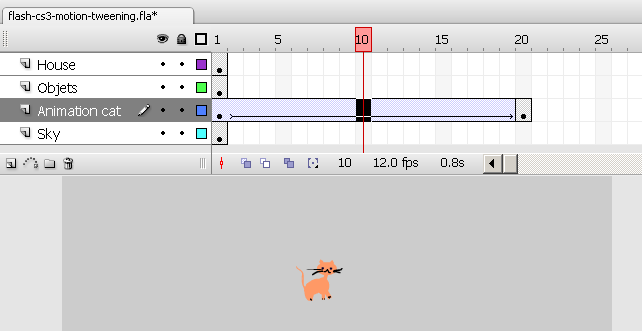
The result should look like this in the screen capture below:
- Between the two keyframes you see a solid line with an arrow.
- You should see your object somewhere in the middle of the two keyframes.
- Test it
- Control->Test Movie
- Alternatively, you can glide (left-right) the red rectangle on top of the red line that displays the current frame in the timeline. It will manually move the object to a position within the interpolation path.
- Make sure that all the static objects are displayed during the movie
Objects from other layers that are only defined in frame 1 (the default) will not show anymore once the animations starts.
In order to make these visible until the end you should do the following:
- Rick-Click in frame 1 and Convert to keyframes (if layers are unlocked it should convert them all, else do it one by one).
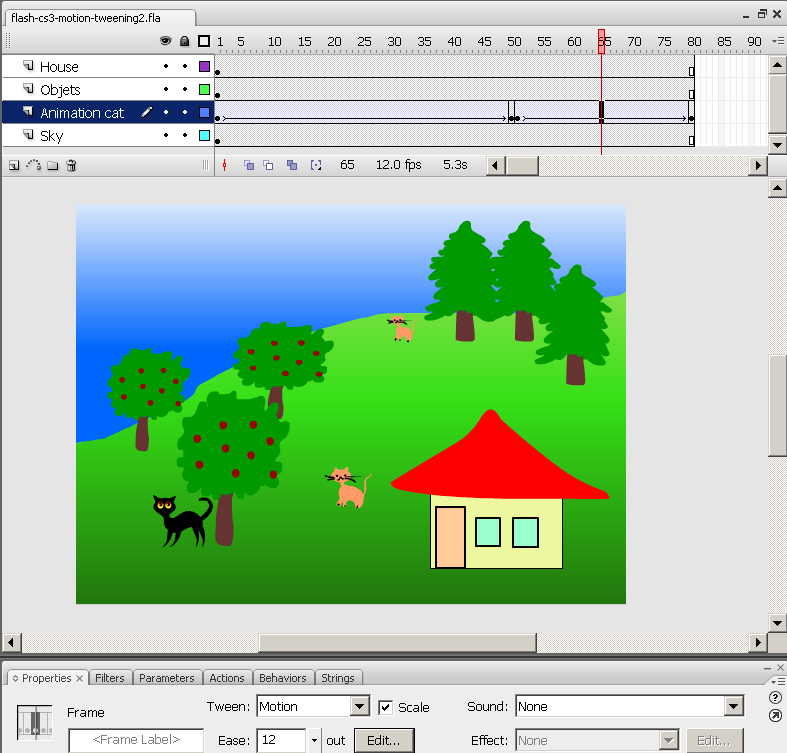
- Then click on the little white rectangle inside the grey rectangle and drag each to the last frame of your animation. The result should look as in the screen capture above, i.e. each animation track is gray and at the end you see a white rectangle.
Adding more motions and shape tweens
- Several motion tweens for an object
You can add more motions to an object simply by repeating the procedure outlined above.
- Add a new keyframe
- Right-click in the middle and add a motion tween
- Onion skins
- You can display the path an object will take by clicking one of the onion skin buttons in the Edit toolbar. This is handy if you have several objects that move.
- Turning the cat
- Turning a cat in the animation is not very graceful
- In this case I made an animation from left to right and the cat will leave the stage. Next to the end frame I made a new frame with the cat turned (Click on the cat and Modify->Transform->Flip Horizontal)
The final result in the Flash Desktop should look like this (more or less):
You can also consult the published result (including the *.fla file which you can load into your Flash and play with)
Discussion
I do have to say that I find the SMIL/SVG time-based animation model including it's interpolation mechanisms more elegant and simpler to understand. But then there are no such tools as Flash CS3 for these formats. A shame ...
Motion along a path
(to be written)
Links
I strongly suggest that look at some of these videos.
- Video tutorials
- Click in the top left window on "Flash CS3 Professional"
- Then view in particular "Creating animations with motion tweens" and "Understanding the timeline, keyframes and frame rate.


