Hotfix stone: Difference between revisions
m (→Quality) |
m (→Quality) |
||
| (14 intermediate revisions by the same user not shown) | |||
| Line 1: | Line 1: | ||
{{ | {{syllabus | ||
|is_part_of_syllabus=Machine embroidery | |||
|is_part_of_module=hotfix stone | |||
|do_not_show_sub_page=No | |||
|objective=Create hotfix designs, | |||
Create hotfix templates, | |||
Transfer of hotfix stones | |||
|see_also=Stitch Era - creating hot fix designs, | |||
Stitch Era - creating embroidery with hot fix stones, | |||
Heat press, | |||
Ricoo T538B heat press, | |||
InkStitch - hotfix | |||
}} | |||
== Introduction == | == Introduction == | ||
Hotfix or (hotfix stones) are decorations like | Hotfix or (hotfix stones) are decorations like rhinestones, rhinestuds, nailheads, etc. that can be glued on textiles or other materials by heating them. This article introduces rhinestones (i.e. flatback hotfix stones), includes a size table and explains how to apply hotfix stones to textiles using templates. | ||
See also: | See also: | ||
* [[computerized embroidery]] | |||
* [[Stitch Era - creating hot fix designs]] | * [[Stitch Era - creating hot fix designs]] | ||
* [[InkStitch - hotfix]] | |||
* [[Stitch Era - creating embroidery with hot fix stones]] | * [[Stitch Era - creating embroidery with hot fix stones]] | ||
* [[Heat press]] and [[Ricoo T538B heat press]] | * [[Heat press]] and [[Ricoo T538B heat press]] | ||
| Line 197: | Line 211: | ||
* Quality of glue | * Quality of glue | ||
* Quality of cut (even) | * Quality of cut (even) | ||
* Number of faces | * Number of faces / cuts | ||
* | * Foiling (backing): silver, aluminium, lead, etc.) | ||
* Stone assembly: stone + metal sheet + glue | * Stone assembly: stone + metal sheet + glue | ||
* Form: Regular or irregular. Do the sizes (radius, height) match ? Are the stones really round ? | * Form: Regular or irregular. Do the sizes (radius, height) match ? Are the stones really round ? | ||
* Overall vs. total quality. Lower quality sets may have bad stones inside. | * Overall vs. total quality. Lower quality sets may have bad stones inside. | ||
* Contains no lead (required in principle for children's wear). | * Contains no lead (required in principle for children's wear). | ||
* Glue: It should stick and be washable. | |||
Generally speaking, a good rhinestone should sparkle from all angles, have the regular and same dimensions, and stick to the fabric. | |||
[[File:swarovski-xirius-rose-2078HF.png|thumb|100px|2078 HF XIRIUS Rose Hotfix]] | |||
Below are a few recommendations that summarize information that is circulating on line | Below are a few recommendations that summarize information that is circulating on line | ||
* [https://www.swarovski-professional.com/ Swarovski] Rhinestones are made in Austria and seem to have the best quality in any color. | * [https://www.swarovski-professional.com/ Swarovski] Rhinestones are made in Austria and seem to have the best quality in any color. There a several models. A well known type is the XIRIUS Rose Hotfix 2078 HF which has 16 cuts (8 large and 8 smaller ones plus the one on top. | ||
** 100 4mm (SS 16) can cost between 5 and 20 Euros on Amazon.fr | ** 100 4mm (SS 16) can cost between 5 and 20 Euros on Amazon.fr | ||
** 1440 SS16 can cost 55 Euros. | ** 1440 SS16 can cost 55 Euros. | ||
| Line 213: | Line 231: | ||
** 1440 SS16 can cost between 7.5 (discount) and 55 Euros. A typical price is 36 Euros for a SS 16 Chaton Rose VIVA12 | ** 1440 SS16 can cost between 7.5 (discount) and 55 Euros. A typical price is 36 Euros for a SS 16 Chaton Rose VIVA12 | ||
* DMC rhinestone (Diamant Machine Cut) is a korean rhinestone company that produces comparatively high quality, but much cheaper than Swarovski. | * DMC rhinestone (Diamant Machine Cut) is a korean rhinestone company that produces comparatively high quality, but much cheaper than Swarovski. Stones have 12 faces. | ||
** E.g. 1000 SS 16 can cost 10 Euros. On AliExpress I have seen offers for 1440 pieces at $5. | ** E.g. 1000 SS 16 can cost 10 Euros. On AliExpress I have seen offers for 1440 pieces at $5. | ||
One should distinguish between the orginal Korean DMC's and the ones that are produced in China. Often, "DMC" does not stand for a brand, but is an indicator of decent quality. | |||
* Blue Nil is an other good brand | * Blue Nil is an other good brand | ||
** 1440 SS16 can cost about 30 Euros | ** 1440 SS16 can cost about 30 Euros | ||
* No name brands can offer suitable quality and they can cost 10 times less than the top Swarovski brand. But there is no guarantee that sizes are even, workmanship is good enough and glue will stick. Enquire before you buy or else keep at least track of the ones you did like. | * No name brands can offer suitable quality and they can cost 10 times less than the top Swarovski brand. But there is no guarantee that sizes are even, workmanship is good enough and glue will stick. Some brands can have 1/3 of deficient stones. Enquire before you buy or else keep at least track of the ones you did like. | ||
== Software == | == Software == | ||
=== Embroidery software === | === Hotfix / Embroidery software === | ||
Hotfix software allows drawing shapes (both fills and borders) that then can be filled with slots for stones according to several filling algorithms and parameters. | |||
[[Stitch Era embroidery software|Stitch Era]] includes an optional module for hotfix designs. It can output design stencils or templates that can be printed with different laser and vinyl cutters. | [[Stitch Era embroidery software|Stitch Era]] as well as Embroidery office includes an optional module for hotfix designs. It can output design stencils or templates that can be printed with different laser and vinyl cutters or produced files for stone setting machines. The module is also available as stand-alone product [https://www.sierra-software.com/Sites/Products/HotfixEra/HotfixEra.aspx Hotfix Era]. | ||
The software | The E4.5 embroidery software includes a (free) hotfix module. | ||
=== Online auxiliary tools === | === Online auxiliary tools === | ||
To do | |||
== Materials suitable for hotfix == | == Materials suitable for hotfix == | ||
| Line 325: | Line 346: | ||
Search for "Rhinestone template material". I used both free compact cardboard and acrylic made for laser cutting. Cardboard is better for brushing but the transfer paper may stick to it and rip some paper away (which is not a big problem). Acrylic is maybe a bit easier for the transfer, but it is more expensive. In addition, acrylic material (such as Trolase) will wrap in the laser cutter and the lens will be offset. Such a defocalised lens may not cut through the material, will take away more material, and can cause the material burn. Supervise the laser cutter when you work with light materials that can wrap (paper, cloth, thin acrylic, etc.). Anyhow, make sure to tape down the borders or weight them down with flat and heavy objects. | Search for "Rhinestone template material". I used both free compact cardboard and acrylic made for laser cutting. Cardboard is better for brushing but the transfer paper may stick to it and rip some paper away (which is not a big problem). Acrylic is maybe a bit easier for the transfer, but it is more expensive. In addition, acrylic material (such as Trolase) will wrap in the laser cutter and the lens will be offset. Such a defocalised lens may not cut through the material, will take away more material, and can cause the material burn. Supervise the laser cutter when you work with light materials that can wrap (paper, cloth, thin acrylic, etc.). Anyhow, make sure to tape down the borders or weight them down with flat and heavy objects. | ||
[[File:hotfix-laser-taped-down.jpg|thumb|600px|none|Tape down before cutting many little holes]] | |||
After cutting out the template, glue some thick paper to its bottom. This, in order to prevent the stones from falling through and gliding underneath. However, also read my own more simple method in the next section, i.e. putting the template on top of the cloth in the heatpress without doing any transfer. The latter method works rather fine for small templates that use SS16 stones and higher. | After cutting out the template, glue some thick paper to its bottom. This, in order to prevent the stones from falling through and gliding underneath. However, also read my own more simple method in the next section, i.e. putting the template on top of the cloth in the heatpress without doing any transfer. The latter method works rather fine for small templates that use SS16 stones and higher. | ||
| Line 331: | Line 354: | ||
[[File:hotfix-gluing-paper-to-bottom.jpg|thumb|600px|none|Glue some thick paper to the bottom of your templates]] | [[File:hotfix-gluing-paper-to-bottom.jpg|thumb|600px|none|Glue some thick paper to the bottom of your templates]] | ||
If the template is warped, something that can happen for larger designs or/and of the support material has different "sides", we suggest gluing it to a sheet of plywood or MDF and then putting into the (cold) heatpress to make it flat. | |||
[[File:hotfix-template-large-glued.jpg|thumb|600px|none|Large template pressed flat and glued to a sheet of wood]] | |||
===Step 2 - Brush the stones into the template === | ===Step 2 - Brush the stones into the template === | ||
| Line 348: | Line 375: | ||
* If you got different colors of the same size, close the holes for the other colors with some tape and then remove them gradually. Alternatively, create different templates, one for each color/size combination. | * If you got different colors of the same size, close the holes for the other colors with some tape and then remove them gradually. Alternatively, create different templates, one for each color/size combination. | ||
* Make sure that the surface of the template is flat, in particular, holes should not have little walls sticking up. | * Make sure that the surface of the template is flat, in particular, holes should not have little walls sticking up. | ||
[[File:hotfix-template-multi.jpg|thumb|600px|none|Multiple sizes and colors. Use of tape to cover holes]] | |||
===Step 4=== | ===Step 4=== | ||
| Line 446: | Line 475: | ||
[[file:hotfix-tecfa-1.jpg|600px|none|thumb|SS16 stone design (our second hotfix design and print) ]] | [[file:hotfix-tecfa-1.jpg|600px|none|thumb|SS16 stone design (our second hotfix design and print) ]] | ||
Ordinary grey cardboard does not seem to warp, neither in the laser cutter nor under the heat press. Below is rather large example that taught me the limit of this method. This method only works if the fabric is totally flat (otherwise stones will glide underneath the cardbord). Also, it is much more suitable for stones that are larger than SS16 and it is not suitable for SS10 and smaller since these stones will not "sit" in position. | |||
The following design was larger than the heat transfer press, i.e. about 55cm width. I just cut the template in two halves and did the left one first. | |||
[[file:rhinestone-prof-template.jpg|600px|none|thumb|Larger than the heat press design, "direct method" ]] | |||
[[file:rhinestone-prof.jpg|600px|none|thumb|Professor Strass ]] | |||
== Links == | == Links == | ||
Latest revision as of 11:42, 13 October 2023
Introduction
Hotfix or (hotfix stones) are decorations like rhinestones, rhinestuds, nailheads, etc. that can be glued on textiles or other materials by heating them. This article introduces rhinestones (i.e. flatback hotfix stones), includes a size table and explains how to apply hotfix stones to textiles using templates.
See also:
- computerized embroidery
- Stitch Era - creating hot fix designs
- InkStitch - hotfix
- Stitch Era - creating embroidery with hot fix stones
- Heat press and Ricoo T538B heat press
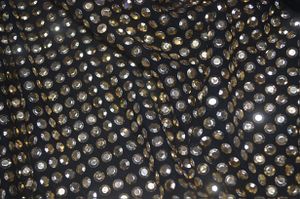
“Flatback crystals which are often called rhinestones have a faceted face one side and a flatback on the opposite side usually with a foiled backing. They are available in a range of materials the cheapest being acrylic and the highest quality and most expensive Swarovski Crystal. They come in a range of shapes and sizes the most popular of which being the circular flatback you can see above which are used for crystallizing such things as nails, lips, clothing, footwear, statues, artwork, gadgets and much more…” (Guide to Using Flatback Crystals (Oct 2, 2017).
According to Wikipedia, “Hot fix rhinestones, also called heat transfer rhinestones, are mainly used for apparel. The flat bottom of the stone has a glue backing and when heated melts onto the surface of the clothing. These can be adhered using a regular iron, however, it is recommended to use a heat press, as they are able to reach higher temperatures (standard transfers require temperatures of up to 180–200 °C (350–400 °F), which regular irons are not capable of) while applying heavy pressures resulting in a more professional standard quality.” (Oct 2, 2017).
Hotfix stone sizes and quality
An introduction to rhinestone size
Rhinestones size are either defined with "ss" (stone size) or pp (pearl plate). PP is a more precise measure.
According to Guide to Using Flatback Crystals (Oct. 2017), as general guide, the following sizes are used:
- ss3 – ss7 : Nail art (7 being the more popular size)
- ss8 – ss10 : Generally used for filler crystals, tiny objects or creating intricate artwork with crystals in conjunction with other crystal sizes.
- ss12 – ss20 : Footwear, clothing or accessorizing gadgets.
- ss30 – ss48 : Clothing especially dance costumes to add some sparkle.
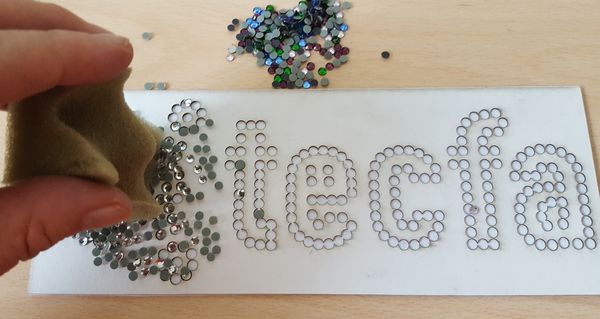
According to Creative Crystal, customers, prefer 4mm (16ss), 3mm (10ss) and 7mm (34ss) in that order. Working with SS16 allows for fairly good filled lettering or other details and manipulating these is not too much of a pain. Working with small SS10 stones is a real pain ! I suggest that beginners should start with SS20 (4.6 to 4.8mm depending on the make) or bigger. Below a picture of brushing SS16 stones into a template.
The procedure for computing the rough amount of stones needed:
- Compute the surface in mm: width X length if you have a square
- Select the stone size in mm
- Divide surface / stone_size
Example: A filled circle of 10 cm (that is quite a lot !) to filled with stones that have a width (diameter) of 5mm.
- Surface of circle formula: radius2 * PI
- Surface: 3.14 * 502 = 7854 mm2
- SS22 surface: 52 = 25 mm2
- Stones needed: 7850 / 25 = 314
Size table
The following table includes approximate rounded mm values. Various source on the Internet include contradictory information. Do not trust these values, verify with other sources please. Also, different manufacturers, may use somewhat different sizes. Sizes in bold are supported by the Hotfix Era software. Sizes of 6, 10, 16, 20, 30, 34 and 40 can be easily found with online retailers such as AliExpress or Amazon.
The table below includes typical width and height. We also will try to add information about time needed in the heat press at 200C and tolerable thickness of template materials. Time for heating is probably dependant on both the tissue and the make of the stone.
| ss | pp | ø mm | ø Svarovski | Typical Height mm | Heat press time (provisional) | Template thickness (provisional) |
|---|---|---|---|---|---|---|
| 000 | 1 | 0.8 - 0.9 | ||||
| 00 | 2 | 0.9 - 1 | ||||
| 0 | 3 | 1.0 - 1.1 | ||||
| 1 | 4 | 1.1 - 1.2 | ||||
| 2 | 5 | 1.2 - 1.3 | ||||
| 2½ | 6 | 1.3 - 1.35 | ||||
| 3 | 7 | 1.35 - 1.4 | 1.4 | |||
| 3½ | 8 | 1.4 - 1.5 | ||||
| 4 | 9 | 1.5 - 1.6 | 1.6 | |||
| 4½ | 10 | 1.6 - 1.7 | ||||
| 5 | 11 | 1.7 - 1.8 | 1.8 | |||
| 5½ | 12 | 1.8 - 1.9 | ||||
| 6 | 13 | 1.9 - 2.0 | 2.0 | |||
| 6½ | 14 | 2.0 - 2.1 | ||||
| 7 | 15 | 2.1 - 2.2 | 2.2 | |||
| 7½ | 16 | 2.2 - 2.3 | ||||
| 8 | 17 | 2.3 - 2.4 | 2.4 | |||
| 8½ | 18 | 2.4 - 2.5 | ||||
| 9 | 19 | 2.5 - 2.6 | 2.6 | |||
| 9½ | 20 | 2.6 - 2.7 | ||||
| 10 | 21 | 2.7 - 2.8 | 3.0 | 1.4 | ||
| 11 | 22 | 2.8 - 2.9 | ||||
| 11½ | 23 | 2.9 - 3.0 | ||||
| 12 | 24 | 3.0 - 3.2 | 3.2 | |||
| 13 | 25 | 3.2 - 3.3 | ||||
| 13½ | 26 | 3.3 - 3.4 | ||||
| 14 | 27 | 3.4 - 3.5 | 3.5 | |||
| 14½ | 28 | 3.5 - 3.6 | ||||
| 15 | 29 | 3.6 - 3.7 | ||||
| 15½ | 30 | 3.7 - 3.8 | ||||
| 16 | 31 | 3.8 - 4.0 | 4.0 | 1.5 | 20s | 0.5 to 1 mm |
| 17 | 32 | 4.0 - 4.2 | ||||
| 17½ | 33 | 4.1 - 4.2 | ||||
| 18 | 34 | 4.3 - 4.4 | ||||
| 18½ | 35 | 4.5 | ||||
| 19 | 36 | 4.5 - 4.6 | ||||
| 19½ | 37 | 4.5 | ||||
| 20 | - | 4.6 - 4.8 | 4.8 | 2 | ||
| 21 | - | 4.8 - 4.9 | ||||
| 22 | - | 4.9 - 5.0 | ||||
| 23 | - | 5.0 - 5.2 | ||||
| 24 | - | 5.2 - 5.4 | ||||
| 25 | - | 5.4 - 5.6 | ||||
| 26 | - | 5.6 - 5.8 | ||||
| 27 | - | 5.8 - 6.0 | ||||
| 28 | - | 6.0 - 6.2 | ||||
| 29 | - | 6.2 - 6.4 | ||||
| 30 | - | 6.4 - 6.6 | 6.5 | |||
| 31 | - | 6.6 - 6.8 | ||||
| 32 | - | 6.8 - 7.0 | ||||
| 33 | - | 7.0 - 7.2 | ||||
| 34 | - | 7.2 - 7.4 | 7.0 | 3 | 30s | |
| 35 | - | 7.4 - 7.6 | ||||
| 36 | - | 7.6 - 7.8 | ||||
| 37 | - | 7.8 - 8.0 | ||||
| 38 | - | 8.0 - 8.2 | ||||
| 39 | - | 8.2 - 8.4 | ||||
| 40 | - | 8.4 - 8.7 | 8.5 | |||
| 41 | - | 8.7 - 9.1 | ||||
| 42 | - | 9.1 - 9.5 | ||||
| 43 | - | 9.5 - 9.8 | ||||
| 44 | - | 9.8 - 10.1 | ||||
| 45 | - | 10.1 - 10.5 | ||||
| 48 | - | 10.9 - 11.3 | 11 | |||
| 50 | - | 11.7 - 12.0 | ||||
| 60 | - | 14.2 - 14.5 | ||||
| 63 | - | 15.0 - 15.2 | ||||
| 70 | - | 16.7 - 17.0 | ||||
| 80 | - | 19.2 - 17.5 | ||||
| 83 | - | 20.0 - 20.2 |
Quality
Hotfix Rhinestones come in several varieties and qualities. From our little experience we can see different quality dimensions:
- Quality of glue
- Quality of cut (even)
- Number of faces / cuts
- Foiling (backing): silver, aluminium, lead, etc.)
- Stone assembly: stone + metal sheet + glue
- Form: Regular or irregular. Do the sizes (radius, height) match ? Are the stones really round ?
- Overall vs. total quality. Lower quality sets may have bad stones inside.
- Contains no lead (required in principle for children's wear).
- Glue: It should stick and be washable.
Generally speaking, a good rhinestone should sparkle from all angles, have the regular and same dimensions, and stick to the fabric.
Below are a few recommendations that summarize information that is circulating on line
- Swarovski Rhinestones are made in Austria and seem to have the best quality in any color. There a several models. A well known type is the XIRIUS Rose Hotfix 2078 HF which has 16 cuts (8 large and 8 smaller ones plus the one on top.
- 100 4mm (SS 16) can cost between 5 and 20 Euros on Amazon.fr
- 1440 SS16 can cost 55 Euros.
- Preciosa Rhinestones are made in Czech Repulic and are cheaper than Swarovski stones. Quality seems to be almost the same for similar models. SS16 are available with 12 faces (MC Chaton Rose VIVA12 line) or 8 faces (Chaton Rose MAXIMA(8F). More complex stones also exist for larger sizes. Below a few randomly collected prices.
- 350 SS16 cost 5 Euros on Amazon.fr.
- 1440 SS16 can cost between 7.5 (discount) and 55 Euros. A typical price is 36 Euros for a SS 16 Chaton Rose VIVA12
- DMC rhinestone (Diamant Machine Cut) is a korean rhinestone company that produces comparatively high quality, but much cheaper than Swarovski. Stones have 12 faces.
- E.g. 1000 SS 16 can cost 10 Euros. On AliExpress I have seen offers for 1440 pieces at $5.
One should distinguish between the orginal Korean DMC's and the ones that are produced in China. Often, "DMC" does not stand for a brand, but is an indicator of decent quality.
- Blue Nil is an other good brand
- 1440 SS16 can cost about 30 Euros
- No name brands can offer suitable quality and they can cost 10 times less than the top Swarovski brand. But there is no guarantee that sizes are even, workmanship is good enough and glue will stick. Some brands can have 1/3 of deficient stones. Enquire before you buy or else keep at least track of the ones you did like.
Software
Hotfix / Embroidery software
Hotfix software allows drawing shapes (both fills and borders) that then can be filled with slots for stones according to several filling algorithms and parameters.
Stitch Era as well as Embroidery office includes an optional module for hotfix designs. It can output design stencils or templates that can be printed with different laser and vinyl cutters or produced files for stone setting machines. The module is also available as stand-alone product Hotfix Era.
The E4.5 embroidery software includes a (free) hotfix module.
Online auxiliary tools
To do
Materials suitable for hotfix
Hotfix stones can be applied to variety of textiles and other materials. According to Understanding Hotfix by Harman, hotfix rhinestones should only be used when the material it is being applied to has all of the following attributes:
- Heat resistant (min of 250°F/ 120°C) (e.g most plastics are not heat resistant)
- Resistant against pressure
- Porous/Absorbent - it does have any waterproof or other coating that would make it non porous. The water drop test is a quick and easy way to get an initial idea of the absorbency of the carrier material. Apply a couple of water drops onto the carrier material. If the material quickly absorbs the drops, it offers good absorbency. If the water pearls off the carrier material, or if it takes a long time to be absorbed, the material offers insufficient absorbency.
They also provide a list of unsuitable fabrics, e.g. very tightly woven textiles, extremely thin fabrics, smooth leather and smooth imitation leather and water repellant treated materials.
Applying hotfix stones
To position hotfix stones, it is best to use a template made with a laser or a vinyl cutter. The template allows positioning of the stones. If you use an iron or a heat press, you can keep the template in place. However, make sure that it is heat resistant, e.g. in particular never use vinyl with PCB inside since burned vinyl releases very dangerous combat gas !
Principle
Hotfix stones can be fixed with different methods. All of them are defined by four parameters
- Amount of heat depends on the maker. E.g. Swarovski has a range of 120 °C to 170 °
- Time: E.g. max. 20 seconds for 160 °C and 60 seconds for 120 °C when applied from the front.
- Pressure: A certain amount of pressure must be applied but not too much since otherwise the glue will spread out. Also if you use an applicator the stone can either get stuck in the opening or not stick, i.e. you will have to find a good compromise.
- Side of application (from top or from underneath)
Both time and heat parameters are highly connected. Higher temperature requires less time.
Before using any tool / textile / stone combination for real, do a test !!
Hardware for hotstone application
Probably the best bet for a beginner is to start using a cheap hotfix applicator. Presses are fairly expensive and working with an iron is a bit more tricky.
As a general rule:
- position the fabric on a surface that is heat resistant, e.g. a sheet of metal or a heat-resistant cutting mat
- separate layers of fabric underneath with baking paper, else they may be glued together
- Make sure to heat enough (at least 120 degrees and make sure that the textile will not melt, i.e. do not use plastics)
Hotfix applicators
Hotfix applicators are cheap devices that look a bit like a soldering iron. They allow heating a hotfix stone one by one. It includes removable ends that will adapt to various hotfix forms. Better ones can aspire the stones. A cheap application costs about 10 Euros. One that includes a vacum mechanism is about 100.-
There are two variants:
- Grab a stone from the top. If you are lucky it should stick, then let it heat. As soon as the glue softens or boils, press it down a few seconds.
- Put the stone on the textile. Then then press the hot applicator down.
In both cases, you can apply a very slight rotational movement to make sure that each part sticks. But do not move the stone and do not apply too much pressure.
Iron without holes
A simple iron (without holes) also can do, heat it to 150°C (that is position 2 on a normal iron). Put cardboard or baking paper underneath the cloth and then put either some baking paper or a flat kitchen towel in between the iron and the stones. Alternatively you can buy more professional fabrics, e.g. teflon-based instead of baking paper. Press it down for about 30 seconds for stronger fabrics.
Heat Press
A heat press or transfer press (presse à chaleur, Hitzepresse, Transferpresse) can glue a whole set. Heat presses also can be used to transfer other materials, in particular cut out heat resistant plastics and textiles. A good beginner's machine can cost 400 to 500 Euros, but one can find $200.- models on sale. High end models can cost from 1500.- to 2000.- There are a huge amount of various makers and vendors. Most do not include information about suitability for hot stone application. See below for more details.
Ultrasonic devices
This looks an applicator but works with ultrasonic fiction as opposed to a heated end. More expensive. It allows to pick up a stone.
Stone setting machines
Used in mass fabrication. Stones are placed and heated with a machine.
Templates for hotfix
Templates are based on drawings that show position for each stone, typically with a circle. Hot fix software, like Hotfix Era eases the design process.
There are two ways of using templates:
- Cut out the template with a laser cutter or a cutting plotter. Glue a sheet of something (e.g. thick paper) underneath. Then fill the template with rhinestones. Transfer the stones to a textile using a transfer sheet. Thickness of template should be 0.5mm for smaller stones, but it can be higher for larger stones (e.g. SS16 and SS24).
- Print a page with the design. On top, put transfer paper, sticky side up. Then manually put the stones upside down (flat side up) on the sticky paper. Then transfer as above on top of a cloth.
The procedure of creating a template with the help of specialized software and some post-processing of the SVG output is explained more in detail in the Stitch Era - creating hot fix designs article.
Fabrication with a template, transfer paper and a heat press
This section shortly explains how to apply hotfix stones with a heat press, positioning the stones with a template and then transferring it to a heat press. The principle can also be used with a hot iron.
Heat transfer press specifications
Your heat press (we believe) should have the following specification.
- It should either have a large opening or a lateral swivel swing (Schwenkarm) or a drawer style lower plateau. A swivel press is probably best if you plan to improvise a bit since it allows positioning things without hindrance from the top.
- It should provide an even distribution of pressure and temperature
- It should auto-adjust pressure to uneven textiles, e.g. with springs on top of the heating plate and a somewhat flexible mat.
- I must allow height/pressure adjustment, i.e. dealing with the somewhat larger height of hot stones by moving the heat plate up or down with a "pressure knob"
- It should have anti-sticking coating underneath the heating plate (e.g. teflon)
- 38 x 38cm size should be enough (15x 15)
If not furnished with the model, you must buy a silicon mat to put underneath. If the top is not coated you must either buy teflon sheet or else use baking paper. In any case, it is always good tu put baking paper (also called bakery paper or parchment paper) underneath the cloth and on top of the design. Do not used wax paper but as we said above there are more professional solutions like teflon sheets. Also, if you use the transfer method, you could take a teflon heat transfer sheet.
The usual procedure for design with lots of hot stones is the following
Step 1 - Create a template
Create a template, e.g. with some specialized software like Stitch Era that you can then print with a laser cutter or a vinyl cutter. There are two options if you use multiple colors and sizes. Either create a single template or one for each size/color combination. The latter may be easier for semi-industrial production, but I am not sure if heating the same stones several times because of multiple passages into the heat press is a good idea. If you use a single template, follow advice below on how to put the stones inside.
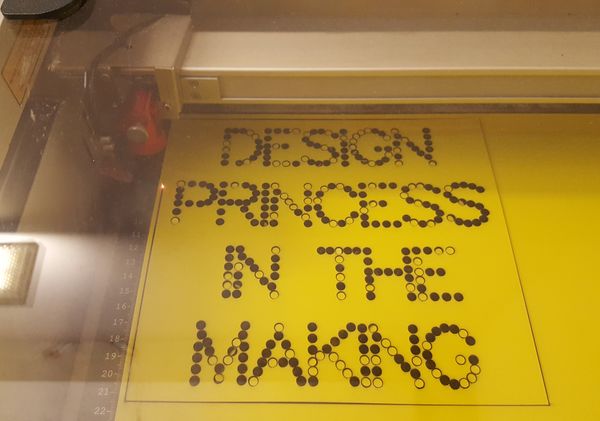
Search for "Rhinestone template material". I used both free compact cardboard and acrylic made for laser cutting. Cardboard is better for brushing but the transfer paper may stick to it and rip some paper away (which is not a big problem). Acrylic is maybe a bit easier for the transfer, but it is more expensive. In addition, acrylic material (such as Trolase) will wrap in the laser cutter and the lens will be offset. Such a defocalised lens may not cut through the material, will take away more material, and can cause the material burn. Supervise the laser cutter when you work with light materials that can wrap (paper, cloth, thin acrylic, etc.). Anyhow, make sure to tape down the borders or weight them down with flat and heavy objects.
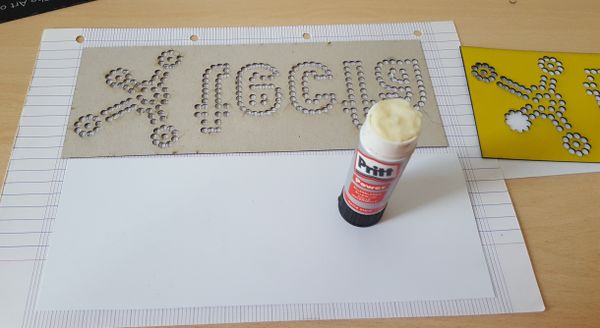
After cutting out the template, glue some thick paper to its bottom. This, in order to prevent the stones from falling through and gliding underneath. However, also read my own more simple method in the next section, i.e. putting the template on top of the cloth in the heatpress without doing any transfer. The latter method works rather fine for small templates that use SS16 stones and higher.
By default I suggest using 0.7 to 1mm thick materials for SS16 stones and larger. SS10 stones (1.4mm height) probably require less thickness than 1mm. Maybe thick paper could do. Otherwise try cardboard from single Malt Whiskey cases (between 0.6 and 0.7mm).
If the template is warped, something that can happen for larger designs or/and of the support material has different "sides", we suggest gluing it to a sheet of plywood or MDF and then putting into the (cold) heatpress to make it flat.
Step 2 - Brush the stones into the template
Put the rhinestone into the holes and make sure that all are in position.
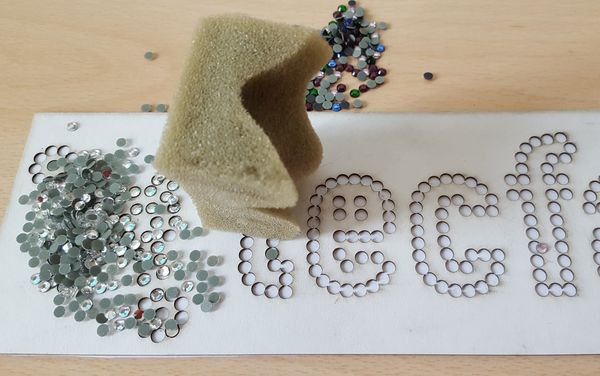
To do so, put a whole big lot of stones over the stencil and then gently brush forth and back with a foam brush or a piece of flat soft foam that you could retrieve from some packing or your matress. This technique works because stones sitting on the flat side and in the right trajectory will be pushed into the holes and stick there. Turned stones in the holes on the other hand will be removed. Again, make sure to pour a big pile of stones over the template. Otherwise you will spend much more time brushing.
Make sure that there no extra stones left and that each stone is in position
Extra tips for single templates:
- If you got stones of different sizes (e.g. SS16 and SS10) in your template, then brush in the big ones first. Otherwise the small ones will go into the hole of the big ones and you will have to retrieve these, e.g. with a piece of adhesive gum.
- If you got different colors of the same size, close the holes for the other colors with some tape and then remove them gradually. Alternatively, create different templates, one for each color/size combination.
- Make sure that the surface of the template is flat, in particular, holes should not have little walls sticking up.
Step 4
Once the stones are in place, put a heat resistant rhinestone transfer paper on top and press it down. Some transfer paper, e.g. the one that would use for textiles may not have enough glue and the stones will not stick. Buy something that is better or you will loose some hours to frustration ...
| 1mm cardboard template | Stones sticking to transfer sheet | Transfer sheet on top of cloth |
|---|---|---|
| Template is taped to table | Turning the sheet allows checking positions | Ready to press |
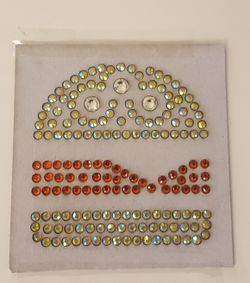
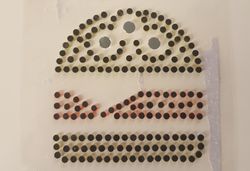
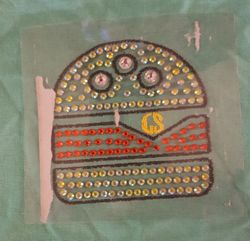
Design, procedure and result of this hamburger "test" is discussed in more detail in Stitch Era - creating embroidery with hot fix stones.
Step 5 - (Optional) check the pressure of the press
Make sure that the pressure is right with respect to the thickness of the material. According to Peggy Elliot's Heat Press Application Tips: The Right Pressure] “Too much pressure can cause over-application sometimes driving adhesive out from the heat transfer vinyl so your final design is not properly adhered to the item you’ve decorated and may fall off. Not enough pressure can cause under-application, designs may not be fully adhered to the fibers of the garment and fall off.”.
As far as we can, the press must close very firmly without having to force down. E.g. If you cannot remove a sheet of paper from an easily closed heat press, it is OK for pressing stones onto a T-shirt.
Step 6 - Insert cloth in press and flatten
Put the cloth in the press and (optionally) preheat for 5 seconds to get moisture out and to flatten the cloth
Now, if you have two layers of cloth (e.g. a T-shirt), put some baking paper, teflon sheet or similar between the layers. Else, glue will not just glue the stones but also the textiles together. In any case we strongly suggest using baking paper underneath the surface to be pressed since it also will protect the map from soaking glue.
Apply the transfer sheet with the attached stones on top of the cloth. Make sure to aim for the right place and directions. To help with that you could marke the upper line with removable tape. Stretch out the transfer sheet, then press it down from the top. Ask a second person for help if needed.
Step 7 - Press
Put baking paper on top to protect the teflon coating of the press.
Heat for about 20 seconds for SS16 stones at 200C. Larger stones may need more
- Let it cool down entirely, then peel away the transfer sheet.
- Make repairs with a stone applicator if needed or press the design again. However, second and third pressing may dilute the glue a bit too much.
Using a template and a heat press the simple way
Since I was frustrated by some transfer paper onto which the stones would not stick, I came up with a more simple solution on day one (i.e. my first design testing the newly arrived heat press)
I first created two designs using some nice acrylic plastic (because I didn't have any free cardboard at hand). Since the transfer paper method did not work I found some cardboard raiding the cupboards and did it again
Create a cardboard template
- Create a template from thin cardboard.
- Thickness does not matter much if the stones stick out well and if it is thick enough for the "brushing method).
I measured the height of the rhinestones I got (don't know what brand they are):
- SS16 - 1.5mm height
- SS20 - 2mm height
- SS34 - 3mm height
For example, as shown in the tests below, 1mm of cardboard for SS20 stones was OK, and 0.7mm carboard was OK for SS16. I don't know if 1mm would be OK for SS16.
The template should be flat, otherwise the stones will move out of position (underneath the cardboard). Tape it down if it bends a little.
Use the template in the heat press
Below are the steps. Follow all of them and think ! Since this procedure is not document in other places as far as I can tell you may experiment a bit.
- Put the cloth on the heat press (just one layer, else insert baking paper between the layers)
- If the cloth is wrinkled, heat the press and press for 4 seconds.
- Put the template on top of the smooth cloth and tape it down on the edges.
- Insert the rhinestones as above (e.g. pour a big pile of stones on top and then use some piece of soft foam to insert them into the holes)
- Make sure that every stone is flat and that there are not stones left
- Heat for 20 seconds at 200C
- Wait to let it cool down ! Do not remove the cardboard before the stones are cold again
The next pictures shows the result. The colored stones were in the same "crystal" pack as a surprise. Unfortunately they did not have glue at bottom. I only figured that after the second attempt to press them down. In other words, the same design had been pressed three times with no apparent damage. The last version only includes the clear stones and do have glue.
Tips
Disadvantage of this method may be that the cardboard can change its form after heating. Avoid cardboard with paint. On the positive side, it seems that paint found on a typical cardboard box for office supplies does not melt. See the two pictures below. Also the wrapping is probably due to the fact that one side had paint and the other did not.
You should tape down the cardboard before setting the stones. Use short length of tape and make "handles" so that you can pull the tape away again before printing. Alternatively, use heat resistant tape such as Kapton. Ask a 3D-printing friend for some or order it from an online outlet. A friend also suggested trying out some special type of glue on the backside of the template, i.e. 3M™ Repositionable 75 Spray Adhesive (I did not try yet).
The picture below shows the result. It's not an artistic master piece. Choice of colors is bad, design could be improved. But at this stage (our second hotfix) we were just testing the transfer method and therefore we are happy with the result. The little oval design on top was made by hand for testing the use of the newly arrived heat press. Two weeks before, we didn't even know that such things existed ...
Ordinary grey cardboard does not seem to warp, neither in the laser cutter nor under the heat press. Below is rather large example that taught me the limit of this method. This method only works if the fabric is totally flat (otherwise stones will glide underneath the cardbord). Also, it is much more suitable for stones that are larger than SS16 and it is not suitable for SS10 and smaller since these stones will not "sit" in position.
The following design was larger than the heat transfer press, i.e. about 55cm width. I just cut the template in two halves and did the left one first.
Links
Various
- Rhinestone (Wikipedia)
- Understanding Hot Fix (Harman), retrieved oct 2017
Transfer techniques
- How to Apply Hotfix Crystals, by: Khaled January 22, 2012, retrieved oct 2017
- How to apply hotfix crystals with an Applicator, Zyneri blogs, retr. oct 2017.
- How to Heat Press Rhinestone Transfers… the right way, Colman, retr. oct 2017.
- Help & Video Education at Stahls.com, e.g.
- Guide: 7 Popular Heat Transfer Styles, Stahls.com (retrieved oct. 2017)
- The Ultimate Guide To Design Size & Placement Stahls.com (retrieved oct. 2017)
Using a heat presses
- See heat press
