Flash CS6 motion tweening tutorial: Difference between revisions
| (7 intermediate revisions by the same user not shown) | |||
| Line 1: | Line 1: | ||
{{Incomplete}} | {{Incomplete}} | ||
{{Flash tutorial|CS4 (CS5, CS6)|beginner|}} | {{Flash tutorial|CS4 (CS5, CS6)|beginner|}} | ||
<pageby nominor="false" comments="false"/> | <!-- <pageby nominor="false" comments="false"/> --> | ||
== Overview == | == Overview == | ||
| Line 20: | Line 20: | ||
: [[Flash shape tweening tutorial]] | : [[Flash shape tweening tutorial]] | ||
: [[Flash animation summary]] | : [[Flash animation summary]] | ||
: [[Flash embedded movie clip tutorial]] (explains in some more depth how to use embedded clips) | |||
: After that you should be ready for interactivity. E.g. do the [[Flash button tutorial]] | : After that you should be ready for interactivity. E.g. do the [[Flash button tutorial]] | ||
;Quality and level | ;Quality and level | ||
| Line 113: | Line 114: | ||
Now you can change the '''motion path''' using two methods. | Now you can change the '''motion path''' using two methods. | ||
* Firstly you can add '''keyframes''' that define intermediate positions. Select a frame, then drag the object. E.g. you could start by adding one in the middle. A little diamond in the "tween layer" indicates a keyframe. The '''motion path''' will change accordingly. | * Firstly you can add '''keyframes''' that define intermediate positions. Select a frame, then drag the object. E.g. you could start by adding one in the middle. A little diamond in the "tween layer" indicates a keyframe. The '''motion path''' will change accordingly. | ||
* Then you also can directly make changes to the motion path graph. We suggest you use the '''selection''' (deselect everything first) or the '''subselection''' tool to | * Then you also can directly make changes to the motion path graph. We suggest you use the '''selection''' (deselect everything first) or the '''subselection''' tool to do this. | ||
[[File:flash-cs4-motion-tween-sun3.png|frame|none|Additions keyframes and realignment]] | [[File:flash-cs4-motion-tween-sun3.png|frame|none|Additions keyframes and realignment]] | ||
| Line 145: | Line 146: | ||
== The motion editor == | == The motion editor == | ||
The editor allows to move all kinds of operations that are difficult | The editor allows to move all kinds of operations that are difficult to do on the stage. It is a fine tuning tool that may not be necessary for your project. | ||
=== Basic use === | |||
'''Step 1: Open the Motion editor''' | '''Step 1: Open the Motion editor''' | ||
| Line 265: | Line 268: | ||
This is a fairly simple task. We just need to add an frame-by-frame animation to the sun and then create a new motion tween for the rocket. For the rocket we will have to substitute the flight path and also adjust rotation in various locations. | This is a fairly simple task. We just need to add an frame-by-frame animation to the sun and then create a new motion tween for the rocket. For the rocket we will have to substitute the flight path and also adjust rotation in various locations. | ||
If you plan to work along while you read, we suggest starting either from: | |||
* [http://tecfa.unige.ch/guides/flash/ex6/motion-tweening-intro/flash-cs-6-motion-tweening-empty.fla flash-cs-6-motion-tweening-empty.fla] (only includes a sun) | |||
* [http://tecfa.unige.ch/guides/flash/ex6/motion-tweening-intro/flash-cs-6-motion-tweening.fla flash-cs6-motion-tweening.fla] (includes the sun animation) | |||
* A [http://tecfa.unige.ch/guides/flash/ex6/frame-by-frame-intro/flash-cs6-rocket-symbol.html rocket movie clip] can be found in the library of [http://tecfa.unige.ch/guides/flash/ex6/frame-by-frame-intro/flash-cs6-rocket-symbol.fla flash-cs6-rocket-symbol.fla] | |||
Look at the result: | |||
* [http://tecfa.unige.ch/guides/flash/ex6/motion-tweening-intro/flash-cs-6-motion-tweening-a-clip.html flash-cs-6-motion-tweening-a-clip.html] | |||
Below is a screenshot explaining the architecture | |||
[[image:flash-cs-6-motion-tweening-a-clip-overview.png|frame|800px|none|Two motion tweens using 2 embedded movie clips]] | [[image:flash-cs-6-motion-tweening-a-clip-overview.png|frame|800px|none|Two motion tweens using 2 embedded movie clips]] | ||
=== Adding a frame-by-frame animation to the sun === | === Adding a frame-by-frame animation to the sun === | ||
| Line 318: | Line 331: | ||
[[image:flash-cs-6-motion-tweening-a-clip-rotate.png|frame|800px|none|Adjust rotations]] | [[image:flash-cs-6-motion-tweening-a-clip-rotate.png|frame|800px|none|Adjust rotations]] | ||
'''Solution''' | |||
* [http://tecfa.unige.ch/guides/flash/ex6/motion-tweening-intro/flash-cs-6-motion-tweening-a-clip.html flash-cs-6-motion-tweening-a-clip.html] | |||
* [http://tecfa.unige.ch/guides/flash/ex6/motion-tweening-intro/flash-cs-6-motion-tweening-a-clip.fla flash-cs-6-motion-tweening-a-clip.fla] | |||
== Links == | == Links == | ||
| Line 329: | Line 346: | ||
** [http://www.adobe.com/devnet/flash/learning_guide/animation/part09.html Animating with preset and custom eases] | ** [http://www.adobe.com/devnet/flash/learning_guide/animation/part09.html Animating with preset and custom eases] | ||
* [http://helpx.adobe.com/pdf/flash_reference.pdf CS6 Help PDF (17 MB)] (Ok reference, but the above links are better for beginners) (retrieved Jan 2013) | * [http://helpx.adobe.com/pdf/flash_reference.pdf CS6 Help PDF (17 MB)] (Ok reference, but the above links are better for beginners) (retrieved Jan 2013) | ||
* [http://help.adobe.com/en_US/flash/cs/using/WSd60f23110762d6b883b18f10cb1fe1af6-7e8aa.html | * [http://help.adobe.com/en_US/flash/cs/using/WSd60f23110762d6b883b18f10cb1fe1af6-7e8aa.html Flash Professional / Drawing in Flash] (retrieved Jan 2013)] | ||
Flash Professional / Drawing in Flash] (retrieved Jan 2013) | |||
== Credits and Copyright == | == Credits and Copyright == | ||
Latest revision as of 15:24, 23 April 2018
Overview
Motion tweening means motion animation with interpolation.
- Learning goals
- Learn about basic motion animation
- Add some simple filter transforms (e.g. size, color) to the animated object
- Learn how to use frame-by-frame animations within embedded movie clips.
- Prerequisites
- Flash CS4 desktop tutorial or Flash CS6 desktop tutorial
- Flash layers tutorial (first part)
- Flash drawing tutorial (at least some of it)
- Flash frame-by-frame animation tutorial (not absolutely needed, but probably useful)
- Flash motion interpolation overview
- Moving on
- Flash shape tweening tutorial
- Flash animation summary
- Flash embedded movie clip tutorial (explains in some more depth how to use embedded clips)
- After that you should be ready for interactivity. E.g. do the Flash button tutorial
- Quality and level
- This text should technical people get going. It's probably not good enough for beginners, but may be used as handout in "hands-on" class. That is what Daniel K. Schneider made it for...
- It aims at beginners. More advanced features and tricks are not explained here.
- Materials (*.fla file you can play with)
- http://tecfa.unige.ch/guides/flash/ex6/motion-tweening-intro/
- Alternative version
- Flash classic motion tweening tutorial (CS3 style animation)
- Flash CS4 motion tweening tutorial (similar, but less)
Introduction
Wikipedia, retrieved May 28 2009 defines tweeing as “Inbetweening or tweening is the process of generating intermediate frames between two images to give the appearance that the first image evolves smoothly into the second image. Inbetweens are the drawings between the keyframes which help to create the illusion of motion. Inbetweening is a key process in all types of animation, including computer animation.”.
In this tutorial we will introduce Flash CS4/CS5/CS6 motion interpolation. See also Flash animation overview and the Flash classic motion tweening tutorial
Built-in motion tweens are applicable only to "heavy" Flash objects, in particular instances of movie clip symbols and text fields. Other types of objects (e.g. drawings or shapes) must first be wrapped into a symbol when interpolation is applied to them. We suggest that you should not let Flash do this, i.e. think ahead and and transform drawings into symbols beforehand.
In Flash, a symbol can be a graphic, a button or movie clip created that is reusable in the same document or in others. Each symbol that you use/create is inserted into the library. The symbol itself is never directly used in an animation, you always must create an instance. In practical terms this means that you must drag the object from the library to the scene, then give it a name as discussed below.
For a programmer, a symbol can be understood as a kind of class (i.e. a generic object). To learn more, read Flash embedded movie clip tutorial. You also can use symbols as classes in ActionScript code, e.g. create an instance and insert it into the scene
You only can animate one single instance of a symbol in the same layer. You later can of course replace the graphics inside. If you want to create animations with multiple objects, use either multiple layers or embedded movie clips.
When the interpolation includes a trajectory (as opposed to a rotation for example), a "motion path" will appear on the stage. This path shows the position of the object in each interpolation frame. In each frame, you can change the position of the object and the interpolated trajectory will change. To do so, just drag the object to another position. This will create new keyframes and therefore modify the path.
Finally in each keyframe (starting, ending and those that you added), you also can transform other properties of the object, for example: size, rotation, tint, 3D position etc.. It is important to understand that you will not change the graphic itself, but rather just apply a "filter" to it.
Traditional Flash desginers create all animations in the main timeline (scenario). The scenario will then be divided into sequences, called scenes. A modern Flash developer rather would tend to place individual animations within and embedded "movie clip" and then place those clips in space and time. As explained in the Flash frame-by-frame animation tutorial , a movie clip symbol has its own timeline. It also may include other movie clips. For example: you could create a movie clip called "bird animation. In this movie clip, you could create a moving object ("bird") which in turn would flap its wings. These wings are are again symbols embedded at a third level and we will have a the following hierarchy: Bird animation -> Bird -> Wings.
Create a simple motion tween
Let's now look at an example:
You can download the following file that already contains the objects
Solution:
- flash-cs-4-motion-tweening.html (already admire the result)
- flash-cs-4-motion-tweening.fla (the solution, do not cheat if you want to learn using this example !)
Step 1: Prepare the object to animate
Important: Each object must be interpolated in a different layer and that object must be a symbol.
If you do not have symbols in your library, this is a procedure:
(1) Create a new layer
(2) In this layer, draw a picture using any drawing tools, images etc.. you want.
(3) transform the drawing into a symbol. If you do not, Flash will do it for you and not necessarily the way you like. So even if Flash provides all sorts of help to unite the selected objects and to create layers for each symbol, do not let Flash do that work for you! To create a symbol which will be placed in the library and create a instance on the stage:
- In the layer with your drawings select all objects on the stage. Then right-click and Create Symbol. Select "Movie Clip" because this type of symbol is the most powerful.
- Make sure it is no unwanted object in the scene for this layer. If you want to create a symbol from drawings that extend over many layers, the procedure is the same, just make sure that you only select wanted elements.
Step 2: Create the interpolation animation (motion tween)
First select the object (symbol instance) on the stage
Then do one of the following:
- Menu Insert> Motion Tween
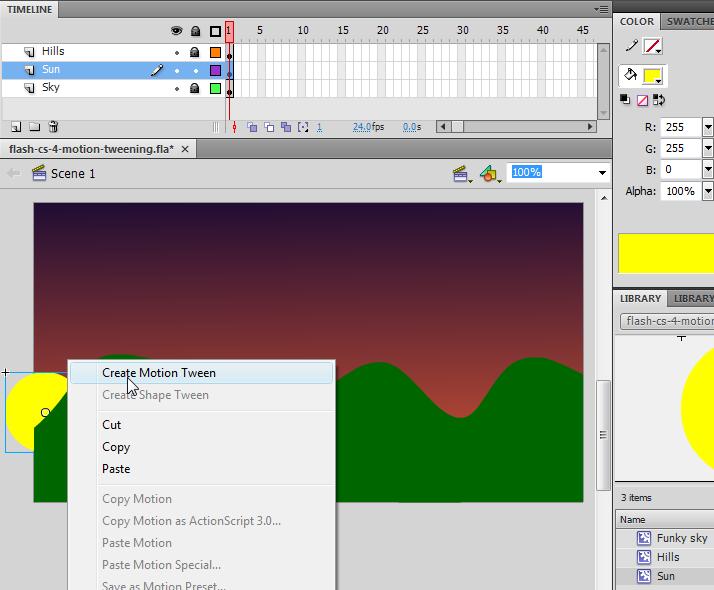
- Right-click (Windows) or Ctrl-click (Macintosh) on the object or the current "frame" and choose Create Motion Tween.
In the following screenshot we show how to add a motion tween to an "Raising Sun" symbol of the "Sun" which is in the library.
Flash now creates a motion tween span with an interpolation of 24 frames (default). Span refers to the range of the interpolation, from the beginning to the end. By default 24 frames last one second at the default frame rate of 24 FPS.
Step 3: Create the motion path
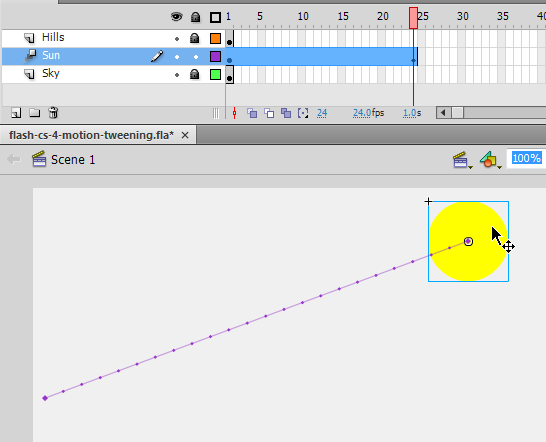
The control (slider) in the timeline (scenario) was placed in the last frame. Now move the object to a new position. A motion path (trajectory) appears on the scene. The motion path shows the trajectory of interpolated images during the tween span. For now, we see just a straight line that connects the first frame to last. You can change this interpolation path to create a more interesting one.
Once done, you'll see this:
To see the object moving along the route:
- Move the control (rectangle) in the red timeline to the left and right
- Or already view the results : Press CTRL-Enter (or menu Control-> Test Movie).
Notes: If the object is not "tweenable" object, or if multiple objects are selected on the same layer, a dialog box appears. The dialog box allows you to convert the selection to a movie clip symbol. If the object to be interpolated is the only item in the layer, Flash will add the motion tween span to the same layer. If there are other objects on the layer, Flash creates multiple layers, each containing an object an its tween.
- If the original object sits in the first frame of the scenario and the frame rate is 24 frames per second, the span will contain 24 frames. If the original object was present in more than one adjacent frames, the span of the interpolation will spread from first to last frame.
Step 4: Adjust the length and extend the other layers
To adjust the duration: Drag either end of the tween span in order to shorten or to lengthen the span. You also can move the span to the right or left.
Before doing so, we advise you to adjust the other "layers" to the same length, otherwise the screen does not display background. A simple method: Select a layer with a background, click in the last frame (eg. 24) and press F5. F5 is a shortcut to insert a static frame (ie a frame without drawing). In other words, a static frame simply extends the duration of the first found keyframe left. If you see "white" in a layer, this means that no image will appear. See also the screenshot for step 6, which shows an animation with 2 layers for the background ("Hills and Sky" and a layer to interpolation ("Sun").
Step 6: Adjust the path
Now you can change the motion path using two methods.
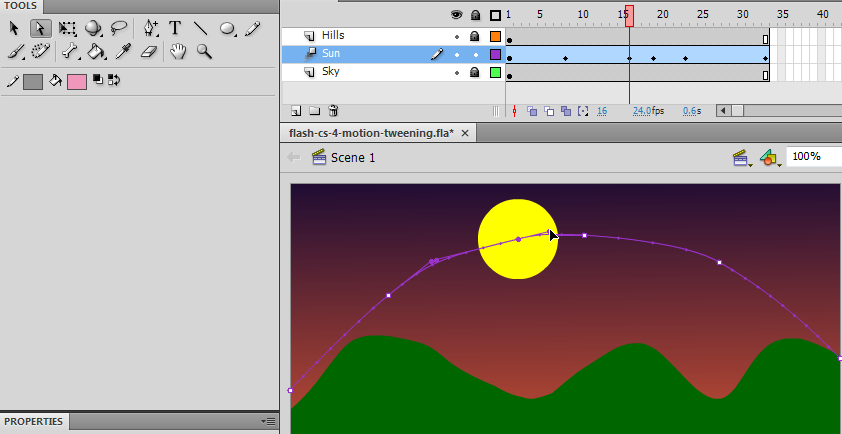
- Firstly you can add keyframes that define intermediate positions. Select a frame, then drag the object. E.g. you could start by adding one in the middle. A little diamond in the "tween layer" indicates a keyframe. The motion path will change accordingly.
- Then you also can directly make changes to the motion path graph. We suggest you use the selection (deselect everything first) or the subselection tool to do this.
Important: If you want to adjust the position of the object in a frame, remember to first click into a frame in the animation layer, otherwise you will do damage elsewhere.
Step 7: Transformations of the object
In each keyframe, you can now make changes. These transformations are grafted onto the object, but does not alter the "symbol" itself. For this reason, using drawing tools will "not work".
To start, we advise you to use two types of transformation:
- Change size or rotation
- Change hue (color effect)
For both, follow these steps:
- Select a frame or a blank keyframe first, then click on the object
- Then change the values in the properties panel (Ctrl-F3 if not already visible).
Alternatively, you can also use the Free Transform tool
You also can add filters (bottom panel properties) and finally, you also can add 3D rotations or positions with the 3D Translation tool and the 3D Rotation Tool in the tool panel.
Step 8: Other Adjustments
Animation may be too fast. To slow down, there are several options:
- Decrease the frame rate (fps). Default CS4 use 24. Click outside the stage somewhere and change the fps in the properties panel (FPS: 16 for example). This would give it a more jerky quality (thus try to avoid).
- Lengthen the span, eg 60 frames. Just pull the tween layer and then with F5 to extend the other layers.
- You'll also can see that the sun's movement is not very regular. This is because we pulled into the sun keyframe left or right instead of moving only vertically. Try to adjust this.
The motion editor
The editor allows to move all kinds of operations that are difficult to do on the stage. It is a fine tuning tool that may not be necessary for your project.
Basic use
Step 1: Open the Motion editor
- Windows Menu -> Motion Editor
- It is advisable not to fix it within the workspace, because it contains a lot of controls. Pull the panel until you see everything.
Step 2: Adjust the visible frames
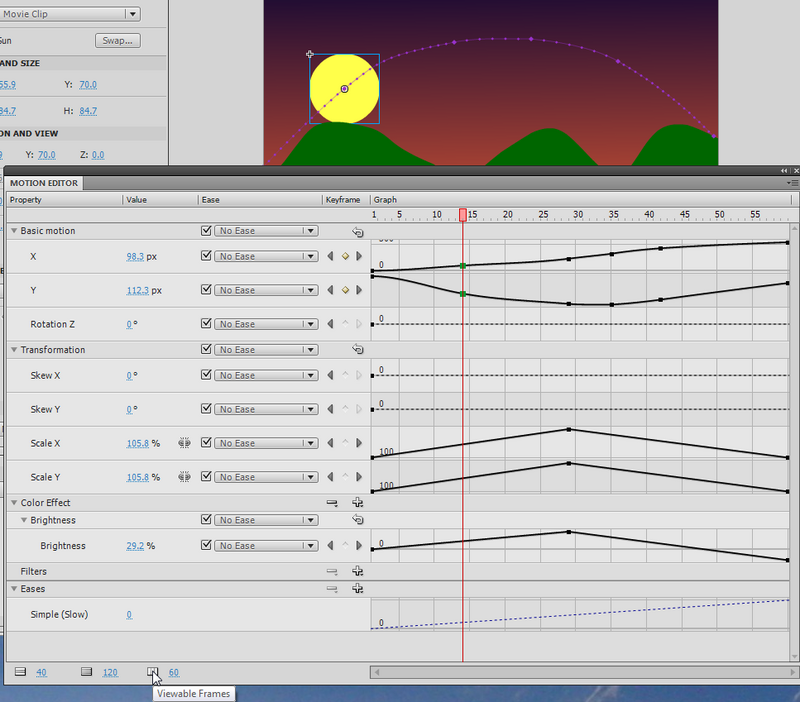
- Bottom left: Adjust the "Visible Frames" to a necessary maximum.
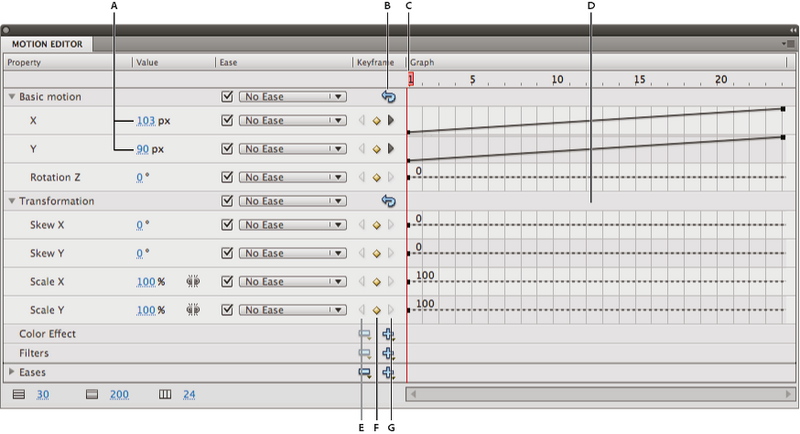
Here is a screenshot of the editor and motion which shows our sun example.
You can, for example:
- Adjust the X position in a keyframe by pulling up or down the control (or by entering precise coordinate)
- Fit a transform, eg size
- Right-click on a keyframe to kill it
- Moving laterally a keyframe in the Timeline
The motion controls of the editor
The controls of this tool are not too difficult to learn. Just know that moving up / down means decrease / increase value. Moving laterally moving means moving in the scenario (timeline).
- A. Property values (for editing finely ...)
- B. Reset Values button (back, takes everything as a group)
- C. Playhead (to move in the timeline)
- D. Property area curve
- E. Previous Keyframe button (keyframe preceding navigated)
- F. Add or Remove Keyframe button (add or remove a keyframe). Otherwise right-click.
- G. Next Keyframe button (keyframe navigated suvi)
Each property that we can animate has his own graphic in this tool. You can open / close a group of properties to save space and enlarge / reduce the graph. Also, if you click in the properties panel on the left, the display space for the curve will grow.
Here is a slightly modified file (and the right state of motion editor). It has smoothed the curve a bit, killed a keyframe animation and inverse size (the sun is now smaller when it is up).
Final Solution:
- flash-cs-4-motion-tweening.html (solution adjusted slightly
- flash-cs-4-motion-tweening.fla
Fine tuning and replacing the motion path
Let's now fine tune the trajectory.
Editing curves
We have already seen that we can add a keyframe in different ways:
- Right-click in an empty frame of a tween layer in the timeline. Then select Insert Keyframe and select the type.
- Move the symbol of a motion tween layer in the timeline
- Use the motion editor.
According to Adobe's Flash CS6 manual, you can edit or change the motion path of a motion tween in the following ways:
- Change the position of the object in any frame of the tween span. Move the playhead and the just move the symbol using the selection tool
- Move the entire motion path to a different location on the Stage. Select and drag it.
- Change the shape or size of the path with the Selection, Subselection, or Free Transform tools.
- Change the shape or size of the path with the Transform panel or Property inspector.
- Use the commands in the Modify -> Transform menu.
- Apply a custom stroke as motion path (copy/paste)
- Use the Motion Editor.
- Reverse start/and end (right-click)
Adjusting the rough shape of the motion path with the selection tool
- Click on the selection tool
- Click on the object that is being animation (e.g. the rocket)
- Drag segments without selecting them ! Watch out for the "moon" cursor File:*
Fine tuning with the subselection tool
- Click on the Subselection tool
- To move a control point, drag it with the Subselection tool.
- To adjust the curve of the path around a control point, drag the Bezier handles of the control point with the Subselection tool.
- If the handles are not extended, you can extend them by Alt-dragging (Windows) or Option-dragging (Macintosh) the control point.
- To delete an Anchor point click on it with Delete Anchor Point tool that sits underneath the pen tool. Most anchor points generated with Selection tool are so-called smooth points.
- To convert an anchor point click on it with 'Convert Anchor Point tool that sits underneath the pen tool in the tools panel. The anchor changes to an angle point.
A short definition of anchor points
- A "smooth point" smoothes two connected curves.
- A corner point only lets you change one end.
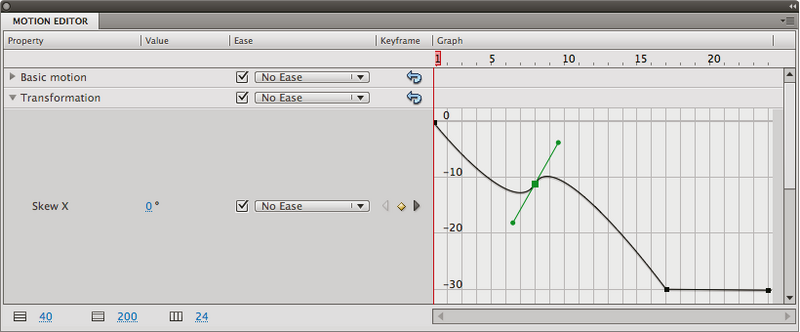
Btw, you also can use the subselection tool in the Motion Editor
- Right-click to change to define the nature of the point (corner, or smooth point)
- For smooth points, you then can drag the Bezier controls
Here is a screenshot of the Adobe CS4 manual that illustrates this principle:
. The graphics of CS6 is a bit different, but the principle is the same.
Replace the path animation
There are two possibilities:
(1) Using Flash Motion presets.
- Open the panel Window-> Motion Presets
- Play with different versions
- Click on Apply (Flash will ask if you want to replace the ancient route)
(2) Copy / paste a line
- In another layer, draw a path, with a beginning and an end and no fills (fills). E.g. use the pencil tool.
- Copy and paste this path into the motion tween layer (then kill your drawing, or put in the library).
Tip: If you want a perfect circle, star, etc.: To the drawing with the Oval tool, polystar.', etc. but without fill. Then use the eraser to a very small incision to obtain a beginning and an end, i.e. a path.
Here is the result of "cutting and pasting" a polystar drawing into the motion tween layer:
Create a motion path for an animated object
Let's now enhance the moving sun animation.
- We want the sun pulsating, i.e. change color and size in regular intervals
- Add a motion animation using the rocket from the Flash frame-by-frame animation tutorial (flash-cs6-rocket-symbol.html)
This is a fairly simple task. We just need to add an frame-by-frame animation to the sun and then create a new motion tween for the rocket. For the rocket we will have to substitute the flight path and also adjust rotation in various locations.
If you plan to work along while you read, we suggest starting either from:
- flash-cs-6-motion-tweening-empty.fla (only includes a sun)
- flash-cs6-motion-tweening.fla (includes the sun animation)
- A rocket movie clip can be found in the library of flash-cs6-rocket-symbol.fla
Look at the result:
Below is a screenshot explaining the architecture
Adding a frame-by-frame animation to the sun
- Double click on the sun (either on the clip in the library or else on the instance on the scene)
- Add the frame-by-frame animation. If you don't know how, read the flash frame-by-frame animation tutorial
Adding a motion tween for the rocket
Get the rocket clip
- Open file flash-cs6-rocket-symbol.fla
- Copy the rocket clip (Select in the library and CTRL-C)
- Paste into the library of the sun animation
Create a motion tween for the rocket
Now do the animation as before ....
- Create a new layer called "Rocket motion" or similar
- Select this frame
- Drag the rocket on the scene
- Hit CTRL-ALT-S and make it about 20%
- Move the rocket either to the left (easier) or to the right
Create the motion tween
- Create the motion tween (click-right on rocket ....)
- Go to the last frame and drag the rocket over there. You know should see a linear flight path
- Adjust the flight path using the selection or the subselection tools (see explanations above ...)
For creating a new the path, you also could use the following (easier) procedure
- Create a new layer called "temp"
- Lock all layers, except "temp"
- Draw the flight path with the pencil tool
- Copy the path
- Paste in place (CTRL-SHIFT-V) into layer "Rocket motion" (unlock it first)
- If the rocket flies from right to left, get the selection tool, right-click in the tween span and select Motion-Path->Reverse Path (!)
Adjust the rotation of the rocket in the path
(a) Automatic
- Select the motion path
- Change the setting in the properties panel to auto-rotate
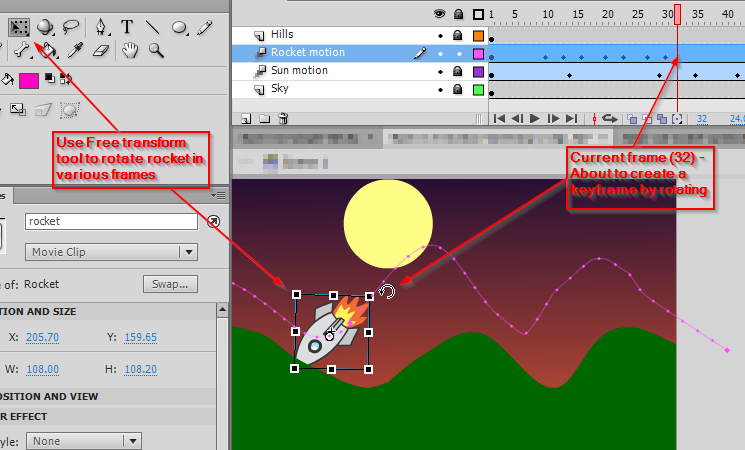
(b) Adjust the rotation of the rocket manually creating some keyframes
- Move the playhead to the start (either left or right)
- Select the Free Transform tool
- Move the rocket a bit and adjust rotation. This will create new keyframe that you can see in the timeline
- Repeat that a lot until the rocket flies smoothly ...
Solution
Links
- Creating a simple Flash animation by Doug Winnie, Adobe, 2 / 2009. (retrieved Jan 2013)
- Animation Learning Guide for Flash (CS 5.5, ok link as of Jan 2013).
- CS6 Help PDF (17 MB) (Ok reference, but the above links are better for beginners) (retrieved Jan 2013)
- Flash Professional / Drawing in Flash (retrieved Jan 2013)]

