Netfabb engine for fabbster build styles: Difference between revisions
m (→Hog style) |
|||
| (14 intermediate revisions by the same user not shown) | |||
| Line 51: | Line 51: | ||
== Reusable ABS styles definitions == | == Reusable ABS styles definitions == | ||
So far, the fabbster has been designed for [[ABS]]. It is possible to produced low-quality prints with [[PLA]] (see below). | |||
=== Angelina style === | === Angelina style === | ||
| Line 266: | Line 268: | ||
; Configuration issues | ; Configuration issues | ||
* Print head must be really close to the print bed and the raft in order to get the first layer printer. Don't hesitate to lower z height bit. E.g. z='''-'''0.2mm | |||
* For objects that have a flat bottom, don't use a raft, do not print the usual 5 dots ! '''No anything''' before the real print. Select a print area on the bed that is very close, i.e. one sheet of paper (the hot end must not touch either !) | * For objects that have a flat bottom, don't use a raft, do not print the usual 5 dots ! '''No anything''' before the real print. Select a print area on the bed that is very close, i.e. one sheet of paper (the hot end must not touch either !) | ||
* Create a strong traditional raft (about 50RPM) for stuff like DUPLOS. For other objects you will have difficulty taking it off (though you can with mechanical tools like a file). | * Create a strong traditional raft (about 50RPM) for stuff like DUPLOS. For other objects you will have difficulty taking it off (though you can with mechanical tools like a file). The raft should be a bit colder than the object (for taking it off). Too cold it will not stick however. | ||
* RPM must be medium high. Minimum = at least 36 RPM or so, but '''50 is better'''. You might go lower with yours or you may have to go higher. This is easy to test: Just extrude filament for a minute or longer and see if it flows ok. Then, while it flows, reduce RPM to 4 (if you can) and put 50 RPM back. This is to simulate jumps. | * RPM must be medium high. Minimum = at least 36 RPM or so, but '''50 is better'''. You might go lower with yours or you may have to go higher. This is easy to test: Just extrude filament for a minute or longer and see if it flows ok. Then, while it flows, reduce RPM to 4 (if you can) and put 50 RPM back. This is to simulate jumps. | ||
* PLA should never stop coming out. Do not use any anti-stringing. On the contrary, have some slight flow while traveling. | * PLA should never stop coming out. Do not use any anti-stringing. On the contrary, have some slight flow while traveling. | ||
* Use a high fill. Since there is no fan, low filling patterns will just "flow/melt" downwards. | * Use a high fill. Since there is no fan, low filling patterns will just "flow/melt" downwards. | ||
* Cheat in the calibration. Basically, don't hesitate to double or triple the default RPM for starters. | * Cheat in the calibration. Basically, don't hesitate to double or triple the default RPM for starters. | ||
* Temperature must be exactly right. Not too cold and not too hot. With respect to the specific PLA variant you are using, you got about 5 degrees variance to play with. In addition, since the Fabbster extruder gets warm after some attempts, you may have to change the Material Style after a print. See the build styles for more information | |||
; During printing | |||
* After printing a raft, you should try to remove a long string that will mess up the first layer. Have a knife ready to intercept while the extruder moves forth and back to a waiting position just after printing the raft. | |||
; Just before printing issues | ; Just before printing issues | ||
| Line 283: | Line 290: | ||
; After printing | ; After printing | ||
* Let the object cool a little bit before removing it. PLA is weak at low temperatures. However, it you printed an object with a flat bottom, then remove it with a knife or something right after | * Let the object cool a little bit before removing it. PLA is weak at low temperatures. However, it you printed an object with a flat bottom, then remove it with a knife or something right after | ||
* Take the plastic filament out. Temperature to | * Take the plastic filament out. Temperature to 220 or so if needed, then reverse extrude and pull (gently!). If you leave the plug, it never will heat enough and can't be pushed down in your next round ... The typical fabbster "plug" is deadly with PLA. | ||
Yes, PLA styles will have animal names :) | Yes, PLA styles will have animal names :) | ||
=== Hog | === Hog PLA styles === | ||
[[image:PLA-hog-3-style. | [[image:PLA-hog-3-style.jpg|thumb|300px|right|PLA printing with hog-3]] | ||
Hog styles allow to print fairly simple objects. The car above was printed in some hog-0 version I lost because I found the upskins, downskins and filling too thin. This style series is called '''hog''' because you only can print objects in a coarse resolution. Also, it will print quite fat. Flat cubic objects or even parts of objects will '''not work''' well. | Hog styles allow to print fairly simple objects. The car above was printed in some hog-0 version I lost because I found the upskins, downskins and filling too thin. This style series is called '''hog''' because you only can print objects in a coarse resolution. Also, it will print quite fat. Flat cubic objects or even parts of objects will '''not work''' well. However you can try, e.g. I managed to print Duplos (with some hanging roofs though). | ||
'''Important tricks''' | '''Important tricks''' | ||
* Use a strong traditional raft (as defined in the hog-2/3 or a more recent Material style). A normal raft can do if your object has a flat bottom, but it that case I'd rather printer without raft. | * Use a strong traditional raft (as defined in the hog-2/3 or a more recent Material style). A normal raft can do if your object has a flat bottom, but it that case I'd rather printer without raft. | ||
* Depending on the raft you use, you may have to lower the part since PLA comes out a bit flatter. Try to put the model at '''z = 0.2mm''' or even lower (but not -2mm!). Negative raft/part in the Material style doesn't seem to work as of June 2012. | * Depending on the raft you use, you may have to lower the part since PLA comes out a bit flatter. Try to put the model at '''z = 0.2mm''' or even lower (but not -2mm!). Negative raft/part in the Material style doesn't seem to work as of June 2012. | ||
* Temperature must be exactly right. Unless ABS, the usable temperature with one kind of PLA is smaller. Typically, between 195 and 205 degrees, but for some [[PLA|PLA variants] you have to go colder or warmer. In the DYI community there are least three very different PLA variants. Note: If you print warmer than recommended, the filament will get very fluid and may fall out and/or down. | * Temperature must be exactly right. Unless ABS, the usable temperature with one kind of PLA is smaller. Typically, between 195 and 205 degrees, but for some [[PLA|PLA variants]] you have to go colder or warmer. In the DYI community there are least three very different PLA variants. Note: If you print warmer than recommended, the filament will get very fluid and may fall out and/or down. | ||
* Filling is really tricky. In principle it would be best to print without filling. If you do use filling, then make it rather dense. Else it will "melt down" and after some point PLA will stop coming out since there is nothing that will "pull" from the bottom. | * Filling is really tricky. In principle it would be best to print without filling. If you do use filling, then make it rather '''dense'''. Else it will "melt down" and after some point PLA will stop coming out since there is nothing that will "pull" from the bottom. | ||
'''Build style hog-2''' | '''Build style hog-2''' | ||
| Line 311: | Line 318: | ||
* width=medium/speed=speed combination, i.e. about 50 RPM at speed = 45mm/s | * width=medium/speed=speed combination, i.e. about 50 RPM at speed = 45mm/s | ||
* Filling is disabled in the BuildStyle, since without cooling fan, filling will not work (except very dense filling) | * Filling is disabled in the BuildStyle, since without cooling fan, filling will not work (except very dense filling) | ||
* Associated Material Style is hog-PLA-3, but another hog material also could do probably. | |||
A picture with this style (above) shows a lady without any fill since "loose" fills will not work (they will melt down) and I didn't want to wait too long. Lack of fill contributes to bad quality. However, the lady on Duplo did print fully in about 1h20. Same for the DUPLO, The walls print just fine, but the overhang is rather bad. | |||
'''Material style (hog-PLA-2)''' | '''Material style (hog-PLA-2)''' | ||
* No anti-stringing (actually even the opposite) | * No anti-stringing (actually even the opposite) | ||
* 4mm layers | * 4mm layers | ||
* 197 degrees (on my fabbster I have to cheat a bit, since it won't cool down). The real temperatures is about | * 197 degrees (on my fabbster I have to cheat a bit, since it won't cool down). The real temperatures is about 209. This is too hot for printing overhangs with this PLA. However, hotter is easier and this style can be suitable for easy hollow objects without any overhangs. Adjust to your PLA ! | ||
'''Material style (hog-PLA-3)''' | '''Material style (hog-PLA-3)''' | ||
* No anti-stringing (actually even the opposite) | * No anti-stringing (actually even the opposite) | ||
* 4mm layers | * 4mm layers | ||
* | * 195 degrees (raft) - 198 degrees (rest). On my fabbster I have to cheat a bit, since it won't cool down). The real temperatures is about 203. Adjust to your PLA ! Also, after printing 1-2 objects you can lower the temperature a bit (since the fabbster extruder doesn't cool down) | ||
'''Discussion''' | '''Discussion''' | ||
* Version two is '''much''' to fat. You could raise print speed, but do not lower the RPMs ! Version three is less '''fat''' and prints colder. It provides better results but is more "fragile" due to the lower temperature. So you could raise it a bit. | * Version two is '''much''' to fat. You could raise print speed, but do not lower the RPMs ! Version three is less '''fat''' and prints a bit colder. It provides better results but is more "fragile" due to the lower temperature. So you could raise it a bit. | ||
'''Download''' | '''Download''' | ||
* http://tecfa.unige.ch/guides/3dprinting/fabbster/styles/hog/ | * http://tecfa.unige.ch/guides/3dprinting/fabbster/styles/hog/ | ||
=== Rhino PLA styles === | |||
Rhino styles are similar to hog-3, but has filling added, smaller layers and faster printing. With PLA you must use a dense filling (slider to the left) or everything will crumble down. | |||
Purpose: Build simple "squared" objects with fills, like a tugboat. Rhino-2 produces a better tugboat despite higher speed. It's got smaller and thinner layers. | |||
[[image:tugboat-PLA.jpg|thumb|600px|none|PLA tugboat (Rhino-1). Source: [http://www.thingiverse.com/thing:21612 Thingiverse]]] | |||
'''Important tricks''' | |||
* Use the normal traditional raft (Rhino-1) or the strong traditional raft (Rhino-2) | |||
* Set the part to -0.3 mm or so, else it may not stick to the raft. If it does not, then go lower still or change something in the Raft definition of the Material style ! | |||
* Use '''dense filling''', e.g. 1.2mm (slider to the left) | |||
; Rhino-1 Build style (with Rhino-1 material !) | |||
* Mostly medium speed/medium width (50 RPM) | |||
* Fat/fast combination for filling (80RPM) | |||
* Width factor of Upskin at 130 (to compensate for "fatter" printing) | |||
... If you use another material style, things will change | |||
; Rhino-1 Material style | |||
* "Fat" 0.4mm layers | |||
* Hotter temperatures (200 - 205 degrees) to insure that the fills can be printed. Hotter is worse, but at the same time, colder means that no filament will come out when the fills somewhat crumble down. Can't have both... | |||
* Rather fast filling (to reduce wait time), but high RPM to insure flow. | |||
* The result should be even uglier than hog-3 because of the higher temperatures. That means that you also could try Rhino-1 build style with hog-PLA Material styles, e.g. hog-PLA-3 | |||
[[image:tugboat-PLA-2.jpg|thumb|300px|right|PLA tugboat printing (Rhino-2). Source: [http://www.thingiverse.com/thing:21612 Thingiverse]]] | |||
; Rhino-2 Build style (with Rhino-2 material !) | |||
* Mostly fast speed/thin width (44 RPM) | |||
* medium/fast combination for filling (50RPM) | |||
* Width factor of Upskin at 130 (to compensate for "fatter" printing) | |||
; Rhino-2 Material style | |||
* 0.35mm layers | |||
* Hotter temperatures (200 - 205 degrees) to insure that the fills can be printed. Hotter is worse, but at the same time, colder means that no filament will come out when the fills somewhat crumble down. Can't have both... | |||
* Rather fast filling (to reduce wait time), but high RPM to insure flow. | |||
* The result should be even uglier than hog-3 because of the higher temperatures. That means that you also could try Rhino-1 build style with hog-PLA Material styles, e.g. hog-PLA-3 | |||
; Download | |||
* http://tecfa.unige.ch/guides/3dprinting/fabbster/styles/rhino/ | |||
[[Category: Fabbster 3D printer]] | [[Category: Fabbster 3D printer]] | ||
Latest revision as of 15:49, 13 June 2012
Introduction
This article presents and discusses some simple build styles for the fabbster 3D printer and that can be imported into the Netfabb engine for RepRap
If you are not familiar with expert settings, you also should read:
- Netfabb engine for RepRap (or equivalent in the netfabb wiki.
Alternative sources:
- Application and buildstyle (fabbster forum)
Design principles and general tips
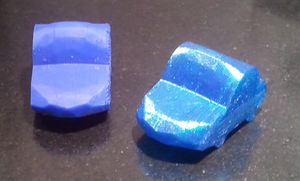
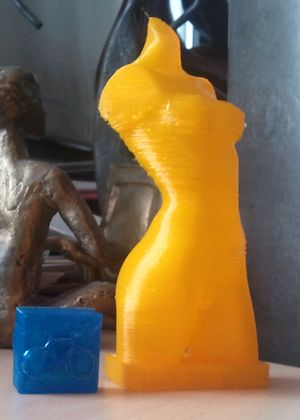
These styles, so far, were made for printing with plastic rolls. As you can see in the picture below - "Angelina" style behind and "Vanessa" style in front to the right, it's fairly easy to get decent enough prints using 0.25mm layers.
However, it may take about five attempts to get it right as the series of the small models in the picture shows (first attempt to the left left, first decent version to right). Creating a more universal style would take more time since you would have to test it with different objects and also make sure that it works with different sizes ...
Important general tips (read this please!)
(1) We set a lower limit of 10 RPM printing (unless otherwise specified). This makes printing with these styles fairly easy. If you change the styles keep this principle unless you know what you do. RPM can be seen in the calibration settings or by using Olaf's excellent style editor (dig into the forum messages for finding the latest version. You can safely use this editor for inspection, I don't know if it is already safe for editing - May 31/2012).
(2) Each build style has an associated material style. Typically, we use 0.25mm layers as opposed to 0.15 layers. Using our build styles with default fabbster material styles simply will not work !
(3) Make sure to get the temperatures right. I typically use between 255 and 270 degrees.
- higher temperature = easier flow (plastic comes out). But never go above 290 or you might produce glass instead...
- lower temperatures = better quality
If no plastic comes out with my settings:
- Raise the temperature a bit (by 5 degrees)
- Make sure that the print head starts really close to the board (2-3 sheets of paper underneath)
- Turn down anti-stringing
... Again, read Netfabb engine for RepRap if you don't know how to do that kind of thing.
Importing and exporting styles
You can import these settings to your Netfabb. To visualize if you are afraid, open with an XML editor or use config.html (an XSLT script that will show contents as ugly HTML).
To make our styles work you need to import both a build style and a material style ! These work together. In the Material style you would for example define layer size and definitions of speed and width. In the Build style you define how to use these definitions within different regions.
In Netfabb:
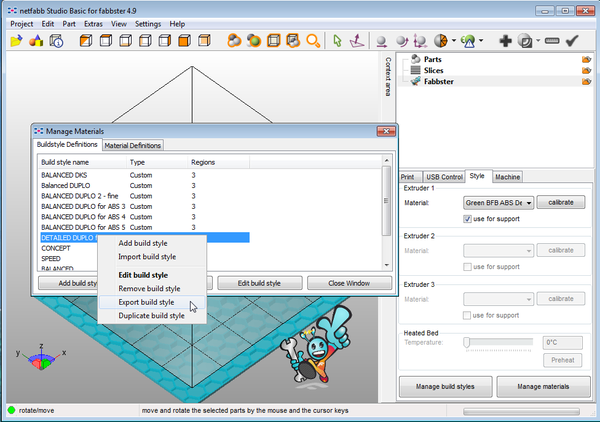
- Open Manage Materials, and right-click->Import. Choose a "reprapcalibration file" !
- Open Manage Build Styles, and right-click->Import. Choose a "reprapbuilstyle file" !
See the screenshots below:
You will have to select a filling:
- I suggest a minimum filling unless you print objects that must be strong. Move the slider rather to the right for less fill. All to the right is OK for larger objects that are not meant to be extremely solid.
- You may have to adjust the temperature. I tend to use low temperatures (as compared to others in the fabbster community) and I even may try lower in the future. High temperatures are better for good flow, but increase warping and worsen overhang problems.
Reusable ABS styles definitions
So far, the fabbster has been designed for ABS. It is possible to produced low-quality prints with PLA (see below).
Angelina style
Purpose: This style does mostly what is explained in the "calibration for dummies" section of the Netfabb for RepRap article. It is not a very precise style, but it prints larger objects ok and fairly fast and it uses 4 walls to make them fairly solid.
Get the latest combination from
E.g. as of May 18, these are:
- angelina-5.reprapcalibration (Material)
- angelina-5.reprapbuildstyle (Build Style)
Main features
- 0.25 layers
- medium/slow and medium/fast combinations
- Walls are 4 think (outer, inner1, inner2 and inner3
If your object includes smaller parts, try the "Uma" style. It's sort of combination of Angelina and Vanessa.
Vanessa style
Purpose: This is another 0.25 style / material combination for "artistic" hollow objects. It is meant for printing out more slowly and it only has been tested with a small hollow object, i.e. the same pink panther woman on Duplo as above, only 8 times less volume. Think of Vanessa as Angelina, Lego sized. It is not a precision style, but should produce acceptable quality. For higher precision styles, see Tinman (fine layers with medium speed), or R2D2 and Uma (0.25 layers at lower speeds)
Style settings:
- Most width are fine
- Walls only have an outer and inner definition (two instead of four as in the Angelina style)
Material settings:
- It goes down to "snake" speed, however, snake means 25 mm/s in our associated Material style definition.
- No up and down jumping of the print head during jumps ! In other words the print head will move in a more quiet way. However, this means that some objects may not be printable. Print head could rip off the model if something sticks out.
- Minimal RPM is around 10. I.e. everyone should be able to use this style with plastic rolls.
Directory with build and material style:
Todo/Problems:
- Upper skins with a slight angle have holes (the upper side of her chest). Needs an extra region definition, but I have to figure out how to do this. One should (but can't) define a new small area that only would work if there is an angle from 5 to 30 degrees.
- The small region prints are too fast. I should take the settings from R2D2 in the same way as Angelina would need the small region settings of Vanessa. See the Uma style for better quality.
R2D2 style
Purpose: It is meant for printing out fine details slowly. This 0.25 style / material combination is meant for small "technical parts" like a hose retention clip posted by Gizmo in the Fabbster forum. However, it will not print at very detailed resolution since this simply can't be done with plastic rolls using the current extruder.
Style settings:
- Practically all width are fine and speed is mostly "snake" (25mm/s)
- Walls have 4 parts (or less if the wall is smaller)
- No up and down jumping of the print head during jumps ! In other words the print head will move in a more quiet way. However, this means that some objects may not be printable. Print head could rip off the model if something sticks out.
- Minimal RPM is around 10. I.e. everyone should be able to use this style with plastic rolls.
Directory with build and material style:
Important settings:
- Set Fill spacing to none: Slider in the Print panel to full left.
- If you print very hot, then you may get "noise" and the print head may rip off the whole thing. In the Material expert setting, set Z Offset in the Jump tab to something like 0.5mm. You also can lower RPM a tiny bit.
Todo/Problems:
- Better testing with other small technical parts
- Reduce flat areas a bit. That may be difficult, since I do want to stick to a minimum of 10 RPM right now. But a slightly "thinner" Material style should work.
Hal style
Purpose: It is meant for printing out small delicate objects as slowly as possible. This 0.25 layers style / material combination has been tested with a small Lego piece and a hand on top. However, it will not print these at very detailed resolution since this simply can't be done with plastic rolls using the current extruder.
Style settings:
- All parts are fine and speed is always "snake" (20mm/s), 9 RPM
- Walls have 2 parts (or less if the wall is smaller)
- Print head does up and down during jumps. Else it might rip off something
- No anti-stringing. This means that the printed piece will need some post-processing (cut/burn away strings)
Directory with build and material style:
Important settings:
- You may have to print double objects next to each other. Otherwise, the plastic will be too hot. In that case you must find a good temperature. I print 5 degrees higher than usual. This is bad for quality, but good for plastic coming out.
Todo/Problems:
- Try a version for sticks at some point ....
Uma
Uma is a fairly solid and somewhat detailed 0.25mm layers style. Meant to be used for objects like duplos and figures that sit on top. However, very fine parts may not render well since the style is quite "fat". As all the others, it may need some further testing and tweaking
Build style
- 4 Walls
- High overlap with filling (meaning that it can print flat roofs)
- 4 upskin and downskin layers (creates solid roofs)
- A special first 2 layers definition (a bit fatter)
- 3 regions that are all fairly detailed
Material style
- 0.250mm layers
- Raft: Lower speed, distance Grid/Part a bit lower (0.2)
- No Z Offset with Jumps
- Slightly lower anti-stringing
Variants
- Uma-2 has thicker first 2 layers and maybe some other changes I forgot. If you print two objects side-by-side, you maybe should raise the temperate a bit.
Settings
- For DUPLOS with hollow objects on top, I'd use a rather low filling (after all she got 4 walls)
- Temperatures should be as low as possible, i.e. plastic must come out nicely. Since ABS properties change, you may have to adapt a bit. E.g. Go higher for fabbster ABS. Test flow by setting RPM to 10.
Directory with build and material style:
Tinman
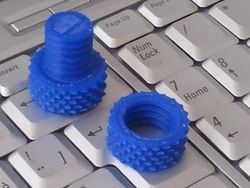
This is a 0.150mm style. It is meant for printing small solid objects (nuts and bolts). It is used with a standard netfabb Material style that is just modified for the raft. Print time for (fully filled) bolt using a standard pillar raft was about 9 minutes. This style is unsuitable for small tree-like structures (Eiffel tower, jewelry hand etc.) since it goes too fast. With plastic rolls you can't have both thin layers and snake speed.
Build style
- 2 Walls
- Only one region
- Most elements are printed thin/medium
- Hatching (as always) for upskins and downskins
Material style
- 0.150 layers size
- Default fabbster settings, except for a few things
- Raft was set to be printed a bit slower.
Variants
- Tinman-1: 2 walls
- Tinman-2: 3 walls (better for larger objects with loose fills)
Settings
- You can set fill space to none (depends on the object)
- Adjust temperature to your plastic (I use 265-270)
Directory with build and material style:
Some styles compared
The purpose of this section is not to provide any sort of serious comparison/benchmarking, but rather provide a feeling of what could be different and sometimes why....
Vanessa vs. RD2D
Vanessa only works with artistic hollow objects and Duplos. For example, a Netfabb piece, i.e. a hose retention clip designed by Gizmo, cannot be printed with Vanessa. Legos don't come out nicely either, except for the walls, since these are simple to print.
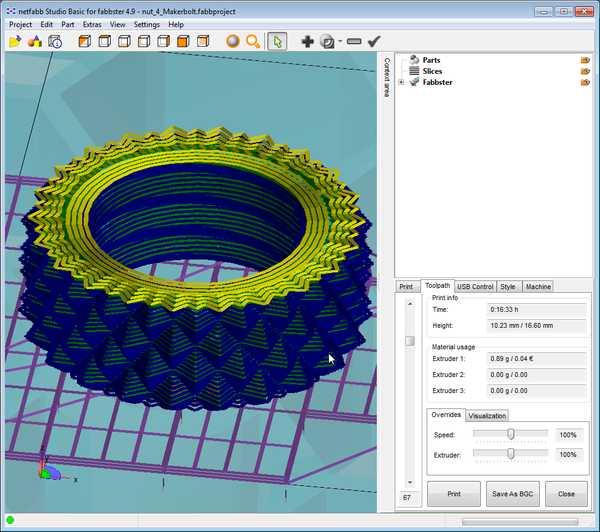
R2D prints in much more detail and can print technical pieces. It will take at least 50% more time to print. You can see such differences in the capabilities of a style by examining the layers to be be printed in the Toolpath tab. If you see interrupted paths, walls that are too thin, etc. you must switch style. BTW the official "relaxed" Fabbster style could print this too I believe (not tested)
For other objects, the difference is less important. R2D2 prints at lesser speed than Vanessa and may lead to better results with Legos (no yet tested).
R2D2 vs. Relaxed
"Relaxed" is an official build style that is fairly complex and that could print large objects and details. It also will create stiff walls, since it will use half-layers (that is 0.075mm z-spacing). That means a lot of squeeze. Without testing, we can hypothesize that this should produce stiffer walls, but maybe less pretty ones. Interestingly, despite long print time, the relaxed style does compromise with inner elements. You can see that it uses less, i.e. prints with wider filament.
Since R2D2 uses much fatter layers, it will print faster than Relaxed. However, an "artistic" object should look as good. You will see the layers, but these should appear neatly.
Vanessa vs. R2D2 vs. Relaxed
The small Lego sized woman for which the Vanessa style fits well (except for the very small parts for now) also could be printed with the R2D2 and the Relaxed styles. Using little filling (around 5mm), the estimated print time for Relaxed is 2h22 as opposed to 40 minutes for the Vanessa style. With a solid fill, Relaxed would take about 3h20m.
Relaxed creates over 1000 layers and the contours are built with 5 walls. Vanessa uses about 600 layers and contours are built with 2 walls. R2D2 is like Vanessa, but more precise and it will take some extra time.
R2D2 vs. Tinman
Tinman prints faster with smaller (0.15mm) layers and R2D2 prints slower with larger (0.25) layers. It also has more walls. For that kind of objects, Tinman provides better results, since the outside and the winding inside is trickier to print.
Outlook
I should take the design idea from the official relaxed style and create a fast 0.25mm layer style that combines all of Angelina, Vanessa, R2D2 and more. Uma is simple attempt into this direction.
I also may go down to 0.2mm and then also play with double layers (0.4mm) for easier sections.
Reusable PLA styles definitions
Since I don't have "modern" easy PLA, you may take my tips with a grain of salt. The PLA I am using was bought from BFB in december 2009. This PLA is very hard and brittle and probably quite difficult as compared to "modern" 1.75mm PLA used in more recent printers.
Getting the plastic to come out
Read this carefully.
- Limitations
- You just can't print with PLA rolls the usual way since the extruder is not made for PLA printing. (The rectangular tube above the hotend is fatally bad for this kind of plastic, and IMHO not great for ABS printing with rolls.
- Anyhow, in order to avoid clogging, you must have throughput ! That means RPM. Else the plastic will weaken above the printhead (in the rectangular tube) and nothing will come after that. That will limit the kind of object you can print as well as quality.
- Configuration issues
- Print head must be really close to the print bed and the raft in order to get the first layer printer. Don't hesitate to lower z height bit. E.g. z=-0.2mm
- For objects that have a flat bottom, don't use a raft, do not print the usual 5 dots ! No anything before the real print. Select a print area on the bed that is very close, i.e. one sheet of paper (the hot end must not touch either !)
- Create a strong traditional raft (about 50RPM) for stuff like DUPLOS. For other objects you will have difficulty taking it off (though you can with mechanical tools like a file). The raft should be a bit colder than the object (for taking it off). Too cold it will not stick however.
- RPM must be medium high. Minimum = at least 36 RPM or so, but 50 is better. You might go lower with yours or you may have to go higher. This is easy to test: Just extrude filament for a minute or longer and see if it flows ok. Then, while it flows, reduce RPM to 4 (if you can) and put 50 RPM back. This is to simulate jumps.
- PLA should never stop coming out. Do not use any anti-stringing. On the contrary, have some slight flow while traveling.
- Use a high fill. Since there is no fan, low filling patterns will just "flow/melt" downwards.
- Cheat in the calibration. Basically, don't hesitate to double or triple the default RPM for starters.
- Temperature must be exactly right. Not too cold and not too hot. With respect to the specific PLA variant you are using, you got about 5 degrees variance to play with. In addition, since the Fabbster extruder gets warm after some attempts, you may have to change the Material Style after a print. See the build styles for more information
- During printing
- After printing a raft, you should try to remove a long string that will mess up the first layer. Have a knife ready to intercept while the extruder moves forth and back to a waiting position just after printing the raft.
- Just before printing issues
- Print head must be really close to the print bed. E.g. A sheet of paper between hot end and the bed in the print area.
- Strategy A (difficult) : Insert the filament before sending off the print file. Then, while it is heating pull it half way at high speed. However, make dead sure that you stop that before it can reach the hot end. I.e. put a marker after 6.5cm on the filament. Then, as below:
- Strategy B (certainly works better with a raft):
- Don't insert the filament as above, keep it above the wheels while it is heating.
- Let it heat to about 170 Degrees, keep one hand on the filament and the other on the mouse, then act very fast ...
- Drag the RPM slider in the USB control panel to 240 (high speed) and help with pushing the filament down, but gently. You must be done before it starts printing. Usually that is the case if you act fast. If you use a raft, it doesn't matter if some "border" is missing. Also keep a flat knife nearby and remove quickly any mess that may have come out. If you can't try pushing it down.... anything.
- After printing
- Let the object cool a little bit before removing it. PLA is weak at low temperatures. However, it you printed an object with a flat bottom, then remove it with a knife or something right after
- Take the plastic filament out. Temperature to 220 or so if needed, then reverse extrude and pull (gently!). If you leave the plug, it never will heat enough and can't be pushed down in your next round ... The typical fabbster "plug" is deadly with PLA.
Yes, PLA styles will have animal names :)
Hog PLA styles
Hog styles allow to print fairly simple objects. The car above was printed in some hog-0 version I lost because I found the upskins, downskins and filling too thin. This style series is called hog because you only can print objects in a coarse resolution. Also, it will print quite fat. Flat cubic objects or even parts of objects will not work well. However you can try, e.g. I managed to print Duplos (with some hanging roofs though).
Important tricks
- Use a strong traditional raft (as defined in the hog-2/3 or a more recent Material style). A normal raft can do if your object has a flat bottom, but it that case I'd rather printer without raft.
- Depending on the raft you use, you may have to lower the part since PLA comes out a bit flatter. Try to put the model at z = 0.2mm or even lower (but not -2mm!). Negative raft/part in the Material style doesn't seem to work as of June 2012.
- Temperature must be exactly right. Unless ABS, the usable temperature with one kind of PLA is smaller. Typically, between 195 and 205 degrees, but for some PLA variants you have to go colder or warmer. In the DYI community there are least three very different PLA variants. Note: If you print warmer than recommended, the filament will get very fluid and may fall out and/or down.
- Filling is really tricky. In principle it would be best to print without filling. If you do use filling, then make it rather dense. Else it will "melt down" and after some point PLA will stop coming out since there is nothing that will "pull" from the bottom.
Build style hog-2
- 3 walls
- 4 upskins and downskins (in case the first two don't go well)
- Negative fill distance (filling and upskins/downskins bang into the walls)
- width=medium/speed=speed combination, i.e. about 54 RPM at speed = 40mm/s
... this method is more promising, in particular if you lower the z-position of the part to be printed. It prints simple hollow objects ok. Will not work with DUPLOS.
Build style hog-3
- 3 walls
- 4 upskins and downskins (in case the first two don't go well)
- Neutral fill distance (filling and upskins/downskins touch the walls)
- width=medium/speed=speed combination, i.e. about 50 RPM at speed = 45mm/s
- Filling is disabled in the BuildStyle, since without cooling fan, filling will not work (except very dense filling)
- Associated Material Style is hog-PLA-3, but another hog material also could do probably.
A picture with this style (above) shows a lady without any fill since "loose" fills will not work (they will melt down) and I didn't want to wait too long. Lack of fill contributes to bad quality. However, the lady on Duplo did print fully in about 1h20. Same for the DUPLO, The walls print just fine, but the overhang is rather bad.
Material style (hog-PLA-2)
- No anti-stringing (actually even the opposite)
- 4mm layers
- 197 degrees (on my fabbster I have to cheat a bit, since it won't cool down). The real temperatures is about 209. This is too hot for printing overhangs with this PLA. However, hotter is easier and this style can be suitable for easy hollow objects without any overhangs. Adjust to your PLA !
Material style (hog-PLA-3)
- No anti-stringing (actually even the opposite)
- 4mm layers
- 195 degrees (raft) - 198 degrees (rest). On my fabbster I have to cheat a bit, since it won't cool down). The real temperatures is about 203. Adjust to your PLA ! Also, after printing 1-2 objects you can lower the temperature a bit (since the fabbster extruder doesn't cool down)
Discussion
- Version two is much to fat. You could raise print speed, but do not lower the RPMs ! Version three is less fat and prints a bit colder. It provides better results but is more "fragile" due to the lower temperature. So you could raise it a bit.
Download
Rhino PLA styles
Rhino styles are similar to hog-3, but has filling added, smaller layers and faster printing. With PLA you must use a dense filling (slider to the left) or everything will crumble down.
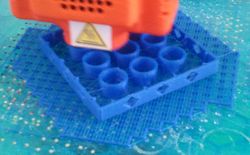
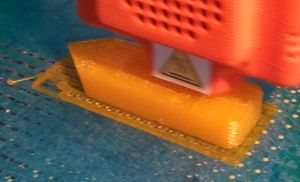
Purpose: Build simple "squared" objects with fills, like a tugboat. Rhino-2 produces a better tugboat despite higher speed. It's got smaller and thinner layers.

Important tricks
- Use the normal traditional raft (Rhino-1) or the strong traditional raft (Rhino-2)
- Set the part to -0.3 mm or so, else it may not stick to the raft. If it does not, then go lower still or change something in the Raft definition of the Material style !
- Use dense filling, e.g. 1.2mm (slider to the left)
- Rhino-1 Build style (with Rhino-1 material !)
- Mostly medium speed/medium width (50 RPM)
- Fat/fast combination for filling (80RPM)
- Width factor of Upskin at 130 (to compensate for "fatter" printing)
... If you use another material style, things will change
- Rhino-1 Material style
- "Fat" 0.4mm layers
- Hotter temperatures (200 - 205 degrees) to insure that the fills can be printed. Hotter is worse, but at the same time, colder means that no filament will come out when the fills somewhat crumble down. Can't have both...
- Rather fast filling (to reduce wait time), but high RPM to insure flow.
- The result should be even uglier than hog-3 because of the higher temperatures. That means that you also could try Rhino-1 build style with hog-PLA Material styles, e.g. hog-PLA-3
- Rhino-2 Build style (with Rhino-2 material !)
- Mostly fast speed/thin width (44 RPM)
- medium/fast combination for filling (50RPM)
- Width factor of Upskin at 130 (to compensate for "fatter" printing)
- Rhino-2 Material style
- 0.35mm layers
- Hotter temperatures (200 - 205 degrees) to insure that the fills can be printed. Hotter is worse, but at the same time, colder means that no filament will come out when the fills somewhat crumble down. Can't have both...
- Rather fast filling (to reduce wait time), but high RPM to insure flow.
- The result should be even uglier than hog-3 because of the higher temperatures. That means that you also could try Rhino-1 build style with hog-PLA Material styles, e.g. hog-PLA-3
- Download


