Stitch Era embroidery software: Difference between revisions
m (using an external editor) |
m (using an external editor) |
||
| Line 1: | Line 1: | ||
{{embroidery|Overview article}} | |||
{{Incomplete}} | {{Incomplete}} | ||
<pageby nominor="false" comments="false"/> | <pageby nominor="false" comments="false"/> | ||
| Line 281: | Line 282: | ||
; Tutorials in other languages | ; Tutorials in other languages | ||
* [http://www.stitchera.fr/aide.html Tutoriels vidéo et traduction française du manuel] par Chantal. | * [http://www.stitchera.fr/aide.html Tutoriels vidéo et traduction française du manuel] par Chantal. | ||
Revision as of 11:51, 9 June 2011
<pageby nominor="false" comments="false"/>
Introduction
Stitch Era Universal (sometimes abbreviated as SEU by Sierra is an advanced free embroidery design software. It's features include:
- Built-in vector drawing and import of vector art
- Bitmap tracing (translation to vector drawings) and import of raster files
- Conversion of vector graphic parts (lines and fills) to corresponding stitch sections (both automatics and semi-manual)
- Advanced stitch section editing/configuration, e.g. changing fill patterns, reordering, thread colors, stitch editing, etc.
- Lettering
The purpose of this entry is to help people get going past the very first steps by writing down our own experience while we still remember the more difficult issues. We started learning embroidery in mid-may 2011, therefore don't trust everything you read for now. Think ! This entry will never become a complete stitch era manual. Again, I just will use it to write down a few tricks and tips while I learn myself. Finally, I also may split contents over several articles at some point. So far I am quite impressed with this software and believe that it can beat most other consumer products - Daniel K. Schneider 16:49, 16 May 2011 (CEST).
Stitch Era tutorials:
See also general articles:
Tip: Most images in this article can be enlarged by clicking on them...
Availability and download
You can get Stitch Era Universal under certain conditions:
- You only get it from an authorized dealer. E.g. since I live in France, I got it from the french authorized reseller. For countries like Switzerland that do not have authorized resellers you will have to send some mail to headquarters.
- You need to register and obtain a license number and key (and renew these periodically)
- The application must be connected to the Internet permanently and there are advertisements. However they don't flicker, just eat up some space to the right.
- The free version limits stitch count to 40'000 stitches. That's a fairly large design, unless you fill up all the space with stitches.
Stitch Era Universal is distributed by Authorized Distributors (either via CD or online) unless you are lucky to live in a country without. Installation and use requires a permanent Internet connection. Software contains advertising. Download can take a long time and you need to find a download site for your country (e.g. for France use Annika's site). You first have to install a downloader, then a download the > 400 MB installation files with the downloader program.
After going through the complicated finding-a-place-to-download, the double download and authentication, we found that this program runs fine on Win 7 64 bit.
Issues
- The program may sometimes enter infinite error loops with different types of mistakes: We encountered:
- Vector our of bounds errors (e.g. the program tries to draw outside its window).
- Access violations (don't know what kind of library or other program it tries to access)
- Out of memory errors
In these cases, the program must be killed with the Windows task manager. This happened to us in several situations, but always when moving/resizing stitching or combined stitching/vector objects in the work area.
- After a longer pause, the program will take some time to wake up. This probably will not happen with the commercial product
Therefore:
- Save before moving/resizing operations, although there is an automatic autosave that automatically will open the safe file after a crash.
- Proceed slowly when editing large and messy designs (e.g. bitmap traced designs)
We also noticed that after a few days of using specific features of the program, errors became very rare. Runtime errors mentioned above may be related to operations an informed user would not do. E.g. when I reshape some area now, I do it a the vector level and then just reprocess. This way the original vector drawing also could be reused for other projects. I also may have slowed down with removing nodes.
The user interface
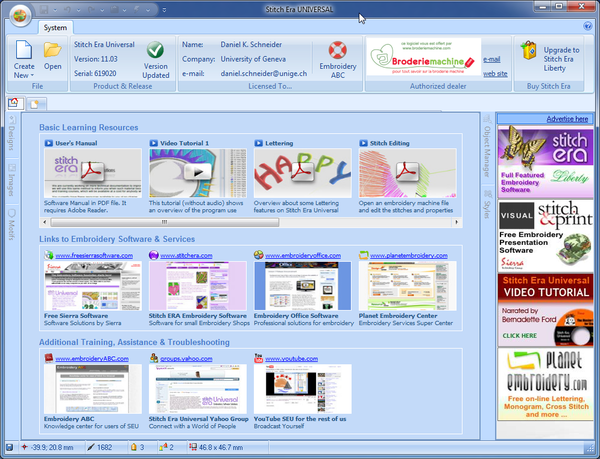
At start up, Stitch Era software that does have a license and a key should look like this:
- Before you click on Create New, download the manual and read some of it (first item under Basic Learning Resources in this startup screen).
- For a new design, select quick start using a simple wizard. You then can specify textile and hoop size (ordered by machines).
The interface is fairly complex and we really suggest reading at least parts of the manual and/or looking at some training videos. Links for documentation is available in the start-up screen for example.
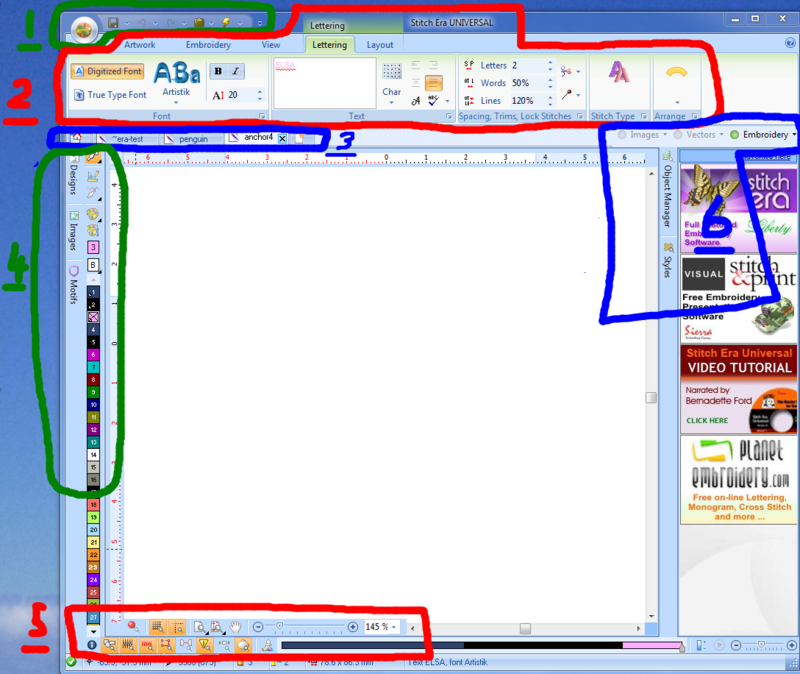
The annotated screen capture below shows the most important areas of the user interface.
Below is a very provisional tools overview.
- File Menu button and quick access toolbar
- Main tools / Ribbon bar. These can change contextually.
- Artwork
- Allows to import bitmaps and vector graphics
- Draw vector shapes that do not include stitching information yet. This is maybe the preferred way to start drawings as opposed to directly inserting stitch parts available through the Embroidery tab or Designs->Create sections.
- Embroidery
- Define materials and hoop
- Retrieve patterns
- Allows to insert stitch parts
- View
- Allows to define various view parameters (including a refresh button and a satellite view)
- Includes snap and measure tools
- Body
- Change parameters of a fill (shapes)
- Border
- Change parameters of a stroke (lines)
- Layout (Rescale, rotation, etc. but also repetitions)
- Tabs on top of ribbon bar show types of selected object and help you understanding what you can do with it.
- Area (shows what you can change for a selected part, i.e Body+Border+Layout)
- Path (shows what you can change for a stroke, i.e. border + layout)
- Lettering (shows that you can change lettering and layout)
- Block (shows that you selected more than one object)
- Artwork (shows what you can do with selected vector graphics)
- Convert (shows that you could convert a vector image to stitches)
- Package ?
- Artwork
- Document bar
- Allows to open/close documents and create new ones.
- Clicking on the home icon will bring you to the start page.
- Create and edit tools / color management / color palette
- Designs
- Select Object (press mouse button for a while for options): Press this to return to select mode !
- Create Sections: Define how to create new different kinds of parts, i.e. fills vs. strokes, kind of stitches.
- Edit Stitches
- Images (changes contextually, e.g.:
- When stitchable object is selected: Change Color palette and optimize Needles
- When a vector object is selected: Change color, etc.
- Motifs
- Provide information about "needles" that will be used. In single needle machine, think of this as threads that you will have to change.
- Double-click allows to change parameters, e.g. the color, thread make/model and number.
- Designs
- Display and reference controls (at the bottom)
- Object manager and Styles (to the right)
- The three little toggle buttons (images, vectors and embroidery) allow to show/hide these types of objects
- The object manager gives you fine grained control over both vector objects and stitch objects.
Lettering
There two basic ways for creating letters
- Start from vector letters and then convert to stitches. This may work with large letters and even then not lead to optimal results since digitizing stitcheable letters is an art by itself ....
- Use specialized lettering software that can produce stitches from letters. In the SEU program, Words are represented as Stitching objects of type Text. Each text then is composed of either simple characters (like a "c") or composed characters like an "m". This probably also depends on the font. There are two kinds of built-in lettering fonts:
- Special purpose digitized "artistic fonts"
- Standard digitized true type fonts.
Good lettering software will recompute the stitches when you change font type and/or font size.
In SEU digitized words are editable, i.e. you can fix spelling mistakes (see below)
Word editing
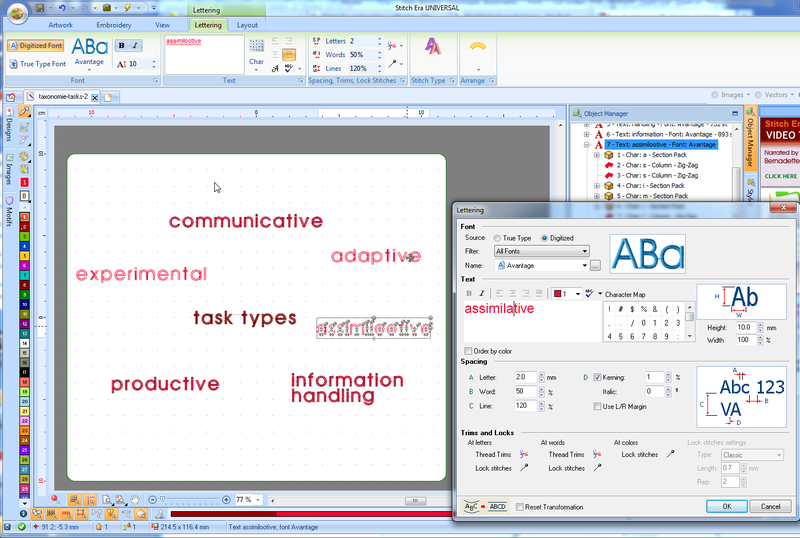
The Lettering panel that allows to edit text, is available through the context menu (select the object, right click on the object and select Text properties) or as expansion of the text panel in the main menu bar.
This panel allows to edit text, to change fonts, size, distances. In addition you may specify trims and locks.
Tips:
- We found it very good voodoo to tick Reset Transformation after changing sizes and distances. Somehow, the Reprocess All (lightning button in the quick access bar) doesn't reprocess all the time. E.g. for small letters (smaller than recommended), the textbox is not resized without ticking "reset transformation".
How small can one print ?
After a little test we believe that one could go as low as 5mm in height under the following conditions:
- fabric must be flat
- fabric must be stabilized
- contrast between fabric and letters must be high
- Stitching speed should be slowed down a bit
- Using small (fine) needles and finer threads
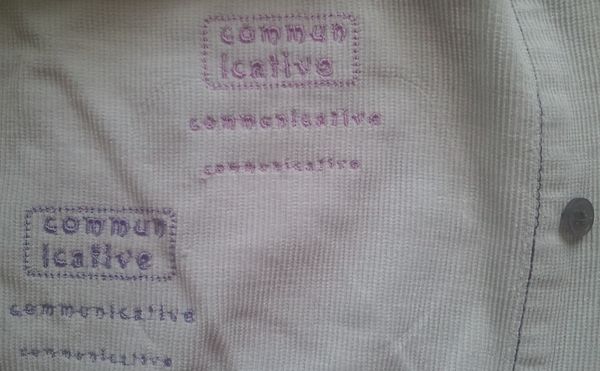
The following picture shows a test that doesn't respect these principles:
- Top right uses the the digitized Artistik font with sizes 10mm, 7mm and 5mm
- Bottom left group used the True Type Arial Rounded MT font with the same sizes
Both were made with Rayon 40 thread and a 0.75 mm needle.
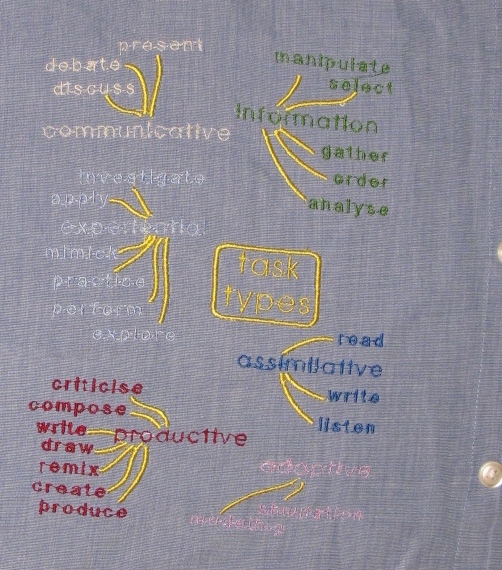
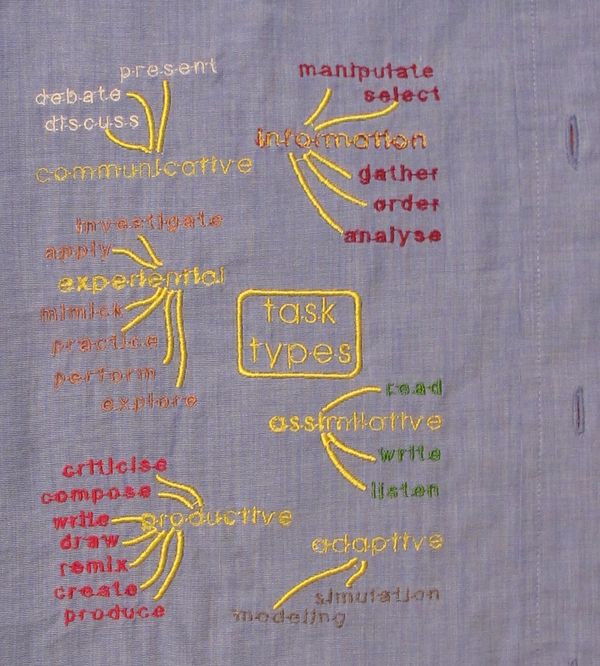
We produced a more ambitious design using 8mm Arial MS for the small words and a built-in digitized font for the others. Textile was a cotton shirt. A first version was without stabilizer.
For the second one we used a iron-on / tear away stabilizer and the results are slightly better. We also changed the colors and made a test with (manual) overprinting of some words. A future version should use either fatter fonts or use running stitches.
Here is a picture of the partially removed stabilizer. I find the stitches a bit too fat, i.e. such a shirt wouldn't be a comfortable thing to wear.
Open questions:
- Is is possible to print digitized fonts otherwise than with a zig-zag technique, i.e. use straight lines instead ? Below 1mm, zig-zag does seem to have problems. We tried to convert stitching to vectors and then to redigitize, but at some point the program crashed. Otherwise one also could change the stitch patterns. To explore more ....
- How much work is editing at the stitch level in order to fix some badly converted characters? We found that "w"'s are not well liked when working with "tiny" Arial and similar fonts.
- How "light" can a readable fill pattern be ?
Availability and download
You can get Stitch Era Universal under certain conditions:
- You only get it from an authorized dealer. E.g. since I live in France, I got it from the french authorized reseller. For countries like Switzerland that do not have authorized resellers you will have to send some mail to headquarters.
- You need to register and obtain a license number and key (and renew these periodically)
- The application must be connected to the Internet permanently and there are advertisements. However they don't flicker, just eat up some space to the right.
- The free version limits stitch count to 40'000 stitches. That's a fairly large design, unless you fill up all the space with stitches.
Stitch Era Universal is distributed by Authorized Distributors (either via CD or online) unless you are lucky to live in a country without. Installation and use requires a permanent Internet connection. Software contains advertising. Download can take a long time and you need to find a download site for your country (e.g. for France use Annika's site). You first have to install a downloader, then a download the > 400 MB installation files with the downloader program.
After going through the complicated finding-a-place-to-download, the double download and authentication, we found that this program runs fine on Win 7 64 bit.
Issues
- The program may sometimes enter infinite error loops with different types of mistakes: We encountered:
- Vector our of bounds errors (e.g. the program tries to draw outside its window).
- Access violations (don't know what kind of library or other program it tries to access)
- Out of memory errors
In these cases, the program must be killed with the Windows task manager. This happened to us in several situations, but always when moving/resizing stitching or combined stitching/vector objects in the work area.
- After a longer pause, the program will take some time to wake up. This probably will not happen with the commercial product
Therefore:
- Save before moving/resizing operations, although there is an automatic autosave that automatically will open the safe file after a crash.
- Proceed slowly when editing large and messy designs (e.g. bitmap traced designs)
We also noticed that after a few days of using specific features of the program, errors became very rare. Runtime errors mentioned above may be related to operations an informed user would not do. E.g. when I reshape some area now, I do it a the vector level and then just reprocess. This way the original vector drawing also could be reused for other projects. I also may have slowed down with removing nodes.
The user interface
At start up, Stitch Era software that does have a license and a key should look like this:
- Before you click on Create New, download the manual and read some of it (first item under Basic Learning Resources in this startup screen).
- For a new design, select quick start using a simple wizard. You then can specify textile and hoop size (ordered by machines).
The interface is fairly complex and we really suggest reading at least parts of the manual and/or looking at some training videos. Links for documentation is available in the start-up screen for example.
The annotated screen capture below shows the most important areas of the user interface.
Below is a very provisional tools overview.
- File Menu button and quick access toolbar
- Main tools / Ribbon bar. These can change contextually.
- Artwork
- Allows to import bitmaps and vector graphics
- Draw vector shapes that do not include stitching information yet. This is maybe the preferred way to start drawings as opposed to directly inserting stitch parts available through the Embroidery tab or Designs->Create sections.
- Embroidery
- Define materials and hoop
- Retrieve patterns
- Allows to insert stitch parts
- View
- Allows to define various view parameters (including a refresh button and a satellite view)
- Includes snap and measure tools
- Body
- Change parameters of a fill (shapes)
- Border
- Change parameters of a stroke (lines)
- Layout (Rescale, rotation, etc. but also repetitions)
- Tabs on top of ribbon bar show types of selected object and help you understanding what you can do with it.
- Area (shows what you can change for a selected part, i.e Body+Border+Layout)
- Path (shows what you can change for a stroke, i.e. border + layout)
- Lettering (shows that you can change lettering and layout)
- Block (shows that you selected more than one object)
- Artwork (shows what you can do with selected vector graphics)
- Convert (shows that you could convert a vector image to stitches)
- Package ?
- Artwork
- Document bar
- Allows to open/close documents and create new ones.
- Clicking on the home icon will bring you to the start page.
- Create and edit tools / color management / color palette
- Designs
- Select Object (press mouse button for a while for options): Press this to return to select mode !
- Create Sections: Define how to create new different kinds of parts, i.e. fills vs. strokes, kind of stitches.
- Edit Stitches
- Images (changes contextually, e.g.:
- When stitchable object is selected: Change Color palette and optimize Needles
- When a vector object is selected: Change color, etc.
- Motifs
- Provide information about "needles" that will be used. In single needle machine, think of this as threads that you will have to change.
- Double-click allows to change parameters, e.g. the color, thread make/model and number.
- Designs
- Display and reference controls (at the bottom)
- Object manager and Styles (to the right)
- The three little toggle buttons (images, vectors and embroidery) allow to show/hide these types of objects
- The object manager gives you fine grained control over both vector objects and stitch objects.
Drawing embroidery objects
Instead of drawing vector objects first you can directly create embroidery objects.
- Select embroidery in the main menu bar on top or select "Create Sections" in the little design panel to the left.
Links
- Official
- Stitch Era Universal Website #1
- stitchera website #2
- EmbroideryABC webiste #3
- Official documentation and forums
- Stitch era distributes a nice 250 page printable PDF manual (see the start page). Last time checked it was here.
- The Stitch era community formus
- Yahoo group StitchEraUniversal
- YouTube training and demo videos
- Tutorials in other languages
- Tutoriels vidéo et traduction française du manuel par Chantal.
