Stitch Era - lettering
Introduction
This is a beginner's tutorial for the Stitch Era embroidery software. It explains how to create letters
Disclaimer: Made by someone who started about embroidery and digitizing in May 2011. I will revise this once I understand more - Daniel K. Schneider 11:00, 9 June 2011 (CEST).
There several ways for creating letters
1) Use the built-in lettering software module
This specialized lettering module can directly produce stitches from phrases you type in. In the SEU program, Words are represented as Stitching objects of type Text. Each text then is composed of either simple characters (like a "c") or composed characters like an "m". This probably also depends on the font. We shall show examples below.
There are two kinds of built-in lettering fonts:
- Special purpose digitized "artistic fonts". These are usally better for large fonts and dont' work with tiny fonts (e.g. 5-8mm)
- Standard digitized true type fonts. These work at all sizes but not be as pretty.
In SEU digitized words are editable, i.e. you can fix spelling mistakes (see below). You also can edit the individual stitch sections through vector graphics manipulations or go down to the stitch level in order to make some fixes.
Tip: If you play with various sizes and fonts, turn automatic generate off in the lightning pull down button in the quick access bar on top left. You then will have to click the button in order to generate the stitches. Good lettering software will recompute the stitches when you change font type and/or font size and that takes time ...

2) Import letters as vector graphics
Such letters can for example be made with Powerpoint, then exported to EMF and copy/pasted to Stitch Era. This may not always work. In that case, try using a vector drawing program. In both cases importing a vector design (e.g. a simple stupid EMF file) first to Illustrator then importing via CorelDraw to Stitch Era does produce good results. I managed to create usable 6.5mm letters.
This strategy works with both large and small letters, but may not lead to optimal results with larger letters since digitizing nice stitcheable letters is an art by itself. However, I got better results than what I expected as you can see in some other tutorials. E.g. the MediWiki Logo that has larger letters and the publish "button" has 6.5mm letters that still can be optimized I believe.
3) Use built-in vector true type fonts and then auto-digitize
I found the result rather sub-optimal, although I only tried small letters. We discuss this below.
4) Draw letters yourself with vector graphics
You could do this either in Stitch Era or in any other Vector drawing program. This is very difficult. Fonts are not trivial
5) Stitch by stitch edit letters
This is an option for a professional design. You probably would import some vector graphics using an interesting font, but then instead of auto-digitizing, you would manually create curved stitch sections.
Inserting phrases with the built-in lettering module
The built-in lettering module should generally produce better result than digitizing artwork (vector graphics or bitmas), since each letter has been optimized for the logic of stitches.
To insert a phrase, click on the Embroidery tab, then Lettering. This will directly produce stitch sections according to parameters selected in the top menu panel.

You can change parameters in three different places.
(1) A lettering pull-out menu in the Text and also in the Spacing, Trims, etc. ribbon centralizes basic customization, such as fonts, font-types (true type or digitized) spacings, alignment (see below).
(2) Some of these parameters can be directly changed in the ribbon menu
(3) The pull-out menu in the Stitch Type ribbon allows to fine tune stitch generation (see below).
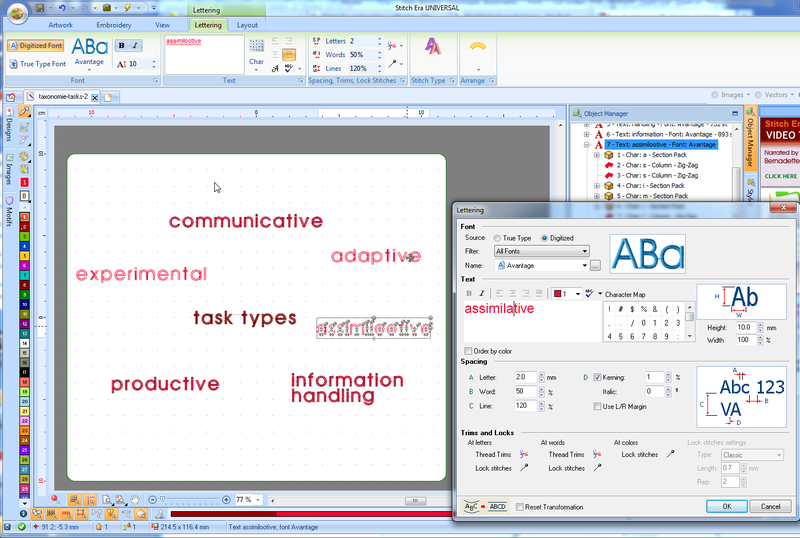
The lettering pop-up panel - editing text
The Lettering panel allows to edit text and change most properties. You likely will not see it when you start using Stitch Era. It is available through two ways:
- the context menu (select the Text object, right click on the object and select Text properties)
- As pull-out (expansion) menu Font, Text and Spacing,Trims, etc. ribbon panels in the main menu bar.
This panel allows to edit text, to change fonts, size, distances. In addition you may specify trims and locks.
Some tips:
- Digitized fonts work well for larger sizes (15mm and bigger) and also may work for smaller sizes depending on the font.
- True type fonts work better for smaller sizes (8-10mm)
- In version 11, we found it very good voodoo to tick Reset Transformation after changing sizes and distances. Somehow, the Reprocess All (lightning button in the quick access bar) doesn't reprocess all the box size. E.g. for small letters (smaller than recommended), the text box is not resized without ticking "reset transformation".
Tuning stitch generation
The Stitch type pull-out popup allows defining various Stitch parameters, e.g. density. There are different customization levels. E.g. if you want to change the fill pattern from zig-zag to a pattern stich you will have to use level 2.

Changing the shape of "embroidery" lettering
Shapes can be changed through the Arrange menu. Just select a kind of shape you want, then read on ...

Changing the shape of a phrase made with the embroidery - lettering tool is really easy. For each shape variant selected, you must explore the different handles (i.e. move around the little dots that will show outside of the text shape....). Make sure not to select individual letters, unless you wish to work at that level. If you have trouble selecting the whole text shape, use the object manager to the right (easier).

- Simple shapes (i.e. the ones in yellow) usually have between 4 and six usable control points and are more manageable
- Complex shapes (i.e. the grey ones like the user distortion one that you can see above) may have more handles.
Large letters and lock stitches
Disclaimer: not yet tested ! - Daniel K. Schneider 17:46, 13 June 2011 (CEST)
When you create large letters, you might want to create lock stitches at start and end of each letter. To do so we suggest using the following procedure before you insert the text:
Open the lettering panel (expansion menu in the lower right corner of the spaces, trims lock stitches panel
- click on Lock stitches at the bottoem
- Define the lock stitch
You also could add trims if you like, but then you will have to re-thread again

In order to add lock stitches to individual letters that you already created:
- Open the Object Manger (tab to the right of the workspace panel)
- Click on the Text section
- Click on the Char ... section pack if needed. Many letters are represented by more than just one Zigzag column
- Insert lock stitches through the More tab in the Object inspector as shown below

How small can one print ?
After a little test we believe that one could go as low as 5mm in height under the following conditions:
- fabric must be flat
- fabric must be stabilized
- contrast between fabric and letters must be high
- Stitching speed should be slowed down a bit
- Using small (fine) needles and finer threads
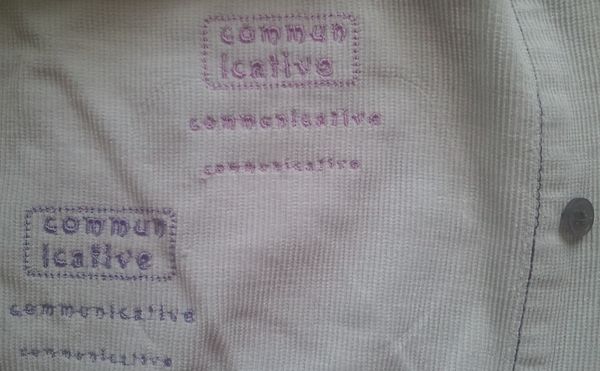
The following picture shows a test that doesn't respect these principles:
- Top right uses the the digitized Artistik font with sizes 10mm, 7mm and 5mm
- Bottom left group used the True Type Arial Rounded MT font with the same sizes
Both were made with Rayon 40 thread and a 0.75 mm needle.
We produced a more ambitious design using 8mm Arial MS for the small words and a built-in digitized font for the others. Textile was a cotton shirt. A first version was without stabilizer.
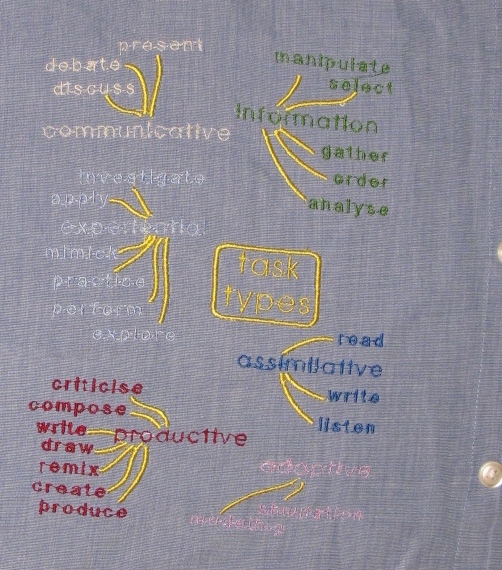
For the second one we used a iron-on / tear away stabilizer and the results are slightly better. We also changed the colors and made a test with (manual) overprinting of some words. A future version should use either fatter fonts or use running stitches.
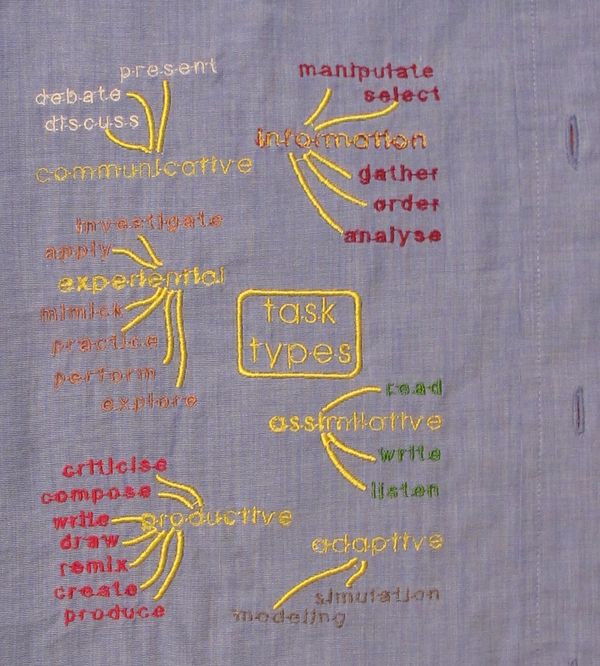
Here is a picture of the partially removed stabilizer. I find the stitches a bit too fat, i.e. such a shirt wouldn't be a comfortable thing to wear.

Open questions:
- Is is possible to print digitized fonts otherwise than with a zig-zag technique, i.e. use straight lines instead ? Below 1mm, zig-zag does seem to have problems.
- How much work is editing at the stitch level in order to fix some badly converted characters? We found that "w"'s are not well liked when working with "tiny" Arial and similar fonts.
- How "light" can a readable fill pattern be ?
Lettering with vector graphics
You also can either import lettering made with a vector graphics program or use the text functionality in Stitch era's vector drawing tool.
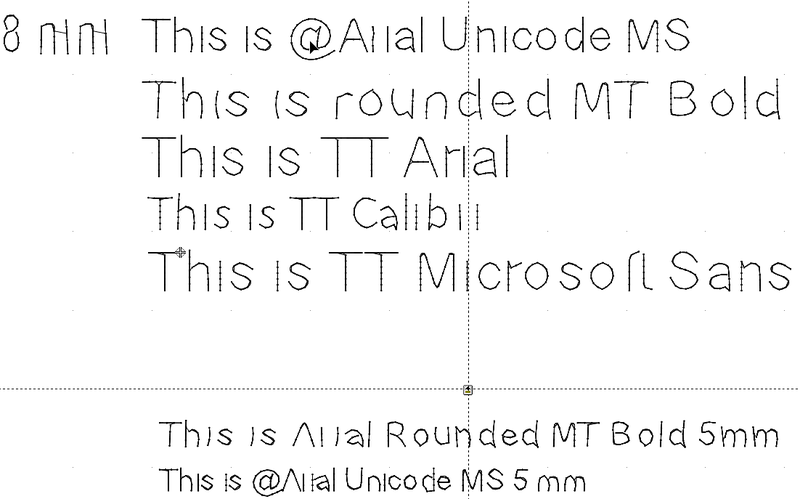
Since we are interested in producing small letters, we also wondered whether we could print small letters with running stitches. We made a quick test:
Using Stitch Era Vector Drawing True type fonts
Starting point:
- A few lines of text with various type faces using 8mm
- Conversion as shown in the following screen capture, in particular:
- stitch-length = 0.8mm (very small)
- inhibit the program to use zig-zag or fills.
- Repeat 3 times (that's too much, I should try 2 next time)

Result:
... Made with SEU Design version 11, the result was not very convincing, i.e. some letters would need manual editing of stitch paths. That's not difficult, but too tedious with respect to the time I have.
Importing vector shapes
We currently believe that importing vector graphics of small letters gives better results. Read Stitch Era - digitizing difficult images, i.e. the section on PowerPoint import.
E.g. the following was made with power point (pptx) using 36pt fonts, imported to Illustrator, smoothed a bit, imported to Stitch Era and reduced in size (about 30%).
