HTML forms tutorial: Difference between revisions
mNo edit summary |
mNo edit summary |
||
| Line 211: | Line 211: | ||
* People that deal with style (CSS) | * People that deal with style (CSS) | ||
* People that deal with contents (usually through a [[CMS]] | * People that deal with contents (usually through a [[CMS]] | ||
* People that deal with client coding (either HTML, HTML forms | * People that deal with client coding (either HTML, HTML forms plus JavaScript or [[portalware]] configuration plus templating) | ||
* People that deal with server-side coding | * People that deal with server-side coding | ||
* People that deal with database issues | * People that deal with database issues | ||
An other trend is represented by the so-called [[ | An other trend is represented by the so-called [[AJAX]] technique which is a combination of: | ||
: XHTML (or HTML) and CSS, for marking up and styling information. | : XHTML (or HTML) and CSS, for marking up and styling information. | ||
: The DOM accessed with a client-side scripting language, usually ECMAScript (JavaScript) | : The DOM accessed with a client-side scripting language, usually ECMAScript (JavaScript) | ||
| Line 307: | Line 307: | ||
<source lang="xml"> | <source lang="xml"> | ||
<!DOCTYPE html PUBLIC "-//W3C//DTD XHTML 1.0 Transitional//EN" "http://www.w3.org/TR/xhtml1/DTD/xhtml1-transitional.dtd"> | <!DOCTYPE html PUBLIC "-//W3C//DTD XHTML 1.0 Transitional//EN" | ||
"http://www.w3.org/TR/xhtml1/DTD/xhtml1-transitional.dtd"> | |||
<html xmlns="http://www.w3.org/1999/xhtml" lang="en"> | <html xmlns="http://www.w3.org/1999/xhtml" lang="en"> | ||
<head> | <head> | ||
| Line 464: | Line 465: | ||
} | } | ||
info += "\nLet's see what we get when we get elements by name \n"; | info += "\nLet's see what we get when we get elements by name \n"; | ||
info += "f.elements['color'] returns a list since we got several: " + f.elements['color'] + "\n"; | info += "f.elements['color'] returns a list since we got several: " | ||
info += "f.elements['color'][0] returns the first element (red): " + f.elements['color'][0] + "\n"; | + f.elements['color'] + "\n"; | ||
info += "f.elements['color'][0].value gives the first object's value: " + f.elements['color'][0].value + "\n"; | info += "f.elements['color'][0] returns the first element (red): " | ||
info += "f.elements['color'][0].checked gives the first object's checked: " + f.elements['color'][0].checked + "\n"; | + f.elements['color'][0] + "\n"; | ||
info += "f.elements['red'] gives a single object 3 element : " | info += "f.elements['color'][0].value gives the first object's value: " | ||
info += "f.elements['red'].value gives the object 3 element's value: " | + f.elements['color'][0].value + "\n"; | ||
info += "f.elements['red'].checked gives the object 3 element's checked: " | info += "f.elements['color'][0].checked gives the first object's checked: " | ||
+ f.elements['color'][0].checked + "\n"; | |||
info += "f.elements['red'] gives a single object 3 element : " | |||
+ f.elements['red'] + "\n"; | |||
info += "f.elements['red'].value gives the object 3 element's value: " | |||
+ f.elements['red'].value + "\n"; | |||
info += "f.elements['red'].checked gives the object 3 element's checked: " | |||
+ f.elements['red'].checked + "\n"; | |||
alert (info); | alert (info); | ||
return false; | return false; | ||
| Line 517: | Line 525: | ||
=== Form validation === | === Form validation === | ||
JavaScript is often used to validate forms, i.e. make sure that user fill in all the elements. You may find many form validation scripts on the Internet, some of which are listed in the [[ | JavaScript is often used to validate forms, i.e. make sure that user fill in all the elements. You may find many form validation scripts on the Internet, some of which are listed in the [[JavaScript links]] entry in this wiki. | ||
Below we present a simple [http://tecfa.unige.ch/guides/js/ex/coap/week-3/6-form-validation.html example to validate radio and checkboxes input]: | Below we present a simple [http://tecfa.unige.ch/guides/js/ex/coap/week-3/6-form-validation.html example to validate radio and checkboxes input]: | ||
| Line 590: | Line 598: | ||
var ok = true; | var ok = true; | ||
if (!(f.elements['color'][0].checked||f.elements['color'][1].checked||f.elements['color'][2].checked)) { | if (!(f.elements['color'][0].checked||f.elements['color'][1].checked | ||
||f.elements['color'][2].checked)) { | |||
ok = false; | ok = false; | ||
feedback+="Please select at least a color from the first color list! \n"; | feedback+="Please select at least a color from the first color list! \n"; | ||
} | } | ||
if (!(f.elements['metallicred'].checked||f.elements['metallicblue'].checked||f.elements['metallicgreen'].checked)) { | if (!(f.elements['metallicred'].checked||f.elements['metallicblue'].checked | ||
||f.elements['metallicgreen'].checked)) { | |||
ok = false; | ok = false; | ||
feedback+="Please select at least a color for the metallic list! \n"; | feedback+="Please select at least a color for the metallic list! \n"; | ||
| Line 621: | Line 631: | ||
<p>Below is a simple form with checkboxes and radio buttons, please fill it in.</p> | <p>Below is a simple form with checkboxes and radio buttons, please fill it in.</p> | ||
<form name="quiz" action="#" method="get" onsubmit="give_feedback();validate(this);"> | <form name="quiz" action="#" method="get" | ||
onsubmit="give_feedback();validate(this);"> | |||
<p> | <p> | ||
Tick colors you like (each checkbox has same name) | Tick colors you like (each checkbox has same name) | ||
| Line 653: | Line 664: | ||
</p> | </p> | ||
<input type="submit" value="Hit me"/> | <input type="submit" value="Hit me"/> | ||
</form> | </form> | ||
</body> | </body> | ||
| Line 665: | Line 673: | ||
* To check if the user selected a radio-button to retrieve a selection value we wrote a little function. <code>function get_selected_radio_value (list)</code> will take a DOM node list representing a series of checkboxes. | * To check if the user selected a radio-button to retrieve a selection value we wrote a little function. <code>function get_selected_radio_value (list)</code> will take a DOM node list representing a series of checkboxes. | ||
<source lang="javascript"> | <source lang="javascript"> | ||
function get_selected_radio_value (list) { | function get_selected_radio_value (list) { | ||
var selection = false; | var selection = false; | ||
| Line 680: | Line 687: | ||
To test if someone picked a value from a color group we use code like: | To test if someone picked a value from a color group we use code like: | ||
if (!(f.elements['color'][0].checked||f.elements['color'][1].checked||f.elements['color'][2].checked)) { | <source lang="javascript"> | ||
if (!(f.elements['color'][0].checked||f.elements['color'][1].checked | |||
||f.elements['color'][2].checked)) { ....} | |||
or | or | ||
(!(f.elements['metallicred'].checked||f.elements['metallicblue'].checked||f.elements['metallicgreen'].checked)) | (!(f.elements['metallicred'].checked||f.elements['metallicblue'].checked | ||
||f.elements['metallicgreen'].checked)) { .... } | |||
</source> | </source> | ||
Revision as of 15:25, 4 October 2009
This article or section is currently under construction
In principle, someone is working on it and there should be a better version in a not so distant future.
If you want to modify this page, please discuss it with the person working on it (see the "history")
<pageby nominor="false" comments="false"/>
Introduction
- Learning goals
- Learn function an purpose of HTML forms
- Learn how to code some kinds of forms
- Understand how JavaScript may be used to process forms
- Understand how forms can be processed with PHP
- Prerequisites
- HTML and XHTML elements and attributes
- See also: HTML and XHTML for some background information and HTML links for a page with pointers (e.g. to other HTML tutorials)
- Concurrent
- Moving on
- See the list of web technology tutorials
- Level and target population
- Beginners
- Remarks
- For the moment, this article is intended to be a "handout" for "lab" teaching. In other words, a teacher + hands-on activities are needed. In addition, we don't explain how to use a specific editing tool.
- To do: Add some more tags and attributes, some additional explantions for each tag, an HTML forms tutorial, etc.
HTML Forms are the "basic" HTML elements for client or server-side interactivity. DHTML (i.e. the combination of HTML, DOM, JavaScript and CSS add extra possibilities.
Let's discuss a short example:
<?xml version = "1.0" encoding="UTF-8"?>
<!DOCTYPE html PUBLIC "-//W3C//DTD XHTML 1.0 Transitional//EN"
   "http://www.w3.org/TR/xhtml1/DTD/xhtml1-transitional.dtd">
<html xmlns = "http://www.w3.org/1999/xhtml">
  <head>
    <title>HTML form</title>
    <meta http-equiv="Content-Type" content="text/html;charset=utf-8" />
  </head>

  <body>

    <h1>HTML form elements</h1>

<form method="get" action="#">

<h2>Personal data</h2>

<p>
<strong>Name</strong><br/>
<input type="text" name="name" size="25" />
</p>

<p>
<strong>Firstname</strong><br/>
<input type="text" name="firstname" size="25"/>
</p>

<p>
<strong>I'd like to have some documentation</strong>
<input type="checkbox" name="doc_wanted"/>
</p>

<p>
<strong>Countries I visited</strong>
<select name="country" size=1>
	  <option>CH:  Switzeland</option>
	  <option>D:   Germany</option>
	  <option>F:   France</option>
	  <option>A:   Austria</option>
	  <option>I:   Italy</option>
	</select>
</p>
<p>
<strong>Gender</strong>
<input type="radio" name="gender" value="1"/>Male
<input type="radio" name="gender" value="2"/>Female
</p>

<p>
<strong>Preferred main color</strong>
<input type="radio" name="colorprefs" value="y"/>Yellow
<input type="radio" name="colorprefs" value="b"/>Blue
<input type="radio" name="colorprefs" value="r"/>Red
<input type="radio" name="colorprefs" value="g"/>Green
</p>

<h2>Majoring in</h2>
Vous may choose more than one:
<p>
<input type="checkbox" name="domain1" />Education
<input type="checkbox" name="domain2" />Psychologie
<input type="checkbox" name="domain3" />Computer Science
<input type="checkbox" name="domain4" />International Relations
<input type="checkbox" name="domain5" />Business Administration
<input type="checkbox" name="domain6" />Other
</p>

<h2>Comments</h2>

Tell me anything you want to ... <p>
<textarea name="comments" rows=4 cols=60></textarea>
</p>

<h2>More</h2>
<p>
Input button for JS coding: <input type="button" value="Press me"/>
</p>
<p>
Password field: <input type="password" name="pw"/>
</p>

<p>
<input type="reset" value="Reset the form"/>
<input type="submit" value="Submit"/>
</p>
</form>
<hr/>
</body>
</html>
Live code: 1-demo-html-form-els.html

This example demoes the most important HTML forms elements.
HTML forms all must be children of the form</form> element and which has the following syntax:
 <form name="myform" action="#" method="get">

 </form>
- The action attribute defines what resource will deal with it. "#" means "this page" and is used for JavaScript code
- the method attribute defines which of the HTTP methods is being used, usually "GET" or "POST" (see below).
- the name attribute is optional, but recommended for DOM processing with JavaScript.
Input elements
Select element
Text area element
Forms processing with the Common Gateway Interface
HTML forms can be processed by a webserver in two ways, either trough the older, easier and still more popular CGI Interface or with AJAX
The principle for both is the same. The client (i.e. your web browser) sends some data to a URL. The webserver will hand over your data to the program identified by the URL, e.g. a PHP file.
HTTP
The Hypertext Transfer Protocol (HTTP) is a communications protocol used to transfer or convey information on the World Wide Web. (Wikipedia).
In the most simple case, a HTTP roundtrip from browser to server and back can be explained with the following picture:
 A simple HTTP request and answer
Message sent from browser to server and the other way round have two parts
- Information that the user will not see
- Data
Browser requests consist of the following:
- A Request line, such as GET /images/logo.gif HTTP/1.1, which requests the file logo.gif from the /images directory
- Headers that will give the server information about your browser, cookies etc.
- An empty line
- An optional message body (e.g. POST contents from a form)
Here is a sample message sent from the browser to the server and that request that the server sends the contents of the resource identified as http://www.example.com/index.
 GET /index.html HTTP/1.1
 Host: www.example.com
Server replies include:
- A first line that includes a status code (e.g. "200 OK" means "here is what you asked")
- Some other information about the context, the server and the most importantly the content type.
- A blank line
- The data
Here is a sample message sent from the server to the browser in response:
HTTP/1.1 200 OK
Date: Sun, 06 May 2007 19:13:32 GMT
Server: Apache/2.2.3 (Win32) PHP/5.1.5
X-Powered-By: PHP/5.1.6
Content-Length: 252
Keep-Alive: timeout=15, max=100
Connection: Keep-Alive
Content-Type: text/html
.... Contents, e.g. HTML code ....
CGI Principles
The common gateway interface defines how a web server can deal with HTML forms. From an HTML form, forms data can be sent to a web server as the following picture shows:
 Forms submission with HTTP
In addition, the script then often will "talk" to a database as the following picture shows:
 Forms submission with HTTP and databases
Web development
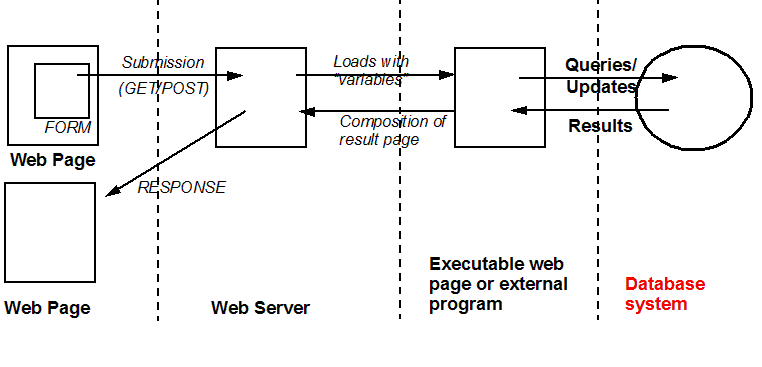
In order to promote modularity and reuse of code, modern web development is ususally based on a three tiers model that we show below.
 Three tier web application architecture
In larger web development shops, one usually separates as best three types of work:
- People that deal with style (CSS)
- People that deal with contents (usually through a CMS
- People that deal with client coding (either HTML, HTML forms plus JavaScript or portalware configuration plus templating)
- People that deal with server-side coding
- People that deal with database issues
An other trend is represented by the so-called AJAX technique which is a combination of:
- XHTML (or HTML) and CSS, for marking up and styling information.
- The DOM accessed with a client-side scripting language, usually ECMAScript (JavaScript)
- The XMLHttpRequest object is used to exchange data asynchronously with the web server.
- XML is sometimes used as the format for transferring data between the server and client.
The principle is the same, but instead of sending a new page to the navigator, it will send data that then is incorporated with "DOM surgery" in the page from which the request originated.
Processing forms with PHP
PHP scripts are put on a web server (like HTML files). However, the server deals with PHP in a very different way:
- HTML files are just sent to the browser
- PHP files are executed by the web server and only the result (which usually is some HTML code) is then sent to the browsers.
PHP code can be be small, e.g. sit in a single file. Or it may consists of hundreds of files. Many (or most) popular portalware is coded with PHP, including this wiki.
PHP code is inserted between: <?php ..... ?>
<?php echo("I am a php instruction\n"); ?>
Example
- calculate.html and calculate.php (but these files need to be put on a server)
The HTML form:
 <form '''action="calculate.php"''' '''method="post"'''>

 What do you know about HTML ?
 <input type="radio" name="choice" value="1" checked>little
 <input type="radio" name="choice" value="2">some
 <input type="radio" name="choice" value="3">everything

 <br>
 What is your programming experience ?
 <input type="radio" name="choice2" value="1" checked>none
 <input type="radio" name="choice2" value="2">some
 <input type="radio" name="choice2" value="3">good
 <P>
 <input type="submit" value="See result!">

 </form>
Contents of the Php file
  <!DOCTYPE HTML PUBLIC "-//W3C//DTD HTML 4.01 Transitional//EN">
  <html><head><title>Simple test with</title></head><body>
      <h1>Simple test with PHP</h1><hr>
  <?php

  // Get variables from the form
  $choice = $_POST['choice'];
  $choice2 = $_POST['choice2'];

  // Compute the score
  $score = $choice + $choice2;
  // Display the score
  echo "<h3>Your score is " . $score . "</h3>";
  if ($score < 3) {
    echo "<p>You are a beginner</p>";
  } elseif ($score < 5) {
    echo "<p>You have some knowledge</p>";
  } else {
    echo "<p>You are an expert !</p>";
  }
  ?>
  <hr>DKS - 2007
  </body></html>
No need to understand CGI details, PHP makes it quite easy ....
Playing at home
To play with a webserver on your personal computer, install a WAMP package for Windows or a LAMP package for Unix, or a MAMP package for the Mac.
- MAMP means
- Windows, the operating system;
- Apache, the Web server;
- MySQL, the database management system
- PHP
Forms processing with JavaScript
Forms processing with JavaScript in your browser is somewhat easier (since you don't need to have access to the webserver) and somewhat more difficult (since JavaScript/DOM programming is a bit more difficult than PHP programming).
Let's examine an simple HTML example that displays two series of radio buttons. Each series is identified by a name attribute. Series one by "question1" and series two by "question2".
<!DOCTYPE html PUBLIC "-//W3C//DTD XHTML 1.0 Transitional//EN"
          "http://www.w3.org/TR/xhtml1/DTD/xhtml1-transitional.dtd">
<html xmlns="http://www.w3.org/1999/xhtml" lang="en">
  <head>
    <title>XHTML form example</title>
    <meta http-equiv="Content-Type" content="text/html;charset=iso8859-1" />
    <script type="text/javascript" language="Javascript" src="2-xhtml-radio-buttons.js">
    </script>
  </head>

  <body>
    <h1>XHTML form example</h1>

    <p>Below is a simple quiz, please fill it in.</p>

    <form name="quiz" action="#" method="get" onsubmit="give_feedback()">  <br/>
        <p>
        Among those three choices, what do you prefer to do to relax ? <br/>
	Watching TV <input type="radio" name="question1" value="1"/> <br/>

	Playing computer games <input type="radio" name="question1" value="2"/> <br/>
	Reading books <input type="radio" name="question1" value="3"/> <br/>
        </p>
        <p>
	What do you prefer to do on Saturday nights ?  <br/>
	Staying at home <input type="radio" name="question2" value="1"/> <br/>

	Going out alone <input type="radio" name="question2" value="2"/> <br/>
	Inviting friends <input type="radio" name="question2" value="3"/> <br/>
	Going out with friends <input type="radio" name="question2" value="4"/> <br/>
        </p>
	<input type="submit" value="Hit me"/>
    </form>

    <hr/>
  </body>
</html>
Live file: 2-xhtml-radio-buttons.html
- In the head element, we load JavaScript code that defines a "give_feedback" function.
- This give_feedback function is triggered when the user presses the submit button because in the form tag we defined the attribute
onsubmit="give_feedback().
There a several ways of dealing with HTML forms. Code presented below can be called old style JavaScript programming, since it includes JavaScript code within the form HTML code.
<form name="quiz" action="#" method="get" onsubmit="give_feedback()"> .... </form>
Below is the contents of the 2-xhtml-radio-buttons.js JavaScript file:
// Made by Daniel K. Schneider, TECFA, March 2008. This is freeware.
// Needs file 2-xhtml-radio-buttons.html

function give_feedback() {

  // f is variable that points to the form, just a shortcut
  var f = document.forms["quiz"];

  // ---------------- debugging --------------------
  // Let's provide some debugging information to the designer.
  // Remove this section at some point or add other debugging information to print out
  // Information about the form and its current state can be retrieved by various properties
  info = "This alert provides some debugging info to remove at later stage:\n"
    + "f.elements: " + f.elements + "\n"
    + "f.elements[0]: " + f.elements[0] + "\n"
    + "f.elements[7]: " + f.elements[8] + "\n"
    + "f.length: " + f.length + "\n"
    + "f.onsubmit: " + f.onsubmit + "\n"
    + "f.name: " + f.elements + "\n"
    + "f.acceptCharset: " + f.acceptCharset + "\n"
    + "f.action: " + f.action + "\n"
    + "f.enctype: " + f.enctype + "\n"
    + "f.encoding: " + f.encoding + "\n"
    + "f.method: " + f.method + "\n"
    + "f.target: " + f.target + "\n"
    + "f.elements['question1'][0].checked:" + f.elements['question1'][0].checked + "\n"
    + "f.elements['question1'][1].checked:" + f.elements['question1'][1].checked + "\n"
    + "f.elements['question1'][2].checked:" + f.elements['question1'][2].checked + "\n"
    + "f.elements['question1'][0].value:" + f.elements['question1'][0].value + "\n"
    + "f.elements['question1'][1].value:" + f.elements['question1'][1].value + "\n"
    + "f.elements['question1'][2].value:" + f.elements['question1'][2].value + "\n";
  // show this information
  alert (info);

  // ---------------- Compute a score --------------------
  // Initially, score is 0
  var score = 0;

  for (var i=0; i < (f.length); i++)  {
    // if the user selected a radio button it is checked
    // In this case we add its value to the score (see the HTML form)
    if (f.elements[i].checked)  {
      score = score + parseInt(f.elements[i].value);
    }
  }

  // ---------------- Provide feedback --------------------

  // Let's check if the user answered at least one question
  if (!score) {
    alert ("Hey you have to fill in at least something");
    return "lazy user";
  }

  // Now provide feedback
  // Of course, this is a rather dumb test ... as example code tends to be
  // If you plan to reuse this code, you certainly MUST change this

  if (score > 6) feedback = "Wow, you are a really active person"
  else if (score > 4) feedback = "You are quite an active person"
  else if (score > 3) feedback = "You are an active person"
  else feedback = "You are not too active";

  alert ("Here are some test results: " + feedback);
}
- Understanding how to deal with HTML forms is not trivial, i.e. you have to learn about DOM and be able to understand texts like the [">Gecko HTML Form Interface documentation].
- In our code we included a popup window that includes DOM information. You may remove the following line or even the whole debugging section.
alert (info);
- However, for starters, you just may try to adapt code to your need.
JavaScript new style
The 3-xhtml-radio-buttons.html example is nearly identical. The only difference is in the forms element.
<form id="quiz" action="#" method="get">
The JavaScript code available in 3-xhtml-radio-buttons.js is also very similar. The big difference is that we will use some "init" code to link a JavaScript function with a user event.
// When the page loads the init function will be called
window.onload = init;

// Init code executed when the page loads
function init () {
  document.getElementById("quiz").onsubmit = give_feedback;
}
Dealing with checkboxes
Dealing with checkboxes is a bit more difficult. In the following example we introduce a combined HTML/JS page that shows how to deal with these.
<!DOCTYPE html PUBLIC "-//W3C//DTD XHTML 1.0 Transitional//EN" "http://www.w3.org/TR/xhtml1/DTD/xhtml1-transitional.dtd">
<html xmlns="http://www.w3.org/1999/xhtml" lang="en">
  <head>
    <title>XHTML form example</title>
    <meta http-equiv="Content-Type" content="text/html;charset=iso8859-1" />
    <script type="text/javascript" language="javascript">

    function give_feedback() {
      var f = document.forms["quiz"];
      info = "This alert shows what we can get from the form:\n"
      info += "Let's first look at the " + f.length + " elements of this form.\n";
      for (var i=0; i < (f.length); i++) {
        info += "Object " + i + ": " + f.elements[i] + " ";
        info += " [Name="    + f.elements[i].name  + "] ";
        info += " [Value="   + f.elements[i].value  + "] ";
        info += " [Checked=" + f.elements[i].checked  + "]\n";
      }
      info += "\nLet's see what we get when we get elements by name \n";
      info += "f.elements['color'] returns a list since we got several: "
           + f.elements['color'] + "\n";
      info += "f.elements['color'][0] returns the first element (red): "
           + f.elements['color'][0] + "\n";
      info += "f.elements['color'][0].value gives the first object's value: "
           + f.elements['color'][0].value + "\n";
      info += "f.elements['color'][0].checked gives the first object's checked: "
           + f.elements['color'][0].checked + "\n";
      info += "f.elements['red'] gives a single object 3 element : "
           + f.elements['red'] + "\n";
      info += "f.elements['red'].value gives the object 3 element's value: "
           + f.elements['red'].value + "\n";
      info += "f.elements['red'].checked gives the object 3 element's checked: "
           + f.elements['red'].checked + "\n";
     alert (info);
     return false;
     }

    </script>
  </head>

  <body>
    <h1>XHTML form example</h1>

    <p>Below is a simple form with checkboxes, please fill it in.</p>

    <form name="quiz" action="#" method="get" onsubmit="give_feedback()">
        <p>
      Tick colors you like (take 1)
       <input type="checkbox" name="color" value="red"/>Red
       <input type="checkbox" name="color" value="blue"/>Blue
       <input type="checkbox" name="color" value="green"/>Green
         </p>
        <p>
      Tick colors you like (take 2):
       <input type="checkbox" name="red" />RED
       <input type="checkbox" name="blue" />BLUE
       <input type="checkbox" name="green" />GREEN

        </p>

	<input type="submit" value="Hit me"/>
     Repeat this with different answers and study the alert box. Also watch the URL on top.
    </form>

    <hr/>
  </body>
</html>
Live exemple: 5-xhtml-checkboxes.html
- In the head, some JavaScript code that defines a "give_feedback" function is loaded
- Checkboxes are a bit more difficult to handle than radio buttons. Also, unlike radio buttons you can either choose to differentiate between check boxes by either giving them the same name but different value combination or alternatively by giving each checkbox its own name.
- In the first case you have to retrieve the element by an index, in the second you don't need to.
- To decide if a user checked a checkbox, you need to look at the the "checked" property.
To understand this code, you have to study both the HTML markup of the input elements and then study the results of the debugging code shown.
Form validation
JavaScript is often used to validate forms, i.e. make sure that user fill in all the elements. You may find many form validation scripts on the Internet, some of which are listed in the JavaScript links entry in this wiki.
Below we present a simple example to validate radio and checkboxes input:
<!DOCTYPE html PUBLIC "-//W3C//DTD XHTML 1.0 Transitional//EN" "http://www.w3.org/TR/xhtml1/DTD/xhtml1-transitional.dtd">
<html xmlns="http://www.w3.org/1999/xhtml" lang="en">
  <head>
    <title>Validation of radio and check boxes input</title>
    <meta http-equiv="Content-Type" content="text/html;charset=iso8859-1" />
    <script type="text/javascript" language="javascript">

// will return false if nothing is checked or the selected value

function get_selected_radio_value (list) {
  var selection = false;

  for (i=0;i<list.length;i++) {
    //alert (list[i].checked + "-" + list[i].value);
    if (list[i].checked) {
      selection = list[i].value;
    }
  }
  return selection;
}

function give_feedback() {
  // f is a shortcut to the form
  var f = document.forms["quiz"];

  info = "This alert shows what we can get from the form:\n"

  info += "Let's first look at the " + f.length + " elements of this form.\n";

  // This loop will list all the form elements and add some information about each.
  for (var i=0; i < (f.length); i++) {
    info += "Object " + i + ": " + f.elements[i] + " ";
    info += " [Name="    + f.elements[i].name  + "] ";
    info += " [Value="   + f.elements[i].value  + "] ";
    info += " [Checked=" + f.elements[i].checked  + "]\n";
  }
  info += "\nLet's see what we get when we get elements by name \n";
  info += "f.elements['color'] returns a list of checkbox objects since we got several: "
    + f.elements['color'] + "\n";
  info += "f.elements['color'].checked returns: "
    + f.elements['color'].checked + "\n";
  info += "f.elements['color'][0] returns the first element (red): "
    + f.elements['color'][0] + "\n";
  info += "f.elements['color'][0].value gives the first object's value: "
    + f.elements['color'][0].value + "\n";
  info += "f.elements['color'][0].checked gives the first object's checked: "
    + f.elements['color'][0].checked + "\n\n";

  info += "f.elements['metallicred'] returns a check box object: "
    + f.elements['metallicred'] + "\n";
  info += "f.elements['metallicred'].value gives the object's value: "
    + f.elements['metallicred'].value + "\n";
  info += "f.elements['metallicred'].checked returns the object's checked: "
    + f.elements['metallicred'].checked + "\n\n";

  info += "get_selected_radio_value (f.elements['colorpref']) will return: "
    + get_selected_radio_value(f.elements['colorpref'])+ "\n\n"; ;

  info += "f.elements['colorselect'].value returns the select box checked value: "
    + f.elements['colorselect'].value + "\n\n";
  alert (info);
  return false;
}

function validate(f) {
  var feedback = "Please fill in all required elements !\n";
  var ok = true;

  if (!(f.elements['color'][0].checked||f.elements['color'][1].checked
        ||f.elements['color'][2].checked)) {
    ok = false;
    feedback+="Please select at least a color from the first color list! \n";
  }
  if (!(f.elements['metallicred'].checked||f.elements['metallicblue'].checked
        ||f.elements['metallicgreen'].checked)) {
    ok = false;
    feedback+="Please select at least a color for the metallic list! \n";
  }
  if (get_selected_radio_value(f.elements['colorpref'])==false){
    ok = false;
    feedback+="Please select a color from the radio buttons !\n";
  }
  if (f.elements['colorselect'].value=="noselect") {
    ok = false;
    feedback+="Please select a color from the pulldown menu !\n";
  }

  if (!ok) alert (feedback);
  // page should not reload
  return false;
}


    </script>
  </head>

  <body>
    <h1>Validation of radio and check boxes input</h1>

    <p>Below is a simple form with checkboxes and radio buttons, please fill it in.</p>

    <form name="quiz" action="#" method="get"
          onsubmit="give_feedback();validate(this);">
        <p>
      Tick colors you like (each checkbox has same name)
       <input type="checkbox" name="color" value="red"/>Red
       <input type="checkbox" name="color" value="blue"/>Blue
       <input type="checkbox" name="color" value="green"/>Green
         </p>
        <p>
      Tick again colors you like (each checkbox as a different name):
       <input type="checkbox" name="metallicred" />Metallic red
       <input type="checkbox" name="metallicblue" />Metallic blue
       <input type="checkbox" name="metallicgreen" />Metallic green
        </p>

        <p>
      Select once more a color you like (radio buttons):
       <input type="radio" name="colorpref" value="red"/>Pastel red
       <input type="radio" name="colorpref" value="blue"/>Pastel blue
       <input type="radio" name="colorpref" value="green"/>Pastel green
        </p>
        <p>
      Select a color you like (select menu):
	<select name="colorselect">
	  <option value="noselect">--select--</option>
	  <option value="red">RED</option>

	  <option value="blue">BLUE</option>
	  <option value="green">GREEN</option>
	  <option value="yellow">YELLOW</option>
	</select>
        </p>
      <input type="submit" value="Hit me"/>
    </form>
  </body>

</html>
Live code: [http://tecfa.unige.ch/guides/js/ex/coap/week-3/6-form-validation.html 6-form-validation.html]

* In the head, some JavaScript code that defines a "give_feedback" function is loaded
* To check if the user selected a radio-button to retrieve a selection value we wrote a little function. <code>function get_selected_radio_value (list)</code> will take a DOM node list representing a series of checkboxes.
<source lang="javascript">
function get_selected_radio_value (list) {
  var selection = false;

  for (i=0;i<list.length;i++) {
    //alert (list[i].checked + "-" + list[i].value);
    if (list[i].checked) {
      selection = list[i].value;
    }
  }
  return selection;
}
To test if someone picked a value from a color group we use code like:
 if (!(f.elements['color'][0].checked||f.elements['color'][1].checked
       ||f.elements['color'][2].checked)) { ....}
or
 (!(f.elements['metallicred'].checked||f.elements['metallicblue'].checked
    ||f.elements['metallicgreen'].checked)) { .... }