Microsoft Word 2003
Introduction
I (Daniel K. Schneider) rarely use Word and when I have to I find it extremely difficult to produce moderately good looking text, e.g. of the kind that would be expected in a self-published textbook. In addition, Word does things to me I didn't ask for, e.g. create new styles or renumber items.
With a program like FrameMaker I can quite easily achieve what I want (in the past I also managed with formatting software) and it does not try to do things not told to do. Also I don't know anyone who even has a moderately good working knowledge to do things efficiently.
Therefore I will try to make an effort to write down a few tricks I might learn. I am particularly interested in:
- Having word executing my orders without helping me
- Creating larger text elements efficiently, e.g. vignettes with title, paragraphs of various forms and appropriate numbering, or figures that include a title, automatic number of the caption...
Btw I got the same problems with Open Office, actually I like it even less (except for the drawing program which is great).
General advice for Word 2003
So the goal is to use Word to write a real text. So far, I only have this much advice below ....
Use styles
That's so obvious that I won't go into it in detail.
To see, or change, the base of a style, modify the style. Via Format->Styles and Formatting you can display the Styles. This pane has five sections:
- On top: Current style: Click on it to modify
- Select All to select all text elements with this style, New Style to create a new style
- A list of the recently used styles
- A list of all other styles
- On the bottom, you can define which styles you want to see....
To print styles you have:
- File->Print
- Then change "Print What" to Styles
set up the toolbar
After a while you may want to use shortcuts (instead of the pulldown menus)
Select tools->Customize->Toolbars
- You can add/remove various groups of tools
Set your preferences
The basic idea is to turn off all "helpful" features, since they create havoc. Read Daiya's Setting Up Word.
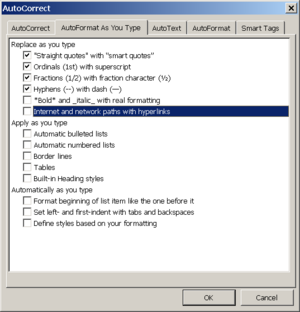
Select tools->Autocorrect Options and fix all tabs ...
- Fix autocorrecting
- This actually can't harm a lot, it even can be useful (but you may go over each in option and the long list in "Replace as you type"
- Fix AutoFormat As You Type
- Take most everything off
- Prompt to update style
- "Tools->Options->Edit Tab: Tick Prompt to update style
- Of course I wonder why the hell MS Word even wants to update styles, what's the purpose of this ? And why does it add styles in styles and formatting list. I don't want this ! (Didn't manage to teach word not to create styles).
When you change a style:
- Untick "Automatically update the style from now on" if by mistake it's on.
When you create a style:
- "Add to template"
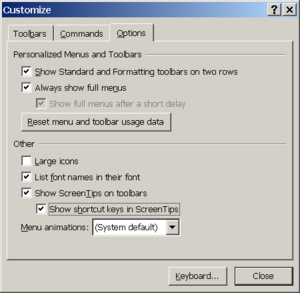
- Tools->Customize->Options
I use these:
How to manage special strands in a text
To problem is to find an efficient way to insert and specially mark various feature strands in a textbook, e.g. conclusions and summaries, lists of definitions, reference boxes, review questions, self-assessment (usually simple quizzes), small exercises etc.
In a modern textbook, these are usually marked as a "box", e.g. with some background color.
I didn't find an efficient way to do this. Below documentation for several attempts. I finally settled down to use tables ...
Multiple Styles
Make a style for each element you plan to have in these feature strands, usually:
- A title
- paragraphs
- bullets
- Maybe a caption
- A ending style (i.e an empty line with a tiny font).
Start by doing 1 style, e.g. the "normal" paragraph style.
- Define a font
- Define a background color: Modify Style->Format Border->
You also may add space after each kind of paragraph, but tick "don't add space between paragraphs of the same style" when you edit the paragraph style".
Example:
- Learning Goals Title
- Learning Goals Para
- Learning Goals Bullet
- Learning Goals End
Problem: I didn't manage to get the bullets right (unless I align them fully to the left and leave out spacing before or after. Here is how the 2 bad solutions (bullet and bullet2) look:
If anyone could help with this, I'd appreciate. An other solution is to give up color and just change the font, insert 2 horizontal lines, etc.
Section breaks
- Sections allow to break down a document in to several sections, each of which may have different formatting. E.g. used to separate the first pages from the rest.
- Probably not that useful, since removing one of these may crate havoc
Repurposing of tables
One possibility to get standardized boxes is to create a table with a single cell or maybe 2-3 cells in a single column.
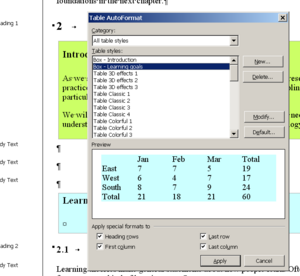
You have to define a new table style and give it a name. Typically you want to make the following changes in the autoformat style, i.e. not in each table. (table->Table AutoFormat->modify style)
- Base style on Table Normal
- Change Background color
- Margins on top and bottom for the default cell. This will add some (colored) space on top and bottom (e.g. what is normally called "padding").
- Margins left of the table
Formatting elements inside the table can be same as the ones you use for ordinary text.
In the Table->Insert>table dialog (first time you use it):
- set number of columns and rows to 1
- Autofit to Window
- Tick "Remember ...."
This sort of works, However, tables don't work very well either in MS Word, e.g. you can't for instance define a margin around a table (MS margins just do padding inside the table). Use a blank line for this.... You can't insert something between 2 tables (because if you insert a table after a table the two sort of seem to merge, huh I must be dreaming). So insert three blank lines and insert the table into the middle one.
Finally, the best and quickest way to insert a new table is to insert a blank line (standard paragraph line), then select Table->Autoformat or the corresponding icon in the table part of the toolbar. Click on the table you want and then Apply.
Of course, tables like most other features become a real nightmare when you try for real to understand how they work, i.e. how table styles would interact with text styles or how to set a table style to a fixed width so that when you click on the style a table could just exactly position itself with the precise margins. Forget it. You can't efficiently write real text with Word. Just a draft and then you have to make manual adjustments I guess.
Inserting a Textbox
Insert->Textbox inserts a box with a floating textbox inside
- If you click on textbox or the surrounding "graphics box" you can set background color and line color
- This solution fixes the margins problem we had with the single cell table solution above.
- But I can't get Word to remember various styles of boxes (you only can set it as default)
... Therefore I prefer the table solution (even if formatting is less powerful).
Inserting a word document
A similar trick is to insert a word document by itself:
- Insert->Object
... but a little overkill
Macros
E.g. O'Reilly provides for its authors a menu with macros to insert special text elements like figures.
A macro then would insert a series of empty paragraphs, each one with an appropriate style. There are 2 ways to create macros:
- By recording steps
- By using Visual Basic, requires a week or two of investment I guess.
To create macros by recording, see the Create a macro (Microsoft tutorial).
Basically this means that you can to things like to inserting a series of styles or insert a portion of selected text into a textbox and then format it (did not test the latter). E.g. you could automatize the Multiple styles solution outlined above.
After some time, trying to make Word do a few simple things without much success, I think that the only solution is to pay someone to write macros. E.g. the O'Reilly environment seems to work rather well (but I did not test it for real, so do not trust me here !). On the other hand O'Reilly books have a relatively simple black and white layout. I wonder if on could modify their macros to create more fancy text inserts ....
Figures
Dealing with figures has become easier than it once was, but compared to FrameMaker or Latex the Word 2003 still is quite clumsy.
In word 2003, I usually just paste external figures into a blank line and I usually use figures that are as large as the text or bigger :)
Alternatively by using the Insert->Picture menu you can access Microsoft components like a drawing tool, Word Art, Organization Chart or Chart.
Then with the right-click menu on the object you can do things like:
- Define Borders
- Define the caption (per default it will be inserted below). Also you can later edit again directly by clicking on it.
Also by right-click you can format the picture and define layout type:
- E.g reduce its size or even crop it
- Important: The Layout type will tell how it is inserted into the text. Usually I use "wrapping" style (else there is trouble).
- Dealing with inlined figures that are smaller than line width.
This can be trouble, since the caption can move to the next page.
- Produce a list of figures
- Menu Insert->Reference->Index and Tables, then select the Table of Figures tab.
I didn't spend time yet to find out how to configure things (e.g. have different sorts of figures or customize numbering). From what I have heard, it ain't easy.
Headings
You absolutely must use the default Heading 1, Heading 2 etc. Otherwise, if people open your document in another language version, there can be huge trouble ....
Also make sure that heading 2 is based on heading 1 etc.
Of course, you can customize headings. But in the Numbering ... page (Bullets and Numbering) never change numbering in any other place than Outline Numbered. You will regret it !
If something is broken, read Shauna Kelly's How to create numbered headings or outline numbering in your Microsoft Word document.
Page layout
- Page headers
Headers should display on top (header) or bottom (footer) of pages.
The menu View->Header and Footer will put you in a mode where you can modify these. You will see a header box on top and a footer box at the bottom. Double-clicking on these areas in Print Layout mode also will get you there.
You then can insert anything you like.
Right-click in the area will display the header and Footer tools pane with which you can insert a number of special things, e.g. page numbers or date. Also towards the right you have buttons to switch between different sections of text or between header and footer and finally you can activate the Page Setup pane (size and margins)
- Chapter and section titles in word 2003 headers
One of the biggest difficulties is to insert chapter and section headings (of course I should say since Word is primarily a tool to write letters).
First, read Insert the chapter number and title in a header or footer (Microsoft)
- The document must first be divided into sections in order to insert chapter numbers and titles into headers and footers
- On the Insert menu, point to Reference, and then click Cross-reference.
- In the Reference type box, click Heading.
- In the For which heading box, click the heading that contains the chapter number and title.
- In the Insert reference to box, select what you want to insert in the header or footer. For example,
- Click Heading number to insert the chapter number.
- Click Heading text to insert the chapter heading.
... Totally ridiculous if you ask me. This is a lot of extra work that any other word processor I am familiar with can do without much trouble. E.g. if you want section numbers and titles also, this means dividing your document into dozens of sections and the passing hours to click and click? The worst is yet to come: I couldn't find a way to have Word make an update ...
- Random headers on a page
Finally, you also can insert a header anywhere on the page, e.g. an icon or watermarks....
Speed
Word can become quite slow once you have over a hundred pages (or even before that).
A few tricks (most are from Daiya Mitchell), are:
- Work in Normal Mode. (I prefer Print Mode since I got a nice screen, but this makes Word slow down, since it tries to show pages as they are printed.)
- Don't show images: Tools->Options->View. Tick Picture placeholders. You also may untick Drawings.
- Only use your styles (don't format paragraphs with fonts, indentation and such). Anyhow, for your own sake you shouldn't ...
- Make sure that all you styles use the right target language. If you insert tags in a different language Word can become confused. On that matter, if you copy text from web pages and such, always copy as text. Or if you don't, immediatly reformat (this may need clicking three times on a style ... )
- You finally can turn of background repagination (Tools->Option->General), but this only works in Normal Mode.
Still got trouble
- Buy a real wordprocessor FrameMaker. Note that I do not endorse Adobe at all. I am really unhappy that they killed support for SVG and Authorware and I don't think that Flash is so cool. But Framemaker at least lets you edit real text (in addition it can deal with XML).
- An other option (if you are a technie), use formatting software. E.g. DocBook or Latex.
Links
General Beginners and mid-level tutorials
These links are not sorted or commented (no time), but when I made them (August 2007) they all seemed to useful and have real contents. Most Google search for "Word XP tutorial" leads to utter junk ...
- http://www.uwec.edu/help/word03.htm Microsoft Word 2003, LTS Online Help Documentation, University of Wisconsin. Quite a good tutorial for both beginners and and somewhat advanced users.
- Word 2003 Courses at Microsoft.
- Tutorials at Rudgers Writing Program. Includes some good beginners tutorials for Word 2003.
- Word Tutorial I (PDF), Word XP, beginner's level, from UC Berkeley Calpact
- Word Tutorial II (PDF), Word XP, mid level, from UC Berkeley Calpact
- Microsoft Word. Three beginners tutorials from University Information services, Georgetown University
- Word 2000 Tutorial and Word 2007 Tutorial, Florida Gulf Coast University.
- Microsoft Word Modules from Intern4Classrooms (i4c).
- Tutorials - Microsoft Word at BetterSolutions.com
Advanced Word
These are the sites I usually consult (both excellent).
- Making the most of Word in your business (Shauna Kelly)
- The Word MVP site includes a great number of useful FAQs and mini-tutorials. Can help advanced users.
- Word Tutorial site by Suzanne S. Barnhill
Tutorials on how to write a book with word
- So You Want to Write a Book with MS Word by Daiya Mitchell. This was the only useful link I found. The text includes links to the related The Word MVP site and other good resources like Kelly's site.
- One Professional's Steps for Writing a Book by John McGhie
Avaliable style sheets
(to write large documents, more needed)
- Microsoft has a large list of templates, e.g. Books (not useful for writing "real" books")
- O'Reilly
- BCS book template
Word macros
- Word2003 Macros at Microsoft
- What is a macro and why you should care, by The Crabby Office Lady, Microsoft. This is a good conceptual introduction.
- Wordprocessing.about.com has some tutorials (search). Ok if you can deal with all the blinking advertisements...
Use of annotations
(i.e. comments for other readers)
- Editing Electronically Submitted Papers (Web by Design, Indiana University]


