Flash classic motion tweening tutorial
Overview
Motion tweening means motion animation with interpolation as explained in the Flash motion interpolation overview. In this article we present one of the possible methods, i.e. the so-called "classic motion tween".
- Learning goals
- Learn about classic motion animation, called simply motion tweening in CS3 and classic motion tweening in CS4/CS5. Motion animation means moving an object from A to B, to C through keyframes that you define and (sometimes) a user-defined motion path.
- Add some simple shape transforms to the animated object
- Learn how to to frame-by-frame animations with embedded movie clips.
- Prerequisites
- Flash CS3 desktop tutorial
- Flash layers tutorial (first part)
- Flash drawing tutorial (at least some of it)
- Flash animation overview
- Flash frame-by-frame animation tutorial (not absolutely needed, but probably useful)
- Immediate next steps
- Flash CS4 motion tweening tutorial (CS4, CS5)
- AS3 TweenLite tweening engine (CS3-CS5, intermediate)
- Moving on
- Flash shape tweening tutorial
- Flash animation summary
- After that you should be ready for interactivity. E.g. do the Flash button tutorial
- Quality and level
- This text should technical people get going. It's probably not good enough for beginners, but may be used as handout in "hands-on" class. That is what Daniel K. Schneider made it for...
- It aims at beginners. More advanced features and tricks are not explained here.
- Materials (*.fla file you can play with)
- http://tecfa.unige.ch/guides/flash/ex/motion-tweening-intro/
In CS4, the motion tween tool has been replaced with an easier tool, but this tool is still available as "motion tween classic" as explained further down.
Introduction
- If you want to work on your own project ...
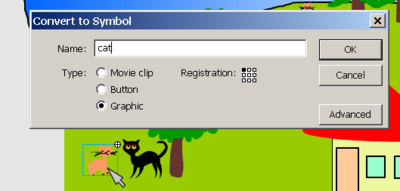
In this tutorial we will mostly work with graphic and motion clip symbols. So the first thing you may have to do - if you want to work on your own project - is to convert one of your graphics to either a graphic or a motion clip symbol and to put it in a separate layer.
- Right-click on the object (click down the right mouse button) and then select Convert to Symbol .... Alternatively just select the object and hit F8.
- Each object to be animated should be in a separate layer. All the other objects may remain in a single layer.
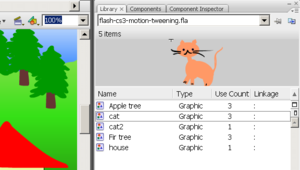
So before we start, make sure that you have a least one graphic symbol, i.e. the object that you would like to move around in your library. E.g. the library of the "cat example" we will build now contains this:
- Use of layers
You must use a different layer for each separate animation. If you plan to animate several of your objects, there is a practical shortcut to distribute each object to a new layer:
- Select objects you want to distribute into layers (e.g. with right-click->select all or shift-click on each object)
- Then, Modify->Timeline->Distribute to layers
- Finally, rename the layers in order to help you find things...
- Motion tweens within movie clips
Instead of using the main timeline, we always recommend to consider creating animations within movie symbols. This way you can easily reuse these animations in other Flash applications or play several animations at the same time. E.g. you would have structure like this:
- Main timeline (no animation)
- Animation_clip (a movie clip with its own timeline)
- Animated_object (e.g. a motion tween) in a layer of Animation_clip
- Animation of the animated_object (e.g. a frame-by-frame animation, etc.)
- Animated_object (e.g. a motion tween) in a layer of Animation_clip
- Animation_clip (a movie clip with its own timeline)
See the example at the end and also Flash embedded movie clip tutorial.
Introductory example - moving a cat
In this example, we will use the drawings made for the flash drawing tutorial and move one of the cats around. If you want to reproduce what we do here, you can start from file flash-cs3-drawing-trees3.fla. Objects you will need are already in the library. I am aware that these drawings are ugly, but it makes these tutorials so much more human ....
- Executive summary
The principle of motion tweening is quite simple:
(1) Firstly position an object in different locations at different times
- We call these positions keyframes in the timeline, since objects are frozen in different states.
- Btw, you also can change other features than just the position of an object (more later)
(2) Then, you have to apply some interpolation method (tweening) between the two keyframes, i.e. you tell the computer to generate some in-between picture for each frame between the 2 keyframes in the timeline.
- Simple motion tweening is a linear path, i.e. the object will move on a line from x1,y1 to x2,y2.
- You can also apply a motion tween along a random path (but this is bit more complicated and we will introduce this technique below).
Moving a cat from x to y
You should lock all other layers. This way you are sure not to edit by mistake a frame of another layer.
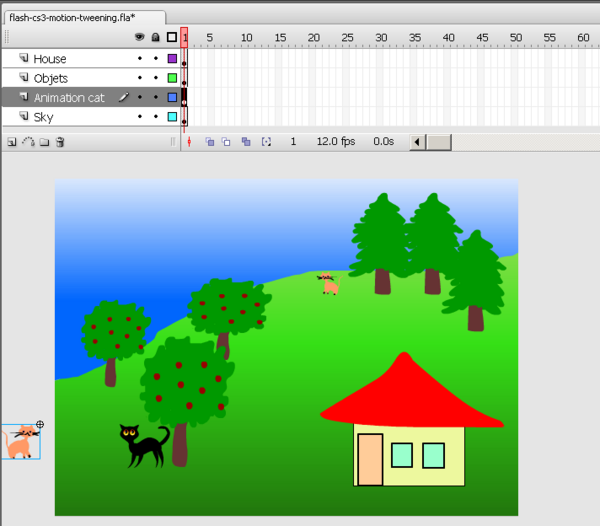
- Step 1 - Create a a new layer and insert an object for animation
- Create a new layer and call it "animation cat" for example (see the Flash layers tutorial if you forgot how).
- Select this layer
- Put an tween-able object inside, e.g. drag it from your library onto the stage, or cut/paste or copy/paste from an other layer or *.fla document.
- In our case we cut/paste the existing cat that was sitting in the lower left in the "Objects" layer.
- We move the object (cat) outside of the stage, because the cat in our scenario will move into the scene.
Remember, that you can not motion tween editable objects, so you need to turn a drawing into a symbol first.
So you should see something like this:
Now you already have a first keyframe for your animation. I.e. the cat is waiting in keyframe 1 to be moved.
- Step 2 - Create a second keyframe
- Make sure that you still have the "animation cat" layer selected.
- Right-click somewhere in the timeline, e.g. at 20 and Insert Keyframe
- This will create a new keyframe and copy the contents of the keyframe before, i.e. contents of frame 1 just for this layer.
- Drag the object (cat) to its final position, e.g. to the right and which can be outside the stage again.
- Step 3 - Create the motion tween
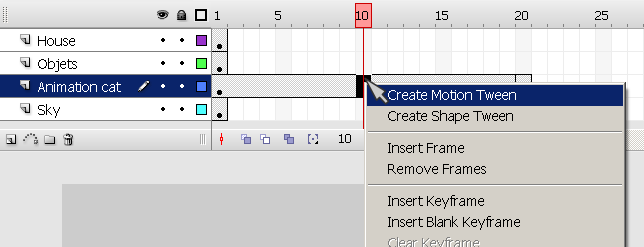
- Click on a random frame between the two keyframes (still in the same layer)
- Then right-click and select Create Motion Tween. Alternatively, you also could have used the Tween pull-down menu in the properties panel at the bottom and select motion.
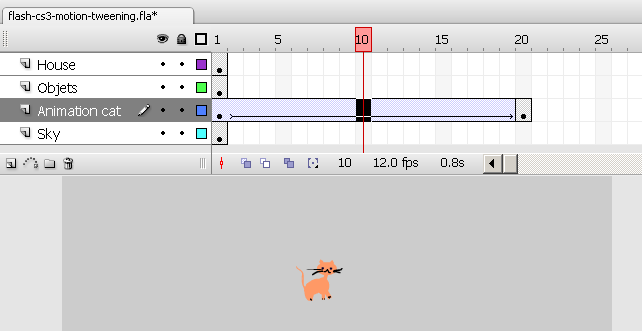
The timeline for the layer including this object should now include a solid line with an arrow (if it is dashed something went wrong).
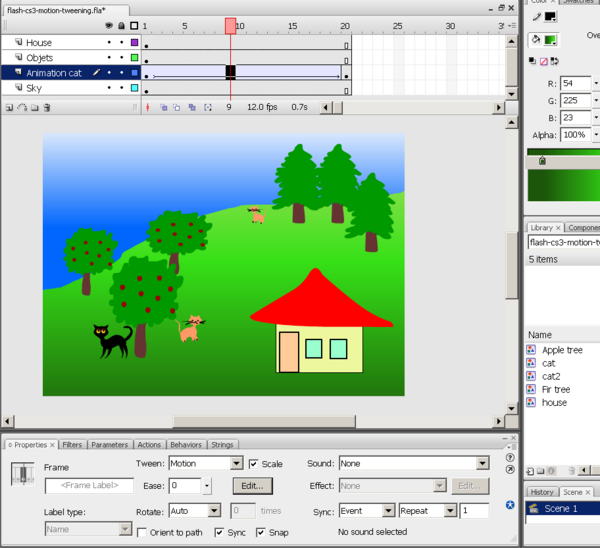
The result should look like in the screen capture below:
- Between the two keyframes you see a solid line with an arrow (look at the "Animation cat" layer).
- You should see your object moved to a different position somewhere in the middle of the two keyframes.
- Step 4 - Replicate contents of the other layers
- As you could see in the screen captures above, the stage is empty, except for the cat. This is because all other drawings for the other layers exist only for frame 1.
- For each other layer, right-click on frame 20 (i.e. in the position of your second keyframe) and hit F5 (Insert Frame, not insert keyframe !)
- This will "stretch" your drawings from frame 1 to frame 20. The drawings still sit in frame 1, but they are carried over up-to frame 20. This is shown in the timeline by a little white rectangle.
You now should have something like this:
- Step 5 - Test it
- You can glide (left-right) the playhead (red rectangle on top of the red line that indicates the current frame in the timeline). It will manually move the object through all positions within the interpolation path.
- Then try: menu Control->Test Movie or hit CTRL-Enter. This will open a popup window with a Flash preview.
- Step 6 - Tuning
You may find that the cat moves too fast. First thing you could do is lower the frame rate/second. Click on the workarea and change the document properties. However, this will lead to a "jumpy" animation. It's a better idea to use frame 50 instead of frame 20 as end-point.
- Drag the black dot in the animation layer from frame 20 to frame 50. Hold down the mouse on the black dot, wait a bit and then drag.
- For the other layers: hit F5 in frame 50 (same as above).
- You also can accelerate/decelerate the cat's movement. Play with the "Ease" option in the Properties panel. Click on layer "animation cat", then select an empty "between frame" somewhere. You now can make changes in the tweening properties.
- If your cat moves in front instead of behind objects, then you can fix this by arranging the layers' order: Grab the objects layer in the timeline panel and move it before or after the animation layer (i.e. pull it up or down).
- Results
- You can look at my published result: flash-cs3-motion-tweening.html
- You can grab all the files from this directory:
Adding more motion tweens
We want the cat to move back where it came from.
- Turning the cat
In our case we have an animation from left to right and the cat will leave the stage. Once it's off the stage we will turn it so that it can walk back.
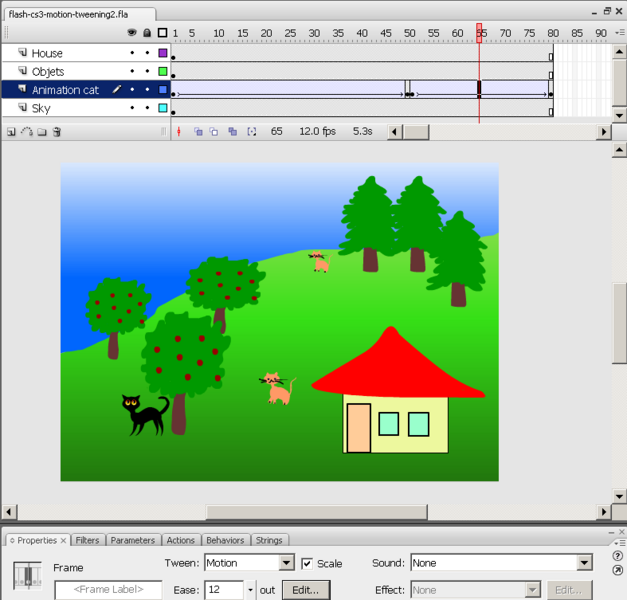
- Next to frame 50 I made a third key frame. Click on frame 51 and hit F6.
- Then turn the cat: Click on the cat and use menu Modify->Transform->Flip Horizontal)
- Add a new motion tween
You can add more motion tweens to an object simply by repeating the procedure outlined above.
- Add a new fourth keyframe to the right, e.g. in frame 81. Simply hit F6 again.
- Right-click on an empty frame between keyframe 3 and 4 and add a motion tween as above
- Of course, you then also adjust the ending frame for the other layers as above (hit F5) in column 80.
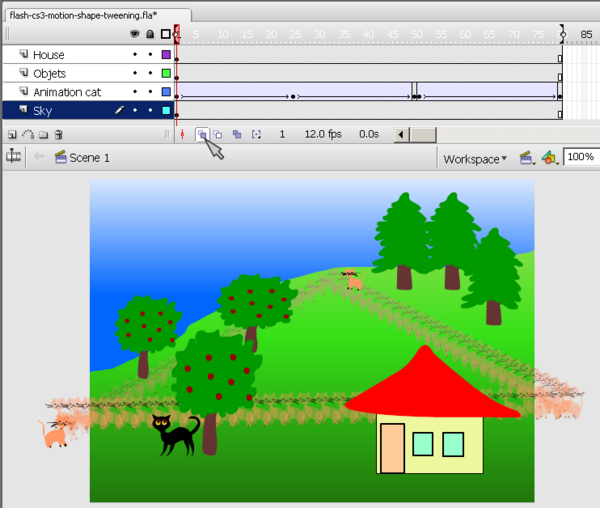
In the screen capture below you can see that we now have several keyframes. In the "animation cat" layer you can see several dots, each one represents a keyframe.
You can look at the published result (the cat will walk back where it came from) here: flash-cs3-motion-tweening2.html
The directory including the *.fla file which you can load into your Flash and play with is here:
Adding (some) motion shape tweening
In each frame you can change some properties of the moving object. In the next example, we will have the cat move up on top of the hill. We want to implement 2 effects:
- The cat should become smaller (because it's further away)
- It should change color (because it's an effort to run up a hill).
- Step 1 - Insert a new keyframe
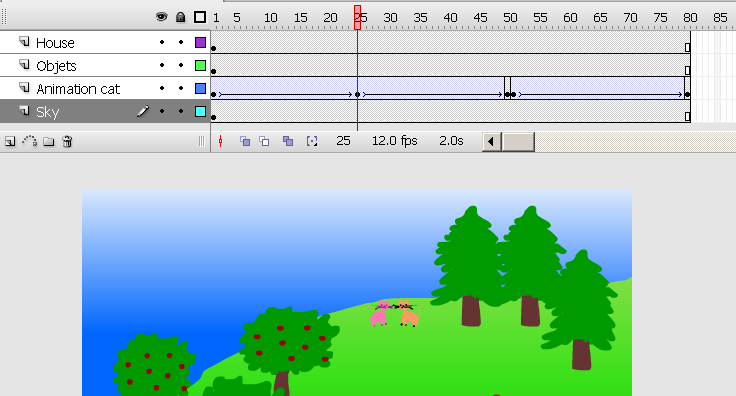
- I inserted a new keyframe in frame 25 (i.e. between the first two existing key frames)
- In the (new) 2nd keyframe the cat was moved next to the other little one on top of the hill.
- Step 2 - Change size of cat in keyframe 2
- Go to the frame (click on frame 25 or wherever yours is)
- Select the object (i.e. the little cat)
- Select the Free Transform Tool in the tools panel (see flash drawing tutorial), hold down the SHIFT key and drag a corner.
- Step 3 - Change the color of the cat in keyframe 2
- Go to the frame
- Select the cat
- In the properties panel you can change the tint (a kind of color) of the cat.
Here is a screen capture. The animated cat is pink and sits next to the other cat. It's pink because moving up the hill takes effort ...
You can look at the published result here: flash-cs3-motion-shape-tweening.html
The directory including the *.fla file which you can load into your Flash and play with is here:
Doing more informed work
Edit bar
If you have to do some frequent zooming you can display the Edit Toolbar (see the screen capture below).
- Get the edit toolbar: Window->Toolbars->Edit bar
This bar also will allow you to directly edit symbols you got in your library.
Onion skins
You can display the path an object will take by clicking one of the onion skin buttons in the Controller toolbar. This is handy if you have several objects that move.
- Get the controller toolbar: Window->Toolbars->Controller and then click on either the Onion Skin or the Onion Skin Outlines icon.
Grids and rules
To achieve what we just did, you don't need these. But for more precise artwork you certainly will...
- Right-click somewhere on the workarea and play with Rules, Grids and Guides ...
Rotating animations
Instead of moving an object from point A to point B, you also can rotate it around point A. A good example would be hands in a clock.
- Step 1 - create the object to animate
- Create a separate layer for the object you want to rotate.
- Draw the object (and don't make any new keyframes yet)
- Transform it into a symbol (right-click and select graphic symbol).
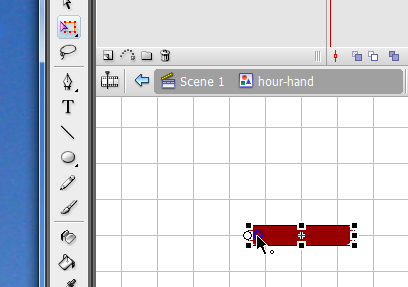
- Step2 - move the center point
- Then with the free transform tool move its center point somewhere else if you want. E.g. to rotate an hour hand for clock move it towards and end (the center of the clock).
- Step 3 - make a motion tween
- Make a new keyframe, i.e.hit F6 in a new frame. You can leave the object where it is (depends on the aim of your animation)
- Then create the motion tween (right-click anywhere in between the two keyframes)
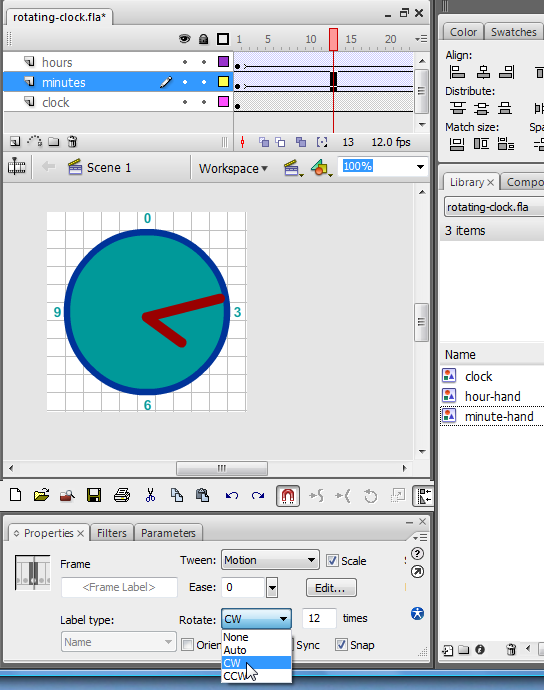
- Now in the parameters panel select Rotate = CW (clockwise) as in the example shown in the picture. Btw ""CCW" would mean "countclock wise"
- If you want to rotate it more than once during the animation time, enter "XX times". E.g. we entered 12 for the minute hand in the clock animation.
- Clock example
If you want, you can:
- Look at rotating clock example
- Or get the flash-cs3-rotating-clock.fla file from http://tecfa.unige.ch/guides/flash/ex/motion-tweening-intro/ and play with it.
You don't like my cats ? / Embedded movie clips
As we pointed out in the Flash drawing tutorial, you can import professionally made clipart into Flash. Furthermore, you now should learn how to move animated objects, i.e. use so-called embedded movie clips. See also the Flash embedded movie clip tutorial.
Use of embedded movie clips
Instead of using the main timeline to create all your animations, you also can animate so-called "movie clips", i.e. instances of movie clips.
- Menu Insert->New Symbol
- Select Movie Clip (and give a good name)
- Double-click on this newly created movie clip in the library. You now can edit this object's own timeline.
Alternatively transform an object into a movie clip:
- Select the object (or use the lasso or another appropriate tool to select several objects)
- Right-click->Convert to Symbol; Select Movie clip
- Double-click on this object to edit.
There are two ways to edit a movie clip:
(1) In "stand-alone" view, i.e. you only will see the components of the movie clip. Double click on the movie symbol's icon (not it's name) in the library. You now can edit, e.g. a add a motion animation or change its drawings. Most of time, this editing mode is preferable.
(2) Edit with the scene as background. If you put an instance of the movie clip on the stage and then double-click on this instance, you can edit the same movie clip symbol, but you will see the objects of the stage while you edit.
By editing a movie symbol you basically can do the all the stuff you have learnt so far, e.g. in the Flash frame-by-frame animation tutorial. In other words, movie clips have their own timeline.
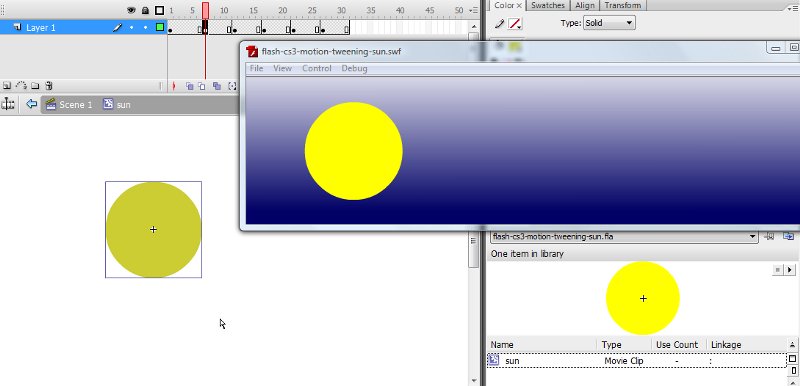
- A pulsating moving sun
Let's now create a very simple animation, i.e. a pulsating sun that is moving from left to right in the sky. First, we will make a simple motion tween of a yellow circle moving from left to right:
- Create a new Flash fileand change the size to 800x200 pixels
- Draw a yellow circle and put it to the left of the stage
- Convert it to a movie clip symbol (Right-click->Convert to Symbol; Select Movie clip)
- Hit F6 in frame 120 and move the circle that is now an instance of a movie clip to the right of the stage
- Make a motion tween.
Then edit the sun symbol to create a frame-by-frame animation
- As you can see, we are editing the sun "symbol". Look at the Edit bar (that sits between the timeline and the stage). It displays the editing hierarchy, i.e. "Scene 1" and "Sun".
- This frame-by-frame animation changes both the color and the size of the circle. Read the Flash frame-by-frame animation tutorial if you don't know how to create frame-by-frame animations.
Do not forget to go back to the main timeline (scene) once you are done, e.g. by double-clicking on the "scene" in the edit bar (on top of the stage) or by clicking on the little "back arrow". When you edit a movie clip you are in symbol edit mode and you should not add anything else by mistake. Make sure that you are aware at which level you edit and where to place objects !
Finally you also may add a sky in the main timeline (e.g. with a gradient color, see the flash colors tutorial)
- The example code is in the http://tecfa.unige.ch/guides/flash/ex/motion-tweening-intro/ directory
- flash-cs3-motion-tweening-sun.html
- flash-cs3-motion-tweening-sun.fla
Note: we use embedded movie clips in many other tutorials. E.g. see ActionScript 3 interactive objects tutorial or Motion tweening of an animated object chapter in the Flash animation summary or the Shape tweens of motion tween elements chapter in the Flash shape tweening tutorial
I usually prefer this kind of animation, since I am more interested in creating interactive application (vs. video clip-like animations). If you plan to learn this, you also should learn how to stop/play embedded movie clips, i.e. trigger with the help of a button or something else an event that will movie_clip.play() and movie_clip.stop().
Use of swf movie clips in motion tweens
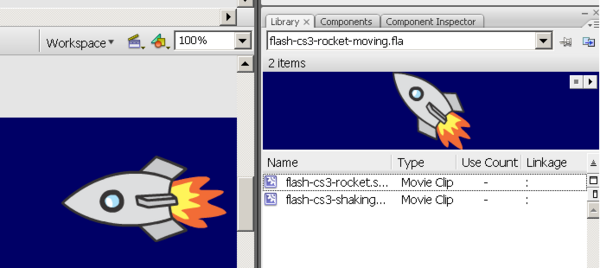
You can import ready made flash animations, e.g. a cat that would have moving legs. In the next chapter we use a simpler animation that uses a rocket. Rocket making itself is described in the Flash frame-by-frame animation tutorial.
To import a Flash movie as object: Use File->Import->Import to library You then will see the *.swf files as items and you can drag them on the stage. With the Transform tools you then can adapt a few features (like size and rotation) to your needs.
If you want, you can:
- Look at the flying rocket
- Or get the file flash-cs3-rocket-moving.fla from here:
Don't worry about details of *.swf movie clip reuse. The motion guide tweens chapter below will show how to do this in some more detail.
Motion guide tweens
Instead of having an object move from one point to another in a straight path, we can make it follow an arbitrary path we draw, i.e. a motion guide.
Note: In Flash CS4, there is a simpler alternative, i.e. you can easily create motion guides with the "normal" motion tween tool.
- Step 1 - Create a normal motion tween
- Like explained above, create two keyframes, i.e. one for start and one for the end. Each keyframe should contain a copy of the same symbol (as above). Then insert a motion tween.
- This is important, else you will fail ...
- Step 2 - Insert a motion guide layer
- Select the first keyframe and layer that starts your animation
- On the layer edit bar in the time line click on the little motion guide icon (looks like a slinky) or Right-click->Add Motion Guide.
You should get something like in the capture below:
- Step 3 - Draw the motion guide in the motion guide layer
- Make sure that you selected the motion guide layer you just created selected. You may lock the other layers and just display their outlines.
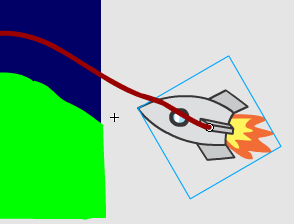
- Then. with the pencil tool. draw the line your rocket has to follow. Use "Object mode" and "Smooth drawing" from the tools panel controls (see the Flash drawing tutorial if you forgot how to use the pencil).
In the screen capture below, the motion guide would be the red (fatter) line on top of the hill's outline.
- Step 4 - Snap the animated object to the start of the motion guide
- Unlock all layers
- Select the animation layer (not the motion guide layer !) and select your start frame.
- Then drag the object (i.e. our rocket) to the start of the line until the little white circle in the center of the rocket will "snap" to the line. Just drag, don't click...
- Step 5 - Snap it to the end
- Select the end frame first
- Then drag the object (the rocket) to the end of the line until it snaps. It should snap with the little white circle.
- Step 6 - Orient to path
- You can have the object tilt along the path if you want
- Select the animation layer (not the guide)
- Select a frame in between start and end
- In the properties panel (bottom of the desktop), check the box "Orient to path"
If you want, you can:
- Look at the flying rocket
- Or get the file flash-cs3-motion-guide-tweening.fla from here and play with it.
Publishing and stopping an animation
Publish settings
When you publish a Flash animation, you should first choose the correct settings.
- Step 1 - Get the settings
- Either click on an empty spot on the workarea, then hit the Publish button in the properties panel
- Or, menu File->Publish Settings
- Step 2 - Choose the Flash version
If you want to make sure that your animation plays on most every computer, select Flash Player 8 (the previous version). Otherwise Flash Player 9 is now widely deployed. You must select "9" if you use Action Script 3.
- Step 3 - HTML
Then select the HTML tab (also in the Publish settings)
- You can untick the loop button (but see below for a more solid solution)
- Step 4 - Hit the publish button
This will copy three files to the same directory where you *.fla file sits.
- A *.swf
- A *.html
- A *.js
Copy all three to your website. Then you can edit the html file and add some more HTML if you like. (Make sure to save copy of this HTML file, since when you publish again the html file will be overwritten).
Stopping an animation
We will improve a bit the flying rocket example, i.e. have the animation stop and display some friendly "Hello".
- Step 1 -Create a new layer
- Create a new layer and call it "action"
- Add a new keyframe for this layer
- Select the layer
- Right-click after the last frame of your animation and add Insert Blank Keyframe (in our case this is frame 21) or hit F7.
- Add some Action Script
- Hit the F9 button
- This will open the Actions-Frame panel in ActionScript 2 (you can dock it to the properties panel) or the Actions panel in ActionScript 3.
- Insert this (in either AS2 or AS3):
stop();
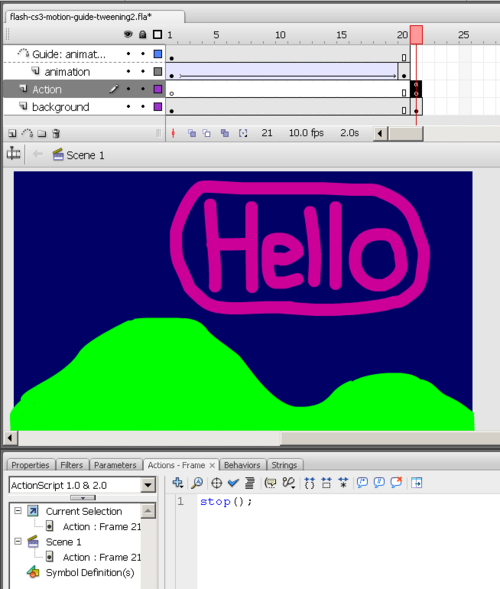
- As you can see in the screenshot below, the last frame in the action layer has a little "a" in it. This means that there is some scripting attached to it.
- Fine tune
- In our case I dragged the Background layer to the right (or hit F5).
- Then I inserted a "Hello" movie into this last frame. I took the one we made in the Flash frame-by-frame animation tutorial
Here is screen dump with the 2 new layers and the bit of ActionScript code.
If you want, you can:
- Look at the flying rocket plus the flashing hello.
- Or get the file flash-cs3-motion-guide-tweening2.fla file from http://tecfa.unige.ch/guides/flash/ex/motion-tweening-intro/ and play with it.
Differences in CS4
In CS4 there is a new way of creating motion animations which is easier. We will document this some other day. In the meantime, you should know that you still can do "classic motion tweening" in CS4. It works exactly in the same way. The only (slight) differences ca be found in the user interface for creating tweens and motion guides:
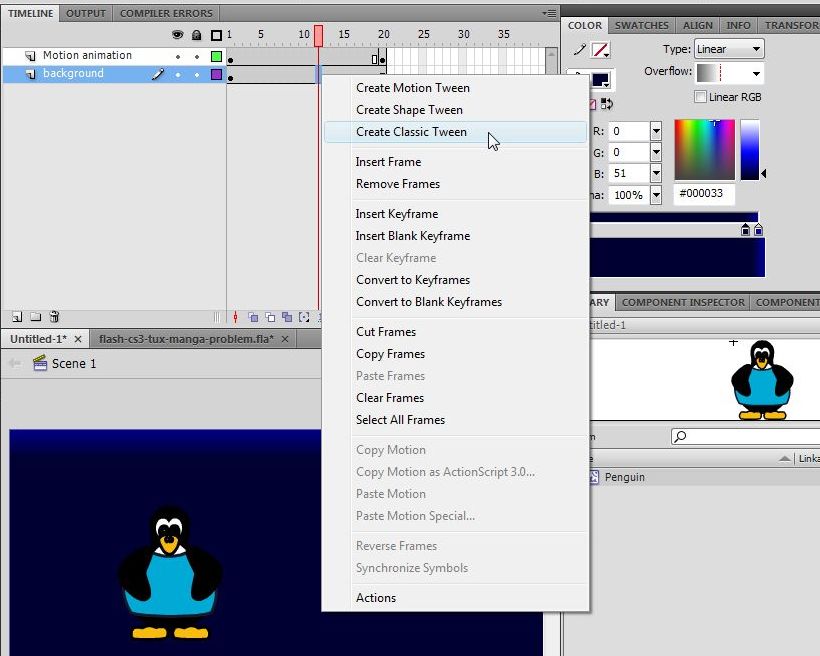
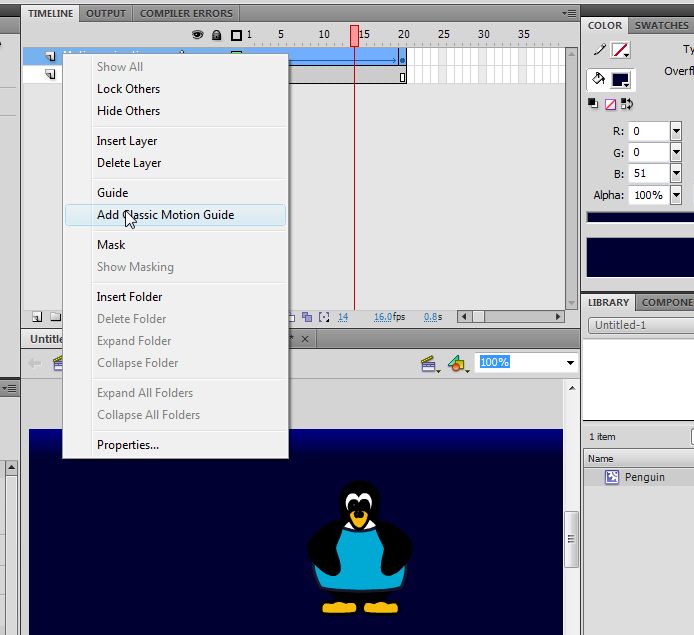
- To add a tween between two frames in a layer, select "Create Classic Tween"
- To add a motion guide in CS4, right click on the layer name to the left of the newly created classic tween and select Add Classic Motion Guide.
The same rules apply:
- Only symbols can be animated.
- Only one symbol can be on the stage per animated layer.
Attached two pictures:
Now right-click on the layer name (not in the timeline itself !)
Resources and discussion
Resources
- clipart
- Follow up the links in Flash and AS3 links - general and Flash and AS3 links - tutorials for other tutorials.
Daniel K. Schneider's opinion
I do have to say that I find the SMIL/SVG time-based animation model including its interpolation mechanisms more elegant and simpler to understand. In SVG, you simply decide which property of the object (position, size, shape, whatever) you want to animate and how interpolation should be done.
CS4 moved in the right direction, i.e. the standard motion tween now creates an "object" by itself...
In CS3, that kind of animation can be done in Flash through ActionScript programming. E.g. by using a tweening library like TweenLite and its sister classes.
Software
Besides Flash from Adobe, certain animation software can export in Flash. I didn't find any software that can export to *.fla, just *.swf. Therefore using such tools is ok if you just want to produce animations in an easier way.
- E-Frontier products (commercial)
- E-Frontier home page
- E.g. Anime Studio Anime Studio (Wikipedia)
- Motion Artist
- Toufee (free online software, needs registration)
- Toufee Home Page
- Toufee (Wikipedia)
- Toufee Wiki
- KToon (not tested)
- Frame-by-frame animation drawing tool for Unix systems (including Linux).
- Ktoon can export animations in Flash or a series of PNG images.
- KToon Home Page
- KToon Wikipedia article
Links to Video Tutorials
You also can look at some of the videos you can find on the Adobe web site
- Video tutorials
- Click in the top left window on "Flash CS3 Professional"
- Then view in particular "Creating animations with motion tweens" and "Understanding the timeline, keyframes and frame rate.
Other Links
- Flash animation (Wikipedia)
Materials used
(including the *.fla's)
Grab stuff from this directory:

