Using Inkscape for laser cutting: Difference between revisions
m (→Using fonts) |
|||
| Line 60: | Line 60: | ||
== Using fonts == | == Using fonts == | ||
In most "modes" you cannot directly print fonts. They have to be transformed to drawings (either strokes or fills). (I actually have to check this in more detail - [[User:Daniel K. Schneider|Daniel K. Schneider]] ([[User talk:Daniel K. Schneider|talk]]) 10:47, 2 November 2016 (CET)). | |||
=== Fonts for cutting === | === Fonts for cutting === | ||
* Transform the fonts to path (once you are happy), then remove the fills or rather change it to a color that will not be engraved (e.g. light blue). | |||
=== Fonts for engraving === | |||
Globally speaking, a font used for engraving: | |||
* should neither be too thin (details being lost) or too fat (too much materials to remove) | |||
* should not be too cramped (e.g. like TimesRoman). There should be some space between the letters. | |||
It probably is best to convert fonts to paths and wind up with fills. There are two possibilities: | It probably is best to convert fonts to paths and wind up with fills. There are two possibilities: | ||
| Line 68: | Line 78: | ||
* '''Filled letters''': add fill and remove stroke | * '''Filled letters''': add fill and remove stroke | ||
=== | Alternatively, install the [http://www.evilmadscientist.com/2011/hershey-text-an-inkscape-extension-for-engraving-fonts/ Hershey text] Inkscape extension. It includes fonts that are nice for engraving, i.e. so-called stroke-based fonts. | ||
* [https://github.com/evil-mad/EggBot/releases/tag/2.7.1 EggBot] extension download | |||
=== Advice for token lettering === | |||
E.g. tokens for simulations and games | |||
* Use a simple font like Tahoma or even good old Helvetica | |||
* | * Bold (also consider engraving twice or defocusing the lens a bit) | ||
* | * 14pt (smaller also can work, but it's more difficult to read) | ||
=== Resources === | === Resources === | ||
Revision as of 11:47, 2 November 2016
Introduction
Inkscape is a popular tool within creative commons/opensource communities, e.g. fab labs and for several reasons:
- The drawing tool is decent enough
- It supports the popular SVG format (and uses an extended version for itself). This allows publishing drawings directly on an HTML5 page. In addition, there are nice repositories for drawings, e.g. http://clipart.org or the https://thenounproject.com.
- There are interesting extensions and probably, over time, there will be more.
Before you start: Make sure to install the latest version. We found that Inkscape 0.49 (that somehow survived in the program files (x86) directory) did not produce proper print files for cutting.
Using Inkscape with Trotec laser cutters
Trotec CO2 laser cutters seem to work like most other laser cutting machines:
- Very thin lines (< 0.01mm or < 0.25pt) are coded with a color and then cut according to settings for each color.
- Other geometry is also encode with a color and then engraved according to settings for each color. Alternatively there is a "picture" mode that takes into account all objects for engraving.
Make sure to create files that include
- fine lines for cutting (if you need to cut)
- standard lines and fills for engraving
You cannot engrave fonts. Once you are happy with a font, make a copy of the file and save it, then convert fonts to paths. Verify that both fills and lines are defined.
Working with patterns
Generate from path extension
The first you do this, you may make mistakes and dammage some drawings. We therefore recommend saving the file into a new version, before each major operation.
Let's assume that you want add objects along a path and/or use a series of objects along a path for some subtractive () geometry:
- Make sure that object to be repeated is on top of the other drawings.
- Select first the object you want to repeat, then the path (holding down the SHIFT key)
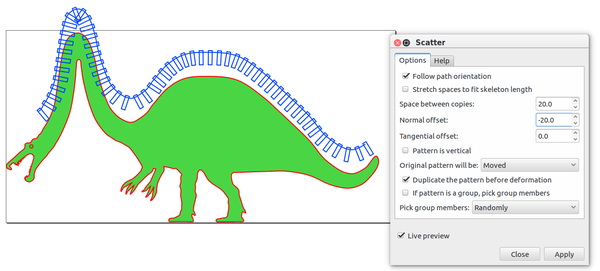
- Select Extensions->Generate from Path-> Scatter
- Use the preview to play with parameters. Distances seem to be in pixels
- After applying, ungroup and ajust individual members.
To subtract the pattern from another path, e.g. a dinosaur
- Create a layer for the dinosaur
- Create a second layer for the pattern
- Copy paste the dinosaur into the new layer and lock the dinosaur layer
- Splice out a path from the copy (read the Using Inkscape for web animation) and draw a rectangle
- Proceed as above, i.e. create the scatter using the generate from path extension
- Remove the path
- Make a single path from the rectangles. Select all, ungroup all, then Path->Union.
- Position if not already done so.
- Unlock dino layer, Select the dinosaur
- Select the new pattern
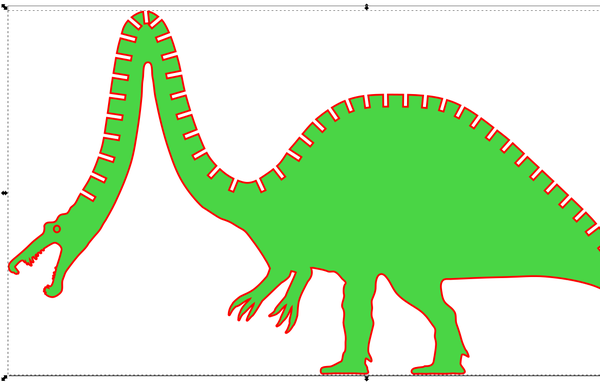
- Path-> Difference
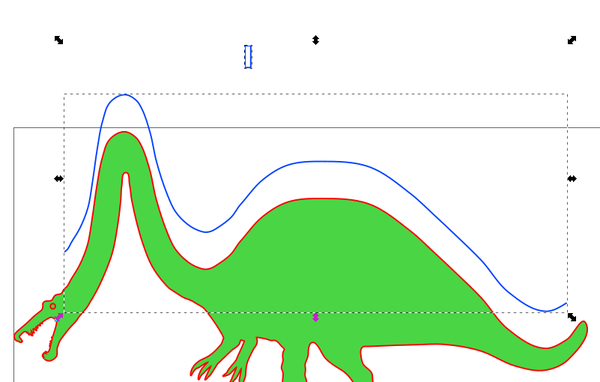
The three pictures below illustrate the most important steps of the procedure (creation of the path is not included)
The dinosaur was extended from this (the big red one in the back). I cut away the head and added a long neck (yes this a heavy genetic splice). Also made the tail somewhat prettier ;)
Using fonts
In most "modes" you cannot directly print fonts. They have to be transformed to drawings (either strokes or fills). (I actually have to check this in more detail - Daniel K. Schneider (talk) 10:47, 2 November 2016 (CET)).
Fonts for cutting
- Transform the fonts to path (once you are happy), then remove the fills or rather change it to a color that will not be engraved (e.g. light blue).
Fonts for engraving
Globally speaking, a font used for engraving:
- should neither be too thin (details being lost) or too fat (too much materials to remove)
- should not be too cramped (e.g. like TimesRoman). There should be some space between the letters.
It probably is best to convert fonts to paths and wind up with fills. There are two possibilities:
- Hollow letters: add stroke and remove fill, then transform stroke to fill
- Filled letters: add fill and remove stroke
Alternatively, install the Hershey text Inkscape extension. It includes fonts that are nice for engraving, i.e. so-called stroke-based fonts.
- EggBot extension download
Advice for token lettering
E.g. tokens for simulations and games
- Use a simple font like Tahoma or even good old Helvetica
- Bold (also consider engraving twice or defocusing the lens a bit)
- 14pt (smaller also can work, but it's more difficult to read)
Resources
There are commercial specialized websites that provide fonts suitable for cutting and engraving.
- Onlinefonts.com
- Fontspace.com has free engraving fonts.
Image processing
I'd have to see the Trotec Control software which does have some built-in image processing facility.
Importing
- Import the picture
- Object->Transform->Scale
Greyscale and contrasts
- Transform to Greyscale (the laser only has 1 color, i.e. depth): Filters -> Color -> GreyScale
- Play with contrast and brightness to make the picture more "black and white" and still preserve details you want to engrave: Filters -> Color -> Lightness Contrast
Aggregate
- Aggregate pixels to larger surfaces. You can use various filters for that (optional)
- Raytrace the whole thing, i.e. translate pixels to vectors. (optional): Path -> Trace Bitmap
- I suggest (for now) playing with brightness cutoff, e.g. select 0.2 to take away greys, also
List of extensions
First, learn how to install extensions. Basically, you have to find the extension directory and then copy all the files
- Read Inkscape Extensions and Addons
- For Ubuntu, read How to install inkscape extension in Ubuntu.
Some extensions may not work, either because they were not tested on your operation system or because they are not compatible with your inkscape version.
JigSaw Extension
This extensions allows to generate puzzles. Tested in Inkscape 0.91, Ubuntu 16LTS in Sept 2016.
Read and Download
Test under Ubuntu 16 LTS
- This works, under the condition to copy manually the contents of the *.py and *.inx files from Github. Click to open, then "raw", then copy/paste.
- The puzzle may to too small to see when you try it first time, since the lines are very faint. Make it bigger.
Lasercut box
This extensions allows to create "saw tooth" boxes. Tested in Inkscape 0.91, Ubuntu 16LTS in Sept 2016.
EggBot extension
The eggbot is a open-source art robot that can draw on spherical or egg-shaped objects. The Inkscape eggboot extension eases the design process for writing and drawing on eggs. However, some of its functionality can be useful for laser cutting and engraving, in particular the Hershey fonts which generate drawings (glyphs as opposed to fonts).
Seamless Pattern extension
(not yet tested)
For engraving larger surfaces it is better to use a nice pattern (as opposed to "milling" off a whole area)
- Download (click on the small download arrow).
However, this extension does not seem to be browser compatible, i.e. may produce some kind of raster format (to be tested).
Alternatively, Inkscape does have built-in "pattern" facility. Not so easy, search for tutorials.
Links
Official
- Inkscape home page and download
- [https://inkscape.org/en/download/addons/ Inkscape Extensions and Addons


