Flash CS3 embedded movie clip tutorial
<pageby nominor="false" comments="false"/>
This is part of the flash tutorials
Overview
- Learning goals
- Learn about how to create embedded movie clips
- Learn how to start/stop these clips with ActionScript assignments)
- Learn how to use movie clips multiple times
- Prerequisites
- Flash drawing tutorial
- Flash motion tweening tutorial
- Moving on
- More Interactivity, e.g. Flash drag and drop tutorial
- The Flash tutorials index has a list of other tutorials.
- Level and target population
- It aims at beginning Flash designers who want to learn some more ActionScript tricks, It does not target beginning ActionScript 3 programmers, although programmers can read this...
- Quality
- This text should technical people get going and may not be good enough for self-learning beginners. It can be used as handout in a "hands-on" class. That is what Daniel K. Schneider made it for...
Manipulation of movie clips
Movie clips are Flash animations. In a *.fla file you can have several kinds of embedded movie clips behaving in a similar way.
- Movie symbols (and instances)
- Movie clips (and instances) that were imported as *.swf files
- Compiled movie clips imported through the *.swc format
The goal of having such embedded animations is to create animations with "moving/changing" objects independently of the flow of the main timeline. You may have a look at early Flash frame-by-frame animation tutorial, i.e. the little rocket we made and re-used in motion animations in the Flash motion tweening tutorial. The new thing is that you should learn how to play/stop and make visible/invisible these clips.
Note: Your whole *.fla also is a movie clip that you could in principle import to other Flash animations.
Creation of an embedded movie clip
To create a new movie clip within a flash animation do the following:
- Menu Insert->New Symbol
- Select Movie Clip and give a good name
Alternatively you also can transform an existing graphic into a movie clip symbol
- Draw an object on the stage
- right-click->Create Movie Symbol. Select Movie Clip
Defining its reference point:
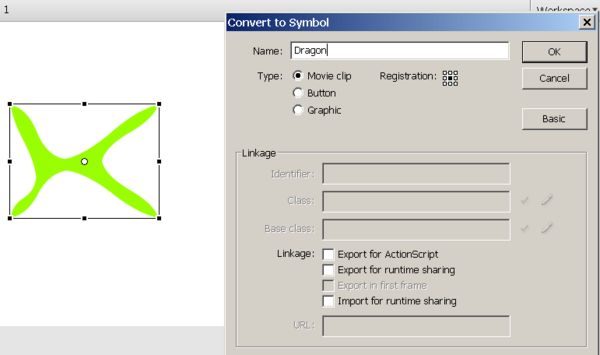
- Each movie clip has a center. You can define it when you create the new movie symbol (see the screen capture below):
You can later change this reference point by moving the drawing in symbol edit mode. The registration point is defined by the little cross (+ sign).
Editing a movie clip
- Double click on the symbol's icon (not it's name) in the library. You now can edit, e.g. a add a motion animation or change its drawings.
- If you double-click on an instance, you can edit the same symbol, but you will see the objects of the stage while you edit.
Do not forget to go back to the scene at some point. When you edit a movie clip you are in symbol edit mode. Make sure that you are aware at which level you edit !
Using a movie clip
See also the Flash video component tutorial for an example.
If there is no instance of the movie clip on the stage, drag a movie from the library to the stage and then immediately give it an instance name. Remember that instance names must be symbols, e.g. movie_books, not something like movie of books. Use a letter, followed by other letters, numbers or the "_" sign only.
Let's assume that the instance name of a clip is movie_books.
- Playing a movie clip
movie_books.play();
- Stopping a movie clip
movie_books.stop();
- Making it visible or invisible
movie_books.visible=false;
movie_books.visible=true;
Tip: Movie clips start playing as soon as they are found in the current frame. E.g. if you put them in frame one, they will play forever until the main timeline moves to another frame. If this is not desired, stop the movie as you may recall from other tutorials.
- Edit the movie clip in symbol edit mode (double click)
- Add a layer called "script"
- Add this action script method:
stop();
Multi-use of a movie clip for animations
Flying kites example
This examples shows how to use an embedded action script movie multiple times. We want some kites flying over the same picture from right to left.
To make it bit more interesting, for each kit instance we change
- the position, i.e. flying lower or higher
- the size of movie clip from 50 to a 100% of its orginal size
- the alpha value from 80 to 100%.
Have a look at the http://tecfa.unige.ch/guides/flash/ex/embedded-movie-clips/kites.html[ flying kites example]
- Step 1 - Create a movie clip with a motion animation
- Make sure that the animation starts a lot to the right and extends a lot to the left of the picture (since we will resize it).
- Step 2 - Export for ActionScript
- Right click on the movie clip symbol in the library and select linkage
- Click on ok
- Step 3 - Insert the ActionScript code
- ActionScript code
- Get the code and play from here
- http://tecfa.unige.ch/guides/flash/ex/embedded-movie-clips/ kites.*
Exercice: Make a snowflakes animation that goes from top to bottom
This article or section is currently under construction
In principle, someone is working on it and there should be a better version in a not so distant future.
If you want to modify this page, please discuss it with the person working on it (see the "history")
