Stitch Era - creating hot fix designs
Introduction
This beginner's tutorial for the Stitch Era embroidery software explains how to create designs for hotfix stones.
- Tutorial home page
- Stitch Era embroidery software
- Learning goals
- Digitize a vector graphic into a hotfix stone (rhinestone, strass) design
- Use various lettering methods
- Manipulate hotfix area parameters
- Edit individual hotfix
- Prerequisites
- Stitch Era embroidery software and Stitch Era - creating embroidery from vector images (in particular, be able to create a design defined by vector graphics).
- Next steps
- Stitch Era - creating embroidery with hot fix stones
- Related pages
- Hotfix stone
- Materials
- You can reuse the pictures. In the wiki, click on picture to make it larger, then click again and save it.
- Quality and level
- This text should technical people get going with Stitch Era. I use it for an optional master degree course in educational technology.
- Last major update
- October 2017.
Stitch Era includes an extension module that allows creating hotfix design templates (also called rhinestones or strass). The module is also available as stand alone program under the name of ''Hotfix Era''. This software allows filling "areas" with "holes" for hotfix stones according to various parameters. The design then can be sent to a vinyl cutter or a laser cutter in order to create a template.
The principle for creating a hotfix design is the same as creating embroidery areas. Instead of filling with a stitch patterns, areas will be filled with "beads", i.e. circles that position each bead. As explained in the hotfix stone article, there are different methods to place the beads. Without much technology, one can:
- manually set the stones with an applicator (a kind of soldering iron with a special tip);
- or print the design on paper, put the stones in place on the paper (flat side down), apply a transfer sheet and then move the attached stones onto the fabric.
Larger designs do need some technology. There are two options:
- Create a template, e.g., a 0.5mm thick cardboard, insert the stones, then as above, use a transfer sheet. It will allow handling designs with hundreds of stones fairly easily.
- Use a stone setting machine (various types exist, not discussed here)
The template method
We will use the template method. With the Stitch Era hotfix module, one can create a design template, export to a vector fromat (e.g. SVG or DXF) and then cut out the holes with a laser cutter or a cutting plotter. Typically you would use 0.5mm cardboard or some strong textile. Below, we quote the procedure from an older version Stitch Era V11 manual (retrieved oct. 2017), with slight modifications.
The key of this method is to create templates or stencils. Since you cannot easily sort out different sizes and colors beads, you need one template for each different piece (different size, shape and color) your design uses. A template is a rigid plate with a set of small deep (0.5 mm) depressions or marks, arranged according the design, in the places where the hotfix pieces should be set. Marks have to be of the same shape of the piece they are intended for, but a bit larger.
The idea is to spread a handful of hotfix pieces over the template and to let them to become trapped in the marks. This happens because hotfix pieces have a flat side (the back) and a round side (the front). So, they become trapped with the shining side up. Usually, a soft brush (e.g. foam) is used to drag the beads over the template until all marks are occupied. Then, a sheet of transfer material (with the adhesive toward the pieces) is pressed by hand against the template. When the transfer sheet is removed from the template, all beads are attached to it. The transfer sheet is then placed on the garment placed in a heat press with the adhesive toward the garment. One also could use an iron, however the result may not be as good since it it is difficult to apply it evenly with the right temperature and pressure.
Hotfix can send files directly to some plotters and laser cutter brands. Instead we export to SVG format that we will modify a bit before sending it to the laser cutter, i.e. in our setting the cutting lines must be red (RGB 255,0,0) and have 0.01mm width. If not done in Stitch Era, we also will have to add a cutting rectangle around the design with some margin and adjust the size of the whole print.
Stitch Era will automatically make the holes a bit bigger. E.g. an SS16 (3.8 to 4mm) stone will be represented with a 4.5mm circle, i.e. it will add 0.3mm (dec mm) to the 1.95mm typical radius of an SS16. This setting can be changed in File tab, Preferences setup -> Application -> Project -> Hotfix -> Hotfix cutting margin. It probably should be reduced if you have a laser cutter (see the test below). E.g. 0.2mm should be enough.
If you don't own a cutting plotter or laser cutter, you may use a cardboard around 0.5 mm thick and drill on it holes a little larger than the beads, e.g. for an SS16 (4mm) use 4.5mm. You may use a Hotfix Era printout of the design 1:1 scale as a reference. Print on cardboard or glue the paper on top.
The drilled template can be glued on top of another board piece of the same size. The template will be ready to use. If you do not glue something to the bottom, make sure to use a very flat surface and do not to move the template while you fill it with stones. Otherwise you may have to restart since it may slip over the stones that are already in place.
Different design methods
As for embroidery, Stitch Era with the hotfix module (or Hotfix Era) offers a whole range of design path for hotfixing. Functionality can be different according to software level. Here we will discuss a version we obtained for our students and that is integrated within Stitch Era.
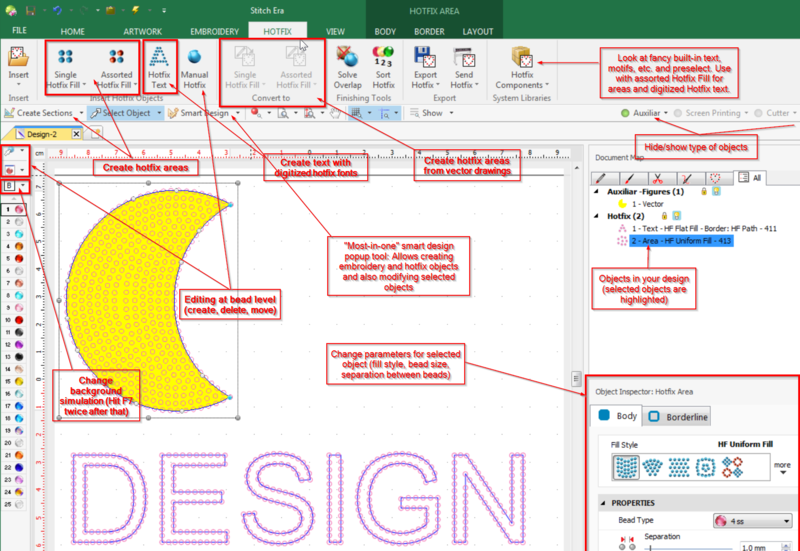
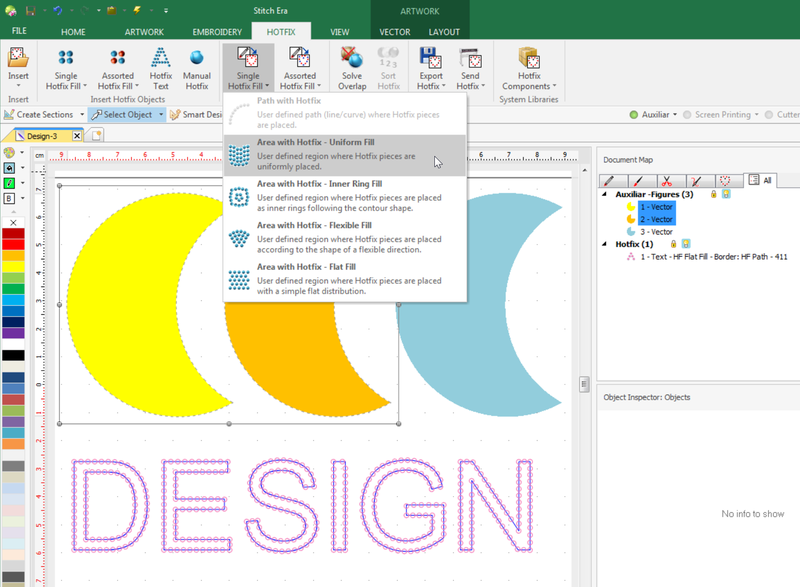
As for embroidery, you could start designing from a raster image or from vector drawings and then digitize to hotfix areas. On the hotfix side, you can draw high-level objects and fill them according to various parameters, you can use a lettering module or you can work at the individual bead level. The moon below was created as vector graphics and then filled with hotfix stones, using the "Single Hotfix Fill" pull-down menu in the middle (see below)
In the ribbon menu, there are about four hotfix creation tools. From left to right:
- Two tools for creating hotfix areas by clicking and/or dragging the mouse in the workspace. Use the context menu (right click) to close a drawing and again to create it. Read the section of working with Bezier curves in Stitch Era - vector graphics.
- A button to create individual beads (Manual hotfix)
- The text creation tool (will change the menu layout)
- The conversion tool from vector objects to hotfix areas
In addition in the main menu (below the ribbon menu bar), there are tools that allow doing the same, in particular the "Create Sections" and "Smart Design" pull-down menu.
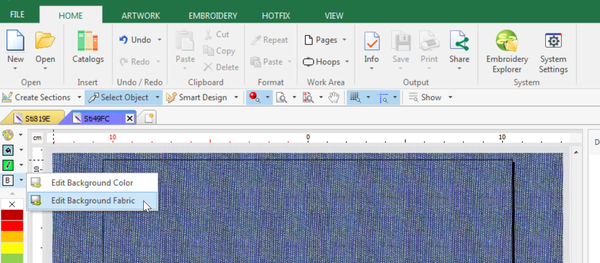
On top of the beads palette you find three little pull down menus: The first two allow making modifications at the beads level (e.g. Edit beads) and one below allows defining a background picture.
As soon as you click on a hotfixed area in the workspace the interface will adapt its ribbons to it. E.g. clicking on text object will show hotfix text with two sub-tabs: text and layout as shown in the next screen capture.
Size and placement
Before starting to design we suggest defining a "paper size" (or a "hoop size" if you also plan to add embroidery to the design).
- Go to the
Home - Select
Pagespull down menu - Either select an existing page size, or create a new one that you then can select.
According to Danielle Petroskey's Ultimate Guide To Design Size & Placement (retrieved oct. 2017), below are the most common hotfix design sizes and placements for T-shirts:
Placement of centred design:
- Adult: 8-9cm (3–3.5)" down from the collar
- Youth: 5-7cm (2–3") down from the collar
- Toddler: 5cm (2") down from the collar
Typical Sizes of a design:
- Adult: 28x28cm (11x11")
- Youth or small adult: 26x26cm (10.5x10.5")
- Youth (small): 21x21cm (8.5x8.5)
- Toddler: 14x14 (5.5x5.5")
You cannot do much wrong if you use a landscape A5 size (21 X 14.8 cm) or a 21x21 square. I.e. you can sketch a design on some ordinary portrait A4 office paper.
A really big size for an adult is about 30 x 35.5cm
Sizes and placements for hoodies are similar. Of course, you can apply hotfix stone designs in other areas, e.g. on the sleeves, down the front, on top of the back (similar as above), down the back, hip area, etc. The largest recommend size by Danielle Petroskey is 30.5x35.5cm (12x14)
Vector graphics to hotfix
As with embroidery, you can create hotfix designs by drawing or importing vector graphics. In sum, the procedure for translating a series of vector drawing objects to hot stone areas is the following.
Digitizing vector graphics
- Create or import a drawing
- For each object, make sure to define either a fill, a border or both.
- Open the hotfix tab
- Select one or more or all objects and select a fill option in the single hotfix fill or assorted hotfix fill menu in the middle of the hotfix ribbon menu bar (see screenshot below)
- This will create a hotfix object (path or area) with default values
If you cannot see the result:
- Make sure to click on hotfix to the right in the menu bar (it must be green). At the same time, you could turn off "auxiliar", i.e. not show the vector drawings.
- Click on the lightning bar on top, i.e. generate the beads if its not done automatically (or hit F9 or FN-F9 on some windows machines)
The moons were created with subtractive geometry as explained in the Stitch Era - vector graphics article.
Parametrizing hotfix areas
Each hotfix object now can be reparametrized. Below we changed settings for the middle moon. We use SS20 stones and an "HF inner ring fill" as you can see in the screen shot below.
Visualizing the result
In order to see the result in a more telling way, hit F7 (or FN F7 on some machines, or use the little pull down menu with the red ball in the main menu bar)
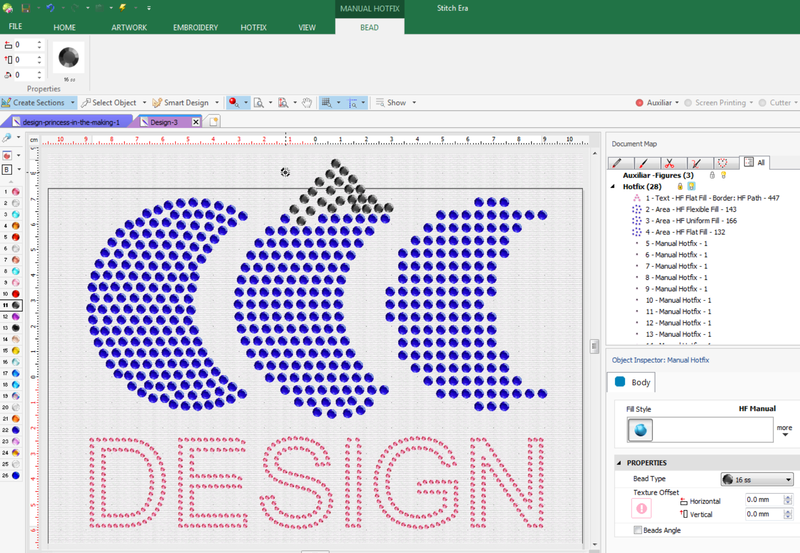
The following picture shows the three moons with three different fills:
- left moon: HF Uniform fill
- middle moon: HF Flexible fill
- right moon: HF Flat fill
Only the Uniform fill will give good results in this precise case:
If none of the automatic fills looks OK, then play first with additional parameters. E.g. if we wanted a denser fill we could have chosen Hexagonal fill (top ribbon menu, or initial layout in the Object manager). In the picture below, we changed the fill of the left moon to Uniform fill / Hexagon variant.
If the result is still unsatisfactory, then choose the best automatic fill and then make manual changes.
- You can move and delete stones using
Edit hotfixmode (pull down menu to the left on top of the palette). - You can add stones using "Manual Hotfix" (select hotfix tab, then select the icon). Before you click, select the right stone in the object manager. In our case (just for the fun of it) we added some grey stones on top of the middle moon and also moved some of the blue ones. To exit from manual editing, click on another tab, then click on "select object" for example.
Creating hotfix designs with digitized letters
You can create letters in different ways:
- Use the Hotfix lettering functionality of which exist two variants:
- Digitized fonts, i.e. fonts that are specially created for hotfix (recommended)
- True type fonts that you can fill either along the borders, inside the fills, or both
- Draw vectors, then digitize to hotfix (discussed in the next section)
Select size and background
Before creating a hotfix design we suggest turning on a simulation of the cloth and then also add a "page size", e.g. A5 landscape size as in the picture below.
Enter the text with a nice font
For beginners, it is probably better to start using a digitized font, i.e. objects that have all the beads positioned in an optimal way.
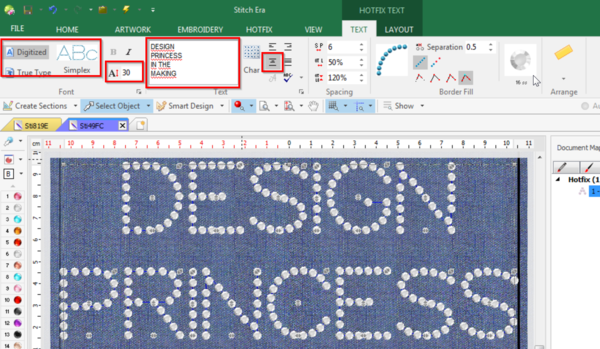
- Click on the Hotfix tab in the ribbon menu, the click on the
Hotfix Texticon. - Alternatively, in the Smart Design Popup, open the hotfix tab, and click on the Hotfix Text icon
In both cases you now should see the Hotfix menu bar. If it does not show click on the TEXT that shows on the menu bar.
- To the left, in the ribbon menu bar, select
Digitizedand then choose a font. - Enter the text in text area in menu bar (To add a new line, hit CTRL-Enter)
- Change size (30 in our case) and the alignment (middle in our case)
Change the rhinestone tone and size
You now should select the rhinestone size:
- Click on the rhinestone icon
- Select one from the popup menu that includes a default palette of rhinestone sizes and colors
Hotstone sizes are usually defined by SS measures. You can have a look at size definitions in the size table. For example:
- SS6 = 2mm
- SS10 = 3mm
- SS16 = 4mm
- SS20 = 5mm
If the wanted size and color is not in the offered selection, then click on add bed at the bottom. You will get a popup that will allow defining all sorts of colors, shapes and sizes. We chose SS16, standard shape and clear crystal color.
Now you could change many other parameters, but we find that the result as shown in the screen captures above is pleasing enough and we will stop here.
Creating hotfix designs with TrueType letters
There are two ways of lettering with true type letters
(1) Using hotfix fonts
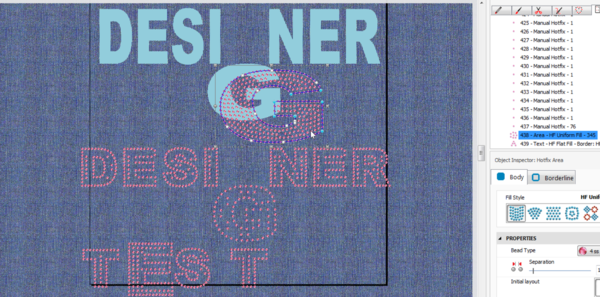
- Advantages: faster, better initial placement of beads, text is editable. It is easy to move a letter up/down or change its size as shown with the "TEST" word in the screen capture below.
- Disadvantage: Shapes of letters are very difficult to manipulate. If we understood right, one has to disassemble the design, then manipulate at the bead level. Shown with the "G" in the screen capture below.
(2) Going the vector drawing route.
- Advantages: Better flexibility in drawing the "right" shape, i.e. vector letters are more easy to manipulate. A line of text can be "ungrouped" and you then can easily change shapes. The same is true for generated hotfix objects. These are ordinary hotfix areas and can be parametrized like any other of that kind.
- Disadvantages: Text is not editable, each line must be defined separately. Generated areas are not optimised for lettering.
Both can be filled (unless disassembled)
- along the stroke defining the letter shape
- inside the fills
- both stroke (outline) and fill (inside shape).
In provisional conclusion, I'd either use digitized hotfix fonts (see previous section) or vector fonts, depending on how much I would need to modify the shapes of letters.
Export hotfix designs to a laser cutter
As explained above, there different ways of using hotfix designs. Since we got a modern little laser cutter, we will export the design to SVG and then send it to the machine. The steps are fairly simple. Firstly:
- Select hotfix tab
- Choose
Export hotfix
In the popup window:
- Select SVG as output
- Depending on how you plan work, you can decide to merge all designs into one page. To do so, drag all the "Bead" objects to the right into the first page. Otherwise, Stitch Era will create a different SVG file for each bead type used, e.g. that differ in size, color and shape.
The final step is:
- open the exported SVG file in an SVG editor, e.g. Inkscape
- Make the strokes hairline and red (that is how we define cutting lines with our Trotec)
- Send to the cutter and select material type and thickness.
Example template
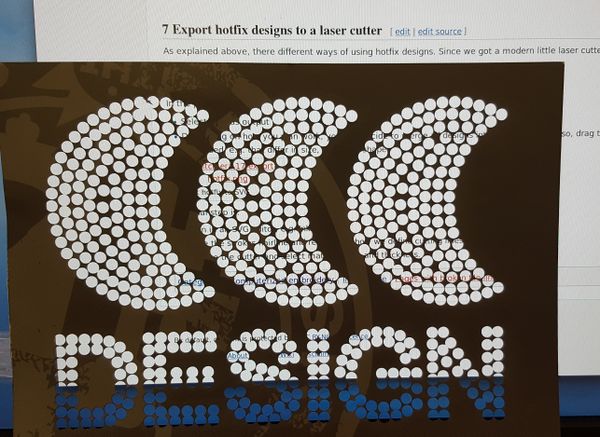
The result of the design discussed above is shown with the two pictures below. The cardboard template is too thin, but it was just a test. I probably will use 0.8 mm Acrylic and also make the extra radius a bit small. A good laser printer is fairly precise, more then a cutting plotter.
I also got an overlap warning in Stitch Era that I ignored. Such errors can either be fixed manually or automatically (click on Solve overlap). Heavy overlap must be solved. One also can very slight augment the distance between stones. The default is 1mm I believe.
Using the template with a heat press
- Read the hotfix stone article and maybe the description of the heat transfer press used at TECFA.
