Netfabb engine for RepRap
<pageby comments="false"/>
Introduction
Netfabb engine for RepRap creates machine code for RepRap-like 3D printers printers from the *.STL format. Such software is sometimes called a "slicer".
This software is included in the purchase of a fabbster 3D printer. Since we own one, our documentation will focus on Netfabb engine for the fabbster.
See also:
“The netfabb Engine for RepRap is a machine-specific software designed for 3D-printing with devices based on the RepRap principle. It is able to process any STL file and generates high quality toolpaths. It does not require any additional software. The [default] Engine includes a customized firmware for the BFB 3000 and the BFB RapMan, which allows accelerated moves during printing, machine control with a USB connection and direct data transfer.” (Engine for RepRap, retrieved May 10 2012)
A variant of this engine is what we would call Netfabb engine for fabbster. However, so far it is not documented as such and since a fabbster is just a somewhat modified Mendel RepRap design, most functionality should be the same. Probably the only major difference is the easy to understand USB control interface, machine settings, etc.
Calibration for dummies
Normal people like me can't print with default "balanced" and "detail" settings. However, it's not very difficult to create profiles that create prints that are comparable to what most other 3D printers in this class can do.
Create a new Material Profile
Printing with very thin layers won't work well since when the print head moves slowly and has to produce thin or fine width, RPM is too low (between 2.5 and 5) and Plastic won't come out anymore. It will get weak and then nothing at higher RPM will work anymore. So let's work with bigger layers. 0.25mm is quite ok for most needs.
- Select a good temperature, ca. 260-270 for ABS (but a bit lower also should do)
- Material settings: Layer Size = 0.250
- Width: Set all Width between 400 and 1000.
- Speed: Set snake to 25mm/s
- Jumps tab: Set Travel RPM = 0. This may not be necessary, but negative extrusion again can cause plastic to weaken.
Save when you are done
- Close
Create a new Build Style
Of course, you could keep a fairly complex one, but I suggest to make it as simple as possible for your first attempt since less calibration work will result.
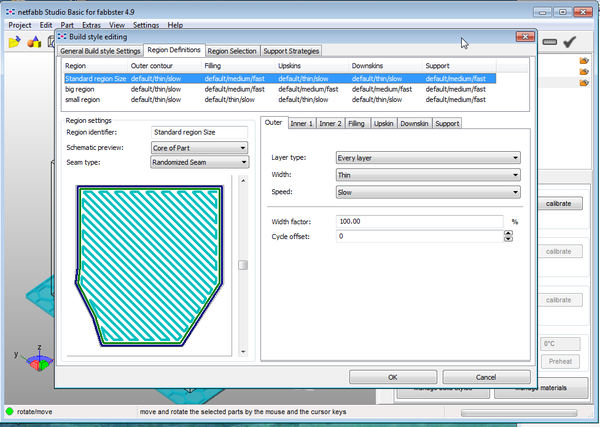
A radical solution looks like this: Set each region (per default you got three) to
- default/thin/slow for everything that should be precise (outer walls, roofs)
- default/medium/fast vor all the Rest.
"Default" means printing each layer. Makes sense, since they are bigger now.
Save when you are done
- Close
Calibrate
This involves at least one step. Firstly you will have to guess what RPM you would need for the new layer size. Roughly speaking just add 60% to each and also make sure that none is below 10 !
- Select your new Material (z.b. Green ABS Angelina Style)
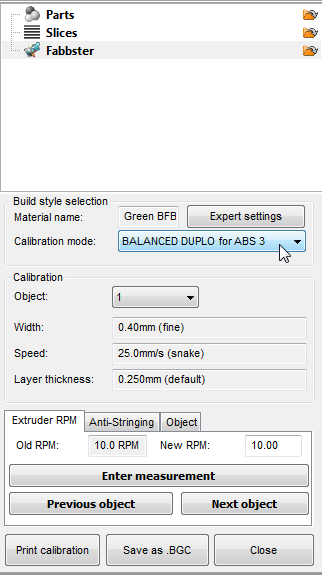
- Press "Calibrate"
Now you are in the calibration assistant
- Now just calibrate for your new Build Style !
- Select it
Now you will have to configure each Speed/Width combination, i.e. set an RPM and fix the anti-stringing (again)
- Add 50-60% to each RPM. Make sure that none is below 10
- Set New RPM
- In the Anti-stringing tab, set pullback to 0
- Set New pullback
- Then Click on Next Object or select it from the pulldown menu
Test with a small print
- If the result is ok, you are done
- If it is not then you can think and adjust Material + Build Style and then again adjust RPMs. The better alternative is to the Netfabb calibration assistance.
Netfabb calibration assistant
- Check if the print head can go to the back and the right back corner ! It must be close but not touch !!
- Press "Print Calibration"
- With a Caliper measure each wall
- Report the width for each calibration object (the speed/width combos you just defined)
- RPMs will change, probably go lower
Test with a small print
- If the result is not ok, then you must change your build style (sorry) or just lower your ambitions. If you change Build Style, check the calibrations again. You may have a freaky element, e.g. (snake/thin) that you must adjust !
- Lower temperature by 3-5 degrees. Lower is better (creates better overhangs)
- Manuelly ajust RPMs if you like
Principles and levels of configuration
(to do)
Printing with PLA
I tried to print with translucid PLA and so far I didn't manage.
What I think so far:
- Don't print a raft
- Remove the filament, then when the extruder goes up for heating insert it with RPM = very fast. If you leave the filament inside it will clog the nozzle, i.e. expand in the square and then can't be pushed down anymore
Expert settings
- Lower speed by half (snake = 10, ultra = 60)
- Double all the width in the same way
Links
- At Netfabb - Wiki pages
- Engine for RepRap. This is the menu page.
- Netfabb Engine for RepRap Machine Settings, explains basic settings and the interface with 3D printers.
- Calibration of Engine for RepRap. Calibration allows to detect what your machine can do, an alternative to thinking and trying out.
- Material Settings for netfabb Engine for RepRap. Actually more than Material settings. Explains how to configure basic parameters (temp, speed, layer size etc. for a material profile(
- Build Styles for netfabb Engine for RepRap. Most important reading, since it explains how one can configure Netfabb to deal with different sorts of parts.
- At Netfabb - forums


