Concepts of computerized embroidery
<pageby nominor="false" comments="false"/>
Introduction
There are many concepts related to computerized embroidery. In this entry we shall try to summarize the most important ones that are of interest to a absolute beginner. Do not trust anything yet. You are in front of rough draft written by someone who has to learn more and to test a out a few things first - Daniel K. Schneider 22:28, 22 May 2011 (CEST)
Although advanced home user software such as the free Stitch Era universal is pretty smart in converting vector drawings to stitchable sections and the latter to stitch commands, you may have to intervene manually and/or at least set a few parameters in order to get a decent enough result.
According to Kathy Jones, the "big three" (problems) of embroidery are puckering, poor fabric coverage or poor registration and “correct stabilization, correct hooping and correct tension on your embroidery machine” will make your embroidery much more successful. However, there is more to know.
- What thread type to choose
- What backing (solid or solvable fabric on the back side) to use
- How different fabric types behave
- What underlay stitching to use in different situations
- Basic stitch types
- Choosing filling patterns and strategies
- Push/Pull (the fact that a stitch is pulled down when it locks)
- Stitching order (and how to change it)
Threads
Material
Most popular embroidery threads are made from Viscose (also known as rayon) or Polyester. Other materials include cotton, wood and metalized.
Thickness
There exist several metrics for thickness and none is really intuitive to understand (like thickness of threads as for climbing ropes). According to Madeira (UK), thread thickness measures are standardized weights (standardized in the sense of statistics). For example:
- In the most popular metric numbering system (Nm or No), higher means finer and lower means thicker. Nm is measured as number of 1000 metre hanks per kilo.
- In the so-called Denier or Tex systems (used for stockings), the opposite is true. Tex is weight in grams of 1000 metres of yarn and Denier is weight in grams of 9000 meters of yarn.
We use Madeira Rayon 40, a so-called "classic" Viscose (artificial silk) thread type that is appropriate for beginners. It can be used both on fine fabrics like silk and rougher/thicker fabrics like jeans or leather.
Some standard weights (Nm/No):
- 80 very fine, e.g. for monograms on silk ties
- 60 fine, e.g. for delicate fabrics and small letters)
- 50 medium-fine, for medium weight fabrics
- 40 is medium, standard fabric, the most popular weight
- 30 medium-thick, for filling larger surfaces, quilts, cross-stitches
- 15 thick
- 6 very thick (not suitable for a machine)
Thread colors
Each make has its own color numbering system ....
Needles
Needles should be adapted to the thread type and weight. Needles for embroidery are usually a bit different from other types of sewing needles. If we understood right the tip is less sharp and the eye (opening for the thread) slightly bigger, but people also seem to use other sewing needles for embroidery.
According to Wikipedia based on Lydia Morgan's "Machine-needle know-how", needles have the following structure (from top to tip)
- shank - clamped by the sewing machine's needle holder
- shoulder - where the thick shank tapers down to the shaft
- shaft - a length suitable for driving the eye and thread through the material and down to the bobbin. The shaft is the longest part and determines the size (diameter)
- groove - cut in the back of the shaft to release the thread into a loop that aids the hook or shuttle to pick up the thread
- scarf - provides extra room for the hook or shuttle to pass close by
- eye - the hole, carries the thread
- point - penetrates the material by parting the threads or cutting a hole
In principle there exist only two kinds systems with respect to how it is attached to the machine, length etc.:
- System 130/705 H (shank has a flat side) ... far more popular since much more stable
- System 287 WH (round cylinder for the shank)
Points (tips) come in several variations:
- Acute round point (very sharp) - pierces threads
- Normal round point (sharp) - doesn't pierce much - typical sewing needle
- Light ball point - doesn't pierce threads - typical embroidery needle
- Medium ball point - doesn't pierce threads
- Twist point
- Chisel point - can punch holes, i.e. pierces through thick materials
For normal small needles, there doesn't seem to be any big visual difference between round points and ball points. Both have a tip that is somewhat sharp, but both should in principle glide between threads in order to preserve the fabric.
With respect to types, needles have according to Wikipedia (GER) a letter code. Some needles also adopt the Schmetz color codes, but with others color just refers to size ...
| Letter code | Schmetz Color code | Application area | Features |
|---|---|---|---|
| H | no color | universal | normal slightly rounded tip |
| H-E | Embroidery | normal slightly rounded ball point tip | |
| H-J | Jeans | Acute sharp tip, rigid | |
| H-M | Microfiber | sharp point | |
| H-Q | Quilting, Stepping | slightly rounded | |
| H-S | Stretch, T-shirts | medium rounded tip | |
| H-SUK | knitted, lycra | medium rounded tip | |
| H-LL | Leather |
Needle size is in 1/100 mm sometimes assorted with an outdated Singer size number.
Typical sizes (shaft diameter) are:
- 100 = 1.0 mm
- 90/14 = 0.9 mm
- 80/12 = 0.8 mm
- 75/11 = 0.75 mm
- 70 = 0.7 mm
- 60 = 0.6 mm
Backing
Backing also called stabilizer is either a woven cutway or tearway fabric or some type of solvable foil that are used underneath the fabric to provide some stability and support.
Underlay
Underlay will stabilize a stretchable fabric for a section that you would like to stitch. Underlays also can be used to create a 3D effect or otherwise change the look of stitched layer on top. Finally, underlay is also used to even out a surface, e.g. tack down sticking out threads on towels or flatten out corduroy.
There are several kinds of patterns used, however one could distinguish the following three families of underlay:
- No underlay
- Soft (little)
- Hard (a lot)
In addition both soft and hard underlays then can use different patterns like:
- Some kind of lines that are orthogonal to the final stitches. E.g. for an "o" letter you would use a circle, for a larger filled pattern a rectangle.
- ZigZag
- Some kind of diagonal lattices, .e.g \\\ or XXX
Fabric and fiber types
Fabric has an impact on the result. In particular, certain types of fabric are more difficult since they are stretchable. Stretchable fabric could be stabilized in several ways that can be combined:
- By using some backing
- By using an appropriate underlay
- By using some pull compensation (?)
Other fabric such as bath towels and fleece present the problem that fine-grained stitching can "get visually lost".
Below are some fabric types:
- Canevas
- Cotton
- Curdory
- Denim
- Fleece
- Jackets
- Leather
- Nylon
- Lycra
- Knit wool
- Terry (towels)
- Twill
- Wovens
Stitch types
There are main stitch types, but we could distinguish three five main types
- Running stitches (to stitch lines): -------
- Satin stiches are used to stitch wider lines, i.e so-called columns. Typically, a narrow zigzag stitch is used.
- Fill stitches (to fill in larger sections in various ways)
- Jump stitches (i.e. no stitches), to get from one point to another.
- Lock stitches should be used at the end of all elements (in particular columns and fills)
Running stitches
- The bean stitch uses the following pattern like two stiches forward and one stitch back, i.e. it will create a strong solid line.
Filling strategies and patterns
A first questions is how to fill in sections (areas). One ground rule is to use a variety of stitches and stitching directions and for two reasons:
- Push/pull effect can be compensated (see below)
- The design looks more interesting.
Good digitizing software should help with that.
A second question concerns density. In programs like Stitch Era, density is measured in terms of lines / mm. For example its default density of 5 means a stitch every 0.2mm and this is fairly dense. Density of 4 also should still look dense. E.g. in Embird Studio, default density seems to be 4.
Push / Pull
(don't trust this yet ... still learning - DKS)
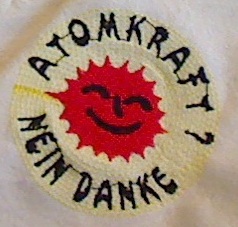
Push and Pull refer to the idea that a fabric can be either pulled in or pulled out by the stitches. This typically happens when you fill larger surfaces. For example, a circle can become an oval. The first two following pictures show anti- and pro-nuclear logos between 5 and 7cm in diameter. The third picture shows distortion in the center-outside axis. The large yellow sold circle was replaced by light fill pattern using running stitches.
Both yellow circles were printed with a quite solid underlay that ran diagonally. Same for the red area and that was totally useless. The underlay probably had the effect to insure that the embroidery was flat, but it could not prevent the pull effect. We did not try using a backing.
- Pull compensation
- Pull compensation that one can it with the software tool will slightly widen the width of stitch. It is applied to two sides of a section since the pull happens in one direction. The pull direction depends on the kind of filling used and the underlying fabric.
- Typically, one could add between 5 and 15% if we understood right. The larger solid circles above probably need 15%, but so far, we didn't do any tests.
- Lower density
- Some software, e.g. Stitch Era uses 5 lines /mm density which is quite a lot. Lowering to to 3mm may help.
- Different patterns
- Instead of generating a homogeneous left-right or up-down pattern, you might use one that pulls in both directions.
- Don't
- Another solution is not to print such large areas, i.e. leave out holes where other parts are to be stitched. An example is shown in the next picture. This logo was digitized from a bitmap (including the lettering) and doesn't have any over-stitching.
Stitching order
.. is crucial of course, since stitches may overlap a bit. I believe that one could adopt the following heuristics:
- lines (in particular a contour) should be printed last
- larger areas before tiny areas inside (on top)
- neighboring areas using the same thread should be stitched in line, in order to avoid jump stitches.
- same thread color in one shot
... of course some of these rules are contradictory. It's probably best to print a test object and see if it makes sense to change order. In addition one also can overstitch things like lines. An embroidery machine allows to selectively print layers (threads).
Links
- Embroidery Glossaries
- Glossary of terms at embroideryauthority.com
- Digitizing Dictionary by Kathy Jones
- Kathy Jones Tutorials has a series of interesting tutorials, e.g
- Density for Machine Embroidery
- The Perfectly Digitized Design
- The Perfectly Embroidered Design
- A Stitcher’s Guide to Pull Compensation by Kathy Jones.
- Needles
- Needles – What the Home Sewer Needs to Know 2004, Web of Thread, Inc.
- Sewing machine needle (Wikipedia)
- Nadel (Wikipedia, German)
- Schmetz Needle Guide (PDF)
- Machine-Needle Know-How by Lydia Morgan, Threads Magazine #94 (2008), pp. 59-61
- Book lists
- lacis, an online story has books on Machine Embroidery
![Sewing Machine Needle Parts. Source: [800px-SewingMachineNeedle-parts.jpg Wikipedia]](/mediawiki/images/thumb/4/4a/SewingMachineNeedle-parts.jpg/300px-SewingMachineNeedle-parts.jpg)


