Flash CS3 button tutorial
<pageby nominor="false" comments="false"/>
Overview
Buttons are interactive elements on which a use can click for example. This is part of Flash CS3 tutorials.
- Learning goals
- Learn how to create and use basic Flash 9 (CS3) buttons
- Learn a little bit of Action Script 2.0 to run something with a button.
- Prerequisites
- Flash CS3 desktop tutorial
- Flash drawing tutorial
- Flash frame-by-frame animation tutorial
- Flash motion tweening tutorial (for the rocket launcher)
- Moving on
- The Flash article has a list of other tutorials.
- We suggest e.g. the Flash components tutorial
- Quality
- This text should technical people get going and may not be good enough for self-learning beginners. It can be used as handout in a "hands-on" class. That is what Daniel K. Schneider made it for...
- Level
- It aims at beginners. More advanced features and tricks are not explained here.
- The executive summary - buttons
Buttons are interface components to add simple interactivity, such as displaying extra information, launch a movie clip etc.
(1) To create a button, either:
- Draw an object and make it a button (Right-click Convert to Symbol and select Button)
- Get a button from the built-in Library - buttons.fla
(2) To use a button: ActionScript 2.0 and ActionScript 3.0 (Flash CS3/9 an later) do not work the same way !
- ActionScript 2.0: Attach some action script to the button that will launch something
- ActionScript 3.0: Write some code in the timeline
A simple slide show with your own buttons (AS 2)
We will show how to create simple buttons first. Then we show some ActionScript 2.0 code that demoes how to make a simple slide show. Purpose is to explain buttons and some Action Script, not to make the perfect slide show tool.
First, we will import the pictures and adjust the stage. This we we can get a feel for the size of buttons needed. Then we draw the buttons. Finally we will make it interactive
- Step 0 - Open a new file
- Select Action Script 2 (This code will not run with Action Script 3.0 !).
- Step 1 - prepare some pictures
- Before importing the pictures, it's a good idea to make them all the same size, e.g. I made my pictures 640x480. If you work under windows, simply use the MS Office Picture manager...
- Then import these all to the library: Menu File->Import->Import to Library. Select all the pictures you would like to import, then click OK.
- Importing to library will turn them into symbols. That way we can later reuse them if we want to.
- Step 2 - Adjust the stage size
- Create a new layer, called "Pictures". In the first keyframe put some text, e.g. "Picture show" (you can fix this later)
- Create a new keyframe (frame 2)
- Drag a picture on the stage of frame 2, then make the stage as big (at least) as the picture. You also can make the stage a big bigger and then select for instance a black background
- To adjust the pictures, position use the properties panel below, i.e. set W and H to 0 (else use the align panel).
- Step 3 - Put your pictures into different keyframes
- If you have 8 pictures you need to add 7 new keyframes.
- On way to do this is to put your cursor in frame 2 of the picture layer, the hit F7 ("Insert new blank keyframe") 7 times
- Then drag a picture into each of these keyframes and align them too (as above).
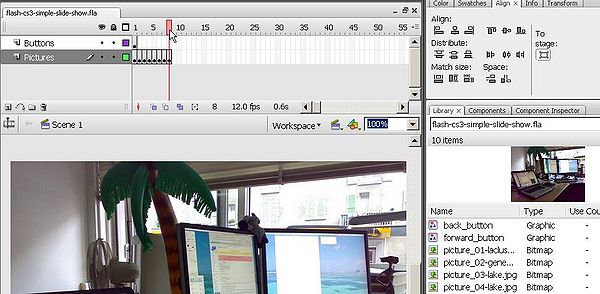
- Control if all pictures are ok and in place by moving the playhead from left to right (red rectangle on top of the timeline)
So you should have something like this.
- Step 4 - Draw a forward, a home and a backward button
- Create a new layer and name it Buttons and select it.
- To draw buttons, you may use the Polystar tool for this and a variety of transform tools, or just simply draw a triangle and get done with it ...
- Then you also want to reduce the alpha channel (i.e. make these transparent). In the color panel, put Alpha to 40%.
- Once you got a forward button, make a copy and flip it horizontally (menu Modify->Transform->Flip Horizontal).
- Step 5 - convert these graphics into to symbols
- Save both buttons as button symbols (right-click on each graphic you made).
- Use decent names for these, e.g. "button_forward"
- Remove the graphics from the stage (yes kill them!)
- Step 6 - place the buttons
- Select the buttons layer (the one with the single frame).
- Drag a forward and backward button from the libray to the stage
- Move both buttons into an a appropriate position.
So now you should have something like 2 button symbols in the library and an instance of each on the stage.
- Step 7 - Add action script code of the forward button
- Right-click on the button instance and select Action (or select, then hit F9)
- Insert this code:
on (click) {
   if (this._currentframe == this._totalframes) {
      gotoAndStop (1);
    } else {
      nextFrame ();
   }
 }
The workspace, i.e. the Actions-Button panel should look like this:
Tip: If is doesn't work, make sure that your Publish settings say ActionScript 2. I won't work with ActionScript 3.
- Step 8 - Add action script code to the backward button
- Right-click on the button and select Action
- Insert this code:
on (release) {
  if (this._currentframe == 1) {
     gotoAndStop (this._totalframes);
   } else {
     prevFrame ();
  }
}
- Step 9 - Stop the movie in frame 1
- If you already tried to test the movie, you could see the frames displaying in rapid succession. That's not what we want.
- Insert a new layer and call it "Actions".
- In frame one of this layer insert the following code in the Actions-Frame panel. If you can't see this panel, hit F9.
stop();
This some action script code that will stop the animation right after frame one is loaded. Only by clicking the buttons can the user then go forward or backward.
- Step 10 - Make sure you buttons are on stage for all frames
Finally, make sure that these buttons are displayed throughout the "movie"
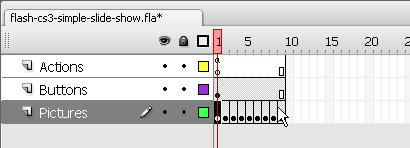
- Select the buttons layer, click the last frame (where the last picture sits) and Right-click->Insert Frame (or hit F5). A the end you should see little white rectangle.
Your timeline should roughly look like this:
- Step 11 - Tuning
You may want to fix the title page.
- Results
- You can look at my published result here
- You can grab all the files from this directory:
This slideshow was fairly simple. No picture animations, no fancy buttons, etc. Now you maybe would like to have more fancy buttons. We will not teach how to build them, but fortunately Flash CS3 has a whole lot in its library.
Overview of the built-in Flash button symbols
Flash contains a good variety of pre-built buttons. To use these, your first should dock the Library-Buttons.fla panel next to your libraries panel: Menu Window->Common Libraries->Buttons. (See the Flash CS3 desktop tutorial on how to dock a panel).
In this section we will just introduce a few concepts, no real use.
Buttons are arranged in folders, double click to open these. Then, you may may inspect various symbols by clicking a button. In the upper part of the panel you get a preview. Click on the arrow to see how it behaves.
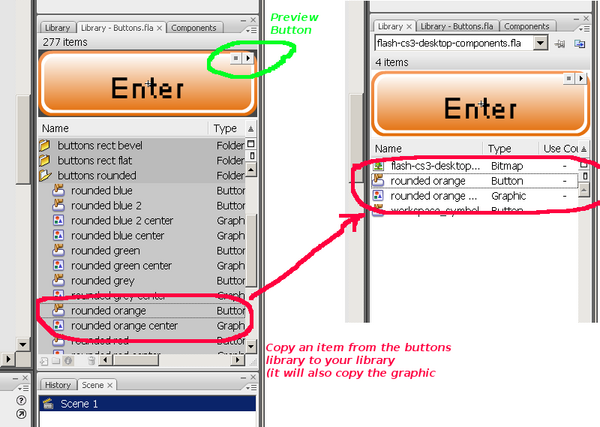
For use in your own animation I suggest to copy a button first to your own library. This way you can find the button again easily and you also can modify its features.
- Right-click on the Symbol and Copy
- Paste it to your own library. Open the library panel and hit crtl-V
From your library panel simply drag the button on the stage. This will create an instance of the button. To remove it from the stage, select it and hit the delete key. Make sure you operate with instances in your flash animation (not symbols themselves). If you did this right, you will see in the properties panel something like Instance of: rounded orange.
Customizing button symbols
- Editing buttons
To customize a button symbol, double click on the icon of the symbol library panel. This will let you work just on this object, i.e. it puts you into a Symbol editing mode. There are other ways to get into this editing "inside" (via the general menu or double-click or right-click on an instance). You can for instance change the font or the color of a symbol or make changes to its frame-by-frame animations.
- Finding your workspace again
There are several solutions:
- Select Edit->Edit Document (Ctrl-E).
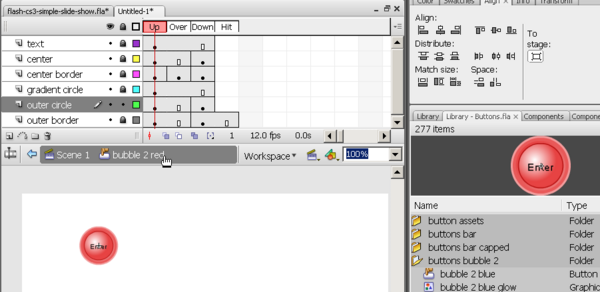
- But I suggest to add the Edit bar: Window->Toolbars->Edit bar. It will show you exactly at what level you are editing, e.g. scene or button.
- You also may add the Scene Panel with Window->Other Panels; Scene (or hit Shift+F2).
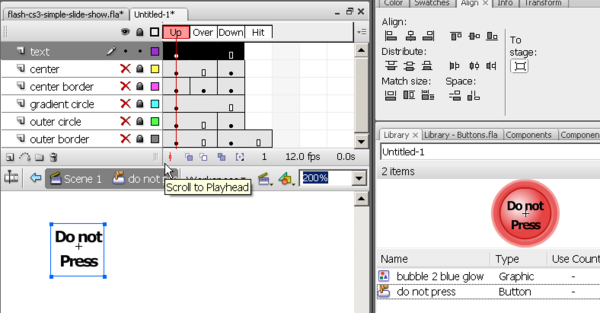
As you can see in the picture below, on the Edit Bar from left to right you can see the cascade of editing levels. Right now we are editing the "bubble to red" button.
- Editing the label of a button
A symbol is basically something that you can use several times over, but its fundamental look and feel properties will remain the same, including its the label. So if you need buttons with other labels you must create copies of these symbols. In your library panel right-click on the icon of the symbol and select duplicate from the popup menu. Choose an appropriate name, e.g. "do not press"
To change the label (and font) of a button:
- Double click to get in the symbol editing mode. You will see a frame-by-frame animation movie (read the Flash frame-by-frame animation tutorial if you are not familiar with this).
- Lock and hide all layers, except the layer with label (e.g. text).
- Change it
- You also can change font properties of course
- Then you may have to adjust its position. Click on the select tool and move the text box with the cursors until it looks right (look at your library panel).
The four frames and the button layers
Built-in button symbols contain four frames and several layers. For each frame, different drawings may be defined but some, e.g. the label text may be reused in several layers. Look at the various frames. The four mandatory frames for button symbols (including the ones you may create) are:
- Up
The button, i.e. the drawing that appears "as is" when a frame is displayed in your animation.
- Over
The button as it appears when the user moves the mouse over it. E.g. it defines highlighting.
- Down
The button as it appears when the user presses the mouse (just during the time the mouse button is held). It shows the clicking effect.
- Hit
This allows to define the sensible area (usually the complete button).
Various kinds of buttons have various layers (usually between three and five) depending on the complexity of the drawings. These layers contains just drawing for these four layers. The Flash engine will then select the appropriate frame according to user action.
Beginners just should use built-in buttons. There is no need to change anything in the keyframes or the layers except the label.
Using the built-in buttons
You can attach behaviors in various ways to buttons. The most obvious ones are:
- Launch a Flash movie (see below)
- Jump to some place in the animation
But you also may launch some action when the user just "touches" a button for example (more in another tutorial)
In the next section we will use this button to launch a rocket.
Rocket launcher (AS 2)
- Step 1 - Create a new file
- Open a new Action Script 2.0 file
- Change its size to about 200x800 (WxH)
- Step 2 - Import a button
- From the Library-buttons.fla panel we copy/paste (from "buttons-bubble2" section) the bubble 2 purple" button. Btw this also copies a graphics file (just leave it).
- We then change the label of this button as describe above.
- Step 3 - Import a rocket from a *.fla file
- Then we import the rocket symbol made in the Flash frame-by-frame animation tutorial
- Download this *.fla file and put it somewhere
- Open this *.fla as external library: Menu File->Import->Open External Library, then drag the rocket into your normal library.
Alternatively you just could have imported a rocket as *.swf, e.g. flash-cs3-rocket.swf. But importing the rocket as symbol will allow us to edit the rocket in this file in case we are not happy with it.
- Step 4 - Create a rocket layer and position the rocket in frame 2
- Create a new layer, called Rocket
- Create a new keyframe in frame 2.
- Drag the rocket from the library to frame 2 of Rocket layer
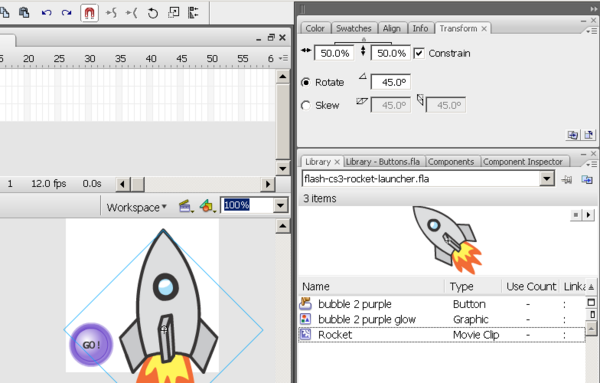
- Turn it 45 degrees to the right
- Make it smaller (e.g. 50%)
- Position on bottom
You should have something like in the screen capture below. You also can see the transform panel I used to adjust size + rotation.
- Step 5 - Let the rocket fly
- Create a motion tween animation as described in the Flash motion tweening tutorial
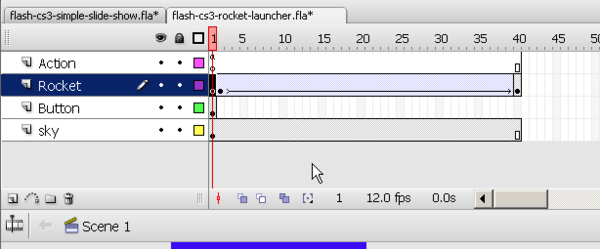
- Make sure that the flying animation starts a frame 2. I had it end at frame 40. See the screenshot further down.
- You also should edit the Ease curve (handlers work like in the subselection tool). Click between frames. In the properties panel, hit the "Edit" button next to "Ease".
- Test this animation (Control->Test Movie or hit Ctrl-Enter)
- Fix things if needed
- Step 6 - Create a background
- I simply added a sky layer with color gradient
- If you can't see the rocket or the button, move the sky layer up or down.
- Step 7 - Stop the animation at start
- Add another layer and call it "Action"
- Click on Frame 1, hit F9 and in the Actions-Frame panel insert:
stop();
- Step 8 - Make the button launch the rocket.
- For Action Script 2.0, right-click on the button, hit F9 and add to the Actions-Button panel:
on (release) { gotoAndPlay (2); }
What that means is that Flash will move to frame 2 (of the current scene) and play it and the rest ... Your timeline finally should look like this:
- Results
- You can look at my published result here
- You can grab all the files flash-cs3-rocket-launcher.* from this directory:
Rocket launcher (AS 3)
You also can make an ActionScript3 launcher. The whole procedure works like above, except for step 8 - launching the rocket with action script. In AS 3 you can not attach behaviors to buttons as you could in AS 2. You only can script relative to the timeline.
- Name the button instance
Firstly we have to give the launch button (not the symbol in the library but the thing we got on stage) a name. Once you drag a library item to stage you produce an instance of the symbol. In order to find this instance, Flash needs to know it by name. It's like in magic: you name it - you control it ;)
- Let's call it:
launch_button
- Open the properties panel and fill in the field (see below):
- Add AS3 code to the timeline
If you remember the AS 2 Rocket launcher example above, recall that we already entered some code into the timeline. This is what we already have (so only do it if you don't already work on adapting an AS 2 version of this ...)
- Add another layer and call it "Action"
- Click on Frame 1, hit F9 and in the Actions-Frame panel insert:
stop();
- Now we just add some more code below the
stop ();line. So click in frame 1 of the Action Layer and hit F9:
this.stop();
launch_button.addEventListener(MouseEvent.CLICK,launchRocket);

function launchRocket(event:MouseEvent):void {
   gotoAndPlay(2);
}
We can not really explain event driven programming here, but the principle is the following:
- For each object that can react to user actions you have to define what will happen when the user does something, e.g. click with the mouse.
- Firstly you define a function that "does something", e.g. move the playhead in the timeline to another frame. In our case this is launchRocket.
- Second, you register this function with the button. The addEventListener method let's you define what function will be called when a user does something with the button (in this case, clicking on it).
- Code reuse
Of course you can reuse this code for a similar problem, i.e. moving the animation to another spot on the timeline when the user presses a button. All you need to do is:
- Put a button on your stage (e.g. one from the Flash library)
- Then give this instance a name
- Then change the number in
gotoAndPlay(2);. E.g. to 5 if you want it jump to frame 5.
Tip: If your code is getting bigger, undock this panel from the one below. Hit F9 to to hide it again.
- Results
- You can look at my published result (works only with Flash 9!) here
- You can grab all the files flash-cs3-rocket-launcher-as3.* from this directory:
Disclaimer: This is my first AS3 code, I may have to change it some point.
Links
Slide shows
If you search the Internet you can find lots of Flash slide shows. Some commercial, some tutorials, some good, some outdated. Here are a few:
- Text tutorials
- http://www.toxiclab.org/tutorial.asp?ID=79
- http://maclab.guhsd.net/flash/mx/slideshow_01.html
- http://www.flashvault.net/tutorial.asp?ID=118
- http://www.lukamaras.com/tutorials/actionscript/ultimate-dynamic-image-gallery.html (advanced)
- Video tutorials
- Creating slideshows in Flash CS3 by Craig Campbell. The basic version is free.
- examples
- Slideshowpro (commercial kit)
