Autodesk 123D Catch: Difference between revisions
Jump to navigation
Jump to search
m (→Procedure) |
m (→Links) |
||
| Line 79: | Line 79: | ||
* [http://www.instructables.com/id/Turn-Yourself-into-a-3D-Printed-Action-Figure/ Turn Yourself into a 3D Printed Action Figure] | * [http://www.instructables.com/id/Turn-Yourself-into-a-3D-Printed-Action-Figure/ Turn Yourself into a 3D Printed Action Figure] | ||
* [http://ivrytwr.com/2013/12/09/using-123d-catch-to-model-historic-buildings/ Using 123D Catch to model historic buildings], December 9, 2013 by ryanalexanderhunt | |||
; Alternatives | ; Alternatives | ||
| Line 84: | Line 85: | ||
In case you are fed up with these strange "your are not connected to Internet" messages (while enjoying sitting on a 10GB line ...) | In case you are fed up with these strange "your are not connected to Internet" messages (while enjoying sitting on a 10GB line ...) | ||
* Try Autodesk's [http://recap360.autodesk.com recap360] (a cloud-based application) | |||
* http://en.wikipedia.org/wiki/Photogrammetry#Current_suite_of_software | * http://en.wikipedia.org/wiki/Photogrammetry#Current_suite_of_software | ||
[[Category: 3D]] | [[Category: 3D]] | ||
Revision as of 17:02, 27 February 2014
Introduction
Autodesk 123D Catch is an application that can take a set of ordinary photos and turn them into 3D models.
Unfortunately:
- you will have to upload photos for processing. Only selection of photos, selecting reference points for stitching etc. is done locally. That means a lot of waiting in case you didn't take the photos as you should have...
- there is no official manual/tutorial, but you will have to look a several video tutorials in order to learn (I resent that).
How to make a model of your torso + head
Principles
- The object cannot move, i.e. do not try to take delayed pictures from yourself rotating on a swivel chair !
- The final object will be assembled using areas that are identified as identical. If you model an object with a uniform surface, paint some markers on it.
- Use consistent lightning, do not use a flash.
- Having other objects in the picture is recommended since the algorithm seems to rely on a camera going around an object that you wish to model.
Procedure
Preparation:
- Add some dots to you (e.g. shoulders, temples, cheekbones). This will help stitching, i.e. at some point the software will ask you to identify matching dots in four different pictures. You could use a felt pen or little round stickers.
- Make sure that walls and floor are decorated with something (pictures on walls, journals on the floor).
Taking pictures:
- Person to be scanned must stand or sit still on a chair without moving
- Take between 20-30 pictures. Do not turn the camera if you can avoid.
- Keep some distance, i.e. make sure that you see at least 2 dots (better 4).
- Start with front face, then move the camera down 30 cm, then move up at least 60cm (3 pictures). Make sure that you get views of the top side of the head.
- Move left (or right) and take three pictures again and repeat.
Alternatively, move around the object at same height, then again from above and below.
Rotate pictures and upload:
- Once you have 20-30 pictures, rotate the pictures if necessary and upload for processing and wait'
First result:
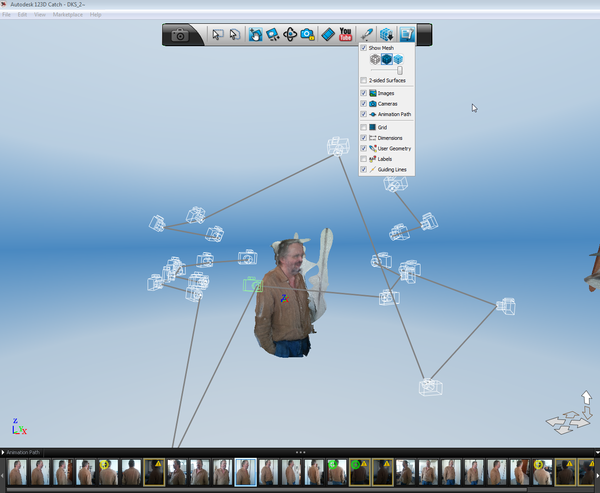
- After following the procedure and uploading the pictures you may see something like this:
- You can see the position of the cameras around the object (notice that some top view is missing)
- At the bottom you can see the pictures that are used in the model and those with an exclamation mark who are not.
- Stitching
- If you took the pictures in portrait mode (camera turned by 90 degrees), it's imperative to turn them around, e.g. a sitting person should sit upright. Use for example Irfanview to do this efficiently (some tips below).
- If you are lucky, your model is almost ok, but it's likely that you will have to do some manual stitching. That involves identifying four common points on three pictures, which can be quite difficult. This is why we suggested using "dots".
- Rotating with IrfanView
- Start the Thumbnail window: Menu: File-> Thumbnails
- Open the folder with JPGs, select all your JPGs
- Thumbnail menu or context menu (right-click): JPG Lossless Operations -> Lossless rotations with selected files.
- Rotate 90 or 270 degrees clockwise
Notes:
- You may have to install a IrfanView plugin (get them all from the download site)
- The auto-rotation option works only if the EXIF orientation tag is properly saved (not top-left).
- You also may just have to repair the EXIF, e.g. Rebuild EXIF thumbnail
(IrfanView FAQ (retr. feb 2014).
Trouble
- "Unable to Connect: Please Check Internet Connection" ... can happen randomly (even if you sit on a very fast and very reliable cable connection near a big backbone)
- Cannot stitch enough: Take pictures again and this time use lots of little sticky dots (number these from A-Z and draw a small dot also). Also keep some distance. Ideally, you have at least 4 dots / picture.
Hardware
- If you own a 3D printer, you could try building the Camera rig (thingiverse) made by gpvillamil
Links
- Official
- Autodesk 123D Catch home page. Including download and links to video tutorials
- Howto Read this !
- Tutorials
- Turn Yourself into a 3D Printed Action Figure
- Using 123D Catch to model historic buildings, December 9, 2013 by ryanalexanderhunt
- Alternatives
In case you are fed up with these strange "your are not connected to Internet" messages (while enjoying sitting on a 10GB line ...)
- Try Autodesk's recap360 (a cloud-based application)
- http://en.wikipedia.org/wiki/Photogrammetry#Current_suite_of_software

