Flash embedded movie clip tutorial: Difference between revisions
| Line 74: | Line 74: | ||
[[image:flash-cs6-create-movie-clip-symbol3.png|thumb|800px|none|Registration point is near center]] | [[image:flash-cs6-create-movie-clip-symbol3.png|thumb|800px|none|Registration point is near center]] | ||
In the following | In the following screen-shot, we moved all the drawings so that the registration point is in the upper left: | ||
[[image:flash-cs6-create-movie-clip-symbol4.png|thumb|800px|none|Registration point is | [[image:flash-cs6-create-movie-clip-symbol4.png|thumb|800px|none|Registration point is upper left]] | ||
=== Editing a movie clip === | === Editing a movie clip === | ||
Revision as of 13:25, 11 February 2013
This article or section is currently under construction
In principle, someone is working on it and there should be a better version in a not so distant future.
If you want to modify this page, please discuss it with the person working on it (see the "history")
<pageby nominor="false" comments="false"/>
... upgrading to CS6 - Daniel K. Schneider (talk) 12:04, 8 February 2013 (CET)
Overview
- Learning goals
- Learn how to create embedded movie clips
- Learn how to copy/paste animations from the main timeline into a a movie clip symbol
- Prerequisites
- Flash drawing tutorial
- Flash motion tweening tutorial
- Flash component button tutorial
- Some ActionScript, e.g. ActionScript 3 interactive objects tutorial to understand the examples towards the end.
- Moving on
- Flash using embedded movie clips tutorial (adding interactivity)
- Flash drag and drop tutorial
- The Flash tutorials index has a list of other tutorials.
- Level and target population
- It aims at beginning Flash designers. Embedded movie clips are used in various other tutorials, but here we explain it a bit more systematically.
- Quality
- This text should technical people get going and may not be good enough for self-learning beginners. It can be used as handout in a "hands-on" class. That is what Daniel K. Schneider made it for...
- Alternative versions
Movie clips are Flash animations/applications. In other words, your whole Flash file is a movie clip. Now, in a *.fla file you can have embedded movie clips having their own timeline. In other words, you can have flash clips within flash clips.
There are several types of movie clips:
- Movie symbols (and instances). That's the main topic of of this tutorial.
- Movie clips (and instances) that were imported as *.swf files. Not really recommended.
- Compiled movie clips imported through the *.swc format
The goal of having such embedded animations is to create animations of "moving/changing" objects that are independent of the flow of the main timeline. You may have seen such embedded animations in other tutorials, e.g. in the Flash motion tweening tutorial. The new thing is that you should learn how to play/stop and make visible/invisible these clips.
Creation and manipulation of embedded movie clips
Creation of an embedded movie clip
Let's now look a how to create flash movie clips within flash files.
To create a new movie clip within a flash animation file do the following:
- Menu Insert->New Symbol
- Select Movie Clip and give a good name
Alternatively you also can transform an existing graphic into a movie clip symbol
- Draw an object on the stage
- right-click->Create Movie Symbol. Select Movie Clip
Finally you also change the nature of symbols. E.g. to transform a graphic symbol into a movie clip:
- Right-click on the symbol in the library, select "symbol properties" and change it. This will make the the graphic symbol "heaver", e.g. it will add a timeline.
The reference and center points
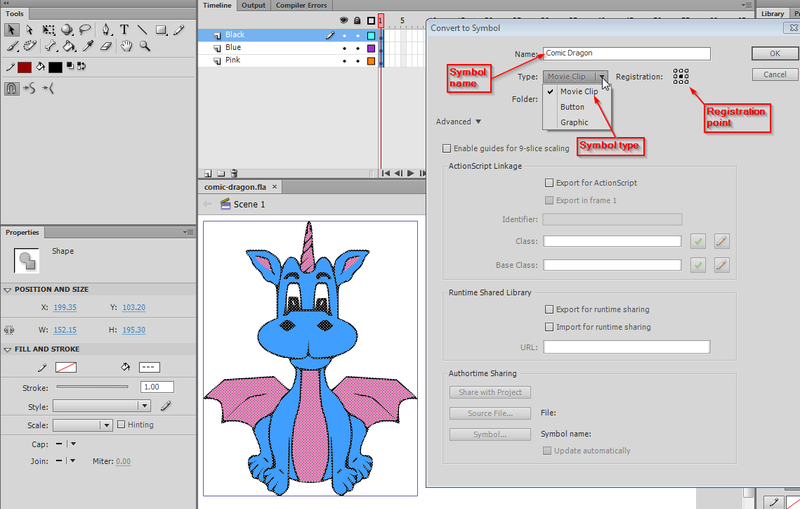
- Each movie clip has a Registration point, i.e. it defines what the x and y coordinates mean for a given object (e.g. upper left or middle). This registration point can later be seen with a little cross (+ sign). You can define the registration point when you create the new movie symbol. Click on a different square next to "Registration" if you don't to use the default (either upper left or your previous choice). See the screen capture below:
Anyhow, you later can change this reference point by moving the drawing to another place in symbol edit mode. By default a registration point is in the upper left corner. I personally like to have in the middle for objects that I will use in animations. Let's look at the following example.
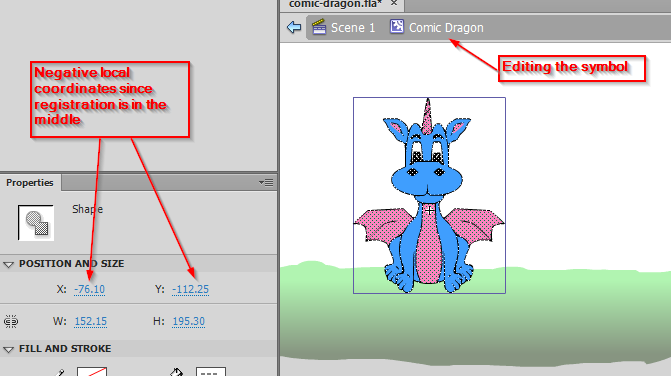
- The registration point (cross) is slightly off the center (I moved the Dragon drawings a bit by editing the symbol)
- In the main scene, the dragon instance sits in a position x=300 (right) and y=260 (down)
The white circle you can see in the middle of a movie clip is called the Center Point and has a similar function. It defines where the object will be attached to a motion guide or around which point it will rotate for example. You can move it to a different place with the Free Transform Tool.
If you edit the symbol again, you can see that the drawings have negative coordinates, since it's origin is not top left, but somewhere in the center.
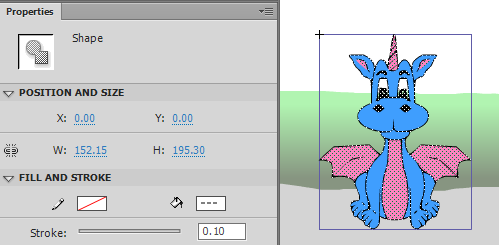
In the following screen-shot, we moved all the drawings so that the registration point is in the upper left:
Editing a movie clip
There are two ways to edit a movie clip:
(1) In "stand-alone" view, i.e. you only will see the components of the movie clip. Double click on the movie symbol's icon (not it's name) in the library. You now can edit, e.g. a add a motion animation or change its drawings.
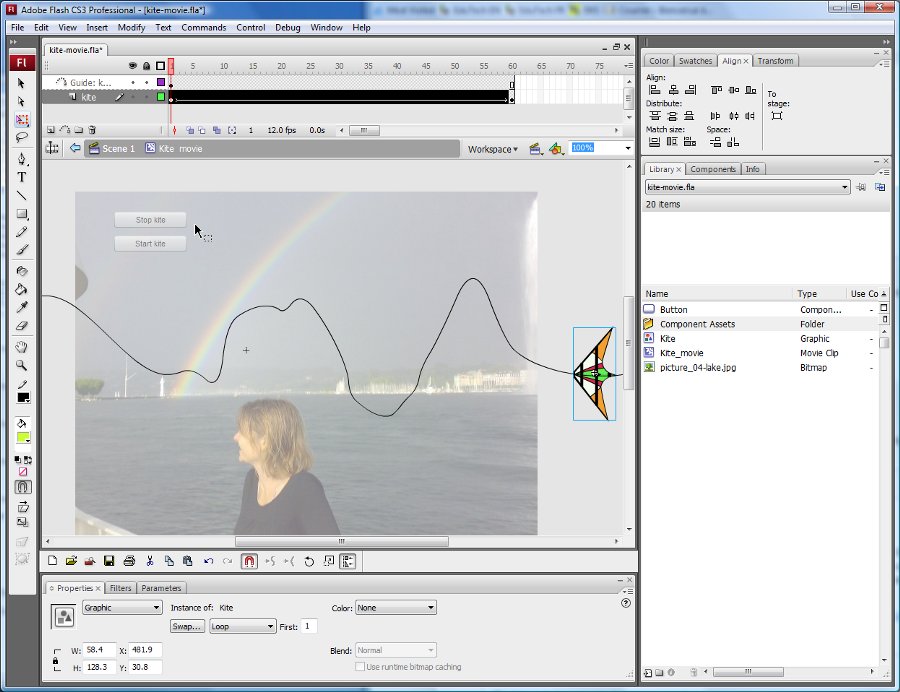
(2) Edit with the scene as background. If you put an instance of the movie clip on the stage and then double-click on this instance, you can edit the same movie clip symbol, but you will see the objects of the stage while you edit. This is quite handy if you plan to create some motion animation. Below is a screen dump of a situation where we edit a movie clip symbol after double-clicking on an instance of it that sits on the stage. The scene itself is somewhat visible (picture and buttons).
By editing a movie symbol you basically can do the all the stuff you have learnt about creating flash movies in previous tutorials, e.g. in the Flash motion tweening tutorial. In other words, movie clips have their own timeline as you can see in the above picture. There is a motion tween for the "Kite" drawing and a Motion guide layer. The whole thing is called the "Kite_movie" movie clip.
Do not forget to go back to the scene once you are done, e.g. by double-clicking on the "scene" in the edit bar (on top of the stage) or by clicking on the little "back arrow". When you edit a movie clip you are in symbol edit mode and you should not for example add navigation buttons that concern the whole scene. Make sure that you are aware at which level you edit and where to place objects !
Using a swf file as movie clip
Your whole *.fla also is a movie clip that you could in principle import to other Flash animations. As a result you will get frame-by-frame animations. This solution is not really recommended, since you can't easily edit this type of animation and if you make changed in the original you will have to reimport...
This is a copy/paste of the Reuse frame-by-frame animations as movies section in the frame-by-frame animation tutorial.
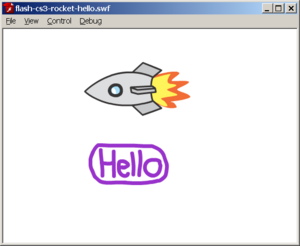
Firstly, have a look at the result, i.e. a flashing hello and little rocket with a pulsating engine. Both were made originally in separate *.fla files and then compiled (saved) to
The *.fla, *.swf and *.html files flash-cs3-rocket-hello.* as well as the imported movie clips can be found here: http://tecfa.unige.ch/guides/flash/ex/frame-by-frame-intro/
- Step 1 - Import *.swf files into the library of a new Flash file
- Create a new flash file (File->New)
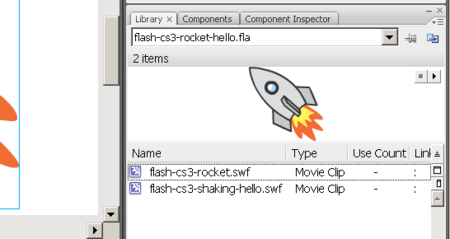
- Then, import flash movies you made: File->Import->Import to library. In our example, get:
- flash-cs3-rocket.swf file
- flash-cs3-shaking-hello.swf file
You now have a nice rocket and a flashing hello in your library:
- Step 2 - Drag the symbols (movies) to the stage
- Drag the item in the library onto the stage
- Use the Free Transform tool to resize it or to rotate it (see the Flash object transform tutorial if you don't know how.
- Hold down the SHIFT key when you resize it from a corner !
Here is the result with a picture
Of course, you then also could use imported movie clips within motion animations, e.g. as in this Flying rocket. Source code is flash-cs3-rocket-moving.fla
Important notice: Importing *.swf files will only work with very simple animations ! Instead of importing directly the *.swf you rather should consider the next strategy, i.e. use embedded movie clips.
Creating an embedded movie clip from a non-embedded animation
Let's assume that you have an interesting animation in fla file that you rather would use as a embedded movie clip.
- Step 1 - Create a new movie clip symbol
(see above)
- Let's assume that the file is called clips.fla
- Menu Insert->New Symbol
- Select Movie Clip and give a good name
You now should see a blank stage be in symbol edit mode. Hold that.
- Step 2
You can either copy full layers or just selected frames.
Copying layers
- Open the fla file with the main timeline animation.
- SHIFT-Click on each layer you want to copy
- Right-click and "Copy layers"
- Go back to your clips.fla file and right-click on layer 1 and "Paste Layers"
Copying frames (more difficult)
- Open the fla file with the timeline-based animation. Let's assume the file is called anim.fla
- Select all frames in the layers you want: Click on the first frame in the first layer, then shift-click on the last frame in the last layer you want.
- Right-click somewhere in the timeline and select Copy frames
- Now go back to your open clips.fla file (you still should be in symbol edit mode, if you are not, double-click on the new symbol in the library).
- Click in frame 1 of layer 1 of the newly created movie clip symbol
- Then Right-click and Paste frames.
Voilà, you now have an embedded movie clip. Go back to the scene.
Using a *.fla file as your own external assets library
Once you have a set of embedded movie clips you could create a library for later reuse.
- Step 1 - Create a new *.fla file
- Copy paste interesting movie clips and graphics (whatever) in the library of this fla file
- Then save the file
- Step 2 - import a *.fla file as external library
Menu File->Import->Open external library
- Step 3 - repeat
- Each time you create something of interest that you often plan to use, open the fla file file and copy/paste again.

