Flash component button tutorial: Difference between revisions
mNo edit summary |
|||
| Line 45: | Line 45: | ||
The goal is to make a sort of simple Flash web site. The user at all times will have a menu to the left that will allow him to navigate to different contents. | The goal is to make a sort of simple Flash web site. The user at all times will have a menu to the left that will allow him to navigate to different contents. | ||
We will build several versions of this. Have a look at the [http://tecfa.unige.ch/guides/flash/ | We will build several versions of this. Have a look at the [http://tecfa.unige.ch/guides/flash/ex6/components-intro/flash-cs6-simple-slide-show-menu.html menu-based slide show] example before you start reading. Also, we will introduce some ActionScript in a way that is hopefully appropriate for non-programmers. | ||
Notice: In the [[Flash button tutorial]] we also demonstrated how to create similar applications with built-in and home-made buttons symbols. | Notice: In the [[Flash button tutorial]] we also demonstrated how to create similar applications with built-in and home-made buttons symbols. | ||
=== A menu-based flash site === | === A menu-based flash site === | ||
All built-in Flash components are available through a specific library. To this library: | All built-in Flash components are available through a specific library. To this library: | ||
| Line 67: | Line 64: | ||
You layers should look like this: | You layers should look like this: | ||
[[image:flash- | [[image:flash-cs6-simple-slideshow-timeline.png|frame|none|Timeline of the menu-based slideshow]] | ||
Create these layers now ! If you don't remember how, see the [[Flash layers tutorial]]. As you can see, the timeline is rather short since this is an a application and not an animation that uses the main timeline. | Create these layers now ! If you don't remember how, see the [[Flash layers tutorial]]. As you can see, the timeline is rather short since this is an a application and not an animation that uses the main timeline. | ||
| Line 81: | Line 78: | ||
* Select the buttons layer | * Select the buttons layer | ||
* Open the '''component library''', select "User Interface" and drag as many '''button'''s to the stage as you have pictures. Add an extra one for the credits page. | * Open the '''component library''', select "User Interface" and drag as many '''button'''s to the stage as you have pictures. Add an extra one for the credits page. | ||
[[image:flash- | [[image:flash-cs6-button-component.png|frame|none|Button of the Flash CS6/ActionScript3 component library]] | ||
* Put them into a good position. You may use the Align panel to align and distribute properly (see the [[Flash arranging objects tutorial]] if needed). | * Put them into a good position. You may use the Align panel to align and distribute properly (see the [[Flash arranging objects tutorial]] if needed). | ||
| Line 105: | Line 102: | ||
Probably you noticed now that it is to work with a component vs. using buttons as explained in the [[Flash button tutorial]] | Probably you noticed now that it is to work with a component vs. using buttons as explained in the [[Flash button tutorial]] | ||
[[image:flash- | [[image:flash-cs6-button-component-parameters.png|frame|none|Parameters of the ActionScript3 button]] | ||
Make sure you did this to all buttons. | Make sure you did this to all buttons. | ||
| Line 112: | Line 109: | ||
* Click in '''Frame 1 of the Action Layer''' you already should have defined (see step 1) | * Click in '''Frame 1 of the Action Layer''' you already should have defined (see step 1) | ||
* Hit F9 to open the "Actions-Frame" panel. In case it is docked with the parameters, you may undock it to have some more space. | * Hit F9 to open the "Actions-Frame" panel. In case it is docked with the parameters, you may undock it to have some more space. | ||
* Then paste all the code from the summary just below (i.e. step 7, 8, 9 code). Alternatively, open the [http://tecfa.unige.ch/guides/flash/ | * Then paste all the code from the summary just below (i.e. step 7, 8, 9 code). Alternatively, open the [http://tecfa.unige.ch/guides/flash/ex6/components-intro/flash-cs6-simple-slide-show-menu.fla flash-cs6-simple-slide-show-menu.fla] file and copy the code from there. | ||
Note: Code that is delimited by <code>/* */</code> represents so-called ''comments'', i.e. code that is not interpreted by Flash, but that we inserted just to remember what our code is supposed to do. | Note: Code that is delimited by <code>/* */</code> represents so-called ''comments'', i.e. code that is not interpreted by Flash, but that we inserted just to remember what our code is supposed to do. | ||
| Line 254: | Line 251: | ||
Here is the picture of the timeline again: | Here is the picture of the timeline again: | ||
[[image:flash- | [[image:flash-cs6-simple-slideshow-timeline.png|frame|none|Timeline of the menu-based slideshow]] | ||
Notice the little "a" in frame 1 of the Actions layer. It means "ActionScript code inside" :) | Notice the little "a" in frame 1 of the Actions layer. It means "ActionScript code inside" :) | ||
| Line 282: | Line 279: | ||
; Results and source code | ; Results and source code | ||
* [http://tecfa.unige.ch/guides/flash/ | * [http://tecfa.unige.ch/guides/flash/ex6/components-intro/flash-cs6-simple-slide-show-menu.html flash-cs6-simple-slide-show-menu.html] | ||
* Source: [http://tecfa.unige.ch/guides/flash/ | * Source: [http://tecfa.unige.ch/guides/flash/ex6/components-intro/flash-cs6-simple-slide-show-menu.fla flash-cs6-simple-slide-show-menu.fla] | ||
* Grab the flash- | * Grab the flash-cs6-simple-slide-show-menu.* files from | ||
: http://tecfa.unige.ch/guides/flash/ | : http://tecfa.unige.ch/guides/flash/ex6/components-intro/ | ||
=== A simpler but longer solution === | === A simpler but longer solution === | ||
Too complicated ? You may use a simpler but less elegant code if you have no programming knowledge and feel not comfortable with the "switch" statement. The result will be same, though I changed the color of the background: [http://tecfa.unige.ch/guides/flash/ | Too complicated ? You may use a simpler but less elegant code if you have no programming knowledge and feel not comfortable with the "switch" statement. The result will be same, though I changed the color of the background: [http://tecfa.unige.ch/guides/flash/ex6/components-intro/flash-cs6-simple-slide-show-menu-fewcode.html menu-based slide show with simple AS code] | ||
So here is what you need to change: | So here is what you need to change: | ||
| Line 362: | Line 359: | ||
; Results and source code | ; Results and source code | ||
* [http://tecfa.unige.ch/guides/flash/ | * [http://tecfa.unige.ch/guides/flash/ex6/components-intro/flash-cs6-simple-slide-show-menu-fewcode.html flash-cs6-simple-slide-show-menu-fewcode.html] | ||
* Source: [http://tecfa.unige.ch/guides/flash/ | * Source: [http://tecfa.unige.ch/guides/flash/ex6/components-intro/flash-cs6-simple-slide-show-menu-fewcode.fla flash-cs6-simple-slide-show-menu-fewcode.fla] | ||
* Grab the flash- | * Grab the flash-cs6-simple-slide-show-menu-fewcode.* files from | ||
: http://tecfa.unige.ch/guides/flash/ | : http://tecfa.unige.ch/guides/flash/ex6/components-intro/ | ||
== Improvements to be made / exercise == | == Improvements to be made / exercise == | ||
Revision as of 12:04, 5 February 2013
This article or section is currently under construction
In principle, someone is working on it and there should be a better version in a not so distant future.
If you want to modify this page, please discuss it with the person working on it (see the "history")
<pageby nominor="false" comments="false"/>
.... upgrading to CS6 - Daniel K. Schneider (talk) 11:22, 5 February 2013 (CET)
Introduction
- Learning goals
- Learn how to use the component button
- Flash level
- 9 / ActionScript 3
- Prerequisites
The following tutorials are recommended but not fully necessary
- Moving on
- Level and target population
- Beginners
- Quality
- This should get you going, component buttons are fairly easy to use.
- Alternative version
- Flash CS3 component button tutorial
In Flash CS3 to CS6 there exist three different kinds of buttons:
(1) Button symbols. See the Flash button tutorial. These button symbols (classes) are made with four predefined frames and can include any kind of drawing (including movie clips). Their visual behavior is highly customizable.
(2) Button components. These are part of the built-in components library that provides various interface components (also called widgets or gadgets) that are easy to use. Technically speaking, these buttons are a kind of embedded movie clip. Graphically speaking, these buttons are some kind of nice looking, semi-transparent rounded rectangles. It is not easy to change their look.
(3) Any movie clip (or other "heavy" object) can be a button. The difference between built-in buttons and "anything" is that built-in buttons include some animation that tells the user that he/she is clicking on a button.
Button components are easier to use than button symbols since their labels can be defined through the parameters panel. Otherwise, you use both in the same way, i.e. you will have to write some ActionScript code.
Before we start, let's quote an explanation from the Adobe user manual: “Components are the building blocks for the rich Internet applications that provide these experiences. A component is a movie clip with parameters that allow you to customize the component either during authoring in Flash or at run time with ActionScript methods, properties, and events. Components are designed to allow developers to reuse and share code, and to encapsulate complex functionality that designers can use and customize without using ActionScript.” (Using ActionScript 3.0 Components, retrieved nov 2008).
- Design goal of the example
The goal is to make a sort of simple Flash web site. The user at all times will have a menu to the left that will allow him to navigate to different contents.
We will build several versions of this. Have a look at the menu-based slide show example before you start reading. Also, we will introduce some ActionScript in a way that is hopefully appropriate for non-programmers.
Notice: In the Flash button tutorial we also demonstrated how to create similar applications with built-in and home-made buttons symbols.
All built-in Flash components are available through a specific library. To this library:
- Window->Components or hit CTRL-F7
- Then dock it somewhere (best is next to your own library)
- Step 1- Planning the layers
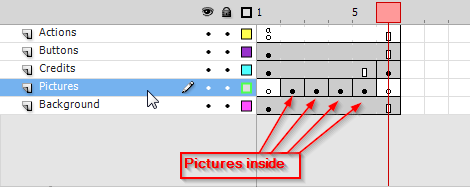
In this example we will work with five layers:
- Actions: will include a little Action Script code
- Buttons: will include the buttons (displayed on all "pages")
- Pictures: Contents we want to display
- Credits: A special page for the "who's done it" (we also could have used the pictures layer for this).
- Background: A simple background that will remain stable.
You layers should look like this:
Create these layers now ! If you don't remember how, see the Flash layers tutorial. As you can see, the timeline is rather short since this is an a application and not an animation that uses the main timeline.
- Step 2 - Add pictures or other contents
- Decide how many pictures you want (we took four)
- Select the Pictures layer
- Frame 1 is reserved for a Title page.
- Create a few new empty keyframes (hit F7) and fill them with pictures or any other content or drawings you'd like. See the button tutorial if you don't know how to import pictures. BTW pasting a picture to the stage also does the trick.
- Step 3 - Get buttons from the library
- Select the buttons layer
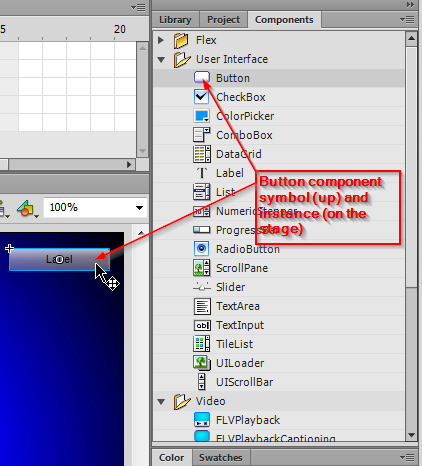
- Open the component library, select "User Interface" and drag as many buttons to the stage as you have pictures. Add an extra one for the credits page.
- Put them into a good position. You may use the Align panel to align and distribute properly (see the Flash arranging objects tutorial if needed).
- Step 4 - Learn some ActionScript 3 principles
Let's recall some ActionScript principles here. ActionScript 3 does not allow to attach scripts to buttons (as in ActionScript 2). In order to script a component we basically have to do three things.
- Give a name to the component (i.e. the movie instance on the stage)
- Fill in some parameters, e.g. add a label for the button. We will do this in the parameters panel.
- Add some ActionScript to the timeline that will:
- Associate a user interaction event (e.g. user clicks) with some "action" function
- Program this action function
- Step 5 - Give a name to each button and change its label
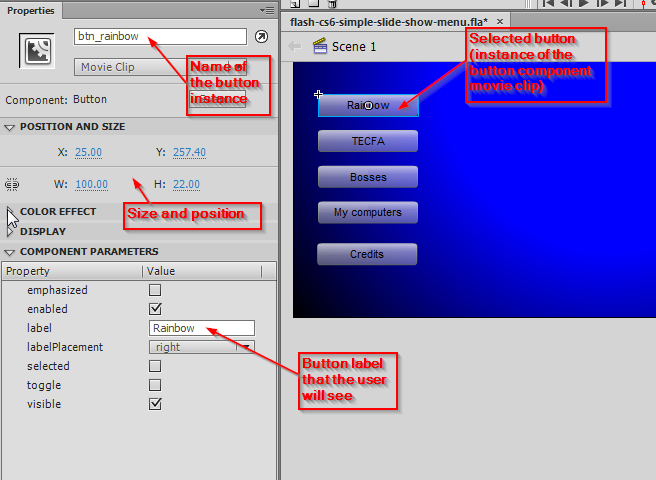
- Click on a button (make sure to lock other layers)
- Select the Parameters panel (menu Window->Properties->Parameters)
- Give the button instance a unique name: e.g. btn_rainbow is fine. ("btn" means "button" and "rainbow" because this button will lead to a rainbow picture). To be safe:
- Start the label name with a letter
- For the rest of the name you can use letters, digits or the underscore "_".
- Do not use whitespaces or punctuation characters or dashes. If you do it wrongly, Flash will complain.
- I suggest that you use only lower case letters (Names are case sensitive)
- Then, you should change the label parameter of the button. This is what the user will see. Type anything there, but don't make it too long (it's a button after all).
- If your text is bigger than the label, change the button width in the same panel, i.e. modify the W: field.
Probably you noticed now that it is to work with a component vs. using buttons as explained in the Flash button tutorial
Make sure you did this to all buttons.
- Step 6 - Open the ActionScript panel
- Click in Frame 1 of the Action Layer you already should have defined (see step 1)
- Hit F9 to open the "Actions-Frame" panel. In case it is docked with the parameters, you may undock it to have some more space.
- Then paste all the code from the summary just below (i.e. step 7, 8, 9 code). Alternatively, open the flash-cs6-simple-slide-show-menu.fla file and copy the code from there.
Note: Code that is delimited by /* */ represents so-called comments, i.e. code that is not interpreted by Flash, but that we inserted just to remember what our code is supposed to do.
It's always a good idea to document your code ...
- Step 7 - Stop the animation from playing in frame one
The stop() instruction will stop Flash from playing all the frames, i.e. we want the user to stay in Frame 1 after the file loads.
stop();
- Step 8 - Associate buttons with an event handler function
ActionScript programming will include two things:
- You must define which ActionScript function is executed when a user clicks on a button. Think of a function as a named set of instructions that Flash will execute.
- You must define the ActionScript code for these functions. Actually, in this example, we will use the same function for all our buttons (a simpler but longer code example is below).
Associate a handler function for each button instance:
- Syntax: button_name.addEventListener(Event.type, function_name
Lines below mean:
- If the user clicks on the btn_rainbow with the mouse, then the function clickHandler defined below will execute and so forth ...
 btn_rainbow.addEventListener(MouseEvent.CLICK, clickHandler);
 btn_tecfa.addEventListener(MouseEvent.CLICK, clickHandler);
 btn_bosses.addEventListener(MouseEvent.CLICK, clickHandler);
 btn_my_computers.addEventListener(MouseEvent.CLICK, clickHandler);
 btn_credits.addEventListener(MouseEvent.CLICK, clickHandler);
When a user clicks a button, a so-called MouseEvent is happening. This event is then given to the function that we called clickHandler for further treatment.
- Step 9 - Write a clickHandler function
Note: you could have chosen an other name, but - as a general rule - function names should be meaningful to you and to other people who read your program.
Let's now look at the complete function code:
 function clickHandler(event:MouseEvent):void {
 	switch (event.currentTarget.label)
 	{
 		case "Rainbow" :
 			gotoAndStop(2);
 			break;
 		case "TECFA" :
 			gotoAndStop(3);
 			break;
 		case "Bosses" :
 			gotoAndStop(4);
 			break;
 		case "My computers" :
 			gotoAndStop(5);
 			break;
 		case "Credits" :
 			gotoAndStop(6);
 			break;
 	}
 }
When a user clicks a button, a so-called MouseEvent is happening. This event is then given to the function for further treatment. Formally speaking, when we defined the clickHandler function, defined a parameter for the information it must deal with. In our case, the function must deal with.
(event:MouseEvent)
means that we define a parameter called "event" (i.e. we name the information that is handed over) and we tell Flash that this parameter is of type "MouseEvent".
We then can use use this "event" information. In order to understand which button was clicked, we can retrieve this from the event information. The following expression:
event.currentTarget.label
will tell us the label of the button that was the current target.
We use this expression in a so-called switch (or case) statement. It starts on line 2 and ends on line 19. Its syntax is the following:
switch (value) {
  case value_1 :
    /* do something */
    break;
  case value_2 :
    /* do something */
    break;
  }
Now, for each label we then define what Flash should do. We only need one single instruction: Go to frame x and stop again. The instruction is
gotoAndStop(x)
E.g.
gotoAndStop(2)
means "move the animation to frame 2" and stop there.
- (Summary) - The complete AS3 code
Here is the complete code you could copy/paste/adapt:
stop();

btn_rainbow.addEventListener(MouseEvent.CLICK, clickHandler);
btn_tecfa.addEventListener(MouseEvent.CLICK, clickHandler);
btn_bosses.addEventListener(MouseEvent.CLICK, clickHandler);
btn_my_computers.addEventListener(MouseEvent.CLICK, clickHandler);
btn_credits.addEventListener(MouseEvent.CLICK, clickHandler);

function clickHandler(event:MouseEvent):void {
	switch (event.currentTarget.label)
	{
		case "Rainbow" :
			gotoAndStop(2);
			break;
		case "TECFA" :
			gotoAndStop(3);
			break;
		case "Bosses" :
			gotoAndStop(4);
			break;
		case "My computers" :
			gotoAndStop(5);
			break;
		case "Credits" :
			gotoAndStop(6);
			break;
	}
}
Things you have to change:
- The instance names of buttons, e.g. btn_rainbow
- The labels of the buttons, e.g. "Rainbow"
- The frame to jump to and play, e.g. gotoAndStop(2).
Of course you also could navigate to named frames, e.g. gotoAndStop("Paradise");
If things go wrong
- Make sure that your syntax is correct. E.g. one single ":" missing may break your program. In the ActionScript window click on the "Check syntax" icon to test for correct syntax.
- Also indent your code properly. Simply click on the "Auto Format" icon.
- Make sure that the Action layer extends to the end of your timeline. Put code in frame 1 and then hit F5 in the right-most frame you use (insert frame and not insert keyframe !)
- Make really sure that your code is in frame 1 and in the Action layer.
- Make sure that button instance names and label names are exactly the same in the Parameters panel and in your Script.
Here is the picture of the timeline again:
Notice the little "a" in frame 1 of the Actions layer. It means "ActionScript code inside" :)
Adding external URLs to buttons
This shows how to program a button that will open an URL in a Web Browser (look at the example file you can download). Code is a bit complicated since it also will test if the URL really exists.
btn_edutech_wiki.addEventListener(MouseEvent.CLICK, GoToUrl);

function GoToUrl(event:MouseEvent):void {
	var url:String =  "http://edutechwiki.unige.ch/en/Flash_components_tutorial";
	var request:URLRequest = new URLRequest(url);
	try
	{
		navigateToURL(request, '_blank');
	}
	catch (e:Error)
	{
		trace("Error occurred!");
	}
}
A simpler way of doing it without testing:
function GoToUrl(event:MouseEvent):void {
	var request:URLRequest = new URLRequest("http://edutechwiki.unige.ch/en/Flash_components_tutorial");
	navigateToURL(request, '_blank');
- Results and source code
- flash-cs6-simple-slide-show-menu.html
- Source: flash-cs6-simple-slide-show-menu.fla
- Grab the flash-cs6-simple-slide-show-menu.* files from
A simpler but longer solution
Too complicated ? You may use a simpler but less elegant code if you have no programming knowledge and feel not comfortable with the "switch" statement. The result will be same, though I changed the color of the background: menu-based slide show with simple AS code
So here is what you need to change:
- (1) Event listener registration
So the principle is: For each button you got to register an event listener function. Change:
- The number of addEventListener definitions (here we got five)
- Make sure that each btn-xxx corresponds to names you gave to your own button instances
myButton.addEventListener(MouseEvent.CLICK, Handler_A);
- (2) Define event listener functions
- Copy/Paste/Change definitions of functions
- So change the name of the function, e.g. clickHandler1 into clickHandler2 and the frame it has to jump to.
 function clickHandler2(event:MouseEvent):void {
     gotoAndStop(2);
 }
Note: Formatting in ECMAScript languages does not matter. You could have written the above line as:
function Handler_A(event:MouseEvent):void {gotoAndStop(2); }
However, make sure to keep delimiters like the { } ; !!
- Start from this complete code
 /* This will stop Flash from playing all the frames
    User must stay in Frame 1 */
 stop();

 /* Associate a different handler function for each button instance:
    Syntax: button_name.addEventListener(Event.type, function_name
    Lines below mean:
    * If the user clicks on the btn_rainbow with the mouse,
      then the function clickHandler defined below will execute
 */
 btn_rainbow.addEventListener(MouseEvent.CLICK, clickHandler1);
 btn_tecfa.addEventListener(MouseEvent.CLICK, clickHandler2);
 btn_bosses.addEventListener(MouseEvent.CLICK, clickHandler3);
 btn_my_computers.addEventListener(MouseEvent.CLICK, clickHandler4);
 btn_credits.addEventListener(MouseEvent.CLICK, clickHandler5);

 /* Each function defines where to move the playhead in the animation.
    E.g. clickHandler2 will go to frame 3 and then stop
    */

 function clickHandler1(event:MouseEvent):void {
 	gotoAndStop(2);
 }
 function clickHandler2(event:MouseEvent):void {
 	gotoAndStop(3);
 }
 function clickHandler3(event:MouseEvent):void {
 	gotoAndStop(4);
 }
 function clickHandler4(event:MouseEvent):void {
 	gotoAndStop(5);
 }
 function clickHandler5(event:MouseEvent):void {
 	gotoAndStop(6);
 }

 /* This shows how to open an URL in a WebBrowser */

 btn_edutech_wiki.addEventListener(MouseEvent.CLICK, GoToUrl);

 function GoToUrl(event:MouseEvent):void {
 	var request:URLRequest = new URLRequest("http://edutechwiki.unige.ch/en/Flash_components_tutorial");
 	navigateToURL(request, '_blank');
 }
- Results and source code
- flash-cs6-simple-slide-show-menu-fewcode.html
- Source: flash-cs6-simple-slide-show-menu-fewcode.fla
- Grab the flash-cs6-simple-slide-show-menu-fewcode.* files from
Improvements to be made / exercise
If you got more and/or bigger pictures, you actually should not include the pictures in the *.swf, but rather load these from the Internet. You then have to learn how to use/program a preloader (we will cover this in some other tutorial).
- You may add text (labels) to each picture
- You also could add another URL button (e.g. I should add one to the TECFA Logo on top left).
- Exercise
- Add some contents to frame one and add a "home" button to navigate there.
Customizing buttons
You can customize button skins, but this is not easy.
- Double click the button on the stage
However, before you try this:
- Be aware that you can change width and height simply though the parameters panel
- Color will adapt to background (buttons are transparent)
Read more about Customizing the Button at Adobe
Component buttons in an animation example
You may consult this example in order learn:
- that one can add a button anywhere in the timeline
- how to work with scenes
Scenes can be understood as fragments of a long timeline (likes scenes in a theatre). They have the following advantage:
- The timeline becomes shorter and more manageable
- You can test scenes independently
To add a scene:
- Menu insert scene
- To rename a scene: menu Window->Other panels->Scene; then double-click on the scene
To navigate from one scene to another, use code like this:
The following code will move the user to a scene called "Credits" in frame 1 and stop after she presses the "credits_btn".
credits_btn.addEventListener(MouseEvent.CLICK, goCredit);

function goCredit(event:MouseEvent):void {
	gotoAndStop(1,"Credits");
}
The following code will move the user to a scene called "Animation" in frame 1 and play
restart_btn.addEventListener(MouseEvent.CLICK, restart);

function restart(event:MouseEvent):void {
	gotoAndPlay(1,"Animation");
}
- Example and code
- You can see the flash-cs3-cloud-animation-sound2.* example
- Source: components-intro/flash-cs3-cloud-animation-sound2.fla
- The files are here: http://tecfa.unige.ch/guides/flash/ex/components-intro/
Component buttons to start/stop embedded movie clips
See the flash embedded movie clip tutorial for details
E.g. in the flying kites example, we use the following code:
kite.stop();

start_button.addEventListener(MouseEvent.CLICK,start_kite);
stop_button.addEventListener(MouseEvent.CLICK,stop_kite);

function start_kite(event:MouseEvent) {
	kite.play();
}

function stop_kite(event:MouseEvent) {
	kite.stop();
}
kite is the instance name of the embedded "Kite movie".
- kite.play() will play the Kite movie
- kite.stop() will stop the Kite movie
In other words, if you to the user to be able to start/stop an embedded movie clip, you can do this with a single frame. On other example using several frames that is discussed in the flash embedded movie clip tutorial is an example from an exam.


