Pybossa: Difference between revisions
No edit summary |
No edit summary |
||
| Line 20: | Line 20: | ||
|field_last_edition=2013/09/09 | |field_last_edition=2013/09/09 | ||
}} | }} | ||
=== pyBossa templates === | |||
pyBossa templates are reusable applications templates that implement popular crowd crafting problems. Templates include: a ''task creator'', a ''task presenter'', a ''tutorial'', an ''application description, etc. | |||
As of April 2013, there are five templates available on the crowdsourcing.org server. You can adapt these to your own needs in various ways. | |||
{| class="wikitable" | |||
|- | |||
! Template !! Task template !! Description | |||
|- | |||
| EpiCollect Plus Project || EpiCollect Plus || Interface to an [http://plus.epicollect.net/ EpiCollect] project | |||
|- | |||
| Geo-coding || Urban Park Task || Allows users to tag a park in a list of cities of the whole world. The result is then shown in a 3D Globe (rendered with WebGL) | |||
|- | |||
| Image Pattern Recognition || Flickr Person Finder || Uses the Flickr web service as the source of the data, pulls a picture from a Flick Feed and then asks the user a question with several possible answers. | |||
|- | |||
| Transcribing documents || PDF transcription || An application that allows transcribing PDF documents (e.g. old texts) | |||
|- | |||
| Sound Pattern Recognition || SoundCloud || ... | |||
|} | |||
In addition, there are two special templates allowing to import data from CSV files or Google Drive Spreadsheets. In order to use that data, you will have to write the code for a presenter. | |||
{| class="wikitable" | |||
|- | |||
! Template !! Task template !! Description | |||
|- | |||
| CSV || Public link to a CSV file || ? | |||
|- | |||
| Google Drive Spreadsheet || Import a Google Drive Spreadsheet || ? | |||
|} | |||
All PyBossa templates are available in [https://github.com/PyBossa GitHub repository], e.g. you can add these to your own pyBossa server or modify the code and push to a pyBossa server. | |||
=== Data exports === | |||
Both tasks and task runs can be exported either in CSV or JSON format for analysis. | |||
== Adapting the built-in Image pattern recognition template == | |||
This example will show how to adapt the built-in ''Image pattern recognition'' using the public pyBossa sever. | |||
Example that you only can view once, unless you connect from a different IP. It is really just a test, e.g. only includes three pictures of the 3D printers I own .... | |||
* http://crowdcrafting.org/app/3D_printers_demo/ | |||
Below, we summarize the steps. | |||
=== Create an account and an application === | |||
* Create an account on http://crowdcrafting.org/ | |||
* Click on the '''Create''' button on top menu to create an application | |||
: Fill in 8 fields that will describe the application. You are allowed to change these later. | |||
You can find your applications in your "personal" pull down menu. | |||
=== Select an existing application template === | |||
In the '''Settings''' for your application (personal pull-down menu -> My applications): | |||
* Click on ''Import tasks'' and select the '''Image Pattern Recognition''' template | |||
You now will see a link to a Google spreadsheet and that you can substitute by your own. Therefore, do not use this link, create your own as explained below. | |||
* Go to [https://drive.google.com/ Google Drive] and log in. If you don't have a Coogle account you will have to create one. | |||
* Open the [https://docs.google.com/spreadsheet/ccc?key=0AsNlt0WgPAHwdHFEN29mZUF0czJWMUhIejF6dWZXdkE#gid=0 this spreadsheet] | |||
* Create a copy and ''share it'' on your own google drive. With the open file, use menu File->Share. | |||
* Replace all the pictures and maybe also the questions. Do not change the headings, since the presenter will use these. | |||
: col1 = question | |||
: col2 = thumbnail picture | |||
: col3 = credits page | |||
: col4 = full picture | |||
... of course you can link to any picture from any site. E.g. we took ours from this wiki: | |||
=== Create/Modify the task presenter === | |||
Pick the ''Image recognition task'' (the others will not work with the template) | |||
You now can change the number and the phrasing of the answers. As you can see below, we added an answer: | |||
<source lang="java"> | |||
<!-- If the user clicks this button, the saved answer will be value="maybe"--> | |||
<button class="btn btn-answer" | |||
value='Maybe'><i class="icon icon-white icon-comment-alt"></i>Maybe</button> | |||
</source> | |||
'''Adapting the buttons''' | |||
PyBossa uses the [http://twitter.github.io/bootstrap/index.html Twitter bootstrap] CSS framework. | |||
* ''icon-comment-alt'' refers to a [http://fortawesome.github.io/Font-Awesome/ special font] that was made for this framework. In principle, you can use any of these font names from [http://fortawesome.github.io/Font-Awesome/design.html this list]. | |||
* Same principle for the button color styles, e.g. ''btn_answer'' would be light grey. See the [http://twitter.github.io/bootstrap/base-css.html#buttons Twitter bootstrap buttons list] | |||
Original fragment: | |||
<source lang="java"> | |||
<div id="answer"> <!-- Start DIV for the submission buttons --> | |||
<!-- If the user clicks this button, the saved answer will be value="yes"--> | |||
<button class="btn btn-success btn-answer" value='Yes'><i class="icon icon-white icon-thumbs-up"></i> Yes</button> | |||
<!-- If the user clicks this button, the saved answer will be value="no"--> | |||
<button class="btn btn-danger btn-answer" value='No'><i class="icon icon-white icon-thumbs-down"></i> No</button> | |||
<!-- If the user clicks this button, the saved answer will be value="NotKnown"--> | |||
<button class="btn btn-answer" value='NotKnown'><i class="icon icon-white icon-question-sign"></i> I don't know</button> | |||
</div><!-- End of DIV for the submission buttons --> | |||
</source> | |||
New fragment: | |||
<source lang="java"> | |||
<div id="answer"> <!-- Start DIV for the submission buttons --> | |||
<!-- If the user clicks this button, the saved answer will be value="yes"--> | |||
<button class="btn btn-success btn-answer" value='Yes'><i class="icon icon-white icon-thumbs-up"></i> Yes</button> | |||
<!-- If the user clicks this button, the saved answer will be value="no"--> | |||
<button class="btn btn-danger btn-answer" value='No'><i class="icon icon-white icon-thumbs-down"></i> No</button> | |||
<!-- If the user clicks this button, the saved answer will be value="maybe"--> | |||
<button class="btn btn-answer" value='Maybe'><i class="icon icon-white icon-comment-alt"></i>Maybe</button> | |||
<!-- If the user clicks this button, the saved answer will be value="NotKnown"--> | |||
<button class="btn btn-answer" value='NotKnown'><i class="icon icon-white icon-question-sign"></i> I don't know</button> | |||
</div><!-- End of DIV for the submission buttons --> | |||
</source> | |||
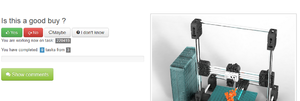
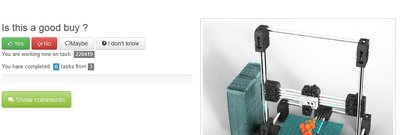
The result looks like this: | |||
[[File:Pybossa-app1.png|400px|thumbnail|none|Adapted PyBossa application]] | |||
== A simple example reusing existing code == | |||
{{stub}} | |||
1. Create an account and/or an application as above | |||
=== Create an application === | |||
* Install a Python virtual environment. This way you can be sure that dependencies will remain ok (not overwritten by system upgrades, etc.) | |||
* Start from an existing template, e.g. from the [http://docs.pybossa.com/en/latest/user/tutorial.html Application tutorial] or from an application you could download from the [https://github.com/PyBossa GitHub repository] | |||
..... | |||
=== Create and push the application to the pyBossa server === | |||
python createTasks.py -u http://crowdcrafting.org -k API-KEY | |||
* Select your application (personal pull-down menu on top -> My Applications | |||
* Open your application. | |||
== Links == | |||
=== Official documentation === | |||
Documentation is available on [http://docs.pybossa.com/ docs.pybossa.com/]. For example: | |||
* [http://docs.pybossa.com/en/latest/overview.html PyBossa Overview] | |||
* [http://docs.pybossa.com/en/latest/build_with_pybossa.html Build with PyBossa] | |||
* [http://docs.pybossa.com/en/latest/user/overview.html Quick overview: Creating your own Application] | |||
* [http://docs.pybossa.com/en/latest/user/tutorial.html Step by step tutorial on creating an Application] (more advanced use) | |||
* [http://crowdcrafting.org/ Crowdcrafting.org]. Official PyBossa server that hosts many projects. Anyone can create his/her own. | |||
=== Example applications === | |||
* [http://irevolution.net/2013/01/20/digital-humanitarian-micro-tasking/ Digital Humanitarian Response: Moving from Crowdsourcing to Microtasking] | |||
=== Other === | |||
* [http://okfnlabs.org/about Open Knowledge Labs] has posts concerning pyBossa, e.g. about new features | |||
{{Free text}} | |||
Revision as of 14:52, 9 September 2013
pyBossa templates
pyBossa templates are reusable applications templates that implement popular crowd crafting problems. Templates include: a task creator, a task presenter, a tutorial, an application description, etc.
As of April 2013, there are five templates available on the crowdsourcing.org server. You can adapt these to your own needs in various ways.
| Template | Task template | Description |
|---|---|---|
| EpiCollect Plus Project | EpiCollect Plus | Interface to an EpiCollect project |
| Geo-coding | Urban Park Task | Allows users to tag a park in a list of cities of the whole world. The result is then shown in a 3D Globe (rendered with WebGL) |
| Image Pattern Recognition | Flickr Person Finder | Uses the Flickr web service as the source of the data, pulls a picture from a Flick Feed and then asks the user a question with several possible answers. |
| Transcribing documents | PDF transcription | An application that allows transcribing PDF documents (e.g. old texts) |
| Sound Pattern Recognition | SoundCloud | ... |
In addition, there are two special templates allowing to import data from CSV files or Google Drive Spreadsheets. In order to use that data, you will have to write the code for a presenter.
| Template | Task template | Description |
|---|---|---|
| CSV | Public link to a CSV file | ? |
| Google Drive Spreadsheet | Import a Google Drive Spreadsheet | ? |
All PyBossa templates are available in GitHub repository, e.g. you can add these to your own pyBossa server or modify the code and push to a pyBossa server.
Data exports
Both tasks and task runs can be exported either in CSV or JSON format for analysis.
Adapting the built-in Image pattern recognition template
This example will show how to adapt the built-in Image pattern recognition using the public pyBossa sever.
Example that you only can view once, unless you connect from a different IP. It is really just a test, e.g. only includes three pictures of the 3D printers I own ....
Below, we summarize the steps.
Create an account and an application
- Create an account on http://crowdcrafting.org/
- Click on the Create button on top menu to create an application
- Fill in 8 fields that will describe the application. You are allowed to change these later.
You can find your applications in your "personal" pull down menu.
Select an existing application template
In the Settings for your application (personal pull-down menu -> My applications):
- Click on Import tasks and select the Image Pattern Recognition template
You now will see a link to a Google spreadsheet and that you can substitute by your own. Therefore, do not use this link, create your own as explained below.
- Go to Google Drive and log in. If you don't have a Coogle account you will have to create one.
- Open the this spreadsheet
- Create a copy and share it on your own google drive. With the open file, use menu File->Share.
- Replace all the pictures and maybe also the questions. Do not change the headings, since the presenter will use these.
- col1 = question
- col2 = thumbnail picture
- col3 = credits page
- col4 = full picture
... of course you can link to any picture from any site. E.g. we took ours from this wiki:
Create/Modify the task presenter
Pick the Image recognition task (the others will not work with the template)
You now can change the number and the phrasing of the answers. As you can see below, we added an answer:
<!-- If the user clicks this button, the saved answer will be value="maybe"-->
<button class="btn btn-answer"
        value='Maybe'><i class="icon icon-white icon-comment-alt"></i>Maybe</button>
Adapting the buttons PyBossa uses the Twitter bootstrap CSS framework.
- icon-comment-alt refers to a special font that was made for this framework. In principle, you can use any of these font names from this list.
- Same principle for the button color styles, e.g. btn_answer would be light grey. See the Twitter bootstrap buttons list
Original fragment:
<div id="answer"> <!-- Start DIV for the submission buttons -->
<!-- If the user clicks this button, the saved answer will be value="yes"-->
<button class="btn btn-success btn-answer" value='Yes'><i class="icon icon-white icon-thumbs-up"></i> Yes</button>
<!-- If the user clicks this button, the saved answer will be value="no"-->
<button class="btn btn-danger btn-answer" value='No'><i class="icon icon-white icon-thumbs-down"></i> No</button>
<!-- If the user clicks this button, the saved answer will be value="NotKnown"-->
<button class="btn btn-answer" value='NotKnown'><i class="icon icon-white icon-question-sign"></i> I don't know</button>
</div><!-- End of DIV for the submission buttons -->
New fragment:
<div id="answer"> <!-- Start DIV for the submission buttons -->
<!-- If the user clicks this button, the saved answer will be value="yes"-->
<button class="btn btn-success btn-answer" value='Yes'><i class="icon icon-white icon-thumbs-up"></i> Yes</button>
<!-- If the user clicks this button, the saved answer will be value="no"-->
<button class="btn btn-danger btn-answer" value='No'><i class="icon icon-white icon-thumbs-down"></i> No</button>
<!-- If the user clicks this button, the saved answer will be value="maybe"-->
<button class="btn btn-answer" value='Maybe'><i class="icon icon-white icon-comment-alt"></i>Maybe</button>
<!-- If the user clicks this button, the saved answer will be value="NotKnown"-->
<button class="btn btn-answer" value='NotKnown'><i class="icon icon-white icon-question-sign"></i> I don't know</button>
</div><!-- End of DIV for the submission buttons -->
The result looks like this:
A simple example reusing existing code
1. Create an account and/or an application as above
Create an application
- Install a Python virtual environment. This way you can be sure that dependencies will remain ok (not overwritten by system upgrades, etc.)
- Start from an existing template, e.g. from the Application tutorial or from an application you could download from the GitHub repository
.....
Create and push the application to the pyBossa server
python createTasks.py -u http://crowdcrafting.org -k API-KEY
- Select your application (personal pull-down menu on top -> My Applications
- Open your application.
Links
Official documentation
Documentation is available on docs.pybossa.com/. For example:
- PyBossa Overview
- Build with PyBossa
- Quick overview: Creating your own Application
- Step by step tutorial on creating an Application (more advanced use)
- Crowdcrafting.org. Official PyBossa server that hosts many projects. Anyone can create his/her own.
Example applications
Other
- Open Knowledge Labs has posts concerning pyBossa, e.g. about new features
| BIBLIOGRAPHY |
