Flash augmented video tutorial: Difference between revisions
m (Text replacement - "<pageby nominor="false" comments="false"/>" to "<!-- <pageby nominor="false" comments="false"/> -->") |
|||
| (3 intermediate revisions by the same user not shown) | |||
| Line 1: | Line 1: | ||
{{Incomplete}} | {{Incomplete}} | ||
{{Flash tutorial|CS6, (CS4, CS5)|intermediate|}} | {{Flash tutorial|CS6, (CS4, CS5)|intermediate|}} | ||
<!-- <pageby nominor="false" comments="false"/> --> | |||
== Introduction == | == Introduction == | ||
| Line 504: | Line 505: | ||
== Cue points work-through example == | == Cue points work-through example == | ||
'''Adapt the following example''' | '''Adapt the following example''' | ||
* Substitute the video by your own | |||
* Change/add cue points | |||
* Change/remove/add your own embedded movie clips | |||
Look at this first: [http://tecfa.unige.ch/guides/flash/ex6/component-video-intro/flash-cs6-video-cue-events-exercise.html flash-cs6-video-cue-events-exercise.html] | Look at this first: [http://tecfa.unige.ch/guides/flash/ex6/component-video-intro/flash-cs6-video-cue-events-exercise.html flash-cs6-video-cue-events-exercise.html] | ||
| Line 591: | Line 596: | ||
</source> | </source> | ||
== Manipulating the video component with ActionScript == | |||
* Read [http://www.adobe.com/devnet/flash/articles/flvplayback_programming.html Controlling web video with ActionScript 3 FLVPlayback programming]. However, this article was written for CS5 and at least looping won't work in Flash 11 (CS6). | |||
See a fixed example: | |||
* [http://tecfa.unige.ch/guides/flash/ex6/component-video-intro/flash-cs6-video-component-looping.fla flash-cs6-video-component-looping.fla] | |||
* [http://tecfa.unige.ch/guides/flash/ex6/component-video-intro/flash-cs6-video-component-looping.html flash-cs6-video-component-looping.html] | |||
== Links == | == Links == | ||
Latest revision as of 18:26, 22 August 2016
Introduction
Video components are prebuilt interface elements (widgets) that will speed up video integration. As explained in the Flash video component tutorial the FLVPlayBack Video Component allows to render videos in an easy way since it includes a nice choice of skins for user controls. Videos also can be enhanced with captioning, read the Flash video captions tutorial or they may interact with the rest of the animation. Some of these techniques require some some ActionScript as we shall explain here. As an alternative, you also can add a video to the main timeline, but this will create very large *.swf files and its therefore a technique that should be used with care. Finally, you also could program your own video interface using ActionScript, a topic that will not be covered here.
- Learning goals
- Learn how to create augmented videos, e.g. animations that are triggered by so-called cue points or buttons that allow the user to access specific frames in the video.
- Prerequisites
- Flash CS6 desktop tutorial
- Flash video component tutorial (important)
- Flash drawing tutorial
- Flash component button tutorial
- Flash button tutorial
- Flash motion tweening tutorial, Flash shape tweening tutorial, Flash special effects tutorial
- Flash embedded movie clip tutorial
- Moving on
- Flash video captions tutorial Adding subtitles to a video
- The Flash tutorials article has a list of other tutorials.
- Quality
- This text should technical people get going and may not be good enough for self-learning beginners. It can be used as handout in a "hands-on" class. That is what Daniel K. Schneider made it for...
- Level
- It both aims at beginners (FLV encoding, using the video playback component and embedding a video in the timeline) and intermediate Flash designers (inserting captions and using cue points to trigger animations).
By "augmented video", we refer to several ways of adding some extra value to a video:
- Add navigation buttons that will move the user to particularly interesting scenes of a video
- Trigger animations that will illustrate or otherwise relate to a given video scene
- Add a set of subtitles or "side-text" to the video. This is covered in the flash video captions tutorial.
In this article we shall present two types of technologies:
- You could import a video to the timeline, as opposed to using some kind of playback or player component. This easy solution suffers from some technical drawbacks and we will introduce it first.
- You can implement both video navigation and video-triggered events with so-called cue points (labels that identify precise video frames, i.e. time in milliseconds).
Importing a video to the timeline
Instead of using the playback component as explained in the Flash video component tutorial we will include the video into the timeline (each video frame will be a timeline frame). This will allow us to create videos augmented with animations in an easy way.
Timeline video with simple controls
If you embed a video into the timeline, then you don't get the ready-made video control as explained in the Flash video component tutorial. Therefore, only embed video in the timeline if you plan to add animations and if the video file is really small. Also you shouldn't care about smaller synchronization problems with the audio track.
Embedded video will make your timeline really long, although you can choose to have it its own timeline. Anyhow, in this example we took the "hundreds of frames" timeline option.
We will insert the video in frame #2. We also will add a play button that will jump to frame 2 and play the video.
- Step 1 - FLV files
Timeline embedded videos only work with the Flash *.flv video format.
- You therefore should encode a non *.flv format with the Media Encoder first or Flash will refuse to import.
- Step 2 - Import the video as embed
- Create a new layer and call it "video"
- Insert a new empty keyframe in frame 2 (since we don't want the video play on load in this case).
- Select this new empty keyframe in the video layer.
- Menu File->Import->Import Video
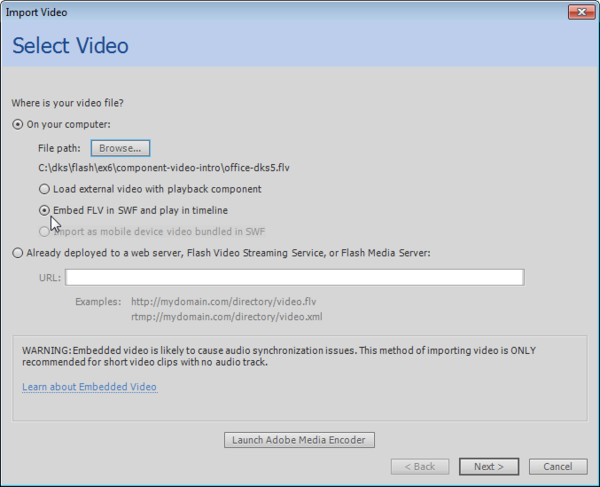
- In the video deployment dialog, choose "Embed video in SWF and play in timeline".
The click next
- Use the defaults
- Step 3 - Add some simple controls
- You need at least a play button, but adding some extra buttons that will allow a user to jump to given frames also may be handy.
- We just used the button component described in the Flash components tutorial.
In our example we added three buttons for video control
- The "PLAY" button will move the playhead to frame 2 where the video starts.
- The "Go to Book Scene" button will move it to frame 230.
- The "Credits" button will go to the very end.
The ActionScript code:
/* This will stop Flash from playing all the frames
   User must stay in Frame 1 */
stop();

/* Associate a handler function for each button instance */

btn_credits.addEventListener(MouseEvent.CLICK, clickHandler);
btn_play.addEventListener(MouseEvent.CLICK, clickHandler);
btn_book.addEventListener(MouseEvent.CLICK, clickHandler);

/* Instead of writing a function for each button, we just create one.
   In order to understand which button was clicked, we ask from the event
   the label of the button(event.currentTarget.label).
   Then we gotoAndStop(x) to Frame 374 for Credits
   Or we can play the movie that sits in frame 2
*/
function clickHandler(event:MouseEvent):void {
	switch (event.currentTarget.label)
	{
		case "Credits" :
			gotoAndStop(609);
			break;
		case "PLAY" :
			gotoAndPlay(2);
			break;
		case "Go to Book Scene" :
			gotoAndPlay(230);
			break;
	}
}

/* This shows how to open an URL in a WebBrowser */
btn_edutech_wiki.addEventListener(MouseEvent.CLICK, GoToUrl);

function GoToUrl(event:MouseEvent):void {
	var url:String = "http://edutechwiki.unige.ch/en/Flash_video_component_tutorial";
	var request:URLRequest = new URLRequest(url);
	try
	{
		navigateToURL(request, '_blank');
	}
	catch (e:Error)
	{
		trace("Error occurred!");
	}
}
The "embed in timeline option" is probably only useful if you plan to play around with fine grained frame-by-frame jumping around or if you plan to add animations that synchronize with the video as described in the next example. Otherwise it is better to use a external video with the video playback component as described in the Flash video component tutorial.
- Results
- flash-cs6-video-simple-embedd.html
- Source: flash-cs6-video-simple-embedd.fla
- Directory: http://tecfa.unige.ch/guides/flash/ex6/component-video-intro/
Note: I noticed that when you import more than once a video, file size will grow a lot ! Probably a side-effect of the undo mechanism. So 'do not do this. If you notice this problem, save the file with "save as". The new version will be ok. (Maybe there is another solution to trim down file size).
Enhanced video embedding into timeline
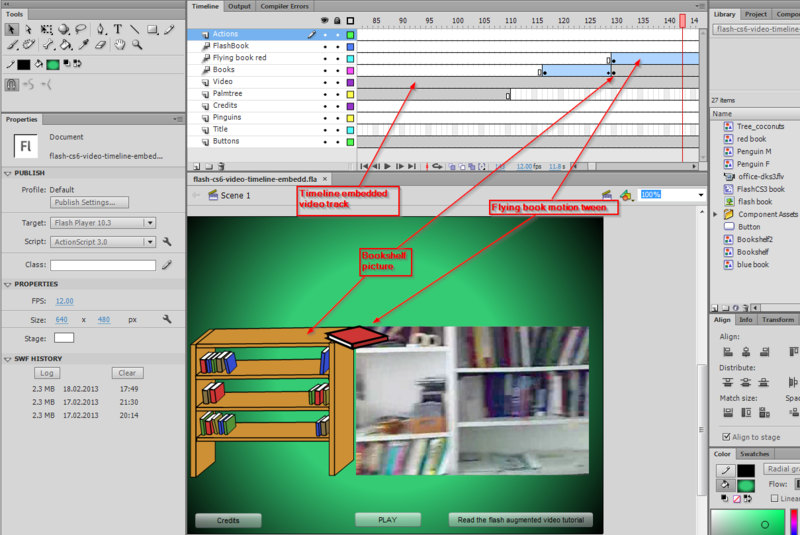
Embedding video into the timeline makes sense (IMHO) if you are looking for an easy way to synchronize other animations with the video. This technique requires no more additional ActionScript knowledge than you need for simple animation and navigation. However, embedded videos will make the *.fla and the resulting *.swf really huge.
In this example, we add various animations (e.g. two motion tweens and a shape tween) to the project. Below you can see that books are tumbling out of a bookshelf while the video shows a "real" bookshelf.
Below is the action script code to implement a simple play button, plus two other ones that are not really necessary, i.e. a "credits" and a "goto ..." button.
All the rest are just simple Flash animations that are embedded in the main timeline.
/* This will stop Flash from playing all the frames
   User must stay in Frame 1 */
stop();

/* Associate a handler function for each button instance */

btn_credits.addEventListener(MouseEvent.CLICK, clickHandler);
btn_play.addEventListener(MouseEvent.CLICK, clickHandler);

/* Instead of writing a function for each button, we just create one.
   In order to understand which button was clicked, we ask from the event
   the label of the button(event.currentTarget.label).
   Then we gotoAndStop(x) to Frame 572 for Credits or
   we can play the movie by moving the user to frame 2.
*/
function clickHandler(event:MouseEvent):void {
	switch (event.currentTarget.label)
	{
		case "Credits" :
			gotoAndStop(572);
			break;
		case "PLAY" :
			gotoAndPlay(2);
			break;
	}
}

/* This shows how to open an URL in a WebBrowser */

btn_edutech_wiki.addEventListener(MouseEvent.CLICK, GoToUrl);

function GoToUrl(event:MouseEvent):void {
	var url:String = "http://edutechwiki.unige.ch/en/Flash_video_component_tutorial";
	var request:URLRequest = new URLRequest(url);
	try
	{
		navigateToURL(request, '_blank');
	}
	catch (e:Error)
	{
		trace("Error occurred!");
	}
}
- Results
- flash-cs6-video-timeline-embedd.html
- Source: flash-cs6-video-timeline-embedd.fla
- Directory: http://tecfa.unige.ch/guides/flash/ex6/component-video-intro/
Cue points
Working with cue points is another way to have your video interact with the user and/or other animations. It's a slightly more difficult solution than using timeline videos as above, but more flexible and more elegant since the resulting flash files will be small and the (external) video could be put on a streaming server.
Let's recall what cue points are with some text that was copied and slightly adapted from Adobe's "use cue points".
A cue point is a point at which the video player dispatches a cuePoint event while a video file plays. You can add cue points to an FLV file at times that you want an action to occur for another element on the web page. You might want to display text or a graphic, for example, or synchronize with a Flash animation, or affect the playing of the FLV file by pausing it, seeking a different point in the video, or switching to a different FLV file. Cue points allow you to receive control in your ActionScript code to synchronize points in your FLV file with other actions on the web page.
There are three types of cue points: navigation, event, and ActionScript. The navigation and event cue points are also known as embedded cue points because they are embedded in the FLV file stream and in the FLV file’s metadata packet.
A navigation cue point allows you to seek a particular frame in the FLV file because it creates a keyframe within the FLV file as near as possible to the time that you specify. A keyframe is a data segment that occurs between image frames in the FLV file stream. When you seek a navigation cue point, the component seeks to the keyframe and starts the cuePoint event.
An event cue point enables you to synchronize a point in time within the FLV file with an external event on the web page. The cuePoint event occurs precisely at the specified time. You can embed navigation and event cue points in an FLV file using either the Video Import wizard or the Adobe Media Encoder.
An ActionScript cue point is an external cue point that you can add either through the component’s Flash Video Cue Points dialog box or through the FLVPlayback.addASCuePoint() method. The component stores and tracks ActionScript cue points apart from the FLV file, and consequently, they are less accurate than embedded cue points. However, ActionScript cue points are still accurate to a tenth of a second.
In ActionScript and within the FLV file’s metadata, a cue point is represented as an object with the following properties: name, time, type, and parameters. The name property is a string that contains the assigned name of the cue point. The time property is a number representing the time in hours, minutes, seconds, and milliseconds (HH:MM:SS.mmm) when the cue point occurs. The type property is a string whose value is "navigation", "event", or "actionscript", depending on the type of cue point that you created. The parameters property is an array of specified name and value pairs.
When a cuePoint event occurs, the cue point object is available in the event object through the info property.
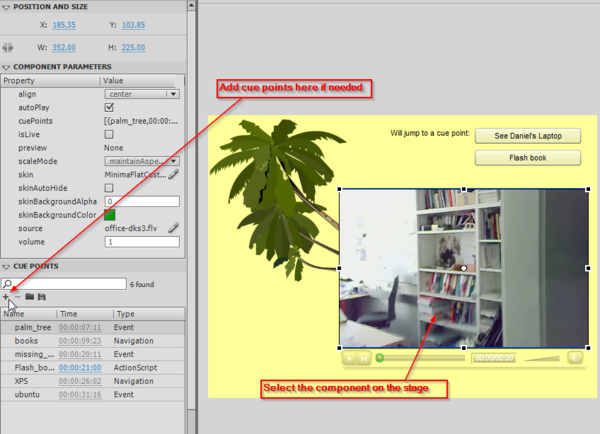
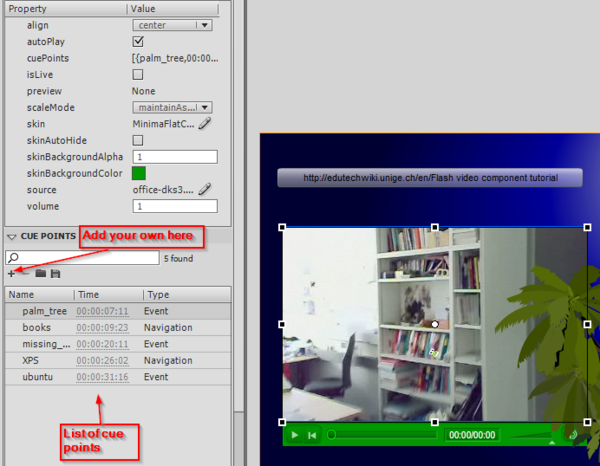
In the following example we used the Media encoder to define most cue points, i.e. they are integrated in the *.flv video file. You also can add cue points in the properties panel after selecting the Flv playback component on the stage. The second solution is much less time consuming since you won't have to re-encode the video. However, cue points are less accurate.
Look first at this example
Then, you could also grab the source.
- Source: flash-cs6-video-goto-cues.fla
- Video: office-dks3.flv
In order to understand this section, you must know how to use buttons. Read the Flash component button tutorial if you do not.
- Optional: Add cue points using the Media encoder, an external program described in the flash video component tutorial). This option requires that you have a file in the original source format (*.flv files won't work).
- Insert a video playback component from the component library. (Read the Flash video component tutorial) if you do not know how).
- Add a video file using the source parameter
- Add cue points in the properties panel as needed.
- Give the playback component on the stage an instance name like video
- Then copy paste the code below and adapt, i.e. change the cue point names. Alternatively, use the Code snippets assistant.
Tip:
- Cue points that you add in the properties panel are attached to the playback component instance. If you remove Playback instance from the stage, the cue points will be gone.
- Therefore you might prefer adding them directly in the ActionScript code, like this:
 your_video_component_instance.addASCuePoint(40, "End");
 video.addASCuePoint(120, "Hot moment");
Now let's see how to implement a button that move the user to a given spot in the video. The logic is very similar as the one use for timeline navigation.
- Define a button
- Define a click event handler for the button
- In the function, define video navigation plus other stuff.
Below is code fragment that illustrate the principle. Note the two lines of code needed for navigation. In your own example, you would to replace video (the name of playback instance on the scene) and the name of the cue point, i.e. "XPS".
btn_laptop.addEventListener(MouseEvent.CLICK, jumpLapTop);

function jumpLapTop(event:MouseEvent):void
{
	var cuePointInstance:Object = video.findCuePoint("XPS");
	video.seek(cuePointInstance.time);
}
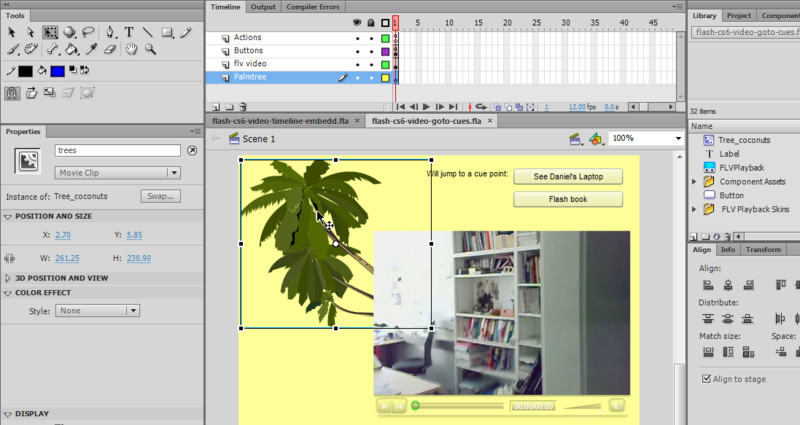
As a bonus I added some invisible trees that will become visible when the user jumps to the "XPS" cue point. These were imported from an SVG drawing and made it into a symbol. The instance on the stage was called trees.
Below is the complete code that you also can find in the source file. To adapt this code to your needs: Change "XPS" to the name of your cue point. Replace the trees with any other graphics symbol or even an embedded movie clip
// hide the trees
trees.visible = false;

btn_laptop.addEventListener(MouseEvent.CLICK, jumpLapTop);

function jumpLapTop(event:MouseEvent):void
{
	var cuePointInstance:Object = video.findCuePoint("XPS");
	video.seek(cuePointInstance.time);
	// remove the following line if you do not have "trees" on the stage
	trees.visible = true;
}

btn_book.addEventListener(MouseEvent.CLICK, jumpFlashBook);

function jumpFlashBook(event:MouseEvent):void
{
	var cuePointInstance:Object = video.findCuePoint("Flash_book");
	video.seek(cuePointInstance.time);
	trees.visible = false;
}
Without trees:
btn_laptop.addEventListener(MouseEvent.CLICK, jumpLapTop);

function jumpLapTop(event:MouseEvent):void
{
	var cuePointInstance:Object = video.findCuePoint("XPS");
	video.seek(cuePointInstance.time);
}

btn_book.addEventListener(MouseEvent.CLICK, jumpFlashBook);

function jumpFlashBook(event:MouseEvent):void
{
	var cuePointInstance:Object = video.findCuePoint("Flash_book");
	video.seek(cuePointInstance.time);
}
- Example
- flash-cs6-video-goto-cues.html
- Source: flash-cs6-video-goto-cues.fla
- Directory http://tecfa.unige.ch/guides/flash/ex6/component-video-intro/
Important notice:
The code above works with any sort of cue points:
- navigation cue points that are inserted into and *.flv file using the Adobe media encoder
- or so-called ActionScript cue points that were inserted with the component inspector or in a script.
In some older textbooks, you might find instructions that will tell how to navigate to specific types of cue points. In particular you will find the two following variants:
For cue points that are encoded into the video with the Media Encoder, use:
video.seekToNavCuePoint ("XPS");
For cue points that were defined in CS6 (either in the parameters panel or with ActionScript commands, use:
video.seek(video.findCuePoint("XPS","actionscript").time);
Our solution above that is also adopted by the code snippets assistant is more verbose, but works with all types of cue points....
Triggering animations from cue points
Implementing animation that is triggered by the video's encounter of cue points works according to similar principles. Look at the example first:
You also could download the source code. However, make sure that you also grab the video or else, substitute your own.
- Source: flash-cs6-video-cue-events.fla
- Video: office-dks3.flv
Knowing all your cue points
All cue points that are either embedded in an *.flv file or defined in the properties panel can bee seen in the properties panel.
A more complicated solution is to to write a little program that tracks cue points. The following code will display a trace of all your cue points in the Flash CS6 output window. Alternatively To make it work:
- Insert a video component on the stage and add a *.flv source (as explained before)
- Give it an instance name. I called it video_component. If give your component an other name you will have to change the ActionScript code below.
// You must import this class (even when you just script the timeline !!)
import fl.video.MetadataEvent;

video_component.addEventListener(MetadataEvent.CUE_POINT, cp_listener);

function cp_listener(eventObject:MetadataEvent):void {
        trace("Elapsed time in seconds: " + video_component.playheadTime);
        trace("Cue point name is: " + eventObject.info.name);
        trace("Cue point type is: " + eventObject.info.type);
}
When you play the *.flv video you can see these kinds of messages in the output window:
Elapsed time in seconds: 7.485
Cue point name is: palm_tree
Cue point type is: event
Elapsed time in seconds: 9.888
Cue point name is: books
Cue point type is: navigation
Elapsed time in seconds: 20.52
Cue point name is: missing_manual
Cue point type is: event
Elapsed time in seconds: 26.188
Cue point name is: XPS
Cue point type is: navigation
Elapsed time in seconds: 31.674
Cue point name is: ubuntu
Cue point type is: event
Adding some embedded movie clips
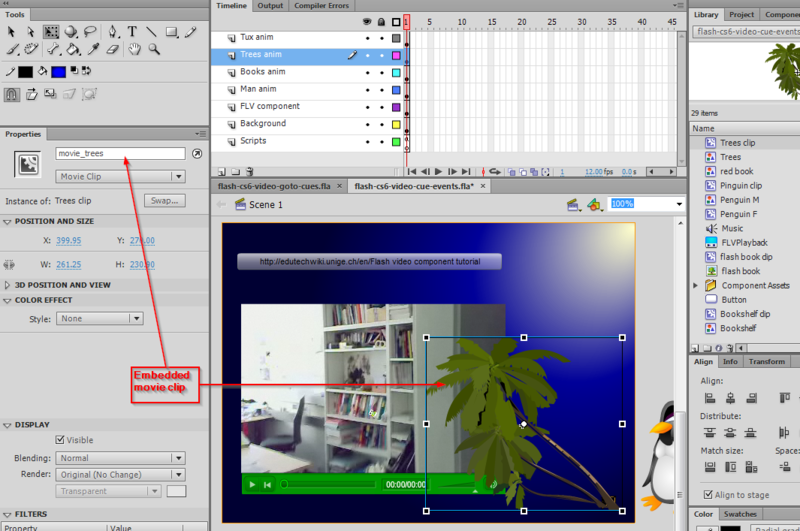
The plan is to trigger a series of stopped embedded movie clips with cue points. We will hide/stop these clips and then unhide/play them at given times. So let's create some Flash movie clips as explained in the Flash embedded movie clip tutorial. Of course, you could use clips that you already have in some other flash file.
- Hit CTRL-F8 (menu Insert->New Symbol) and select "movie clip"
- Then, double click on the new library item to get into symbol edit mode. Create any animation you like. Make sure that you are aware at which level you edit, i.e. make sure to return to the scene when you are done !!
- Alternatively, you also may import simple Flash animations you made before as movie clips.
Once you got one or more of these animations:
- Create an instance of each on the stage and give it an instance name, e.g.
movie_books
- Then in the AS code you may want to stop() each movie clip instance and also make some of them invisible, e.g. use code like:
movie_books.stop();
movie_books.visible=false;
Using cue points to trigger animations
At the heart of cue point events management is an event handler that is registered, i.e. we use exactly the same principle as for user interaction with buttons (Flash button tutorial). Only this, time events are not generated by the user, but by cue points that will "emerge" when the video is played. Flash will have to watch out for these.
video_component.addEventListener(MetadataEvent.CUE_POINT, cuepoint_listener);

function cuepoint_listener(obj:MetadataEvent):void {
 // .... do something here, e.g. play a clip ....
}
The cuepoint_listener function shown below includes a switch statement that deals with each event it receives.
- For most of these events we play some movie clip. If the movie clip was hidden, we make it visible too, e.g.
movie_books.visible=true;
movie_books.play();
- Also we have to stop previous movie clips or even make them invisible again (as you like)
Note about bout imported classes: Sometimes we have to tell Flash to import certain functionality. If you plan to work with cue points in ActionScript, then the following line is necessary:
import fl.video.MetadataEvent;
If you want music textures, you can for example import a sound file into the library and then export it for action script (Right-click on it). Make sure you remember its class name. Else you can dynamically import sound from external files as shown in the Flash drag and drop tutorial.
So here is the complete code you can find in the *.fla file of this example:
import fl.video.MetadataEvent;
// Stop all the animations of the various movie clips
// Make the bookshelf invisible
movie_trees.stop();
movie_books.stop();
movie_books.visible=false;
movie_penguin.stop();
movie_manual.stop();
movie_manual.visible=false;

// This is a sound of the class music
// Was defined by exporting the music file in the library
var music:Music = new Music();
var volume = new SoundTransform(0.2, 0);

// Add a cuepoint for the end and which is not in the flv movie
video_component.addASCuePoint(40, "End");

video_component.addEventListener(MetadataEvent.CUE_POINT, cuepoint_listener);

function cuepoint_listener(obj:MetadataEvent):void {
	switch (obj.info.name)
	{
		case "palm_tree" :
			movie_trees.play();
			break;
		case "books" :
			movie_trees.stop();
			movie_books.visible=true;
			movie_books.play();
			break;
		case "missing_manual" :
			movie_books.stop();
			movie_books.visible=false;
			movie_manual.visible=true;
			movie_manual.play();
			break;
		case "XPS" :
			movie_manual.stop();
			movie_manual.visible=false;
			var song = music.play(0,3,volume);
			break;
		case "ubuntu" :
			movie_penguin.play();
			break;
		case "End" :
			// song.stop();
			movie_penguin.stop();
			movie_penguin.visible=false;
			movie_books.visible=false;
	}
}

/* This shows how to open an URL in a WebBrowser */
btn_edutech_wiki.addEventListener(MouseEvent.CLICK, GoToUrl);

function GoToUrl(event:MouseEvent):void {
	var url:String = "http://edutechwiki.unige.ch/en/Flash_video_component_tutorial";
	var request:URLRequest = new URLRequest(url);
	try
	{
		navigateToURL(request, '_blank');
	}
	catch (e:Error)
	{
		trace("Error occurred!");
	}
}
- Example (using classic motion tweens, sorry)
Cue points work-through example
Adapt the following example
- Substitute the video by your own
- Change/add cue points
- Change/remove/add your own embedded movie clips
Look at this first: flash-cs6-video-cue-events-exercise.html
Download:
- flash-cs6-video-cue-events.fla
- Optional (else you can run the example as is): office-dks3.flv
Make this your own cue-points enhanced component video. Prerequisites:
- Flash component button tutorial
- Flash embedded movie clip tutorial
- (Optional) ActionScript 3 interactive objects tutorial
Below is a copy of the AS3 code you should modify. It sits in the Actions layer.
import fl.video.MetadataEvent;

/* Instructions:
1. Add a *.flv video to the video component (edit with the properties panel for CS6)
2. Add more cue points, using the properties panel. Move the playhead in the playback
   component in position, the click on the "+" in the properties panel
3. Fix the code below:
  a. Add cue points below or in the properties or component inspector
  b. stop all your animations, make them invisible if you like
  c. Add "if clauses" in the cuepoint_listener function
  d. Edit the jump1 function for navigation
*/


// 3.a. Add a cuepoint with ActionScript, else use the component inspector

video_component.addASCuePoint(10.5, "wonder");

// 3.b. Add movie clips to the scene, make them invisible and stop them
// 1. Add more animations here and kill the example anim
// 2. Your embedded clips must have an instance name in the Flash Scene
// copy/paste the two following lines, i.e. add anim2 etc. and adapt

anim1.visible=false;
anim1.stop();

// Optional: Add sound from a sound file in the library.
// Was defined by exporting the music file in the library to AS3
var guitar_music = new Guitarmusic();
var volume=new SoundTransform(0.2,0);

// 3.c Add more if clauses to the cuepoint_listener function
video_component.addEventListener(MetadataEvent.CUE_POINT, cuepoint_listener);

function cuepoint_listener(event) {

	// get the event name
	var event_name = event.info.name;

	// the next three lines will just print out information to the console
	// you later can remove these if you want
	trace("Elapsed time in seconds: " + video_component.playheadTime);
	trace("Cue point name is: " + event_name);
	trace("Cue point type is: " + event.info.type);

	// deal with the cue events. If you know how-to, you'd rather use a switch statement here
	if (event_name == "wonder") {
		anim1.visible=true;
		anim1.play();  // should be stopped at some point ....
		guitar_music.play();
	}

	/* remove this start comment line
	if (event_name == "something") {
	    anim2.visible=true;
	    anim2.play();
	}
	remove this end comment line */
}

// 3.d - Navigation - Adapt to your cuepoint
button1.addEventListener(MouseEvent.CLICK, jump1);

function jump1(event) {
	var cuePointInstance:Object = video_component.findCuePoint("wonder");
	video_component.seek(cuePointInstance.time);
	anim1.visible=true;
	anim1.play();
}
Manipulating the video component with ActionScript
- Read Controlling web video with ActionScript 3 FLVPlayback programming. However, this article was written for CS5 and at least looping won't work in Flash 11 (CS6).
See a fixed example:
Links
Manual entries
- For Designers
Below some more technical links which so far are not really used much in this tutorial.
- ActionScript overview documentation for programmers
Tutorials
- (To do ....)
Artwork and finding videos
All Artwork (clipart) is from:
- http://www.openclipart.org/ (sorry I didn't write down names of individual creators). These are SVG files in the public domain I imported via Illustrator (I really can't understand why Flash doesn't support SVG in some ways...)
Sound (except voice track on videos) is from:
Finding and downloading videos
- You may download videos from the Internet (make sure that copyright allows you to do so). Getting videos from sites like YouTube is not easy without download helpers (see below). Therefore, try sites like http://vimeo.com first.
- Firefox video download helper extension: https://addons.mozilla.org/en-US/firefox/addon/3006
- Google video search: http://video.google.com/. Use advanced search in order to restrict search to duration.
Video sites:
- http://vimeo.com/ Includes open source (creative commons) videos. After a search, you can tick a box for only showing downloadable videos.
- http://vids.myspace.com/ Needs special tools to download
- http://youtube.com/ Needs special tools to download
External Flash Video Component Sources
Acknowledgements and copyright modification
The general section on cue point was copied from Let's recall what cue points are with some text that was copied and slightly adapted from Adobe's "use cue points". You also must cite this source if you reuse this material.

