Drupal: Difference between revisions
m (→References) |
|||
| (26 intermediate revisions by 4 users not shown) | |||
| Line 26: | Line 26: | ||
=== Software architecture === | === Software architecture === | ||
* Drupal runs on any typical [[LAMP]], [[WAMP]] or MAMP configuration. | * Drupal runs on any typical [[LAMP]], [[WAMP]] or [http://www.mamp.info/en/index.html MAMP] configuration. | ||
* Content in Drupal is created in individual "nodes". For nodes of type "story", users can add comments to the node (comments themselves are not considered nodes). Depending on site settings, adding new nodes and/or posting comments might or might not be allowed. Also, nodes or comments might require approval from the moderators before the node or comment is displayed. (Drupal terminology, retrieved 18:36, 11 May 2007 (MEST)) | * Content in Drupal is created in individual "nodes". For nodes of type "story", users can add comments to the node (comments themselves are not considered nodes). Depending on site settings, adding new nodes and/or posting comments might or might not be allowed. Also, nodes or comments might require approval from the moderators before the node or comment is displayed. (Drupal terminology, retrieved 18:36, 11 May 2007 (MEST)) | ||
| Line 94: | Line 94: | ||
* [http://drupal.org/project Download page]. (includes core system and modules). | * [http://drupal.org/project Download page]. (includes core system and modules). | ||
=== DrupalEd === | === DrupalEd === | ||
| Line 103: | Line 104: | ||
* [http://www.funnymonkey.com/come-and-get-it DrupalEd Is Ready For Download] (Announcement of 04/17/2007) | * [http://www.funnymonkey.com/come-and-get-it DrupalEd Is Ready For Download] (Announcement of 04/17/2007) | ||
* [http://groups.drupal.org/drupaled-distro DrupalEd page] | * [http://groups.drupal.org/drupaled-distro DrupalEd page] | ||
=== Other extensions of interest to education === | |||
* http://drupal.org/project/elms | |||
==Getting started with drupal 7.27== | |||
===Before the instalation=== | |||
====Moving Drupal to its intended location==== | |||
If you work locally using Wamp system extract the zip file and copy-past it in the “www.directory”. If you use a web server (e.g Tecfa server) follow the same procedure and copy-paste the extracted file into the directory that will host your future site. | |||
====Create a database and a user using phpMyAdmin==== | |||
'''Local machine:''' | |||
If you don’t know how to create a user and a database using phpMyAdmin see the example [[Wordpress_installation_and_configuration|wordpress/create a database]] | |||
'''Web server:''' | |||
According to the drupals’ community documentation “Most web hosting accounts provide a Web-based control panel to help you administer your site. These tools include easy-to-use features for creating a new database, and for creating a "user" with rights to the database. To create a database using a browser-based control panel consult the documentation or ask your web host service provider. | |||
Either you use a local machine or a web server it is important to take note of the username, password, database name and hostname during this step, as you will need them when running the install script. | |||
[https://drupal.org/documentation/install/create-database] | |||
====Running the installation script:==== | |||
'''Local machine:''' | |||
Insert the URL (the directory where you placed your Drupal files. If you are using a system like WAMP the URL is http://localhost/drupal. If for example you renamed the extracted folder to drupalTest the URL is http://localhost/drupalTest. | |||
'''Web server:''' | |||
If you have installed drupal in a web host insert the domain name. if you are using the TECFA server insert the URL http://www.tecfaetu.unige.ch/. If you have installed Drupal in a subfolder that is called projects point your browser to the folder, for example http://www.tecfaetu.unige.ch/projects. | |||
===Installation process=== | |||
Note: Be very careful when clicking save and continue. There is no ''back'' button. | |||
* '''Step 1''' | |||
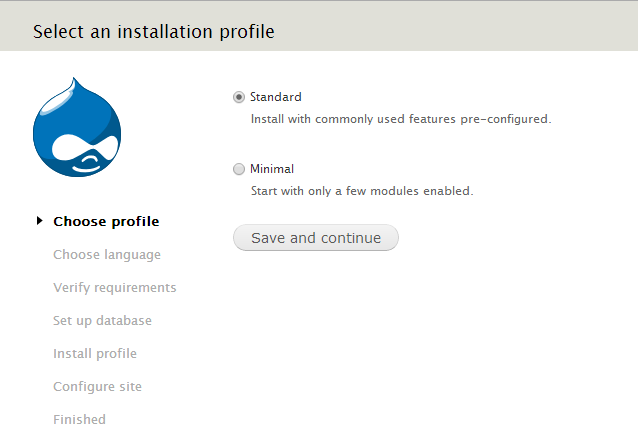
Select the ''Standard'' profile as shown in the picture.The ''Minimal'' profile is targeted toward more experienced Drupal site creators. | |||
[[File:Drupal1.png]] | |||
Click ''Save and continue'' | |||
* '''Step 2''' | |||
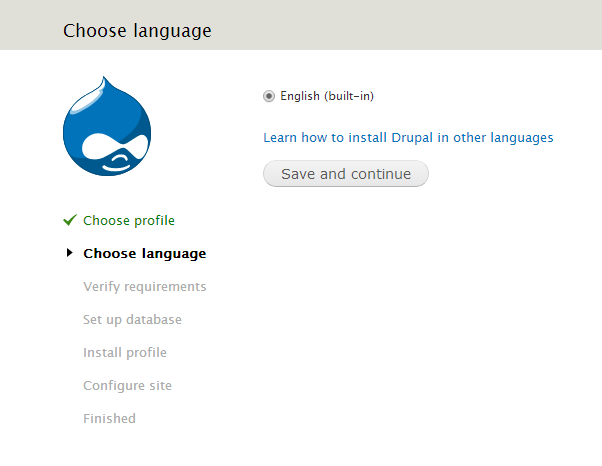
The default language is English, if you want to change it, click ''Learn how to install Drupal in other languages link.'' | |||
[[File:Drupal2.png]] | |||
Click ''Save and continue'' | |||
* '''Step 3''' | |||
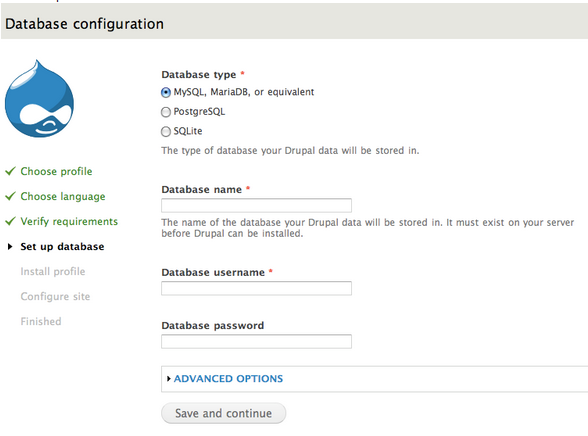
Select the database type, enter the database name and the database username that you created at the ''Create a database and user using phpMyAdmin'' step. According to the Drupal community, the Advanced options allow you to change the database host-name in case that you are using a web server, the port number if you are using a non-standard port number and the table prefix if you are installing multiple instances of Drupal tables that share the same database. [https://drupal.org/documentation/install/run-script] | |||
[[File:DatabaseConfig.png]] | |||
Click ''save and continue'' | |||
* '''Step 4''' | |||
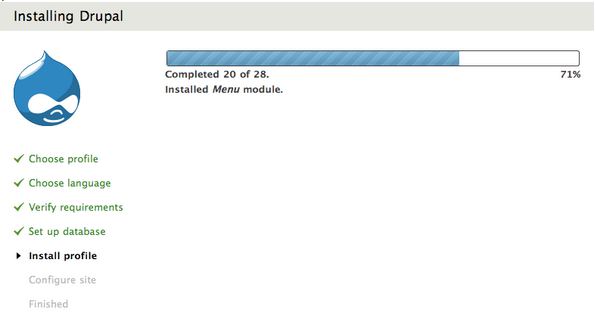
The following progress bare will appear; wait for the installer to finish the installations. | |||
[[File:Drupal6.png]] | |||
* '''Step 5''' | |||
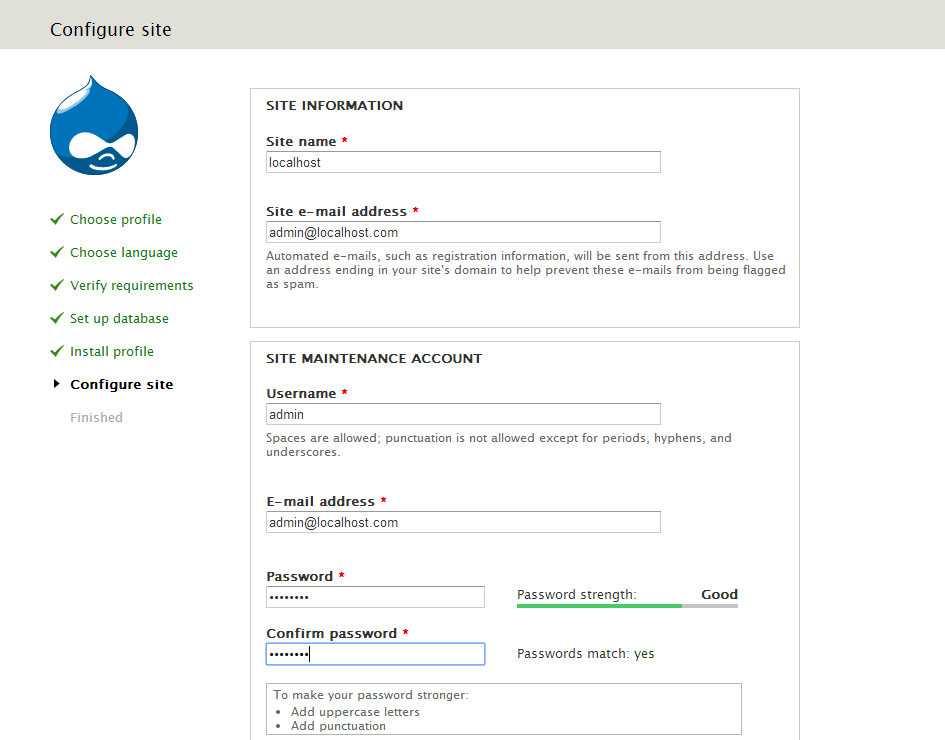
Provide the information for the first user account (Administrator). Note that all the following information can be changed later through the configuration panel. | |||
# Site information: Enter the name of your site and the site e-mail address | |||
# Site maintenance account: Enter the username and the password of the first user (Administrator). | |||
# Server settings: You can change the Default country and the Default time zone. Also you can uncheck the boxes in the Update notifications field if you don’t want to receive notifications for required updates. | |||
[[File:Drupal3.png]] | |||
Click ''Save and continue'' | |||
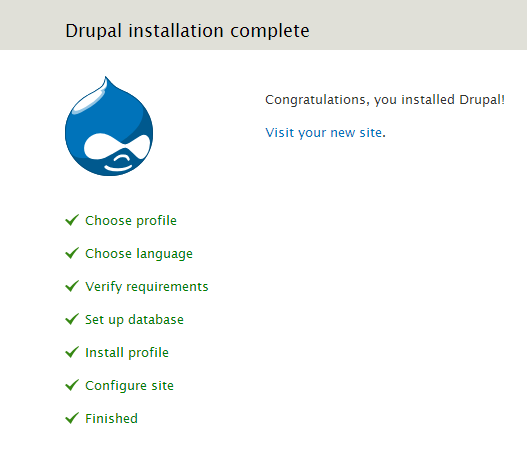
* '''Step 6''' | |||
Your new site is ready. Click ''visit your new site'' | |||
[[File:Drupal4.png]] | |||
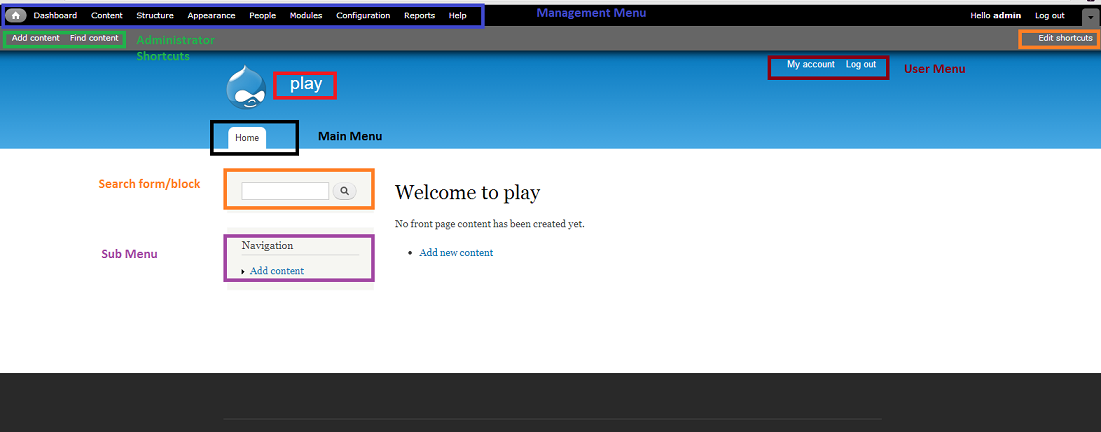
===A glance to the administrators front-page=== | |||
[[File:Drupal7.png]] | |||
# '''Name of the site:''' in our case Play | |||
# '''Main menu:''' the main navigation bar | |||
# '''Management Menu:''' the administrator's tools for managing the site | |||
# '''User Menu:''' log out (be sure that you remember the administrator's username and password before being tempted to click it) and a link to the users account | |||
# '''sub menu:''' side navigation bar | |||
# '''Search form:''' accessing information by adding key-words. | |||
# '''Shortcuts:''' the administrator can easily create and find content. These options can be changed (''edit shortcuts'') | |||
===A closer look=== | |||
====Dashboard==== | |||
It is a list of items that helps you track your important information. Activating a block on your dashboard doesn't mean that it will be published in your site. | |||
The default activated blocks are: | |||
[[File:Drupal8.png]] | |||
* Recent content | |||
* Search form | |||
* Who’s online? | |||
=====Adding, removing, or rearranging items on the dashboard===== | |||
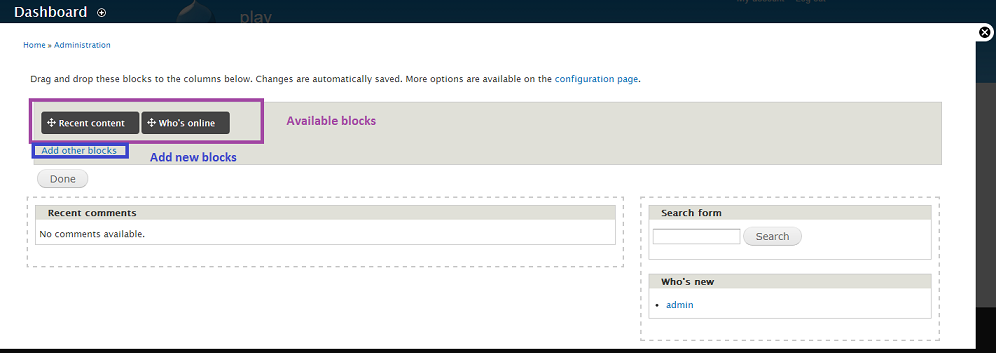
You can add new block views by clicking the ''Customize Dashboard'' button. You will see a set of dashboard blocks that you can drag and drop in and out of your dashboard. Once dragged into the dashboard, each block can also be rearranged to the desired position in the page. (The settings are saved automatically.) | |||
Press on the add other blocks button in order to enable new blocks for your dashboard. | |||
[[File:Drupal9.png]] | |||
=====Disabling the dashboard===== | |||
# Click on the Modules button or insert the URL Modules http://example.com/admin/modules). | |||
# In the Core section, disable the Dashboard module. | |||
# Click ''Save Configuration''. | |||
====Content==== | |||
The administrator can access the created content and the comments. | |||
=====Content===== | |||
[[File:Drupal10.png]] | |||
* '''Add content''' | |||
For the moment you can either add articles or/and basic pages in your site. | |||
:* '''Article''' | |||
:* Give a title to your article | |||
:* Enter tags to describe your content | |||
:* Write your article in the body field. Notice that the default Text format is Filtered HTML. You can change it to Plain Text and forget the HTML tags or to Full HTML in order to be able to use all HTML tags. | |||
:* Upload an image from your machine. | |||
:* Menu settings:<br /> | |||
::*Allows you to create a menu link in the main navigation bar.Check the Provide a menu link box and leave the default inputs (Parent item--><Main menu>) | |||
::* Set weight: The weight field determines the order that the links are displayed. For example the weight of the link Home of the main navigation bar is 0. If you give a weight -1 to your article it will be displayed before the link Home. | |||
::* Display the content in the front page as a teaser (sort form of the article):Change the field (Parent item --> --Home). | |||
:* Revision information | |||
:* URL settings: You can provide an alternative URL of the page that you’ve created. | |||
:* Comment settings: By default the comments are activated. If you want to disable them you can select the order Closed. | |||
:* Authoring information: Provide information for the author of the content and the date that the content was created. | |||
:* Publishing options: by default the page that you’ve created is published and promoted to the front-page as a teaser (sort form of the article). If you don’t wish to publish the content or/and promote it to the front-page, uncheck the relevant boxes. Publishing options give you the possibility to make your content sticky. This means that in a list of different contents the current content will be promoted at the top of the list and will also be highlighted (displayed within a shady background). | |||
Note that if you wish to display your content as a teaser in the front-page the default setting works just fine. DO NOT change neither the Parent item field nor the publishing options. | |||
:*'''Basic page''' | |||
For the basic page content the principles are the same as for the article content. | |||
'''Differences:''' | |||
The image field is missing, this means that you can only include an image by selecting the Full HTML text format and using the <img> HTML tag. | |||
By default the comments are closed. So if you want to activate the comments you have to select the order open. | |||
* '''SHOW ONLY ITEMS WHERE''' | |||
You can filter the display of the created content by choosing its status and/or its type. For the moment your created content could be articles and basic pages. | |||
Status: the status options are published, not published, promoted, not promoted, sticky, not sticky. Note that you have defined the status of your content the moment that you’ve created it in the publishing options. | |||
:*'''Type''' | |||
Choose either article or basic page, the default content that you are allowed to create for the moment. | |||
Press filter in order to display the content that meets the selected criteria. | |||
*'''UPDATE OPTIONS''' | |||
Allows you to publish or unpublish, promote or demote, make sticky or not sticky and delete the selected content/s from the list of content under the update options. | |||
Press update in order to save your changes. | |||
=====Comments===== | |||
This tab allows you to manage the created comments. | |||
[[File:Drupal11.png]] | |||
* '''Published comments''' | |||
:*'''Update options:''' Unpublish or delete created comments. By unpublishing a comment it will no longer appear on your site but it can be accessed through the unapproved comments tab.<br /> | |||
:*'''Unapproved comments:''' Publish the unapproved comments in order to reactivate them or delete them permanently. | |||
====Structure==== | |||
=====Blocks===== | |||
Blocks are boxes of content that can be displayed in the different regions of your site. | |||
For example the search box and the navigation box that you can see in the front-page are blocks enabled by default. | |||
For the moment you can disable and enable existing blocks or create your own content blocks. The advantage of blocks is that you can choose in which page and region these blocks will be displayed. | |||
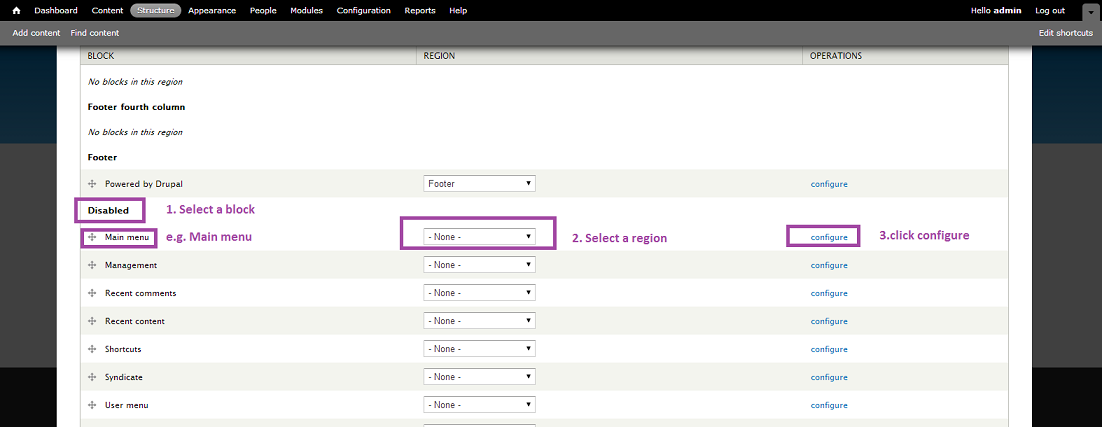
*'''Activate an existing block:''' | |||
Scroll down the page and find the disabled blocks | |||
Select the region in which your block will be displayed. Once you have selected a region the block will be automatically added to the regions list. | |||
Scroll up to find your block and click configure. Note that if you don’t do the necessary configurations your changes will not be saved even if you click the save button at the bottom of the page. | |||
[[File:Drupal12.png]] | |||
*'''In the user menu block page:''' | |||
# '''Block title:''' Enter the title of the block | |||
# '''Region settings:''' It defines where the block will be published. | |||
# '''Bartik (default theme):''' Select the region in which this block will be displayed, if not; the block will not appear on the page. | |||
# '''Seven (administration theme):''' You can add the block in your dashboard and select its position. | |||
#'''Visibility settings:''' This basically means who can actually see the block and where. | |||
# '''Pages:''' the default value is display in all pages. Here you can specify in which pages this block will be visible by entering their path. | |||
# '''Content types:''' You can specify in which pages this block will be visible according to the type of the content. For the moment this can be article/s and/or basic page/s. | |||
# '''Roles:''' The block will be visible to the selected users. If you don’t select any role the block will be visible to all users. | |||
# '''Users:''' By default users cannot decide if a block will be visible or not, here you can set permissions in order to decide on their own whether the selected block will be visible or not. | |||
=====Content types===== | |||
In Drupal, a Content Type is a pre-defined collection of data types (Fields) that are related by an informational context. In this sense, "context" means "parts that should be considered as a correlated whole." [https://drupal.org/documentation/modules/field-ui] | |||
For the moment the default content types are articles and basic pages. | |||
[[File:Drupal13.png]] | |||
Here you can add content types, edit them, manage fields and display as well as delete them. | |||
The changes affect all the future published content in your site that is part of the same type. For example if you deactivate the comments for the article content type (Article --> edit --> comment settings --> Default comment setting for new content: Closed) this means that in the future articles, users will no longer be able to leave their comments. | |||
* '''The identity of content types''' | |||
'''Name:''' one or more words that reflects the structure of the content e.g. Article | |||
'''Description:''' Examples of use e.g. Use <em>articles</em> for time-sensitive content like news, press releases or blog posts.<br /> | |||
Note that the identity of the content type helps authors to easily select the content type that serves their purposes. | |||
* '''The structure of content types''' | |||
:* Content types are a combination of different data types e.g. title, text, image, etc selected by the creator of the content type. | |||
:* These that actually define the structure of content types are the fields and widgets. <br /> | |||
Putting ourselves in the shoes of the creator of the Article content type, we can observe how he gave authors the ability to publish content that resembles to a real article (title, long text, picture, comments). In order to do that he selected the right fields (Node module element, Long text and summary, Term reference, Image) and he edited the field settings.<br /> | |||
'''How?''' <br /> | |||
In order to understand the procedure let’s add our own field in the Article content type. | |||
# Select structure-->Content types-->Article-->manage fields-->Add new field | |||
# Give a label e.g. File | |||
# Select a Field type e.g. File | |||
# Click Save | |||
# Check Enable Display field | |||
# Click Save field settings | |||
# The default values work just fine for now. Just make sure that you have a .txt file (the default value for Allow file extensions field) stored in your machine in order to upload it afterwards and see the result. | |||
# Click save settings | |||
Create a new Article in order to see what are the changes. (Add content-->Article)<br /> | |||
'''Where do fields and widgets come from?'''<br /> | |||
Modules<br /> | |||
'''Existing fields:''' Boolean, Decimal, File, Float, Image, Integer, List (float), List (integer), List (text), Long text, Long text and summary, term, reference, Text. | |||
====People==== | |||
* '''List tab''' | |||
:*'''Block list:''' A list of your users that can be filtered according to roles, permissions and status. Probably for now you can see only you. | |||
:*'''SHOW ONLY USERS WHERE''' defines which user will be displayed in the block list according to their roles. | |||
::*'''The default roles are:''' | |||
:::* Administrator: it’s you when you are logged in. | |||
:::* Authenticated User: are the users that you create from the Add user panel. | |||
:::* Anonymous User: everyone that has access to the site without log in. | |||
::*'''Permissions:''' Defines what the users can do and see on your site. | |||
::*'''Status:''' active or blocked. | |||
:*'''Update options:''' | |||
::* Block or unblock the selected users | |||
::* cancel their accounts | |||
::* add roles and delete roles. | |||
* '''Permission tab''' | |||
Here is where you define the privileges of your roles. By default you can see that the role administrator is the most privileged one. If you wish to give more privileges (permissions) to other roles just check the box that associates the permission with the role. | |||
'''Tips'''<br /> | |||
Drupal is not as complicated as it seems!!! <br /> | |||
* Make sure that you have explored the core modules before installing new ones. | |||
* Read carefully the modules’ documentation and make sure that you have already installed their dependencies (if any). | |||
* Don’t get too greedy with the additional modules; stay focused on those that serve your objectives. | |||
* Some modules may not work as expected! don’t panic! it is highly probable that Drupal team has already implemented a similar module or a solution to your problem. | |||
== Links == | == Links == | ||
| Line 109: | Line 404: | ||
; Official | ; Official | ||
* [http://drupal.org/node/159534 Tutorial ] on the installation of Drupal avec Lamp/Wamp/Mamp (en anglais) | |||
* [http://drupal.org/ Drupal Home] | * [http://drupal.org/ Drupal Home] | ||
* [http://drupalsites.net/ Drupal sites.net] | * [http://drupalsites.net/ Drupal sites.net] | ||
| Line 121: | Line 417: | ||
; Other | ; Other | ||
*A comparison of Drupal and Joomla [http://www.alledia.com/blog/general-cms-issues/joomla-and-drupal-which-one-is-right-for-you/ Which is the best for You?] | |||
* [http://2bits.com/articles/drupal-performance-tuning-and-optimization-for-large-web-sites.html Drupal Performance Tuning and Optimization for large web sites]. A series of articles a 2BITS. | * [http://2bits.com/articles/drupal-performance-tuning-and-optimization-for-large-web-sites.html Drupal Performance Tuning and Optimization for large web sites]. A series of articles a 2BITS. | ||
| Line 126: | Line 424: | ||
== References == | == References == | ||
* There are | * There are many books about Drupal. See [http://drupal.org/node/42200 Books about Drupal]. | ||
* Albion, Peter (2005) 'Designing for an online doctoral studies community using an open source platform.' In: Crawford, C. and Carlsen, R. and Gibson, I. and McFerrin, K. and Price, J. and Weber, R. and Willis, D. A., (ed.). Proceedings of the 16th International Conference of the Society for Information Technology in Teacher Education, Association for the Advancement of Computing in Education, pp. 2138-2143. [http://www.editlib.org/index.cfm?fuseaction=Reader.ViewAbstract&paper_id=19387 Abstract/HTML/PDF] | * Albion, Peter (2005) 'Designing for an online doctoral studies community using an open source platform.' In: Crawford, C. and Carlsen, R. and Gibson, I. and McFerrin, K. and Price, J. and Weber, R. and Willis, D. A., (ed.). Proceedings of the 16th International Conference of the Society for Information Technology in Teacher Education, Association for the Advancement of Computing in Education, pp. 2138-2143. [http://www.editlib.org/index.cfm?fuseaction=Reader.ViewAbstract&paper_id=19387 Abstract/HTML/PDF] | ||
| Line 134: | Line 432: | ||
* Schneider Daniel; Mourad Chakroun, Pierre Dillenbourg, Catherine Frété, Fabien Girardin, Stéphane Morand, Olivier Morel and Paraskevi Synteta, (2004) TECFA Seed Catalog, unpublished, [http://tecfa.unige.ch/proj/seed/catalog/net/catalog-eng.pdf PDF] | * Schneider Daniel; Mourad Chakroun, Pierre Dillenbourg, Catherine Frété, Fabien Girardin, Stéphane Morand, Olivier Morel and Paraskevi Synteta, (2004) TECFA Seed Catalog, unpublished, [http://tecfa.unige.ch/proj/seed/catalog/net/catalog-eng.pdf PDF] | ||
[[Category: Portalware]] | [[Category: Portalware]] | ||
[[fr:Drupal]] | [[fr:Drupal]] | ||
[[Category: AMP]] | [[Category: AMP]] | ||
Latest revision as of 16:06, 4 August 2014
Definition
Drupal is a popular portalware of the C3MS or CMS variety. It is used to build all sorts of educational websites, including teaching platforms. Similar systems discussed in this Wiki are Joomla and PostNuke.
Purpose and features
According to the About Drupal page (retrieved 18:36, 11 May 2007 (MEST)) “Drupal is a free software package that allows an individual or a community of users to easily publish, manage and organize a wide variety of content on a website. Tens of thousands of people and organizations have used Drupal to power scores of different web sites, including Community web portals, Discussion sites, Corporate web sites, Intranet applications, Personal web sites or blogs, Aficionado sites, E-commerce applications, Resource directories, Social Networking sites.”
Features
The built-in functionality, combined with dozens of freely available add-on modules, will enable features such as:
- Content management systems
- Blogs
- Collaborative authoring environments (i.e. it is a collaborative writing tool.
- Forums
- Peer-to-peer networking
- Newsletters
- Podcasting
- Picture galleries
- File uploads and downloads
... and much more.
Software architecture
- Content in Drupal is created in individual "nodes". For nodes of type "story", users can add comments to the node (comments themselves are not considered nodes). Depending on site settings, adding new nodes and/or posting comments might or might not be allowed. Also, nodes or comments might require approval from the moderators before the node or comment is displayed. (Drupal terminology, retrieved 18:36, 11 May 2007 (MEST))
Drupal's basic set of note types include ([1]):
- Blog Entry
- Drupal blogs have typical functionality of blogware
- Book Page
- Book pages are designed to be part of a collaborative book. An example of a collaborative book is the Drupal developer documentation. All node types can be part of a book.
- Comment
- Comments actually aren't nodes, they are their own special content type. Comments are what allow people to add comments to any other node that has been created.
- Forum
- Forums are sets of nodes and their comments. These are grouped together as belonging in one forum by assigning them the forum name, which is a taxonomy term. These forum names can be grouped in forum containers, which are other terms, of which they are children in a hierarchical vocabulary which is called "forums", and configured as only applicable to nodes of the "forum" type.
- Page
- Pages are simple nodes, typically used for static content that can (but are not required to) be linked into the main navigation bar
- Poll
- A poll is where a multiple choice question is asked and users can answer and see other peoples answers to questions.
- Story
- Story pages are news engine entries. Stories are generally used for information which is only relevant for a period of time (eg. news stories) and is expected to expire off of the page.
Many other node types are included by [ contributed modules].
In education
Websites for educators and researchers
Drupal is very popular in education (all levels) to build community web sites within which members can post news, share resources or collaborate in other ways. Examples:
- Learning Networks (R&D in Learning Design)
- Council of Writing Program Administrators
- Kairosnews (Community of members interested in the intersections of rhetoric and pedagogy with technology)
- EdTech tools and Opinion for Educators (Blog)
- Fab Central at MIT, an online community for inventors, artists and digital fabricators.
- FreeTeach.com Community of teachers for lesson plans, worksheets, and teaching ideas.
There are dozens more ...
Teaching platforms
While Drupal as platform for education-related websites doesn't come as a surprise, using Drupal instead of a learning management system is a more interesting topic. We believe that drupal is good platform to implement project-oriented learning designs. Typically, a teacher (and not the institution) will run the platform. It's something that Daniel K. Schneider advocated in his C3MS project-based learning model (implemented a few years ago with PostNuke).
Examples:
- Archive of Welcome to English 420S (Distance Learning), Purdue University
- Maxetom Integrates educational on-line multimedia applications. “Maxetom propose aux enfants des coloriages en ligne qui leur feront découvrir les couleurs en espagnol ou en anglais.”
Typically, a teacher (or an organization) will design a custom environment to support various kinds of learning activities. One way to think about this, was presented in 2004 in the TECFA SEED Catalog. There is also a TECFA SEED Catalog version in this wiki and that will be updated a bit in some nearer future - Daniel K. Schneider 11:10, 1 June 2007 (MEST).
Links and resource management
Example:
Installation
Prerequisites
- Drupal should install without problems on a LAMP or WAMP system. So install Apache/MySQL/Php first. In case you just want to play, I recommend WOS, a free WAMP distribution that runs on a memory stick and that includes a Drupal (optional module) !
Drupal is open-source software distributed under the GPL ("General Public License") and is maintained and developed by a community of thousands of users and developers.
Standard Drupal
Drupal is ready to go from the moment you download it. It even has an easy-to-use web installer. However, a typical educator probably would like to download and install third-party modules.
- Download page. (includes core system and modules).
DrupalEd
A group of people (including Bill Fitzgerald) released an educational package (not tested yet).
“DrupalEd is a powerful open source content management system with the power to support the e-learning needs of large educational institutions. It is also easy enough to install and use for individual teachers/professors to implement in their own classes (for teachers who would like to abandon BlackBoard, sans IT Department backing)” ([2]).
- DrupalEd Is Ready For Download (Announcement of 04/17/2007)
- DrupalEd page
Other extensions of interest to education
Getting started with drupal 7.27
Before the instalation
Moving Drupal to its intended location
If you work locally using Wamp system extract the zip file and copy-past it in the “www.directory”. If you use a web server (e.g Tecfa server) follow the same procedure and copy-paste the extracted file into the directory that will host your future site.
Create a database and a user using phpMyAdmin
Local machine:
If you don’t know how to create a user and a database using phpMyAdmin see the example wordpress/create a database
Web server:
According to the drupals’ community documentation “Most web hosting accounts provide a Web-based control panel to help you administer your site. These tools include easy-to-use features for creating a new database, and for creating a "user" with rights to the database. To create a database using a browser-based control panel consult the documentation or ask your web host service provider. Either you use a local machine or a web server it is important to take note of the username, password, database name and hostname during this step, as you will need them when running the install script. [3]
Running the installation script:
Local machine:
Insert the URL (the directory where you placed your Drupal files. If you are using a system like WAMP the URL is http://localhost/drupal. If for example you renamed the extracted folder to drupalTest the URL is http://localhost/drupalTest.
Web server:
If you have installed drupal in a web host insert the domain name. if you are using the TECFA server insert the URL http://www.tecfaetu.unige.ch/. If you have installed Drupal in a subfolder that is called projects point your browser to the folder, for example http://www.tecfaetu.unige.ch/projects.
Installation process
Note: Be very careful when clicking save and continue. There is no back button.
- Step 1
Select the Standard profile as shown in the picture.The Minimal profile is targeted toward more experienced Drupal site creators.
Click Save and continue
- Step 2
The default language is English, if you want to change it, click Learn how to install Drupal in other languages link.
Click Save and continue
- Step 3
Select the database type, enter the database name and the database username that you created at the Create a database and user using phpMyAdmin step. According to the Drupal community, the Advanced options allow you to change the database host-name in case that you are using a web server, the port number if you are using a non-standard port number and the table prefix if you are installing multiple instances of Drupal tables that share the same database. [4]
Click save and continue
- Step 4
The following progress bare will appear; wait for the installer to finish the installations.
- Step 5
Provide the information for the first user account (Administrator). Note that all the following information can be changed later through the configuration panel.
- Site information: Enter the name of your site and the site e-mail address
- Site maintenance account: Enter the username and the password of the first user (Administrator).
- Server settings: You can change the Default country and the Default time zone. Also you can uncheck the boxes in the Update notifications field if you don’t want to receive notifications for required updates.
Click Save and continue
- Step 6
Your new site is ready. Click visit your new site
A glance to the administrators front-page
- Name of the site: in our case Play
- Main menu: the main navigation bar
- Management Menu: the administrator's tools for managing the site
- User Menu: log out (be sure that you remember the administrator's username and password before being tempted to click it) and a link to the users account
- sub menu: side navigation bar
- Search form: accessing information by adding key-words.
- Shortcuts: the administrator can easily create and find content. These options can be changed (edit shortcuts)
A closer look
Dashboard
It is a list of items that helps you track your important information. Activating a block on your dashboard doesn't mean that it will be published in your site.
The default activated blocks are:
- Recent content
- Search form
- Who’s online?
Adding, removing, or rearranging items on the dashboard
You can add new block views by clicking the Customize Dashboard button. You will see a set of dashboard blocks that you can drag and drop in and out of your dashboard. Once dragged into the dashboard, each block can also be rearranged to the desired position in the page. (The settings are saved automatically.) Press on the add other blocks button in order to enable new blocks for your dashboard.
Disabling the dashboard
- Click on the Modules button or insert the URL Modules http://example.com/admin/modules).
- In the Core section, disable the Dashboard module.
- Click Save Configuration.
Content
The administrator can access the created content and the comments.
Content
- Add content
For the moment you can either add articles or/and basic pages in your site.
- Article
- Give a title to your article
- Enter tags to describe your content
- Write your article in the body field. Notice that the default Text format is Filtered HTML. You can change it to Plain Text and forget the HTML tags or to Full HTML in order to be able to use all HTML tags.
- Upload an image from your machine.
- Menu settings:
- Allows you to create a menu link in the main navigation bar.Check the Provide a menu link box and leave the default inputs (Parent item--><Main menu>)
- Set weight: The weight field determines the order that the links are displayed. For example the weight of the link Home of the main navigation bar is 0. If you give a weight -1 to your article it will be displayed before the link Home.
- Display the content in the front page as a teaser (sort form of the article):Change the field (Parent item --> --Home).
- Revision information
- URL settings: You can provide an alternative URL of the page that you’ve created.
- Comment settings: By default the comments are activated. If you want to disable them you can select the order Closed.
- Authoring information: Provide information for the author of the content and the date that the content was created.
- Publishing options: by default the page that you’ve created is published and promoted to the front-page as a teaser (sort form of the article). If you don’t wish to publish the content or/and promote it to the front-page, uncheck the relevant boxes. Publishing options give you the possibility to make your content sticky. This means that in a list of different contents the current content will be promoted at the top of the list and will also be highlighted (displayed within a shady background).
Note that if you wish to display your content as a teaser in the front-page the default setting works just fine. DO NOT change neither the Parent item field nor the publishing options.
- Basic page
For the basic page content the principles are the same as for the article content.
Differences:
The image field is missing, this means that you can only include an image by selecting the Full HTML text format and using the <img> HTML tag. By default the comments are closed. So if you want to activate the comments you have to select the order open.
- SHOW ONLY ITEMS WHERE
You can filter the display of the created content by choosing its status and/or its type. For the moment your created content could be articles and basic pages. Status: the status options are published, not published, promoted, not promoted, sticky, not sticky. Note that you have defined the status of your content the moment that you’ve created it in the publishing options.
- Type
Choose either article or basic page, the default content that you are allowed to create for the moment. Press filter in order to display the content that meets the selected criteria.
- UPDATE OPTIONS
Allows you to publish or unpublish, promote or demote, make sticky or not sticky and delete the selected content/s from the list of content under the update options. Press update in order to save your changes.
Comments
This tab allows you to manage the created comments.
- Published comments
- Update options: Unpublish or delete created comments. By unpublishing a comment it will no longer appear on your site but it can be accessed through the unapproved comments tab.
- Update options: Unpublish or delete created comments. By unpublishing a comment it will no longer appear on your site but it can be accessed through the unapproved comments tab.
- Unapproved comments: Publish the unapproved comments in order to reactivate them or delete them permanently.
Structure
Blocks
Blocks are boxes of content that can be displayed in the different regions of your site. For example the search box and the navigation box that you can see in the front-page are blocks enabled by default. For the moment you can disable and enable existing blocks or create your own content blocks. The advantage of blocks is that you can choose in which page and region these blocks will be displayed.
- Activate an existing block:
Scroll down the page and find the disabled blocks Select the region in which your block will be displayed. Once you have selected a region the block will be automatically added to the regions list. Scroll up to find your block and click configure. Note that if you don’t do the necessary configurations your changes will not be saved even if you click the save button at the bottom of the page.
- In the user menu block page:
- Block title: Enter the title of the block
- Region settings: It defines where the block will be published.
- Bartik (default theme): Select the region in which this block will be displayed, if not; the block will not appear on the page.
- Seven (administration theme): You can add the block in your dashboard and select its position.
- Visibility settings: This basically means who can actually see the block and where.
- Pages: the default value is display in all pages. Here you can specify in which pages this block will be visible by entering their path.
- Content types: You can specify in which pages this block will be visible according to the type of the content. For the moment this can be article/s and/or basic page/s.
- Roles: The block will be visible to the selected users. If you don’t select any role the block will be visible to all users.
- Users: By default users cannot decide if a block will be visible or not, here you can set permissions in order to decide on their own whether the selected block will be visible or not.
Content types
In Drupal, a Content Type is a pre-defined collection of data types (Fields) that are related by an informational context. In this sense, "context" means "parts that should be considered as a correlated whole." [5] For the moment the default content types are articles and basic pages.
Here you can add content types, edit them, manage fields and display as well as delete them.
The changes affect all the future published content in your site that is part of the same type. For example if you deactivate the comments for the article content type (Article --> edit --> comment settings --> Default comment setting for new content: Closed) this means that in the future articles, users will no longer be able to leave their comments.
- The identity of content types
Name: one or more words that reflects the structure of the content e.g. Article
Description: Examples of use e.g. Use articles for time-sensitive content like news, press releases or blog posts.
Note that the identity of the content type helps authors to easily select the content type that serves their purposes.
- The structure of content types
- Content types are a combination of different data types e.g. title, text, image, etc selected by the creator of the content type.
- These that actually define the structure of content types are the fields and widgets.
Putting ourselves in the shoes of the creator of the Article content type, we can observe how he gave authors the ability to publish content that resembles to a real article (title, long text, picture, comments). In order to do that he selected the right fields (Node module element, Long text and summary, Term reference, Image) and he edited the field settings.
How?
In order to understand the procedure let’s add our own field in the Article content type.
- Select structure-->Content types-->Article-->manage fields-->Add new field
- Give a label e.g. File
- Select a Field type e.g. File
- Click Save
- Check Enable Display field
- Click Save field settings
- The default values work just fine for now. Just make sure that you have a .txt file (the default value for Allow file extensions field) stored in your machine in order to upload it afterwards and see the result.
- Click save settings
Create a new Article in order to see what are the changes. (Add content-->Article)
Where do fields and widgets come from?
Modules
Existing fields: Boolean, Decimal, File, Float, Image, Integer, List (float), List (integer), List (text), Long text, Long text and summary, term, reference, Text.
People
- List tab
- Block list: A list of your users that can be filtered according to roles, permissions and status. Probably for now you can see only you.
- SHOW ONLY USERS WHERE defines which user will be displayed in the block list according to their roles.
- The default roles are:
- Administrator: it’s you when you are logged in.
- Authenticated User: are the users that you create from the Add user panel.
- Anonymous User: everyone that has access to the site without log in.
- Permissions: Defines what the users can do and see on your site.
- Status: active or blocked.
- Update options:
- Block or unblock the selected users
- cancel their accounts
- add roles and delete roles.
- Permission tab
Here is where you define the privileges of your roles. By default you can see that the role administrator is the most privileged one. If you wish to give more privileges (permissions) to other roles just check the box that associates the permission with the role.
Tips
Drupal is not as complicated as it seems!!!
- Make sure that you have explored the core modules before installing new ones.
- Read carefully the modules’ documentation and make sure that you have already installed their dependencies (if any).
- Don’t get too greedy with the additional modules; stay focused on those that serve your objectives.
- Some modules may not work as expected! don’t panic! it is highly probable that Drupal team has already implemented a similar module or a solution to your problem.
Links
Drupal
- Official
- Tutorial on the installation of Drupal avec Lamp/Wamp/Mamp (en anglais)
- Drupal Home
- Drupal sites.net
- Reviews and analysis on the Drupal website
- Choosing a platform for the telecentre.org distributed net
- Drupal and the New Paradigm for Content Management
- Drupal Themes
- drupal.org/project/Themes - Drupal Themes at drupal.org
- Drupal Theme Garden - Drupal Themes Showcase (live preview of Drupal Themes)
- Other
- A comparison of Drupal and Joomla Which is the best for You?
- Drupal Performance Tuning and Optimization for large web sites. A series of articles a 2BITS.
References
- There are many books about Drupal. See Books about Drupal.
- Albion, Peter (2005) 'Designing for an online doctoral studies community using an open source platform.' In: Crawford, C. and Carlsen, R. and Gibson, I. and McFerrin, K. and Price, J. and Weber, R. and Willis, D. A., (ed.). Proceedings of the 16th International Conference of the Society for Information Technology in Teacher Education, Association for the Advancement of Computing in Education, pp. 2138-2143. Abstract/HTML/PDF
- Norma, David Kent Distance Education Development And Delivery Tools (found with google scholar, no refs ..)
- Schneider Daniel; Mourad Chakroun, Pierre Dillenbourg, Catherine Frété, Fabien Girardin, Stéphane Morand, Olivier Morel and Paraskevi Synteta, (2004) TECFA Seed Catalog, unpublished, PDF
